本文主要是介绍ubuntu外置网卡配置AP模式,希望对大家解决编程问题提供一定的参考价值,需要的开发者们随着小编来一起学习吧!
外置网卡RTL8811CU设置
UBUNTU使用RTL8811CU网卡(包含树莓派)
外置网卡配置AP模式流程
1. 检查网卡支持情况(是否支持AP模式)
iw list
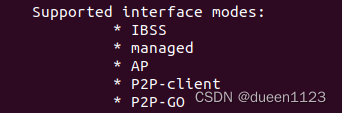
找到以上部分,发现支持AP
2. 安装依赖
sudo apt-get update
sudo apt-get install hostapd dnsmasq
3. 配置hostapd
创建和编辑hostapd配置文件
sudo gedit /etc/hostapd/hostapd.conf
更改配置文件如下,其中interface是ifconfig确定的模式,driver后面的驱动是固定的,不因为外置网卡下载不同驱动而改变
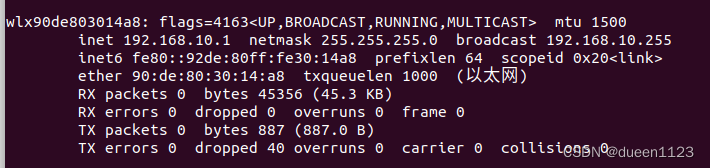
interface=wlx90de803014a8 #interface 参数定义了无线接口的名称
driver=nl80211  #driver 参数定义了使用的驱动程序,固定,不因为外置网卡设备名而改变
ssid=WL1             #wifi名称
channel=6           #channel 参数定义了网络所在的频道
auth_algs=1       #auth_algs 参数定义了用于身份验证的算法
hw_mode=g       #hw_mode 参数定义了硬件模式
ignore_broadcast_ssid=0   #ignore_broadcast_ssid 参数决定是否忽略广播的 SSID
wpa=3
wpa_passphrase=123456789    #密码
wpa_key_mgmt=WPA-PSK
wpa_pairwise=TKIP
rsn_pairwise=CCMP#wpa 参数定义了是否使用 WPA 加密
#wpa_passphrase 参数定义了 WPA 的密码
#wpa_key_mgmt 参数定义了 WPA 的密钥管理方式
#wpa_pairwise 参数定义了 WPA 的对等加密方式
#rsn_pairwise 参数定义了 RSN 的对等加密方式
查看无线接口名称如下,插拔外置网卡判断具体是哪个
ifconfig
4. 配置hostapd配置文件
编辑/etc/default/hostapd文件
sudo gedit /etc/default/hostapd
找到DAEMON_CONF=""这一行,并替换为
DAEMON_CONF="/etc/hostapd/hostapd.conf"
5. 配置dnsmasq
sudo gedit /etc/dnsmasq.conf
文件末尾加入
interface=wlan0
dhcp-range=192.168.10.2,192.168.10.20,255.255.255.0,24h
port=5353
6. 配置网络接口
sudo gedit /etc/network/interfaces
添加以下配置
auto wlx90de803014a8
iface wlx90de803014a8 inet static
address 192.168.10.1
netmask 255.255.255.0
7. 重启服务
sudo systemctl restart hostapd
sudo systemctl restart dnsmasq
报错处理
在sudo systemctl restart hostapd出现以下报错:
Job for dnsmasq.service failed because the control process exited with error code.
See "systemctl status dnsmasq.service" and "journalctl -xe" for detail
可以通过sudo systemctl status hostapd这个命令来查看具体错误原因
● hostapd.service - Advanced IEEE 802.11 AP and IEEE 802.1X/WPA/WPA2/EAP AuthenticatorLoaded: loaded (/lib/systemd/system/hostapd.service; disabled; vendor preset: enabled)Active: failed (Result: exit-code) since Tue 2024-04-30 16:42:09 CST; 3s agoProcess: 15958 ExecStart=/usr/sbin/hostapd -P /run/hostapd.pid -B $DAEMON_OPTS ${DAEMON_CONF} (code=exited, status=1/FAILURE)4月 30 16:42:09 pc-NUC11TNKi7 systemd[1]: Starting Advanced IEEE 802.11 AP and IEEE 802.1X/WPA/WPA2/EAP Authenticator...
4月 30 16:42:09 pc-NUC11TNKi7 hostapd[15958]: Configuration file: /etc/hostapd/hostapd.conf
4月 30 16:42:09 pc-NUC11TNKi7 hostapd[15958]: Line 2: invalid/unknown driver 'rtl8821cu'
4月 30 16:42:09 pc-NUC11TNKi7 hostapd[15958]: 1 errors found in configuration file '/etc/hostapd/hostapd.conf'
4月 30 16:42:09 pc-NUC11TNKi7 hostapd[15958]: Failed to set up interface with /etc/hostapd/hostapd.conf
4月 30 16:42:09 pc-NUC11TNKi7 hostapd[15958]: Failed to initialize interface
4月 30 16:42:09 pc-NUC11TNKi7 systemd[1]: hostapd.service: Control process exited, code=exited status=1
4月 30 16:42:09 pc-NUC11TNKi7 systemd[1]: hostapd.service: Failed with result 'exit-code'.
4月 30 16:42:09 pc-NUC11TNKi7 systemd[1]: Failed to start Advanced IEEE 802.11 AP and IEEE 802.1X/WPA/WPA2/EAP Authenticator.
pc@pc-NUC11TNKi7:~$
以上报错是因为驱动使用了错误的rtl8821cu,修改驱动即可
在sudo systemctl restart dnsmasq同样出现报错
Job for dnsmasq.service failed because the control process exited with error code.
See "systemctl status dnsmasq.service" and "journalctl -xe" for details.
同样通过这个查看报错信息sudo systemctl status dnsmasq.service
● dnsmasq.service - dnsmasq - A lightweight DHCP and caching DNS serverLoaded: loaded (/lib/systemd/system/dnsmasq.service; enabled; vendor preset: enabled)Active: failed (Result: exit-code) since Tue 2024-04-30 16:46:19 CST; 1min 36s agoProcess: 16137 ExecStart=/etc/init.d/dnsmasq systemd-exec (code=exited, status=1/FAILURE)Process: 16136 ExecStartPre=/usr/sbin/dnsmasq --test (code=exited, status=0/SUCCESS)4月 30 16:46:19 pc-NUC11TNKi7 systemd[1]: Starting dnsmasq - A lightweight DHCP and caching DNS server...
4月 30 16:46:19 pc-NUC11TNKi7 dnsmasq[16136]: dnsmasq: syntax check OK.
4月 30 16:46:19 pc-NUC11TNKi7 dnsmasq[16137]: dnsmasq: bad option at line 2 of /etc/dnsmasq.d/wlan0-ap.conf.save
4月 30 16:46:19 pc-NUC11TNKi7 dnsmasq[16137]: bad option at line 2 of /etc/dnsmasq.d/wlan0-ap.conf.save
4月 30 16:46:19 pc-NUC11TNKi7 systemd[1]: dnsmasq.service: Control process exited, code=exited status=1
4月 30 16:46:19 pc-NUC11TNKi7 dnsmasq[16137]: 启动失败
4月 30 16:46:19 pc-NUC11TNKi7 systemd[1]: dnsmasq.service: Failed with result 'exit-code'.
4月 30 16:46:19 pc-NUC11TNKi7 systemd[1]: Failed to start dnsmasq - A lightweight DHCP and caching DNS server.
以上报错是因为在/etc/dnsmasq.d/wlan0-ap.conf.save这个文件的第二行出现错误字符
● dnsmasq.service - dnsmasq - A lightweight DHCP and caching DNS serverLoaded: loaded (/lib/systemd/system/dnsmasq.service; enabled; vendor preset: enabled)Active: failed (Result: exit-code) since Thu 2024-05-02 11:59:37 CST; 13s agoProcess: 5591 ExecStart=/etc/init.d/dnsmasq systemd-exec (code=exited, status=2)Process: 5590 ExecStartPre=/usr/sbin/dnsmasq --test (code=exited, status=0/SUCCESS)5月 02 11:59:37 pc-NUC11TNKi7 systemd[1]: Starting dnsmasq - A lightweight DHCP and caching DNS server...
5月 02 11:59:37 pc-NUC11TNKi7 dnsmasq[5590]: dnsmasq: syntax check OK.
5月 02 11:59:37 pc-NUC11TNKi7 dnsmasq[5591]: dnsmasq: failed to create listening socket for port 53: 地址已在使用
5月 02 11:59:37 pc-NUC11TNKi7 dnsmasq[5591]: failed to create listening socket for port 53: 地址已在使用
5月 02 11:59:37 pc-NUC11TNKi7 dnsmasq[5591]: 启动失败
5月 02 11:59:37 pc-NUC11TNKi7 systemd[1]: dnsmasq.service: Control process exited, code=exited status=2
5月 02 11:59:37 pc-NUC11TNKi7 systemd[1]: dnsmasq.service: Failed with result 'exit-code'.
5月 02 11:59:37 pc-NUC11TNKi7 systemd[1]: Failed to start dnsmasq - A lightweight DHCP and caching DNS server
以上报错是因为端口53被同时占用,在 /etc/dnsmasq.conf中换一个端口即可
这篇关于ubuntu外置网卡配置AP模式的文章就介绍到这儿,希望我们推荐的文章对编程师们有所帮助!


