本文主要是介绍WebSockets VS Server-Sent Events VS Long-polling,希望对大家解决编程问题提供一定的参考价值,需要的开发者们随着小编来一起学习吧!
社交网络如此流行,以至于所有的厂商都想在他们的网站中加入一些新的特性,例如有些需要即时的通知。这是非常常见的需求,设想你打开一个页面后,你肯定想你收到的通知,好友的状态列表等等即时的展现出来。原来的web设计就是一种方法,一个请求,一个相应,而现在在HTML5的帮助下对于服务器和客户端的通信来讲,我们有了新的办法。虽然现在还是有很多人在使用Long-polling技术模拟服务器和客户端的通信。
随着web浏览器的更新换代,现在已经有相当的一部分浏览器具有了比较新的非常酷的特性。有相当大的一部分浏览器支持HTML5 cmmunication API,是否时候抛弃long-polling了?让我们拭目以待。
如果您的网站有任何需要告知用户的通信,那么这个测试对您就有帮助。很简单,这个测试就是用户获取私人信息,在通知用户未读信息的时候,我们采用long-polling、Server-Sent Events和WebSockets的方式实现,然后比较结果。
首先让我们来看一下例子中基础的代码,我们需要一个访问数据库的库,一个获取未读通知数量和添加一个新的通知的模型。
我们需要一张数据库表:
CREATE TABLE IF NOT EXISTS `notification` (`id` int(10) unsigned NOT NULL AUTO_INCREMENT,`recipientUid` int(10) unsigned NOT NULL,`eventId` int(10) unsigned NOT NULL,`isNew` tinyint(1) unsigned NOT NULL DEFAULT '1',PRIMARY KEY (`id`),KEY `IX_recipientUid` (`recipientUid`),KEY `IX_isNew` (`isNew`)
) ENGINE=InnoDB  DEFAULT CHARSET=utf8 COMMENT='User notifications';
获取未读通知数量和添加通知的模型:
<?php
class Model_UserNotification
{private $_db;public function  __construct(Lib_Db $db){$this->_db = $db;}/**** @param int $recipientUid* @return  int*/public function fetchNumberByRecipientUid($recipientUid){return $this->_db->fetch("SELECT count(*) as count ". " FROM notification WHERE recipientUid = %d AND isNew = 1", $recipientUid)->count;}/**** @param int $recipientUid* @param int $eventId*/public function add($recipientUid, $eventId){$this->_db->update("INSERT INTO ". " notification (`id`, `recipientUid`, `eventId`, `isNew`) VALUES (NULL, '%d', '%d', '1')", $recipientUid, $eventId);}/**** @param int $recipientUid*/public function removeAll($recipientUid){$this->_db->update("DELETE FROM ". " notification WHERE recipientUid = %d", $recipientUid);}
}
long-polling

运行原理
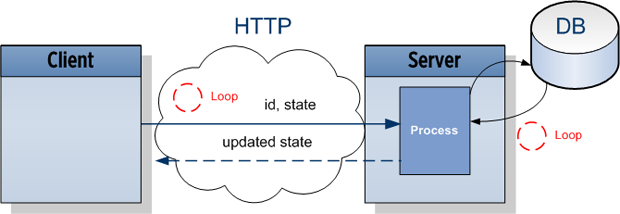
浏览器通过HTTP发送一个带有接收者ID(这里是user)的请求和当前状态(当前展示的未读通知的数量)到服务器。这将创建一个进程,这个进程一直查询数据库直到状态改变为止,当状态改变的时候,客户端就收到了服务器的相应,它可以更新自己的展示,而后发出下一个请求。
实现方式
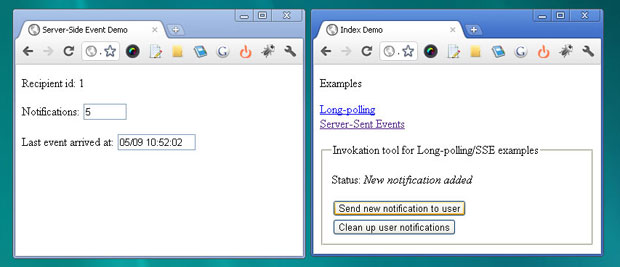
客户端就是简单的两个input输入框,一个展示未读消息数量,一个展示上次消息到达的时间。JavaScript通过AJAX的方式向服务器发送接收者用户id和当前的状态(当前页面上展示的未读通知数量)。使用JSONP处理跨域。
...
<p>Recipient id: <?= $recipientUid ?></p>
<p>Notifications: <input id="notificationNum" size="4" name="some" value="<?= $displayedNotificationNum ?>" /></p>
<p>Last event arrived at: <input id="time" size="12" name="some" value="0" /></p><script type="text/javascript">(function( $ ) {var UID = <?= $recipientUid ?>;$.NotifierLongPolling = (function() {var _stateNode = $('#notificationNum'), _timeNode = $('#time');return {onMessage : function(data) {_stateNode.val(data.updatedNotificationNum);_timeNode.val(data.time);setTimeout($.NotifierLongPolling.send, 3000);},send : function() {           $.ajax({'url': 'server.php','type': 'POST','dataType': 'jsonp','jsonpCallback': '$.NotifierLongPolling.onMessage','data': 'recipientUid=' + UID + '&displayedNotificationNum='+ _stateNode.val()});}}
}());// Document is ready
$(document).bind('ready.app', function() {setTimeout($.NotifierLongPolling.send, 40);
});})( jQuery );</script>
服务器等待3秒,然后检查状态是否改变,如果状态改变了则响应请求,否则继续等待,然后查询。
//...
$recipientUid = (int)$_REQUEST["recipientUid"];
$displayedNotificationNum = (int)$_REQUEST["displayedNotificationNum"];
$secCount = 0;do {sleep(IDLE_TIME);$updatedNotificationNum = $model->fetchNumberByRecipientUid($recipientUid);
} while ($updatedNotificationNum == $displayedNotificationNum);header("HTTP/1.0 200");
printf ('%s({"time" : "%s", "updatedNotificationNum" : "%d"});', $_REQUEST["callback"], date('d/m H:i:s'), $updatedNotificationNum);
客户端收到服务器返回的状态,然后展示出来,接下来再次发送请求。
Server-Sent Events

运行原理
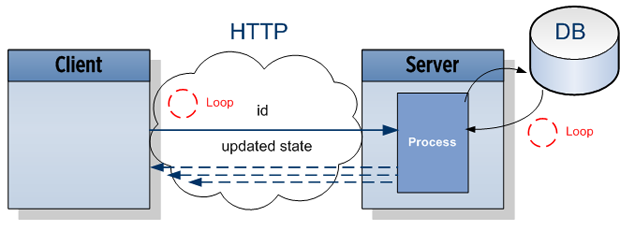
浏览器通过HTTP向服务器发送请求,服务器端拿出数据库中的最新的信息,立即返回给客户端,客户端等待三秒后再次发出下一个请求。
实现方式
同样,浏览器中HTML两个input,JavaScript模块打开EventSource,把接受者的id传给服务端。
...
<p>Recipient id: <?= $recipientUid ?></p>
<p>Notifications: <input id="notificationNum" size="4" name="some" value="<?= $displayedNotificationNum ?>" /></p>
<p>Last event arrived at: <input id="time" size="12" name="some" value="0" /></p><script type="text/javascript">(function( $ ) {var UID = <?= $recipientUid ?>;NotifierSSE = (function() {var _stateNode = $('#notificationNum'),_timeNode = $('#time'),_src,_handler = {onMessage : function(event) {            var data = JSON.parse(event.data);_stateNode.val(data.updatedNotificationNum);_timeNode.val(data.time);}};return {init : function () {_src = new EventSource("server.php?recipientUid=" + UID);_src.addEventListener('message', _handler.onMessage, false);}}
}());// Document is ready
$(document).bind('ready.app', function() {setTimeout(NotifierSSE.init, 40);
});})( jQuery );</script>
服务器端将最新的未读消息数量返回给客户端。
//...
header('Content-Type: text/event-stream');
header('Cache-Control: no-cache'); // recommended to prevent caching of event data.$recipientUid = (int)$_REQUEST["recipientUid"];function send($updatedNotificationNum)
{printf ("id: %s\n\n", PROC_ID);printf ('data: {"time" : "%s", "updatedNotificationNum" : "%d"}' . "\n\n",date('d/m H:i:s') , $updatedNotificationNum);ob_flush();flush();
}while (true) {send($model->fetchNumberByRecipientUid($recipientUid));sleep(IDLE_TIME);
}
//...
客户端收到相应后,onMessage事件的处理器将被调用。浏览器将每3秒发送一个请求,除非将连接关闭(Close方法)。
WebSockets

运行原理
客户端通知WebSockets服务器一个事件,告诉他接收者id,服务器将立即通知消息,当任何新的未读消息来的时候,服务器都将立即返回数据给客户端。
<p>Recipient id: <?= $recipientUid ?></p><p>Notification: <span id="display"></span></p><button id="test">Fire an event</button><script>realtime = new realtimeComm(window.location.host + ":20001");realtime.addListener('/notification/updates', function(response) {$('#display').html('Client #' + response.data.recipientUid + ' broadcast an action #' + response.data.actionId);});$('#test').bind('click', this, function(e){e.preventDefault();realtime.send('/notification/presence', {'actionId': 1,'recipientUid': <?= $recipientUid ?>}, function() {});});</script>客户端打开一个WebSockets连接而且在/notification/updates上订阅一个事件处理。在HTML中添加一个发送向/notification/presents发送接收者id的button。这将在所有的打开连接中引起广播消息。所以每一个活跃的客户端都收到通知,客户端会检查消息中的id是否是当前登录的用户的id,如果是就更新通知数量。
总结
浏览器兼容性- Long-polling支持大多数当前的浏览器
- Server-Sent Events支持Chrome9+、Firefox6+、Opera11+、Safari5+
- Chrome14、Firefox7支持最新的hybi-10协议,Firefox6支持hybi-07.
服务器负载
- Long-polling占一小部分CPU资源,但是创建空的进程将浪费系统的内存
- Server-Sent Events工作的方式有很多,除非Server-Sent Events不必在每一次响应发出后都关闭连接。
- WebSockets,服务器只需要一个进程处理所有的请求,没有循环,不必为每个客户端都分配cpu和内存。
客户端负载
- Long-polling取决于实现方式,但终究是一个异步的方式
- Server-Sent Events采用浏览器的内置的实现方式,只花费很少的一部分资源。
- WebSockets跟Server-Sent Events一样,采用浏览器的内置的实现方式,只花费很少的一部分资源。
时间线
- Long-polling接近实时,但是发送新的请求和发送相应会有一定的时延。
- Server-Sent Events默认延时3秒,但是可以调整。
- WebSockets真正的实时
实现方式复杂度
- Long-polling实现起来非常简单
- Server-Sent Events甚至比Long-polling更简单
- 需要一个WebSockets服务器处理事件,并开放一个端口
点击这里可以下载例子的代码。
OSChina.NET原创翻译/ 原文链接这篇关于WebSockets VS Server-Sent Events VS Long-polling的文章就介绍到这儿,希望我们推荐的文章对编程师们有所帮助!


