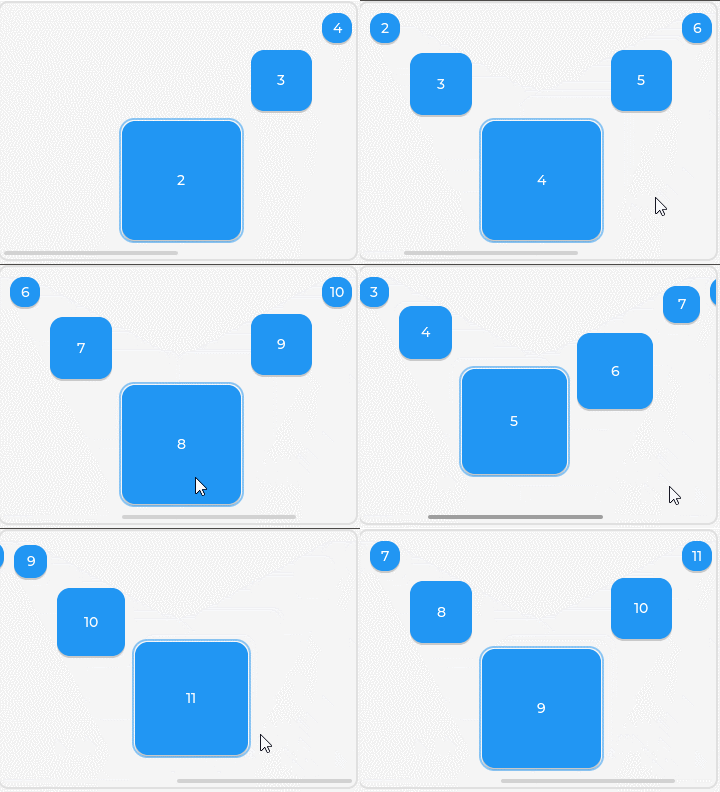
本文主要是介绍LVGL自定义滑动,希望对大家解决编程问题提供一定的参考价值,需要的开发者们随着小编来一起学习吧!

触摸和编码器都可以操作
typedef struct
{lv_obj_t* obj;int16_t x;int16_t y;int16_t width;int16_t height;
}pos_and_size_t;typedef struct
{lv_obj_t* obj;lv_coord_t height;lv_coord_t width;lv_coord_t width_pad;lv_coord_t height_pad;lv_coord_t child_widget;lv_coord_t child_height;
}widget_attr_t;#define NUMBER_OF_MENUS    10static pos_and_size_t ps[NUMBER_OF_MENUS+4];
static widget_attr_t widget =
{.height = 260,.height_pad = 10,.width = 360,.width_pad = 10,
};void widget_refresh(void)
{for (int i = 0; i < sizeof(ps) / sizeof(ps[0]); i++){lv_obj_set_size(ps[i].obj, ps[i].width, ps[i].height);lv_obj_set_pos(ps[i].obj, ps[i].x, ps[i].y);}
}/*** @brief 根据x坐标,计算y坐标和宽度
*/
void widget_get_y_w(int x, int* y, int* w)
{float k1 = (2 * widget.height_pad + 3 * widget.child_height) * 1.0f / (2 * widget.width_pad + 3 * widget.child_widget);float b1 = widget.height_pad - k1 * widget.width_pad;float k2 = (3*widget.child_widget) * 1.0f / (2 * widget.width_pad + 3 * widget.child_widget);float b2 = widget.child_widget - k2 * widget.width_pad;float k3 = (2 * widget.height_pad + 3*widget.child_height) * -1.0f / (2 * widget.width_pad + 6 * widget.child_widget);float b3 = widget.height_pad - k3 * (5*widget.width_pad+9*widget.child_widget);float k4 = (3 * widget.child_widget) * -1.0f / (2 * widget.width_pad + 6 * widget.child_widget);float b4 = widget.child_widget - k4 * (5*widget.width_pad + 9*widget.child_widget);if (x < widget.width_pad){*y = widget.height_pad;*w = widget.child_widget;}else if (x < 3 * widget.width_pad + 3 * widget.child_widget){*y = k1 * x + b1;*w = k2 * x + b2;}else if (x < 5 * widget.width_pad + 9 * widget.child_widget){*y = k3 * x + b3;*w = k4 * x + b4;}else{*y = widget.height_pad;*w = widget.child_widget;}
}void widget_update(widget_attr_t* widget)
{int start_x = lv_obj_get_scroll_x(widget->obj);for (int i = 1; i < sizeof(ps) / sizeof(ps[0]); i++){int x = ps[i - 1].x + ps[i - 1].width + widget->width_pad;int diff = (x - start_x);ps[i].x = x ;widget_get_y_w(diff, &ps[i].y, &ps[i].width);ps[i].height = ps[i].width;}int index = 1;for (int i = 1; i < sizeof(ps) / sizeof(ps[0]); i++){if (ps[i].width > ps[index].width){index = i;}lv_obj_clear_state(ps[i].obj, LV_STATE_FOCUS_KEY);}lv_obj_add_state(ps[index].obj, LV_STATE_FOCUS_KEY);widget_refresh();
}/*** @brief
*/
void widget_end(widget_attr_t* widget)
{static int start_x_old = 0;int start_x = lv_obj_get_scroll_x(widget->obj);if (abs(start_x_old - start_x) < 5){return;}start_x_old = start_x;int index = 1;for (int i = 1; i < sizeof(ps) / sizeof(ps[0]); i++){if (ps[i].width > ps[index].width){index = i;}lv_obj_clear_state(ps[i].obj, LV_STATE_FOCUS_KEY);}lv_obj_scroll_to_x(widget->obj, (index-2)*(widget->width_pad + widget->child_widget), LV_ANIM_OFF);lv_group_focus_obj(ps[index].obj);lv_obj_add_state(ps[index].obj, LV_STATE_FOCUS_KEY);
}lv_timer_t* s_timer = NULL;
static void timer_cb(lv_timer_t* t)
{lv_timer_pause(s_timer);widget_end(&widget);
}static widget_cb(lv_event_t* e)
{lv_event_code_t code = lv_event_get_code(e);if (LV_EVENT_SCROLL == code){lv_timer_pause(s_timer);widget_update(&widget);}else if(code == LV_EVENT_SCROLL_END){//结束滑动时,如果没有控件在最中间位置,将最近的控件滑动到最中间lv_timer_reset(s_timer);lv_timer_resume(s_timer);}}static btn_cb(lv_event_t* e)
{lv_event_code_t code = lv_event_get_code(e);lv_obj_t* obj = lv_event_get_target(e);if (LV_EVENT_FOCUSED == code){//焦点移动时,滑动控件,始终保持最中间控件聚焦int index = lv_event_get_user_data(e);lv_obj_scroll_to_x(lv_obj_get_parent(obj), (index - 2) * (widget.width_pad + widget.child_widget), LV_ANIM_OFF);}
}
void widget_init(void)
{widget.child_widget = (widget.width - 6 * widget.width_pad) / 10;widget.child_height = (widget.height - 2 * widget.height_pad) / 8;widget.obj = lv_obj_create(lv_scr_act());lv_obj_set_size(widget.obj, widget.width, widget.height);//lv_obj_set_scrollbar_mode(widget.obj, LV_SCROLLBAR_MODE_OFF);lv_obj_set_style_bg_opa(widget.obj, LV_OPA_0, LV_STATE_DEFAULT);lv_obj_set_style_pad_all(widget.obj, 0, LV_STATE_DEFAULT);//lv_obj_set_scroll_snap_x(obj, LV_SCROLL_SNAP_CENTER);lv_obj_clear_flag(widget.obj, LV_OBJ_FLAG_SCROLL_ELASTIC);s_timer = lv_timer_create(timer_cb, 100, 0);lv_timer_pause(s_timer);//创建初始屏幕,显示5个控件,宽度 1, 2, 4, 2, 1,for (int i = 0; i < sizeof(ps) / sizeof(ps[0]); i++){ps[i].obj = lv_btn_create(widget.obj);lv_obj_t* lab = lv_label_create(ps[i].obj);lv_label_set_text_fmt(lab, "%d", i);lv_obj_align(lab, LV_ALIGN_CENTER, 0, 0);lv_obj_set_scrollbar_mode(ps[i].obj, LV_SCROLLBAR_MODE_OFF);lv_obj_add_event_cb(ps[i].obj, btn_cb, LV_EVENT_ALL, i);ps[i].width = widget.child_widget;ps[i].height = widget.child_height;}ps[1].width = widget.child_widget*2;ps[1].height = widget.child_height*2;ps[2].width = widget.child_widget*4;ps[2].height = widget.child_height*4;ps[3].width = widget.child_widget*2;ps[3].height = widget.child_height*2;ps[0].x = widget.width_pad;ps[0].y = widget.height_pad;for (int i = 1; i < sizeof(ps) / sizeof(ps[0]); i++){ps[i].y = widget.height_pad;ps[i].x = widget.width_pad + ps[i - 1].x + ps[i - 1].width;}ps[1].y = widget.height_pad*2 + widget.child_height;ps[2].y = widget.height_pad*3 + widget.child_height*3;ps[3].y = widget.height_pad*2 + widget.child_height;//隐藏开头两个lv_obj_add_flag(ps[0].obj, LV_OBJ_FLAG_HIDDEN);lv_obj_add_flag(ps[1].obj, LV_OBJ_FLAG_HIDDEN);//隐藏最后两个lv_obj_add_flag(lv_obj_get_child(ps[NUMBER_OF_MENUS + 2].obj, -1), LV_OBJ_FLAG_HIDDEN);lv_obj_add_flag(lv_obj_get_child(ps[NUMBER_OF_MENUS + 3].obj, -1), LV_OBJ_FLAG_HIDDEN);lv_obj_remove_style_all(ps[NUMBER_OF_MENUS + 2].obj);lv_obj_remove_style_all(ps[NUMBER_OF_MENUS + 3].obj);lv_obj_set_style_border_width(ps[NUMBER_OF_MENUS + 2].obj, 0, LV_STATE_DEFAULT);lv_obj_set_style_border_width(ps[NUMBER_OF_MENUS + 3].obj, 0, LV_STATE_DEFAULT);lv_obj_set_style_bg_opa(ps[NUMBER_OF_MENUS + 2].obj, LV_OPA_0, LV_STATE_DEFAULT);lv_obj_set_style_bg_opa(ps[NUMBER_OF_MENUS + 3].obj, LV_OPA_0, LV_STATE_DEFAULT);lv_obj_add_event_cb(widget.obj, widget_cb, LV_EVENT_ALL, NULL);widget_refresh();
}
这篇关于LVGL自定义滑动的文章就介绍到这儿,希望我们推荐的文章对编程师们有所帮助!


