本文主要是介绍SuperSet安装和使用,希望对大家解决编程问题提供一定的参考价值,需要的开发者们随着小编来一起学习吧!
1、SuperSet概述
Apache Superset 是一个现代的数据探索和可视化平台。它功能强大且十分易用,可对接
各种数据源,包括很多现代的大数据分析引擎,拥有丰富的图表展示形式,并且支持自定义
仪表盘。
2、安装SuperSet
①python环境安装
Superset 是由 Python 语言编写的 Web 应用,要求 Python3.7 的环境。而CentOS系统自带python版本是2.7.5,不满足SuperSet的要求。
而如果升级系统Python环境会影响系统本身一些以来python环境应用的使用,比如yum,所以我们系统需要存在多个不同版本的Python
②安装Miniconda
# 需要有wget工具,没有的话安装wget
yum -y install wget
# 下载miniconda
wget -c https://repo.anaconda.com/miniconda/Miniconda3-latest-Linux-x86_64.sh
# 安装miniconda
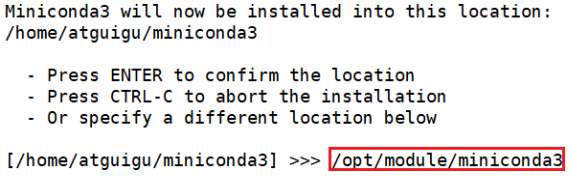
bash Miniconda3-latest-Linux-x86_64.sh
在安装过程中,出现以下提示时,可以指定安装路径
加载环境变量配置文件,使之生效
source ~/.bashrc
取消激活 base 环境
Miniconda 安装完成后,每次打开终端都会激活其默认的 base 环境,我们可通过以下命
令,禁止激活默认 base 环境。
conda config --set auto_activate_base false
③创建python3.7环境
配置conda国内镜像
conda config --add channels https://mirrors.tuna.tsinghua.edu.cn/anaconda/pkgs/free
conda config --add channels https://mirrors.tuna.tsinghua.edu.cn/anaconda/pkgs/main
创建python3.7环境
conda create --name superset python=3.7
conda常用命令
# 创建环境
conda create -n env_name python=3.7
# 查看所有环境
conda info --envs
# 删除一个环境
conda remove -n env_name --all
# 激活环境
conda activate env_name
conda启动环境脚本
#!/bin/bash# ~/.bashrc中conda环境的命令,要加这一段才能再shell中使用conda命令
# >>> conda initialize >>>
# !! Contents within this block are managed by 'conda init' !!
__conda_setup="$('/opt/modules/miniconda3/bin/conda' 'shell.bash' 'hook' 2> /dev/null)"
if [ $? -eq 0 ]; theneval "$__conda_setup"
elseif [ -f "/opt/modules/miniconda3/etc/profile.d/conda.sh" ]; then. "/opt/modules/miniconda3/etc/profile.d/conda.sh"elseexport PATH="/opt/modules/miniconda3/bin:$PATH"fi
fi
unset __conda_setup
# <<< conda initialize <<<case $1 in
"start"){echo "==========启动superset python3.7 环境=========="conda activate supersetconda info --envs
};;
"stop") {echo "==========关闭superset python3.7 环境=========="conda deactivateconda info --envs
};;
esac
命令使用如下:
source superset_py_env.sh start
source superset_py_env.sh stop
之所以用source执行脚本,如果不用source liunx会默认生成一个子线程执行命令,所以主线程的环境仍然不会改变,所以要用source
因为调用./a.sh来执行shell是在一个子shell里运行的,所以执行后,结构并没有反应到父shell里,但是source不同他就是在本shell中执行的,所以能够看到结果。
④安装SuperSet
更换yum源
cd /etc/yum.repos.d/
wget -nc http://mirrors.aliyun.com/repo/Centos-7.repo
mv CentOS-Base.repo CentOS-Base.repo.back
mv CentOS-7.repo CentOS-Base.repo
mv Centos-7.repo CentOS-Base.repo
下载SuperSet
# 安装依赖
sudo yum install -y gcc gcc-c++ libffi-devel python-devel python-pip python-wheel python-setuptools openssl-devel cyrus-sasl-devel openldap-devel
# 安装和更新setuptools 和 pip
pip install --upgrade setuptools pip -i https://pypi.tuna.tsinghua.edu.cn/simple
# pip换源
pip config set global.index-url https://pypi.tuna.tsinghua.edu.cn/simple
# 安装Superset
pip install apache-superset
# 没换源的话可以指定源安装
# pip install apache-superset -i https://pypi.tuna.tsinghua.edu.cn/simple
# 初始化SuperSet数据库
superset db upgrade
# 创建管理员用户
export FLASK_APP=superset
superset fab create-admin
# Superset 初始化
superset init
3、启动SuperSet
①安装 gunicorn
pip install gunicorn
gunicorn 是一个 Python Web Server,可以和 java 中的 TomCat 类比
②启动和停止SuperSet
# 启动
gunicorn --workers 5 --timeout 120 --bind 虚拟机地址:8787 "superset.app:create_app()" --daemon
# 停止
ps -ef | awk '/superset/ && !/awk/{print $2}' | xargs kill -9
–workers:指定进程个数
–timeout:worker 进程超时时间,超时会自动重启
–bind:绑定本机地址,即为 Superset 访问地址
–daemon:后台运行
③superset启停脚本
#!/bin/bash
superset_status(){result=`ps -ef | awk '/gunicorn/ && !/awk/{print $2}' | wc -l`if [[ $result -eq 0 ]]; thenreturn 0elsereturn 1fi
}
superset_start(){source ~/.bashrcsuperset_status >/dev/null 2>&1if [[ $? -eq 0 ]]; thenconda activate superset ; gunicorn --workers 5 --timeout 120 --bind 虚拟机地址:8787 --daemon 'superset.app:create_app()'elseecho "superset 正在运行"fi
}
superset_stop(){superset_status >/dev/null 2>&1if [[ $? -eq 0 ]]; thenecho "superset 未在运行"elseps -ef | awk '/gunicorn/ && !/awk/{print $2}' | xargs kill -9fi
}
case $1 instart )echo "启动 Superset"superset_start;;stop )echo "停止 Superset"superset_stop;;restart )echo "重启 Superset"superset_stopsuperset_start;;status )superset_status >/dev/null 2>&1if [[ $? -eq 0 ]]; thenecho "superset 未在运行"elseecho "superset 正在运行"fi
esac
加执行权限:
chmod u+x superset.sh
4、Superset 使用
①准备 MySQL 数据源
安装依赖
conda install mysqlclient
对接不同的数据源,需安装不同的依赖,以下地址为官网说明
https://superset.apache.org/docs/databases/installing-database-drivers
重启SuperSet
②数据源配置
添加数据库:

添加数据表

这篇关于SuperSet安装和使用的文章就介绍到这儿,希望我们推荐的文章对编程师们有所帮助!


