本文主要是介绍尚医通项目--20个技术栈个人总结,希望对大家解决编程问题提供一定的参考价值,需要的开发者们随着小编来一起学习吧!
目录
- Mybatis-Plus
- Swagger2
- 自定义全局异常处理
- LogBack
- EasyExcel
- Spring Cache
- Redis
- Nginx
- MongoDB
- 图片Bash64编码工具类
- Nacos
- Feign
- Gateway
- JWT
- 阿里云短信服务
- 用户认证和网关整合
- OAuth2 微信登录
- 阿里云OSS对象存储服务
- RabbitMQ
- Docker
一、Mybatis-Plus
使用Mybatis-Plus的项目模块:
Service包:
service-hosp医院服务接口模块
Mybatis-Plus的配置、集成以及CRUD操作请看我的另一篇博客
https://blog.csdn.net/tufhgddty/article/details/123332559?spm=1001.2014.3001.5501
二、Swagger2
引入依赖
<!--swagger-->
<dependency>
<groupId>io.springfox</groupId>
<artifactId>springfox-swagger2</artifactId>
</dependency>
<dependency>
<groupId>io.springfox</groupId>
<artifactId>springfox-swagger-ui</artifactId>
</dependency>
添加配置类
/*** Swagger2配置信息*/
@Configuration
@EnableSwagger2
public class Swagger2Config {@Beanpublic Docket webApiConfig(){return new Docket(DocumentationType.SWAGGER_2).groupName("webApi").apiInfo(webApiInfo()).select()//只显示api路径下的页面.paths(Predicates.and(PathSelectors.regex("/api/.*"))).build();}@Beanpublic Docket adminApiConfig(){return new Docket(DocumentationType.SWAGGER_2).groupName("adminApi").apiInfo(adminApiInfo()).select()//只显示admin路径下的页面.paths(Predicates.and(PathSelectors.regex("/admin/.*"))).build();}private ApiInfo webApiInfo(){return new ApiInfoBuilder().title("网站-API文档").description("本文档描述了网站微服务接口定义").version("1.0").contact(new Contact("atguigu", "http://atguigu.com", "493211102@qq.com")).build();}private ApiInfo adminApiInfo(){return new ApiInfoBuilder().title("后台管理系统-API文档").description("本文档描述了后台管理系统微服务接口定义").version("1.0").contact(new Contact("atguigu", "http://atguigu.com", "49321112@qq.com")).build();}
}
1.默认的访问地址
http://localhost:端口/swagger-ui.html;
2.如果配置文件中配置了 context-path:/目录
http://localhost:端口/目录/swagger-ui.html
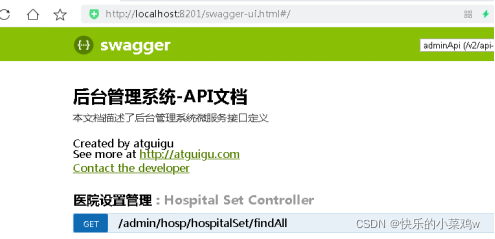
swagger通过注解表明该接口会生成文档,包括接口名、请求方法、参数、返回信息的等等。
@Api:修饰整个类,描述Controller的作用
@ApiOperation:描述一个类的一个方法,或者说一个接口
@ApiParam:单个参数描述
@ApiModel:用对象来接收参数
@ApiModelProperty:用对象接收参数时,描述对象的一个字段
@ApiImplicitParam:一个请求参数 @ApiImplicitParams:多个请求参数
三、自定义全局异常处理
spring boot 默认情况下会映射到 /error 进行异常处理,但是提示并不十分友好,下面自定义异常处理,提供友好展示。
自定义全局异常类
我们在搭建模块时在common-util模块已经添加了YyghException类,这里不做解释
添加全局异常处理类
在common/common_util包里的exception文件夹下添加
@Data
@ToString
@ApiModel(value = "自定义全局异常类")
public class YyghException extends RuntimeException {@ApiModelProperty(value = "异常状态码")private Integer code;/*** 通过状态码和错误消息创建异常对象* @param message* @param code*/public YyghException(String message, Integer code) {super(message);this.code = code;}/*** 接收枚举类型对象* @param resultCodeEnum*/public YyghException(ResultCodeEnum resultCodeEnum) {super(resultCodeEnum.getMessage());this.code = resultCodeEnum.getCode();}
package com.atguigu.yygh.common.exception;/*** 全局异常处理类**/
@ControllerAdvice 【@ControllerAdvice来声明一些全局性的东西,最常见的是结合@ExceptionHandler注解用于全局异常的处理】
public class GlobalExceptionHandler {@ExceptionHandler(Exception.class) 【异常处理Handler注解,参数为异常类型,即出现哪种异常用这个异常处理Hanlder方法】
@ResponseBody 【让返回的结果可以输出(以Json格式)】
public Result error(Exception e){e.printStackTrace(); 【输出异常内容】
return Result.fail(); 【前面集成的,自定义返回结果】}/*** 自定义异常处理方法* @param e
* @return
*/
@ExceptionHandler(YyghException.class)
@ResponseBody
public Result error(YyghException e){
return Result.build(e.getCode(), e.getMessage()); 【根据传入的Code和Message实现返回自定义异常结果】}
}
自定义异常处理方法需要手动抛出异常,并且传入自定义的参数:错误信息Message和错误状态码Code

四、LogBack
配置日志级别
日志记录器(Logger)的行为是分等级的。如下表所示:
分为:OFF关闭、FATAL致命、ERROR错误、WARN警告、INFO消息、DEBUG调试、ALL所有
默认情况下,spring boot从控制台打印出来的日志级别只有INFO及以上级别,可以配置日志级别
在application.properties设置日志级别
logging.level.root=WARN
这种方式只能将日志打印在控制台上
LogBack日志
spring boot内部使用Logback作为日志实现的框架。
Logback和log4j非常相似,如果你对log4j很熟悉,那对logback很快就会得心应手。
配置 resources/logback-spring.xml(能看懂就行,不要求掌握,具体配置请看尚医通项目的课件)
五、EasyExcel
EasyExcel是一个基于Java的简单、省内存的读写Excel的开源项目。在尽可能节约内存的情况下支持读写百M的Excel
官方文档https://www.yuque.com/easyexcel/doc/easyexcel
添加依赖,在service-cmn接口模块
<dependencies><!-- https://mvnrepository.com/artifact/com.alibaba/easyexcel --><dependency><groupId>com.alibaba</groupId><artifactId>easyexcel</artifactId><version>2.1.1</version></dependency>
</dependencies>
添加依赖,在model模块,因为需要在实体类加上EasyExcel的注解
【注意此处加了< scope>provided< scope>】对< scope>标签的描述点这里
<dependency>
<groupId>com.alibaba</groupId>
<artifactId>easyexcel</artifactId>
<scope>provided </scope>
</dependency>
添加依赖,在common-util模块,因为后面要把导入导出封装为所有模块公用的工具类
<dependency>
<groupId>com.alibaba</groupId>
<artifactId>easyexcel</artifactId>
</dependency>
实体类,在model模块的com.atguigu.yygh.vo.cmn.DictEeVo
package com.atguigu.yygh.vo.cmn;@Data
public class DictEeVo {@ExcelProperty(value = "id",index = 0)
private Long id;@ExcelProperty(value = "上级id",index = 1)
private Long parentId;@ExcelProperty(value = "名称",index = 2)
private String name;@ExcelProperty(value = "值",index = 3)
private String value;@ExcelProperty(value = "编码",index = 4)
private String dictCode;}
接口方法,在DictService
/*** 导出* @param response
*/
void exportData(HttpServletResponse response);
实现类方法,在DictServiceImpl
@Override
public void exportData(HttpServletResponse response) {
try {response.setContentType("application/vnd.ms-excel");response.setCharacterEncoding("utf-8");
// 这里URLEncoder.encode可以防止中文乱码 当然和easyexcel没有关系
String fileName = URLEncoder.encode("数据字典", "UTF-8");response.setHeader("Content-disposition", "attachment;filename="+ fileName + ".xlsx");List<Dict> dictList = dictMapper.selectList(null);List<DictEeVo> dictVoList = new ArrayList<>(dictList.size());
for(Dict dict : dictList) {DictEeVo dictVo = new DictEeVo();BeanUtils.copyBean(dict, dictVo, DictEeVo.class);dictVoList.add(dictVo);}EasyExcel.write(response.getOutputStream(), DictEeVo.class).sheet("数据字典").doWrite(dictVoList);} catch (IOException e) {e.printStackTrace();}
}
Controller类方法,在DictController
@ApiOperation(value="导出")
@GetMapping(value = "/exportData")
public void exportData(HttpServletResponse response) {
dictService.exportData(response);
}
六、Spring Cache
因为缓存也是公共使用,所有的service模块都有可能使用缓存,所以我们把依赖与部分配置加在service-util模块,这样其他service模块都可以使用了
添加依赖
service-util模块的pom.xml
<!-- redis -->
<dependency>
<groupId>org.springframework.boot</groupId>
<artifactId>spring-boot-starter-data-redis</artifactId>
</dependency><!-- spring2.X集成redis所需common-pool2-->
<dependency>
<groupId>org.apache.commons</groupId>
<artifactId>commons-pool2</artifactId>
<version>2.6.0</version>
</dependency>
service-util添加配置类
创建com.atguigu.yygh.common.config.RedisConfig
package com.atguigu.yygh.common.config;@Configuration
@EnableCaching
public class RedisConfig {/*** 自定义key规则* @return
*/
@Bean
public KeyGenerator keyGenerator() {
return new KeyGenerator() {
@Override
public Object generate(Object target, Method method, Object... params) {StringBuilder sb = new StringBuilder();sb.append(target.getClass().getName());sb.append(method.getName());
for (Object obj : params) {sb.append(obj.toString());}
return sb.toString();}};}/*** 设置RedisTemplate规则* @param redisConnectionFactory
* @return
*/
@Bean
public RedisTemplate<Object, Object> redisTemplate(RedisConnectionFactory redisConnectionFactory) {RedisTemplate<Object, Object> redisTemplate = new RedisTemplate<>();redisTemplate.setConnectionFactory(redisConnectionFactory);Jackson2JsonRedisSerializer jackson2JsonRedisSerializer = new Jackson2JsonRedisSerializer(Object.class);//解决查询缓存转换异常的问题
ObjectMapper om = new ObjectMapper();
// 指定要序列化的域,field,get和set,以及修饰符范围,ANY是都有包括private和public
om.setVisibility(PropertyAccessor.ALL, JsonAutoDetect.Visibility.ANY);
// 指定序列化输入的类型,类必须是非final修饰的,final修饰的类,比如String,Integer等会跑出异常
om.enableDefaultTyping(ObjectMapper.DefaultTyping.NON_FINAL);jackson2JsonRedisSerializer.setObjectMapper(om);//序列号key value
redisTemplate.setKeySerializer(new StringRedisSerializer());redisTemplate.setValueSerializer(jackson2JsonRedisSerializer);redisTemplate.setHashKeySerializer(new StringRedisSerializer());redisTemplate.setHashValueSerializer(jackson2JsonRedisSerializer);redisTemplate.afterPropertiesSet();
return redisTemplate;}/*** 设置CacheManager缓存规则* @param factory
* @return
*/
@Bean
public CacheManager cacheManager(RedisConnectionFactory factory) {RedisSerializer<String> redisSerializer = new StringRedisSerializer();Jackson2JsonRedisSerializer jackson2JsonRedisSerializer = new Jackson2JsonRedisSerializer(Object.class);//解决查询缓存转换异常的问题
ObjectMapper om = new ObjectMapper();om.setVisibility(PropertyAccessor.ALL, JsonAutoDetect.Visibility.ANY);om.enableDefaultTyping(ObjectMapper.DefaultTyping.NON_FINAL);jackson2JsonRedisSerializer.setObjectMapper(om);// 配置序列化(解决乱码的问题),过期时间600秒
RedisCacheConfiguration config = RedisCacheConfiguration.defaultCacheConfig().entryTtl(Duration.ofSeconds(600)).serializeKeysWith(RedisSerializationContext.SerializationPair.fromSerializer(redisSerializer)).serializeValuesWith(RedisSerializationContext.SerializationPair.fromSerializer(jackson2JsonRedisSerializer)).disableCachingNullValues();RedisCacheManager cacheManager = RedisCacheManager.builder(factory).cacheDefaults(config).build();
return cacheManager;}
}
说明:
@EnableCaching:标记注解
@EnableCaching,开启缓存,并配置Redis缓存管理器。
@EnableCaching 注释触发后置处理器,检查每一个Spring bean 的 public 方法是否存在缓存注解。如果找到这样的一个注释, 自动创建一个代理拦截方法调用和处理相应的缓存行为。
service-cmn添加redis配置
application.properties
spring.redis.host=192.168.44.165
spring.redis.port=6379
spring.redis.database= 0
spring.redis.timeout=1800000spring.redis.lettuce.pool.max-active=20
spring.redis.lettuce.pool.max-wait=-1
#最大阻塞等待时间(负数表示没限制)
spring.redis.lettuce.pool.max-idle=5
spring.redis.lettuce.pool.min-idle=0
使用Spring Cache
@Cacheable
根据方法对其返回结果进行缓存,下次请求时,如果缓存存在,则直接读取缓存数据返回;如果缓存不存在,则执行方法,并把返回的结果存入缓存中。一般用在查询方法上。
属性/方法名 解释 value 缓存名,必填,它指定了你的缓存存放在哪块命名空间 cacheNames 与 value 差不多,二选一即可 key 可选属性,可以使用 SpEL 标签自定义缓存的key @CachePut
使用该注解标志的方法,每次都会执行,并将结果存入指定的缓存中。其他方法可以直接从响应的缓存中读取缓存数据,而不需要再去查询数据库。一般用在新增方法上。
参数与@Cacheable一样
@CacheEvict
使用该注解标志的方法,会清空指定的缓存。一般用在更新或者删除方法上
参数比@Cacheable多两个
属性/方法名 解释 allEntries 是否清空所有缓存,默认为 false。如果指定为true,则方法调用后将立即清空所有的缓存 beforeInvocation 是否在方法执行前就清空,默认为 false。如果指定为 true,则在方法执行前就会清空缓存
应用:改造com.atguigu.yygh.cmn.service.impl.DictServiceImpl类方法
/*** 根据上级id获取子节点数据列表* @param parentId
*/
@Cacheable(value = "dict",keyGenerator = "keyGenerator")
@Override
public List<Dict> findByParentId(Long parentId) {List<Dict> dictList = dictMapper.selectList(new QueryWrapper<Dict>().eq("parent_id", parentId));dictList.stream().forEach(dict -> {
boolean isHasChildren = this.isHasChildren(dict.getId());dict.setHasChildren(isHasChildren);});
return dictList;
}
/*** 导入* allEntries = true: 方法调用后清空所有缓存* @param file
*/
@CacheEvict(value = "dict", allEntries=true)
@Override
public void importData(MultipartFile file) {ExcelHelper fileHelper = new ExcelHelper(DictEeVo.class);List<DictEeVo> dictVoList = fileHelper.importExcel(file);
if(!CollectionUtils.isEmpty(dictVoList)) {
dictMapper.insertBatch(dictVoList);}
}
七、Redis
即将根据项目写一篇专门的博客
八、Nginx
下载安装nginx(window版)
在nginx.conf里的http{ }中添加
server {listen       9001;server_name  localhost;location ~ /hosp/ {           proxy_pass http://localhost:8201;}location ~ /cmn/ {           proxy_pass http://localhost:8202;}
}
前端 调整/config/dev.env.js中的BASE_API
BASE_API: 'http://localhost:9001'
九、MongoDB
MongoDB的CRUD操作请看另一篇博客
https://blog.csdn.net/tufhgddty/article/details/123748180
十、图片Bash64编码工具类【【【【【】】】】】
图片的base64编码就是可以将一张图片数据编码成一串字符串,使用该字符串代替图像地址url
在前端页面中常见的base64图片的引入方式:<img src="data:image/png;base64,iVBORw0…>
优点
(1)base64格式的图片是文本格式,占用内存小,转换后的大小比例大概为1/3,降低了资源服务器的消耗
(2)网页中使用base64格式的图片时,不用再请求服务器调用图片资源,减少了服务器访问次数。
缺点
(1)base64格式的文本内容较多,存储在数据库中增大了数据库服务器的压力
(2)网页加载图片虽然不用访问服务器了,但因为base64格式的内容太多,所以加载网页的速度会降低,可能会影响用户的体验。
说明:医院logo图片小,因此上传医院logo是可以使用base64格式保存
添加工具类:在common-util模块添加工具类:com.atguigu.yygh.common.util.ImageBase64Util类
public class ImageBase64Util {public static void main(String[] args) {String imageFile = "D:\\yygh_work\\xh.png";// 待处理的图片System.out.println(getImageString(imageFile));}public static String getImageString(String imageFile) {InputStream is = null;try {byte[] data = null;is = new FileInputStream(new File(imageFile));data = new byte[is.available()];is.read(data);return new String(Base64.encodeBase64(data));} catch (Exception e) {e.printStackTrace();} finally {if (null != is) {try {is.close();is = null;} catch (Exception e) {e.printStackTrace();}}}return "";}
}
图片转换为base64字符串时,该字符串中包含大量的加号“+”,服务器在解析数据时会把加号当成连接符,转换为空格,因此我们要做一下特殊处理
在ApiController类上传接口添加:
//传输过程中“+”转换为了“ ”,因此我们要转换回来
String logoDataString=(String)paramMap.get("logoData");
if(!StringUtils.isEmpty(logoDataString)){
String logoData=logoDataString.replaceAll("","+");
paramMap.put("logoData",logoData);
}
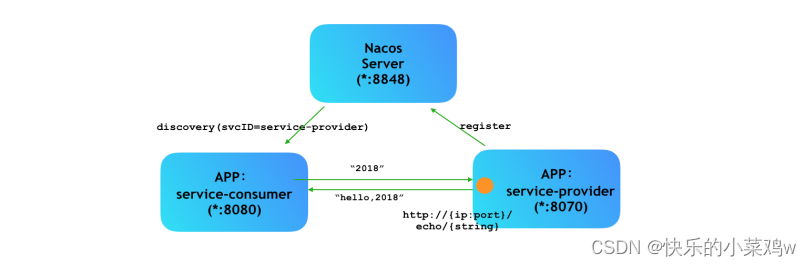
十一、SpringCloud Nacos
Nacos 是阿里巴巴推出来的一个动态服务注册、配置、管理平台, 是构建以“服务”为中心的现代应用架构 (例如微服务范式、云原生范式) 的服务基础设施
其他类似的还有Eureka,Zookeeper,Consul
Nacos = Spring Cloud Eureka + Spring Cloud Config
-
通过 Nacos Server 和 spring-cloud-starter-alibaba-nacos-config 实现配置的动态变更
-
通过 Nacos Server 和 spring-cloud-starter-alibaba-nacos-discovery 实现服务的注册与发现
Nacos结构图:
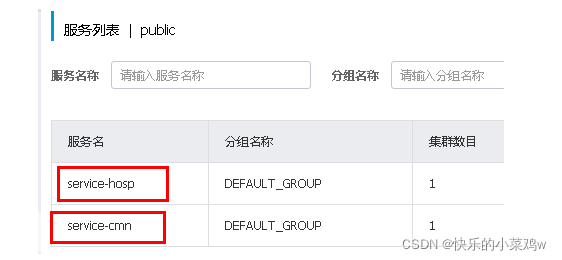
具体操作–注册:例如在Nacos注册service-hosp
1、引入依赖
<!-- 服务注册 -->
<dependency><groupId>com.alibaba.cloud</groupId><artifactId>spring-cloud-starter-alibaba-nacos-discovery</artifactId>
</dependency>
2、在配置文件添加Nacos服务地址
# nacos服务地址
spring.cloud.nacos.discovery.server-addr=127.0.0.1:8848
3、在service-hosp的启动类上添加@EnableDiscoveryClient注解(启动 发现/注册 客户端/服务)
@SpringBootApplication
@ComponentScan(basePackages = "com.atguigu")
@EnableDiscoveryClient
public class ServiceHospApplication {public static void main(String[] args) {SpringApplication.run(ServiceHospApplication.class, args);}
}
4、启动service-hosp服务即可在Nacos管理界面的服务列表中看到注册的服务
十二、SpringCloud Feign
Feign的翻译为假装、佯装。举例理解:比如service-hosp模块佯装调用service-cmn-client模块的接口方法,但是从本质上来说其实调用的是service-cmn模块的接口方法
创建service-client模块
引入依赖
<!-- 服务调用feign -->
<dependency>
<groupId>org.springframework.cloud</groupId>
<artifactId>spring-cloud-starter-openfeign</artifactId>
<scope>provided </scope>
</dependency>
</dependencies>
在service-client模块创建service-cmn-client模块
添加Feign被远程调用接口类
/*** 数据字典API接口*/
@FeignClient("service-cmn")
public interface DictFeignClient {/**
* 获取数据字典名称
* @param parentDictCode
* @param value
* @return
*/
@GetMapping(value = "/admin/cmn/dict/getName/{parentDictCode}/{value}")String getName(@PathVariable("parentDictCode") String parentDictCode, @PathVariable("value") String value);/**
* 获取数据字典名称
* @param value
* @return
*/
@GetMapping(value = "/admin/cmn/dict/getName/{value}")String getName(@PathVariable("value") String value);
}
service-hosp模块远程调用service-cmn模块的接口
在service父模块引入依赖
<!-- 服务调用feign -->
<dependency><groupId>org.springframework.cloud</groupId><artifactId>spring-cloud-starter-openfeign</artifactId>
</dependency>
在service-hosp模块引入service-cmn-client(也就是service-cmn模块的client)依赖
<dependency><groupId>com.atguigu.yygh</groupId><artifactId>service-cmn-client</artifactId><version>1.0</version>
</dependency>
在service-hosp模块的启动类上添加开启服务调用的注解 @EnableFeignClients(basePackages = “com.atguigu”)
@SpringBootApplication
@ComponentScan(basePackages = "com.atguigu")
@EnableDiscoveryClient
@EnableFeignClients(basePackages = "com.atguigu")
public class ServiceHospApplication {public static void main(String[] args) {SpringApplication.run(ServiceHospApplication.class, args);}
}
修改HospitalServiceImpl实现类方法,将远程调用接口返回的数据整合进去
>>>>>>>>>>>>>>>>>>>>>>>>>>>>>>>>>>>>>
@Autowired 【注入字典的Feignclient】
private DictFeignClient dictFeignClient;
<<<<<<<<<<<<<<<<<<<<<<<<<<<<<<<<<<<<
@Override
public Page<Hospital> selectPage(Integer page, Integer limit, HospitalQueryVo hospitalQueryVo) {Sort sort = Sort.by(Sort.Direction.DESC, "createTime");
//0为第一页
Pageable pageable = PageRequest.of(page-1, limit, sort);Hospital hospital = new Hospital();BeanUtils.copyProperties(hospitalQueryVo, hospital);//创建匹配器,即如何使用查询条件
ExampleMatcher matcher = ExampleMatcher.matching() //构建对象
.withStringMatcher(ExampleMatcher.StringMatcher.CONTAINING) //改变默认字符串匹配方式:模糊查询
.withIgnoreCase(true); //改变默认大小写忽略方式:忽略大小写//创建实例
Example<Hospital> example = Example.of(hospital, matcher);Page<Hospital> pages = hospitalRepository.findAll(example, pageable);>>>>>>>>>>>>>>>>>>>>>>>
【调用封装数据方法】
pages.getContent().stream().forEach(item -> {this.packHospital(item);});<<<<<<<<<<<<<<<<<<<<<<
return pages;
}>>>>>>>>>>>>>>>>>>>>>>>>>>>>>>>>>>>>>>>>
【这个方法其实是把远程调用方法的返回数据整合原返回数据一块封装到实体类中进行返回,所以这个方法叫做整合封装数据方法其实更合适】
/**
* 封装数据
* @param hospital
* @return
*/
private Hospital packHospital(Hospital hospital) {String hostypeString = dictFeignClient.getName(DictEnum.HOSTYPE.getDictCode(),hospital.getHostype());String provinceString = dictFeignClient.getName(hospital.getProvinceCode());String cityString = dictFeignClient.getName(hospital.getCityCode());String districtString = dictFeignClient.getName(hospital.getDistrictCode());hospital.getParam().put("hostypeString", hostypeString);hospital.getParam().put("fullAddress", provinceString + cityString + districtString + hospital.getAddress());
return hospital;}
<<<<<<<<<<<<<<<<<<<<<<<<<<<<<<<<<<<<<<<<<<<<<<<
十三、Spring Cloud Gateway
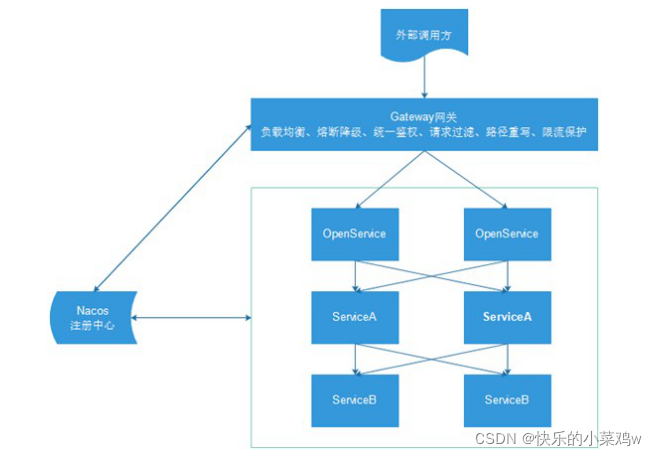
网关介绍
API网关出现的原因是微服务架构的出现,不同的微服务一般会有不同的网络地址,而外部客户端可能需要调用多个服务的接口才能完成一个业务需求,如果让客户端直接与各个微服务通信,会有以下的问题:
- 客户端会多次请求不同的微服务,增加了客户端的复杂性
- 存在跨域请求,在一定场景下处理相对复杂
- 认证复杂,每个服务都需要独立认证
- 难以重构,随着项目的迭代,可能需要重新划分微服务。例如,可能将多个服务合并成一个或者将一个服务拆分成多个。如果客户端直接与微服务通信,那么重构将会很难实施
- 某些微服务可能使用了防火墙 / 浏览器不友好的协议,直接访问会有一定的困难
以上这些问题可以借助 API 网关解决。API 网关是介于客户端和服务器端之间的中间层,所有的外部请求都会先经过API 网关这一层。也就是说,API 的实现方面更多的考虑业务逻辑,而安全、性能、监控可以交由 API 网关来做,这样既提高业务灵活性又不缺安全性
Spring Cloud Gateway介绍
Spring cloud gateway是spring官方基于Spring 5.0、Spring Boot2.0和Project Reactor等技术开发的网关,Spring Cloud Gateway旨在为微服务架构提供简单、有效和统一的API路由管理方式,Spring Cloud Gateway作为Spring Cloud生态系统中的网关,目标是替代Netflix Zuul,其不仅提供统一的路由方式,并且还基于Filer链的方式提供了网关基本的功能,例如:安全、监控/埋点、限流等
搭建server-gateway模块
导入依赖
<dependency><groupId>com.atguigu.yygh</groupId><artifactId>common-util</artifactId><version>1.0</version></dependency><dependency><groupId>org.springframework.cloud</groupId><artifactId>spring-cloud-starter-gateway</artifactId></dependency><!-- 服务注册 --><dependency><groupId>com.alibaba.cloud</groupId><artifactId>spring-cloud-starter-alibaba-nacos-discovery</artifactId></dependency>
配置文件application.properties中添加配置
# 服务端口
server.port=80
# 服务名
spring.application.name=service-gateway# nacos服务地址
spring.cloud.nacos.discovery.server-addr=127.0.0.1:8848#使用服务发现路由
spring.cloud.gateway.discovery.locator.enabled=true#设置路由id
spring.cloud.gateway.routes[0].id=service-hosp
#设置路由的uri
spring.cloud.gateway.routes[0].uri=lb://service-hosp
#设置路由断言,代理servicerId为auth-service的/auth/路径
spring.cloud.gateway.routes[0].predicates= Path=/*/hosp/**#设置路由id
spring.cloud.gateway.routes[1].id=service-cmn
#设置路由的uri
spring.cloud.gateway.routes[1].uri=lb://service-cmn
#设置路由断言,代理servicerId为auth-service的/auth/路径
spring.cloud.gateway.routes[1].predicates= Path=/*/cmn/**>>>>>>>>>>>>>>>>>>>>>>>>>>>>>>>>>>>>>>>>>>>>>>>>>>>>>>>>>>>>>>>>>>>>>>>>>>>>>>>>>>>>
后续添加
#设置路由id
spring.cloud.gateway.routes[2].id=service-user
#设置路由的uri
spring.cloud.gateway.routes[2].uri=lb://service-user
#设置路由断言,代理servicerId为auth-service的/auth/路径
spring.cloud.gateway.routes[2].predicates= Path=/*/user/**#设置路由id
spring.cloud.gateway.routes[3].id=service-msm
#设置路由的uri
spring.cloud.gateway.routes[3].uri=lb://service-msm
#设置路由断言,代理servicerId为auth-service的/auth/路径
spring.cloud.gateway.routes[3].predicates= Path=/*/msm/**#设置路由id
spring.cloud.gateway.routes[4].id=service-user
#设置路由的uri
spring.cloud.gateway.routes[4].uri=lb://service-user
#设置路由断言,代理servicerId为auth-service的/auth/路径
spring.cloud.gateway.routes[4].predicates= Path=/*/ucenter/**#设置路由id
spring.cloud.gateway.routes[5].id=service-oss
#设置路由的uri
spring.cloud.gateway.routes[5].uri=lb://service-oss
#设置路由断言,代理servicerId为auth-service的/auth/路径
spring.cloud.gateway.routes[5].predicates= Path=/*/oss/**#设置路由id
spring.cloud.gateway.routes[6].id=service-order
#设置路由的uri
spring.cloud.gateway.routes[6].uri=lb://service-order
#设置路由断言,代理servicerId为auth-service的/auth/路径
spring.cloud.gateway.routes[6].predicates= Path=/*/order/**#设置路由id
spring.cloud.gateway.routes[7].id=service-statistics
#设置路由的uri
spring.cloud.gateway.routes[7].uri=lb://service-statistics
#设置路由断言,代理servicerId为auth-service的/auth/路径
spring.cloud.gateway.routes[7].predicates= Path=/*/statistics/**
<<<<<<<<<<<<<<<<<<<<<<<<<<<<<<<<<<<<<<<<<<<<<<<<<<<<<<<<<<<<<<<<<<<<<<<<<<<<<<<<<<<<<<
添加启动类
@SpringBootApplication
public class ServerGatewayApplication
跨域处理
跨域:浏览器对于javascript的同源策略的限制 。
以下情况都属于跨域:
| 跨域原因说明 | 示例 |
|---|---|
| 域名不同 | www.jd.com 与 www.taobao.com |
| 域名相同,端口不同 | www.jd.com:8080 与 www.jd.com:8081 |
| 二级域名不同 | item.jd.com 与 miaosha.jd.com |
| http和https也属于跨域 |
如果域名和端口都相同,但是请求路径不同,不属于跨域,如:www.jd.com/item 和www.jd.com/goods
而我们刚才是从localhost:1000去访问localhost:8888,这属于端口不同,跨域了。
为什么有跨域问题?
跨域不一定都会有跨域问题。
因为跨域问题是浏览器对于ajax请求的一种安全限制:一个页面发起的ajax请求,只能是与当前页域名相同的路径,这能有效的阻止跨站攻击。
因此:跨域问题 是针对ajax的一种限制。
但是这却给我们的开发带来了不便,而且在实际生产环境中,肯定会有很多台服务器之间交互,地址和端口都可能不同,怎么办?
解决跨域问题
全局配置类实现:CorsConfig类
@Configuration
public class CorsConfig {@Beanpublic CorsWebFilter corsFilter() {CorsConfiguration config = new CorsConfiguration();config.addAllowedMethod("*");config.addAllowedOrigin("*");config.addAllowedHeader("*");UrlBasedCorsConfigurationSource source = new UrlBasedCorsConfigurationSource(new PathPatternParser());source.registerCorsConfiguration("/**", config);return new CorsWebFilter(source);}
}
服务调整
目前我们已经在网关做了跨域处理,那么service服务就不需要再做跨域处理了,将之前在controller类上添加过@CrossOrigin标签的去掉,防止程序异常
十四、JWT(Json Web Token)
JWT介绍
JWT(Json Web Token)是为了在网络应用环境间传递声明而执行的一种基于JSON的开放标准。
JWT的声明一般被用来在身份提供者和服务提供者间传递被认证的用户身份信息,以便于从资源服务器获取资源。比如用在用户登录上
JWT最重要的作用就是对 token信息的防伪作用
JWT原理
一个JWT由三个部分组成:公共部分、私有部分、签名部分,最后由这三者组合进行base64编码得到JWT。
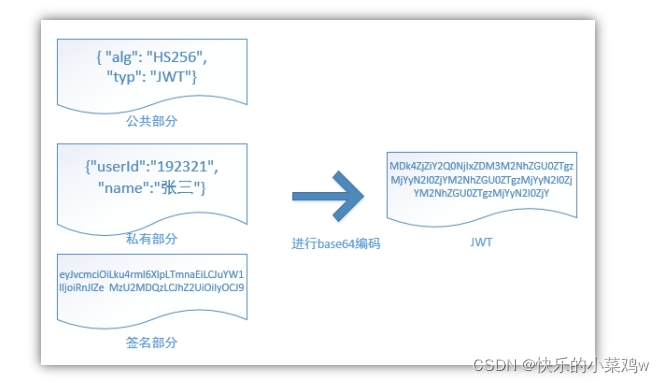
公共部分
主要是该JWT的相关配置参数,比如签名的加密算法、格式类型、过期时间等等。
Key=ATGUIGU
私有部分
用户自定义的内容,根据实际需要真正要封装的信息。
userInfo{用户的Id,用户的昵称nickName}
签名部分
SaltiP: 当前服务器的Ip地址!{linux 中配置代理服务器的ip}
主要用户对JWT生成字符串的时候,进行加密{盐值}
最终 key+userInfo+salt-------base64------>token
base64编码,并不是加密,只是把明文信息变成了不可见的字符串。但是其实只要用一些工具就可以把base64编码解成明文,所以不要在JWT中放入涉及私密的信息。
集成JWT
引入依赖:在common-util模块pom.xml添加依赖
<dependency><groupId>io.jsonwebtoken</groupId><artifactId>jjwt</artifactId>
</dependency>
添加帮助类:在common-util模块编写JwtHelper类
public class JwtHelper {private static long tokenExpiration = 24*60*60*1000;private static String tokenSignKey = "123456";public static String createToken(Long userId, String userName) {String token = Jwts.builder().setSubject("YYGH-USER").setExpiration(new Date(System.currentTimeMillis() + tokenExpiration)).claim("userId", userId).claim("userName", userName).signWith(SignatureAlgorithm.HS512, tokenSignKey).compressWith(CompressionCodecs.GZIP).compact();return token;}public static Long getUserId(String token) {if(StringUtils.isEmpty(token)) return null;Jws<Claims> claimsJws = Jwts.parser().setSigningKey(tokenSignKey).parseClaimsJws(token);Claims claims = claimsJws.getBody();Integer userId = (Integer)claims.get("userId");return userId.longValue();}public static String getUserName(String token) {if(StringUtils.isEmpty(token)) return "";Jws<Claims> claimsJws
= Jwts.parser().setSigningKey(tokenSignKey).parseClaimsJws(token);Claims claims = claimsJws.getBody();return (String)claims.get("userName");}public static void main(String[] args) {String token = JwtHelper.createToken(1L, "55");System.out.println(token);System.out.println(JwtHelper.getUserId(token));System.out.println(JwtHelper.getUserName(token));}
}
完善登录service接口
public Map<String, Object> login(LoginVo loginVo) {…………
<<<<<<<<<<<<<<<<<<<<<<<<<<<<<<<<<<<<<<<<<<<<<<<<<<<<<<<<<<<<<<<
修改UserInfoServiceImpl类登录方法//jwt生成token字符串String token = JwtHelper.createToken(userInfo.getId(), name);map.put("token",token);
>>>>>>>>>>>>>>>>>>>>>>>>>>>>>>>>>>>>>>>>>>>>>>>>>>>>>>>>>>>>return map;
}
十五、阿里云短信服务
服务申请不下来,这个我自己改成了短信验证码发送到控制台显示,也实现了验证码登录
十六、用户认证与网关整合
思路:
-
所有请求都会经过服务网关,服务网关对外暴露服务,在网关进行统一用户认证;
-
既然要在网关进行用户认证,网关得知道对哪些url进行认证,所以我们得对url制定规则
-
Api接口异步请求的,我们采取url规则匹配,如:/api/ ** /auth/ **,如凡是满足该规则的都必须用户认证
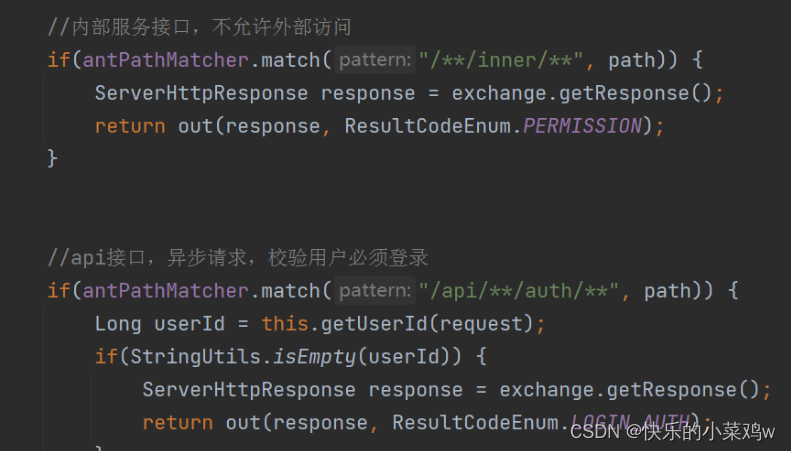
添加拦截器filter:
在service-gateway模块添加filter包,在filter包内添加AuthGlobalFilter.Java
@Override
public Mono<Void> filter(ServerWebExchange exchange, GatewayFilterChain chain) {ServerHttpRequest request = exchange.getRequest();String path = request.getURI().getPath();System.out.println("==="+path);//内部服务接口,不允许外部访问if(antPathMatcher.match("/**/inner/**", path)) {ServerHttpResponse response = exchange.getResponse();return out(response, ResultCodeEnum.PERMISSION);}Long userId = this.getUserId(request);//api接口,异步请求,校验用户必须登录if(antPathMatcher.match("/api/**/auth/**", path)) {if(StringUtils.isEmpty(userId)) {ServerHttpResponse response = exchange.getResponse();return out(response, ResultCodeEnum.LOGIN_AUTH);}}return chain.filter(exchange);
}
在服务网关中判断用户登录状态
在网关中如何获取用户信息:统一从header头信息中获取
判断用户信息合法:登录时我们返回用户token,在服务网关中获取到token后,我在到redis中去查看用户id,如何用户id存在,则token合法,否则不合法
/*** 获取当前登录用户id* @param request* @return*/
private Long getUserId(ServerHttpRequest request) {Stringtoken ="";List<String> tokenList = request.getHeaders().get("token");if(null  != tokenList) {token = tokenList.get(0);}if(!StringUtils.isEmpty(token)) {return JwtHelper.getUserId(token);}return null;
}
AuthGlobalFilter.Java完整代码
/*** <p>* 全局Filter,统一处理会员登录与外部不允许访问的服务* </p>** @author qy* @since 2019-11-21*/
@Component
public class AuthGlobalFilter implements GlobalFilter, Ordered {private AntPathMatcher antPathMatcher = new AntPathMatcher();@Overridepublic Mono<Void> filter(ServerWebExchange exchange, GatewayFilterChain chain) {ServerHttpRequest request = exchange.getRequest();String path = request.getURI().getPath();System.out.println("==="+path);//内部服务接口,不允许外部访问if(antPathMatcher.match("/**/inner/**", path)) {ServerHttpResponse response = exchange.getResponse();return out(response, ResultCodeEnum.PERMISSION);}Long userId = this.getUserId(request);//api接口,异步请求,校验用户必须登录if(antPathMatcher.match("/api/**/auth/**", path)) {if(StringUtils.isEmpty(userId)) {ServerHttpResponse response = exchange.getResponse();return out(response, ResultCodeEnum.LOGIN_AUTH);}}return chain.filter(exchange);}@Overridepublic int getOrder() {return 0;}/*** api接口鉴权失败返回数据* @param response* @return*/private Mono<Void> out(ServerHttpResponse response, ResultCodeEnum resultCodeEnum) {Result result = Result.build(null, resultCodeEnum);byte[] bits = JSONObject.toJSONString(result).getBytes(StandardCharsets.UTF_8);DataBuffer buffer = response.bufferFactory().wrap(bits);//指定编码,否则在浏览器中会中文乱码response.getHeaders().add("Content-Type", "application/json;charset=UTF-8");return response.writeWith(Mono.just(buffer));}/*** 获取当前登录用户id* @param request* @return*/private Long getUserId(ServerHttpRequest request) {Stringtoken="";List<String> tokenList = request.getHeaders().get("token");if(null  != tokenList) {token = tokenList.get(0);}if(!StringUtils.isEmpty(token)) {return JwtHelper.getUserId(token);}return null;}
}
十七、OAuth2 微信登录
十八、阿里云OSS对象存储服务
搭建service-oss模块
引入阿里云oss依赖
<!-- 阿里云oss依赖 --><dependency><groupId>com.aliyun.oss</groupId><artifactId>aliyun-sdk-oss</artifactId></dependency>
配置文件application.properties
# 服务端口
server.port=8205
# 服务名
spring.application.name=service-oss#返回json的全局时间格式
spring.jackson.date-format=yyyy-MM-dd HH:mm:ss
spring.jackson.time-zone=GMT+8# nacos服务地址
spring.cloud.nacos.discovery.server-addr=127.0.0.1:8848aliyun.oss.endpoint=oss-cn-beijing.aliyuncs.com
aliyun.oss.accessKeyId=xxxxxx
aliyun.oss.secret=xxxxxx
aliyun.oss.bucket=yygh-atguigu
启动类
//取消数据源自动配置
@SpringBootApplication(exclude = DataSourceAutoConfiguration.class)
@EnableDiscoveryClient
@ComponentScan(basePackages = {"com.atguigu"})
public class ServiceOssApplication {public static void main(String[] args) {SpringApplication.run(ServiceOssApplication.class, args);}
}
配置网关 在service-gateway模块的application.properties
#设置路由id
spring.cloud.gateway.routes[5].id=service-oss
#设置路由的uri
spring.cloud.gateway.routes[5].uri=lb://service-oss
#设置路由断言,代理servicerId为auth-service的/auth/路径
spring.cloud.gateway.routes[5].predicates= Path=/*/oss/**
创建存储空间:存储空间是OSS的全局命名空间,相当于数据的容器,可以存储若干文件。
使用此demo运行一次即可创建一个Bucket【也可以自己在阿里云OSS控制台图形化页面手动创建】
public class demo {public static void main(String[] args) {// Endpoint以华东1(杭州)为例,其它Region请按实际情况填写。String endpoint = "https://oss-cn-hangzhou.aliyuncs.com";// 阿里云账号AccessKey拥有所有API的访问权限,风险很高。强烈建议您创建并使用RAM用户进行API访问或日常运维,请登录RAM控制台创建RAM用户。String accessKeyId = "yourAccessKeyId";String accessKeySecret = "yourAccessKeySecret";// 填写Bucket名称,例如examplebucket。String bucketName = "examplebucket";// 创建OSSClient实例。OSS ossClient = new OSSClientBuilder().build(endpoint, accessKeyId, accessKeySecret);// 创建存储空间。ossClient.createBucket(bucketName);//关闭OSSClientossClient.shutdown();}
}
创建com.atguigu.yygh.oss.utils.ConstantOssPropertiesUtils配置类
@Component
public class ConstantOssPropertiesUtils implements InitializingBean {@Value("${aliyun.oss.endpoint}")private String endpoint;@Value("${aliyun.oss.accessKeyId}")private String accessKeyId;@Value("${aliyun.oss.secret}")private String secret;@Value("${aliyun.oss.bucket}")private String bucket;public static String EDNPOINT;public static String ACCESS_KEY_ID;public static String SECRECT;public static String BUCKET;@Overridepublic void afterPropertiesSet() throws Exception {EDNPOINT=endpoint;ACCESS_KEY_ID=accessKeyId;SECRECT=secret;BUCKET=bucket;}
}
接口、实现类、Controller
接口:FileService
public interface FileService {//上传文件到阿里云ossString upload(MultipartFile file);
}实现类:FileServiceImpl
@Service
public class FileServiceImpl implements FileService {@Overridepublic String upload(MultipartFile file) {// Endpoint以杭州为例,其它Region请按实际情况填写。String endpoint = ConstantOssPropertiesUtils.EDNPOINT;String accessKeyId = ConstantOssPropertiesUtils.ACCESS_KEY_ID;String accessKeySecret = ConstantOssPropertiesUtils.SECRECT;String bucketName = ConstantOssPropertiesUtils.BUCKET;try {// 创建OSSClient实例。OSS ossClient = new OSSClientBuilder().build(endpoint, accessKeyId, accessKeySecret);// 上传文件流。InputStream inputStream = file.getInputStream();String fileName = file.getOriginalFilename();//生成随机唯一值,使用uuid,添加到文件名称里面String uuid = UUID.randomUUID().toString().replaceAll("-","");fileName = uuid+fileName;//按照当前日期,创建文件夹,上传到创建文件夹里面//  2021/02/02/01.jpgString timeUrl = new DateTime().toString("yyyy/MM/dd");fileName = timeUrl+"/"+fileName;//调用方法实现上传ossClient.putObject(bucketName, fileName, inputStream);// 关闭OSSClient。ossClient.shutdown();//上传之后文件路径// https://yygh-atguigu.oss-cn-beijing.aliyuncs.com/01.jpgString url = "https://"+bucketName+"."+endpoint+"/"+fileName;//返回return url;} catch (IOException e) {e.printStackTrace();return null;}}
}Controller:FileApiController
@RestController
@RequestMapping("/api/oss/file")
public class FileApiController {@Autowiredprivate FileService fileService;//上传文件到阿里云oss@PostMapping("fileUpload")public Result fileUpload(MultipartFile file) {//获取上传文件String url = fileService.upload(file);return Result.ok(url);}
}
十九、RabbitMQ
(1)简介:
以商品订单场景为例,
如果商品服务和订单服务是两个不同的微服务,在下单的过程中订单服务需要调用商品服务进行扣库存操作。按照传统的方式,下单过程要等到调用完毕之后才能返回下单成功,如果网络产生波动等原因使得商品服务扣库存延迟或者失败,会带来较差的用户体验,如果在高并发的场景下,这样的处理显然是不合适的,那怎么进行优化呢?这就需要消息队列登场了。
消息队列提供一个异步通信机制,消息的发送者不必一直等待到消息被成功处理才返回,而是立即返回。消息中间件负责处理网络通信,如果网络连接不可用,消息被暂存于队列当中,当网络畅通的时候在将消息转发给相应的应用程序或者服务,当然前提是这些服务订阅了该队列。如果在商品服务和订单服务之间使用消息中间件,既可以提高并发量,又降低服务之间的耦合度。
RabbitMQ就是这样一款消息队列。RabbitMQ是一个开源的消息代理的队列服务器,用来通过普通协议在完全不同的应用之间共享数据。
(2)典型应用场景:
异步处理:把消息放入消息中间件中,等到需要的时候再去处理。
流量削峰:例如秒杀活动,在短时间内访问量急剧增加,使用消息队列,当消息队列满了就拒绝响应,跳转到错误页面,这样就可以使得系统不会因为超负载而崩溃。
日志处理
应用解耦
安装RabbitMQ
docker pull rabbitmq:management
docker run -d -p 5672:5672 -p 15672:15672 --name rabbitmq rabbitmq:management
搭建rabbit-util模块:在common模块下搭建,搭建过程如:common-util
引入依赖
<!--rabbitmq消息队列--><dependency><groupId>org.springframework.boot</groupId><artifactId>spring-boot-starter-actuator</artifactId></dependency><dependency><groupId>org.springframework.cloud</groupId><artifactId>spring-cloud-starter-bus-amqp</artifactId></dependency>
封装Service方法
@Service
public class RabbitService {@Autowiredprivate RabbitTemplate rabbitTemplate;/***  发送消息* @param exchange 交换机* @param routingKey 路由键* @param message 消息*/public boolean sendMessage(String exchange, String routingKey, Object message) {rabbitTemplate.convertAndSend(exchange, routingKey, message);return true;}
}
创建RabbitMQ配置类,配置mq消息转换器
@Configuration
public class MQConfig {@Beanpublic MessageConverter messageConverter(){return new Jackson2JsonMessageConverter();}
}
//说明:默认是字符串转换器
封装更新排班数量接口
操作模块:service-hosp
引入依赖
<!--rabbitmq消息队列-->
<dependency><groupId>com.atguigu.yygh</groupId><artifactId>rabbit-util</artifactId><version>1.0</version>
</dependency>
添加配置:在service-hosp的application.properties中添加
#rabbitmq地址
spring.rabbitmq.host=192.168.44.165
spring.rabbitmq.port=5672
spring.rabbitmq.username=guest
spring.rabbitmq.password=guest
添加常量配置 constant:常量
在rabbit-util模块的constant包的MqConst类添加
/*** 预约下单*/
public static final String EXCHANGE_DIRECT_ORDER = "exchange.direct.order";
public static final String ROUTING_ORDER = "order";
//队列
public static final String QUEUE_ORDER  = "queue.order";
使用model模块封装的更新排班实体类
@Data
@ApiModel(description = "OrderMqVo")
public class OrderMqVo {@ApiModelProperty(value = "可预约数")private Integer reservedNumber;@ApiModelProperty(value = "剩余预约数")private Integer availableNumber;@ApiModelProperty(value = "排班id")private String scheduleId;@ApiModelProperty(value = "短信实体")private MsmVo msmVo;
}
接口方法和实现类方法
接口 ScheduleService
/*** 修改排班
*/
void update(Schedule schedule);实现类 ScheduleServiceImpl
@Override
public void update(Schedule schedule) {schedule.setUpdateTime(new Date());//主键一致就是更新scheduleRepository.save(schedule);
}
封装mq监听器:在service-hosp模块
@Component
public class HospitalReceiver {@Autowiredprivate ScheduleService scheduleService;@Autowiredprivate RabbitService rabbitService;@RabbitListener(bindings = @QueueBinding(value = @Queue(value = MqConst.QUEUE_ORDER, durable = "true"),exchange = @Exchange(value = MqConst.EXCHANGE_DIRECT_ORDER),key = {MqConst.ROUTING_ORDER}))public void receiver(OrderMqVo orderMqVo, Message message, Channel channel) throws IOException {//下单成功更新预约数Schedule schedule = scheduleService.getScheduleId(orderMqVo.getScheduleId());schedule.setReservedNumber(orderMqVo.getReservedNumber());schedule.setAvailableNumber(orderMqVo.getAvailableNumber());scheduleService.update(schedule);//发送短信MsmVo msmVo = orderMqVo.getMsmVo();if(null != msmVo) {rabbitService.sendMessage(MqConst.EXCHANGE_DIRECT_MSM, MqConst.ROUTING_MSM_ITEM, msmVo);}}
}
调整下单接口
操作模块:service-order
引入依赖
<dependency><groupId>com.atguigu</groupId><artifactId>rabbit_util</artifactId><version>0.0.1-SNAPSHOT</version>
</dependency>
添加配置
#rabbitmq地址
spring.rabbitmq.host=192.168.44.165
spring.rabbitmq.port=5672
spring.rabbitmq.username=guest
spring.rabbitmq.password=guest
修改下单接口实现类方法
@Autowired
private RabbitService rabbitService;@Transactional(rollbackFor = Exception.class)
@Override
public Long saveOrder(String scheduleId, Long patientId) {.......
>>>>>>>>>>>>>>>>>>>>>>>>>>>>>>>>>>>>>>>>>>>>>>>>>>//排班可预约数Integer reservedNumber = jsonObject.getInteger("reservedNumber");//排班剩余预约数Integer availableNumber = jsonObject.getInteger("availableNumber");//发送mq信息更新号源和短信通知//发送mq信息更新号源OrderMqVo orderMqVo = new OrderMqVo();orderMqVo.setScheduleId(scheduleId);orderMqVo.setReservedNumber(reservedNumber);orderMqVo.setAvailableNumber(availableNumber);//短信提示MsmVo msmVo = new MsmVo();msmVo.setPhone(orderInfo.getPatientPhone());msmVo.setTemplateCode("SMS_194640721");String reserveDate =
new DateTime(orderInfo.getReserveDate()).toString("yyyy-MM-dd")
+ (orderInfo.getReserveTime()==0 ? "上午": "下午");Map<String,Object> param = new HashMap<String,Object>(){{put("title", orderInfo.getHosname()+"|"+orderInfo.getDepname()+"|"+orderInfo.getTitle());put("amount", orderInfo.getAmount());put("reserveDate", reserveDate);put("name", orderInfo.getPatientName());put("quitTime", new DateTime(orderInfo.getQuitTime()).toString("yyyy-MM-dd HH:mm"));}};msmVo.setParam(param);orderMqVo.setMsmVo(msmVo);rabbitService.sendMessage(MqConst.EXCHANGE_DIRECT_ORDER, MqConst.ROUTING_ORDER, orderMqVo);
<<<<<<<<<<<<<<<<<<<<<<<<<<<<<<<<<<<<<<<<<<<<<<<<<<<<<<<<<} else {throw new YyghException(result.getString("message"), ResultCodeEnum.FAIL.getCode());}return orderInfo.getId();
}
二十、Docker
见https://blog.csdn.net/tufhgddty/article/details/123559160
这篇关于尚医通项目--20个技术栈个人总结的文章就介绍到这儿,希望我们推荐的文章对编程师们有所帮助!


