本文主要是介绍51.HarmonyOS鸿蒙系统 App(ArkUI)通知,希望对大家解决编程问题提供一定的参考价值,需要的开发者们随着小编来一起学习吧!
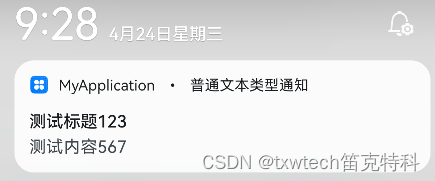
普通文本通知测试

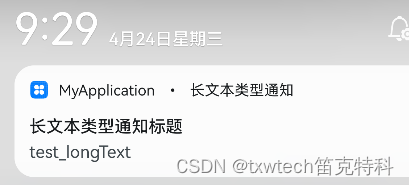
长文本通知测试

多行文本通知测试

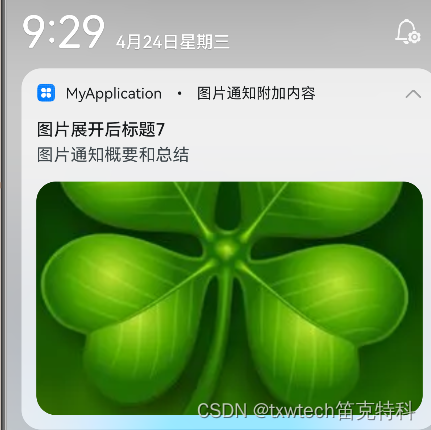
图片通知测试

进度条通知测试

通知简介
应用可以通过通知接口发送通知消息,终端用户可以通过通知栏查看通知内容,也可以点击通知来打开应用。
通知常见的使用场景:
-
显示接收到的短消息、即时消息等。
-
显示应用的推送消息,如广告、版本更新等。
-
显示当前正在进行的事件,如下载等。
HarmonyOS通过ANS(Advanced Notification Service,通知系统服务)对通知类型的消息进行管理,支持多种通知类型,如基础类型通知、进度条类型通知。
通知业务流程
通知业务流程由通知子系统、通知发送端、通知订阅端组成。一条通知从通知发送端产生,通过IPC通信发送到通知子系统,再由通知子系统分发给通知订阅端。
-
通知发送端:可以是三方应用或系统应用。开发者重点关注。
-
通知订阅端:只能为系统应用,比如通知中心。通知中心默认会订阅手机上所有应用对当前用户的通知。开发者无需关注。

基础类型通知主要应用于发送短信息、提示信息、广告推送等,支持普通文本类型、长文本类型、多行文本类型和图片类型。
表1 基础类型通知中的内容分类
| 类型 | 描述 |
|---|---|
| NOTIFICATION_CONTENT_BASIC_TEXT | 普通文本类型。 |
| NOTIFICATION_CONTENT_LONG_TEXT | 长文本类型。 |
| NOTIFICATION_CONTENT_MULTILINE | 多行文本类型。 |
| NOTIFICATION_CONTENT_PICTURE | 图片类型。 |

import NotificationManager from '@ohos.notificationManager';import image from '@ohos.multimedia.image';
import wantAgent from '@ohos.app.ability.wantAgent';
//import { Header} from '../common/components/CommonComponents'
//为通知添加行为意图,点击通知栏启动相关app应用程序,呼出对应应用程序let wantAgentObj = null; // 用于保存创建成功的wantAgent对象,后续使用其完成触发的动作。
// 通过WantAgentInfo的operationType设置动作类型。
let wantAgentInfo = {wants: [{deviceId: '',bundleName: 'com.example.myapplication',abilityName: 'EntryAbility',action: '',entities: [],uri: '',parameters: {}}],operationType: wantAgent.OperationType.START_ABILITY,requestCode: 0,wantAgentFlags:[wantAgent.WantAgentFlags.CONSTANT_FLAG]
}
// 创建WantAgent
// wantAgent.getWantAgent(wantAgentInfo, (err, data) => {
//   if (err) {
//     console.error('[WantAgent]getWantAgent err=' + JSON.stringify(err));
//   } else {
//     console.info('[WantAgent]getWantAgent success');
//     wantAgentObj = data;
//   }
// });// 构造NotificationRequest对象行为意图
let notificationRequest_behavior = {content: {contentType: NotificationManager.ContentType.NOTIFICATION_CONTENT_BASIC_TEXT,normal: {title: '行为意图Test_Title_呼出app',text: '行为意图Test_Text',additionalText: 'Test_AdditionalText',},},id: 6,label: 'TEST',wantAgent: wantAgentObj,
}// 图片构造
const color = new ArrayBuffer(60000);
let bufferArr = new Uint8Array(color);
for (var i = 0; i<bufferArr.byteLength;i++) {bufferArr[i++] = 60;bufferArr[i++] = 20;bufferArr[i++] = 220;bufferArr[i] = 100;
}
let opts = { editable:true, pixelFormat:"ARGB_8888", size: {height:100, width : 150}};
let imagePixelMap: PixelMap = undefined;NotificationManager.isSupportTemplate('downloadTemplate').then((data) => {console.info(`[ANS] isSupportTemplate success`);console.info('Succeeded in supporting download template notification.');let isSupportTpl: boolean = data; // isSupportTpl的值为true表示支持支持downloadTemplate模板类通知,false表示不支持
}).catch((err) => {console.error(`Failed to support download template notification. Code is ${err.code}, message is ${err.message}`);
});
let template = {name:'downloadTemplate',data: {title: '标题:',fileName: 'music.mp4',progressValue: 30,progressMaxValue:100,}
}
//构造NotificationRequest对象
let notificationRquest_progress = {id: 5,slotType: NotificationManager.SlotType.OTHER_TYPES,template: template,content: {contentType: NotificationManager.ContentType.NOTIFICATION_CONTENT_BASIC_TEXT,normal: {title: template.data.title + template.data.fileName,text: "sendTemplate",additionalText: "30%"}},deliveryTime: new Date().getTime(),showDeliveryTime: true
}let notificationRequest2 = {id:1,content:{contentType:NotificationManager.ContentType.NOTIFICATION_CONTENT_BASIC_TEXT,//普通文本类型通知normal:{title:'测试标题123',text:'测试内容567',additionalText:'普通文本类型通知'}}
}
let notificationRequest_long = {id:2,content:{contentType:NotificationManager.ContentType.NOTIFICATION_CONTENT_LONG_TEXT,//长文本类型通知longText:{title:'长文本类型通知标题123',text:'测试内容567',additionalText:'长文本类型通知',longText: 'test_longText',briefText: 'test_briefText',expandedTitle: '长文本类型通知标题',}}
}
let notificationRequest_multiline = {id:3,content:{contentType:NotificationManager.ContentType.NOTIFICATION_CONTENT_MULTILINE,//多行文本类型通知multiLine:{title:'多行文本类型标题123',text:'多行文本类型内容567',briefText: 'test_briefText',longTitle: '多行文本类型',lines: ['1行', '2行', '3行', '4行','5行'],}}
}
//
//Argument of type '{ id: number; content: { contentType: NotificationManager.ContentType; normal: { title: string; test: string; additionalText: string; }; }; }' is not assignable to parameter of type 'NotificationRequest'. The types of 'content.normal' are incompatible between these types. Property 'text' is missing in type '{ title: string; test: string; additionalText: string; }' but required in type 'NotificationBasicContent'. <tsCheck>
//Argument of type '{ id: number; content: { contentType: NotificationManager.ContentType; normal: { title: string; test: string; additionalText: string; }; }; }' is not assignable to parameter of type 'NotificationRequest'. <tsCheck>@Entry
@Component
struct Index {@State message: string = 'Hello World你好,世界很精彩'@State imagePixelMap: PixelMap = undefined;@State url :string =''// 全局任务idindex: number = 6@State bundleName: string = ''public async get_bundleName() {this.bundleName = await globalThis.context.abilityInfo.bundleName}//aboutToAppear函数在创建自定义组件的新实例后,在执行其build()函数之前执行。允许在aboutToAppear函数中改变状态变量,更改将在后续执行build()函数中生效。async aboutToAppear() {{let rm = getContext(this).resourceManager;// 读取图片let file = await rm.getMediaContent($r('app.media.leaf'))// 创建PixelMapimage.createImageSource(file.buffer).createPixelMap().then(value => this.imagePixelMap = value).catch(reason => console.log('testTag', '加载图片异常', JSON.stringify(reason)))}}// 图片型文本发送publishPictureNotification() {let request: NotificationManager.NotificationRequest = {id: this.index++,content: {contentType: NotificationManager.ContentType.NOTIFICATION_CONTENT_PICTURE,picture: {title: '图片通知标题' + this.index,text: '图片通知内容详情',additionalText: '图片通知附加内容',briefText: '图片通知概要和总结',expandedTitle: '图片展开后标题' + this.index,picture: this.imagePixelMap}}}NotificationManager.publish(request,(err)=>{if(err){console.error(`图片类型通知失败,err[${err}]`);return;}console.info('图片文本类型通知成功')});}httpRequest2(){let aa:PixelMap = undefinedlet imageRes = image.createImageSource(this.url)}build() {Row() {Column() {Text(this.message).fontSize(50).fontWeight(FontWeight.Bold)Button('普通文本通知测试').onClick(()=>{NotificationManager.publish(notificationRequest2,(err)=>{if(err){console.error(`普通文本类型通知失败,err[${err}]`);return;}console.info('普通文本类型通知成功')});})Button('长文本通知测试').onClick(()=>{NotificationManager.publish(notificationRequest_long,(err)=>{if(err){console.error(`长文本通知测试失败,err[${err}]`);return;}console.info('长文本通知测试成功')});})Button('多行文本通知测试').onClick(()=>{NotificationManager.publish(notificationRequest_multiline,(err)=>{if(err){console.error(`多行文本通知测试失败,err[${err}]`);return;}console.info('多行文本通知测试成功')});})Button('图片通知测试').onClick(()=>{// this.url = $r('app.media.icon')this.publishPictureNotification();})Button('进度条通知测试').onClick(()=>{NotificationManager.publish(notificationRquest_progress,(err)=>{if(err){console.error(`进度条通知测试失败,err[${err}]`);return;}console.info('进度条通知测试成功')});})// Button('行为意图通知测试_呼出app')//   .onClick(()=>{//////   })}.width('100%')}.height('100%')}
}
这篇关于51.HarmonyOS鸿蒙系统 App(ArkUI)通知的文章就介绍到这儿,希望我们推荐的文章对编程师们有所帮助!


