本文主要是介绍【Vue】第十八部分 路由 vue-router(重要 重要 重要),希望对大家解决编程问题提供一定的参考价值,需要的开发者们随着小编来一起学习吧!
【Vue】第十八部分 路由 vue-router(重要 重要 重要)
文章目录
- 【Vue】第十八部分 路由 vue-router(重要 重要 重要)
- 18. 路由 vue-router(重要 重要 重要)
- 18.1 相关概念的解释
- 18.1.1 什么是vue-router?
- 18.1.2 什么是SPA应用?
- 18.1.3 什么是路由?
- 18.1.4 路由的分类
- 18.2 路由器的基本使用
- 18.2.1 准备工作
- 18.2.2 小案例
- 18.3 注意点
- 18.4 嵌套路由
- 18.4.1 小案例
- 18.4.2 嵌套路由注意点总结
- 18.5 路由的query参数
- 18.5.1 传递参数(两种写法)
- 18.5.2 接收参数
- 18.6 命名路由
- 18.6.1 命名路由的作用
- 18.6.2 使用方式
- 18.6.3 简化跳转
- 18.7 路由的params参数
- 18.7.1 案例示图 (实现效果和query一样)
- 18.7.2 传递参数
- 18.7.3 接收参数
- 18.8 路由中的props配置
- 18.9 <router-link> 的replace属性
- 18.9.1 基本概念
- 18.9.2 如何开始replace模式
- 18.10 编程式路由导航
- 18.11 缓存路由组件
- 18.11.1 注意点
- 18.11.2 具体代码
- 18.12 路由组件中独有的两个生命周期钩子
- 18.12.1 两个生命周期钩子
- 18.13 全局路由守卫(重要 重要 重要)
- 18.13.1 前置路由守卫
- 18.13.2 后置路由守卫
- 18.14 独享路由守卫
- 18.15 组件内守卫
- 总结
18. 路由 vue-router(重要 重要 重要)
18.1 相关概念的解释
18.1.1 什么是vue-router?
它是Vue的一个插件库,专门用来实现SPA应用
npm i vue-router 安装插件库
Vue.use() 使用插件
18.1.2 什么是SPA应用?
- 单页面web应用
- 整个应用只有一个完整的页面
- 点击页面中的导航链接不会刷新页面,只会做页面的局部更新
- 数据需要通过
Ajax请求获取
18.1.3 什么是路由?
- 一个路由就表示一组的映射关系(key - value)
- key :路径 value:function 或者 components
18.1.4 路由的分类
前端路由:
- key是路径,value是组件
- 用于页面的展示
- 工程的过程:浏览器的路径发生改变的时候,对应的组件就会被应用展示
后端路由:
- key是路径,value是函数
- 用于去处理客服端提交的请求
- 工作的过程:服务器接收到一个请求时,会根据请求路径找到对于的函数来处理请求,返回响应的数据
18.2 路由器的基本使用
18.2.1 准备工作
因为这里使用的Vue2所以安装路由的版本是 3
npm i vue-router@3 安装vue-router
Vue.use() 使用插件
18.2.2 小案例
案例示图

src/router/index.js (vue-router配置)
import Vue from "vue";
// 导入vue-route
import VueRouter from "vue-router"//导入相关组件
import About from "../components/About.vue"
import Home from "../components/Home.vue"// 使用插件
Vue.use(VueRouter)//创建VueRouter实例对象,去管理一组一组的路由规则
export default new VueRouter({ //配置路由规则routes:[{// 下面代码的意思是:如果路径是/about,就展示About组件path:'/about',component:About},{path:'/home',component:Home}]})
main.js
import Vue from "vue"
import App from "./App.vue"
import router from "./router/index"Vue.config.productionTip = false   //阻止vue在生成时自动产生提示
new Vue({el: '#app',data: {},// 配置路由器router:router,render: h => h(App),beforeCreate(){Vue.prototype.$bus = this  //绑定事件总线}
})
App.vue
<template><div><div class="row"><div class="col-xs-offset-2 col-xs-8"><div class="page-header"><h2>Vue Router Demo</h2></div></div></div><div class="row"><div class="col-xs-2 col-xs-offset-2"><div class="list-group"><!--原html中使用a标签进行页面的跳转<a class="list-group-item" active-class="active" href="./about.html">About</a><a class="list-group-item" active-class="active" href="./home.html">Home</a> --><!-- router-link 最后都会转成<a>标签Vue中借助 router-link 标签实现路由的切换active-class = "xxx "  控制元素被激活的样式--><router-link class="list-group-item" active-class="active" to="/about">About</router-link><router-link class="list-group-item" active-class="active" to="/home">Home</router-link></div></div><div class="col-xs-6"><div class="panel"><div class="panel-body"><!-- router-view :指定组件的呈现位置 --><router-view></router-view></div></div></div></div></div>
</template><script>
export default {name:"App"
}
</script><style></style>
18.3 注意点
验证代码示图

-
路由组件通常存放在
pages文件夹,一般组件通常存放在components文件夹。 -
通过切换,“隐藏”了的路由组件,默认是被销毁掉的,需要的时候再去挂载。

-
每个组件都有自己的
$route属性,里面存储着自己的路由信息(也就是路由规则)。 -
整个应用只有一个路由器,可以通过组件的
$router属性获取到。 -
不要将路由和路由器搞混

18.4 嵌套路由
18.4.1 小案例

src/router/index.js (vue-router配置)
import Vue from "vue";
// 导入vue-route
import VueRouter from "vue-router"//导入相关组件
import About from "../pages/About.vue"
import Home from "../pages/Home.vue"
import News from "../pages/News.vue"
import Message from "../pages/Message.vue"// 使用插件
Vue.use(VueRouter)//创建VueRouter实例对象,去管理一组一组的路由规则
export default new VueRouter({ //配置路由规则routes:[{// 下面代码的意思是:如果路径有/about,就展示About组件path:'/about',component:About},{path:'/home',component:Home,children:[ //通过children配置子级路由{path:'news',  // 子级路由路径一定不要写成 /News,因为VueRouter会帮我们加上去component:News},{path:'message',component:Message}]}]})
Home组件
<template><div><h2>Home组件内容</h2><div><ul class="nav nav-tabs"><li><router-link class="list-group-item" active-class="active" to="/home/news">News</router-link></li><li><router-link class="list-group-item" active-class="active" to="/home/message">Message</router-link></li></ul><router-view></router-view></div></div>
</template><script>
export default {name:"Home",//    mounted(){//     console.log("Home挂载完毕!!");// },// beforeDestroy(){//     console.log("Home被销毁!!");// }// mounted(){//     Window.homeRoute = this.$route//     Window.homeRouter = this.$router// }
}
</script><style></style>
Message组件
<template><div><ul><li><a href="/message1">message001</a> </li><li><a href="/message2">message002</a> </li><li><a href="/message/3">message003</a> </li></ul></div>
</template><script>
export default {name:'Message'
}
</script><style></style>
News组件
<template><ul><li>news001</li><li>news002</li><li>news003</li></ul>
</template><script>
export default {name:'News'
}
</script><style></style>
18.4.2 嵌套路由注意点总结
- 配置子级路由时候,子级路由路径一定不要写成``/News
,因为VueRouter会帮我们加上/` - 跳转
<router-link to = "/home/news">News</router-link>,要写完整的路径 - 嵌套路由子级路由要写在父级路由里,通过
children配置项
18.5 路由的query参数
案例示图

18.5.1 传递参数(两种写法)
<template><div><ul><li v-for="l in list" :key="l.id"><!-- 路由跳转并且携带query参数,to的字符串写法 -->?(做分隔) key=value  &(做连接)key=value<!-- <router-link :to="`/home/message/detail?id=${l.id}&title=${i.title}`">{{l.title}}}</router-link> --><!-- 路由跳转并且携带query参数,to的对象写法(最好使用这个,便于维护) --><router-link :to="{path:'/home/message/detail',  //完整路径query:{  // query参数,把要传的参数写进去id:l.id,title:l.title}}">{{l.title}}</router-link></li></ul><hr><router-view></router-view></div>
</template><script>
export default {name:'Message',data(){return{list:[{id:'001',title:'新闻'},{id:'002',title:'运动'},{id:'003',title:'娱乐'},]}}
}
</script><style></style>
18.5.2 接收参数
this.$route.query.xxx
18.6 命名路由
18.6.1 命名路由的作用
作用:可以简化路由的跳转
18.6.2 使用方式
export default new VueRouter({ //配置路由规则routes:[{name:'about', //命名路由path:'/about',component:About},{path:'/home',component:Home,children:[ {path:'news', component:News},{path:'message',component:Message,children:[{name:'detail', //命名路由path:'detail',component:detail}]}]}]})
18.6.3 简化跳转
<template><div><ul><li v-for="l in list" :key="l.id"><router-link :to="{<!-- path:'/home/message/detail' -->		原来的写法					name:'detail',  //简化写法query:{  id:l.id,title:l.title}}">{{l.title}}</router-link></li></ul><hr><router-view></router-view></div>
</template>
18.7 路由的params参数
注意:在使用params参数时,如果使用的是对象的写法,则不能使用path配置项,必须要使用name配置项,不然会出错!!!
18.7.1 案例示图 (实现效果和query一样)

18.7.2 传递参数
<template><div><ul><li v-for="l in list" :key="l.id"><!-- 路由跳转并且携带params参数,to的字符串写法-->/(做分隔) 参数<!-- <router-link :to="`/home/message/detail/${l.id}/${l.title}`">{{l.title}}</router-link> --><!-- 路由跳转并且携带params参数,to的对象写法(最好使用这个,便于维护) --><!-- 该对象写法不能使用path,只能使用name --><router-link :to="{name : 'detail',  params:{  // params参数,把要传的参数写进去id:l.id,title:l.title}}">{{l.title}}</router-link></li></ul><hr><router-view></router-view></div>
</template><script>
export default {name:'Message',data(){return{list:[{id:'001',title:'新闻'},{id:'002',title:'运动'},{id:'003',title:'娱乐'},]}}
}
</script><style></style>
//创建VueRouter实例对象,去管理一组一组的路由规则
export default new VueRouter({ //配置路由规则routes:[{// 下面代码的意思是:如果路径有/about,就展示About组件name:'about',  //命名路由path:'/about',component:About},{path:'/home',component:Home,children:[ //通过children配置子级路由{path:'news',  // 子级路由路径一定不要写成 /News,因为VueRouter会帮我们加上去component:News},{path:'message',component:Message,children:[{name:'detail', //命名路由path:'detail/:id/:title', //使用占位符声明接收params参数component:detail}]}]}]})
18.7.3 接收参数
this.$route.params.xxx
18.8 路由中的props配置
作用:让组件能够更方便的接收到参数
//创建VueRouter实例对象,去管理一组一组的路由规则
export default new VueRouter({ //配置路由规则routes:[{// 下面代码的意思是:如果路径有/about,就展示About组件name:'about',  //命名路由path:'/about',component:About},{path:'/home',component:Home,children:[ //通过children配置子级路由{path:'news',  // 子级路由路径一定不要写成 /News,因为VueRouter会帮我们加上去component:News},{path:'message',component:Message,children:[{name:'detail', //命名路由path:'detail/:id/:title', //使用占位符声明接收params参数component:detail,// 新的配置项props/* 第一种写法,值为对象,该对象中所有key-value都会以props的形式,传递给detail组件。(props写在哪里就传给哪里)缺点:传递的值是死的*/// props:{a:1,b:2}/* 第二种写法,值为布尔值,如果为真,就会将该路由组件的所接收到params参数全部以props的形式传递给detail组件缺点:只对params参数有效,对query参数无效*/// props:true/* 第三种写法,值为函数,依靠返回值,默认会有一个参数$route*/props($route){return{id:$route.params.id,title:$route.params.title}}  }]}]}]})
接收
<template><ul><!--  原来的写法<li>消息编号:{{$route.params.id}}</li><li>消息标题:{{$route.params.title}}</li>--><li>消息编号:{{id}}</li><li>消息标题:{{title}}</li></ul>
</template><script>
export default {name:'detail',props:["id","title"],  //接收和之前学习的props一样mounted(){console.log(this);}
}
</script><style></style>
18.9 的replace属性
18.9.1 基本概念
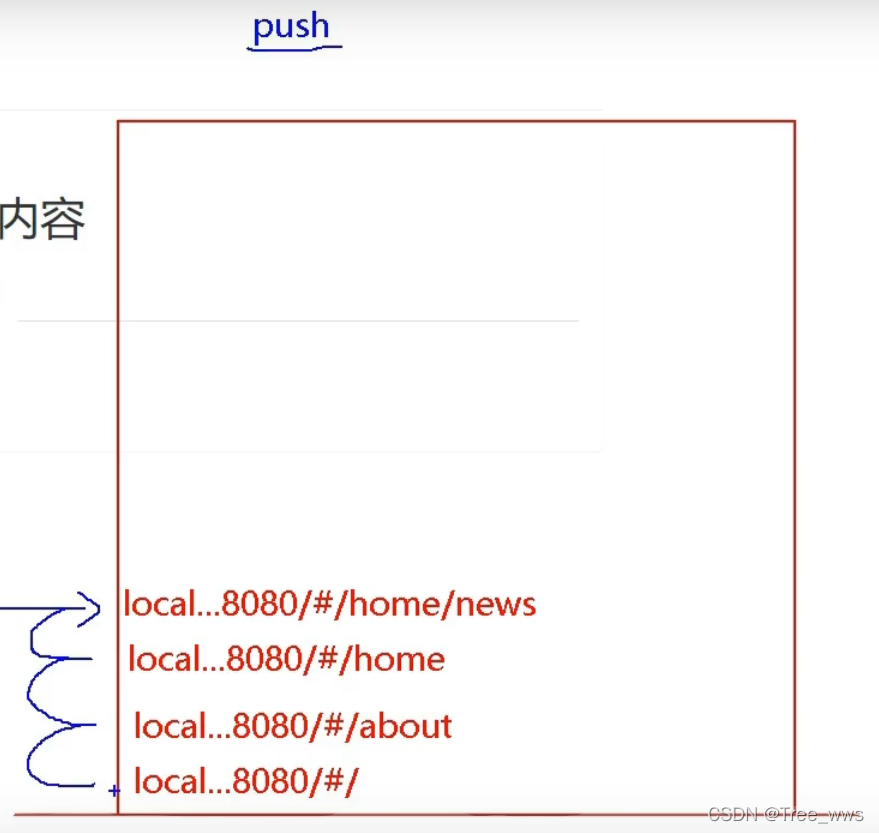
- 作用:控制路由的跳转时,去操作浏览器历史记录的模式
- 浏览器历史记录的有两种写入方式,分别是
push和replace,push是追加历史记录,replace是替换当前记录 - 路由跳转的默认模式是
push如何开启replace模式
push图

replace模式

18.9.2 如何开始replace模式
<router-link replace ....> xxx </router-link>
18.10 编程式路由导航
作用:不借助 实现路由的跳转,让路由跳转变得更加的灵活
案例示图

具体代码
export default {name:'Message',data(){return{list:[{id:'001',title:'新闻'},{id:'002',title:'运动'},{id:'003',title:'娱乐'},]}},methods:{pushShow(l){this.$router.push({  //push方法name:'detail',params:{id:l.id,title:l.title}})},replaceShow(l){this.$router.replace({ //replace方法name:'detail',params:{id:l.id,title:l.title}})}}
}
</script>
export default {name:"App",methods:{back(){this.$router.back() //回退},forward(){this.$router.forward() //前进}}
}
</script>18.11 缓存路由组件
18.11.1 注意点

-
keep-active作用:让不展示的路由组件保持挂载,不被销毁 -
如果不写
include,就表示对所有放入到<keep-alive>中的组件都进行缓存,保持挂载 -
include属性可以指定某个组件保持挂载 -
如果想要缓存多个组件
<keep-alive :include="['News,'Message']"><router-view></router-view></keep-alive> -
注意
include的值写的是==组件名==,不是路由名,切记!!!!
18.11.2 具体代码
<keep-alive include="News"><router-view></router-view></keep-alive>
18.12 路由组件中独有的两个生命周期钩子
需求:
- 保持News组件挂载(缓存News组件)
- 并且新添加一个透明度不断变化的li
- 当失活News组件要停止定时器
使用mounted和beforeDestroy发现不能够实现上述的第3个要求,清除定时器

18.12.1 两个生命周期钩子
- 作用:用于去捕获该组件的激活状态
activated路由组件被激活时触发deactivated路由组件失活时触发

具体代码
<template><ul><li :style="{opacity}">欢迎学习Vue!!!</li><li>news001</li><input type="text"><li>news002</li><input type="text"><li>news003</li><input type="text"></ul>
</template><script>
export default {name:'News',data(){return{opacity:1}},// mounted(){//   this.timer = setInterval(()=>{//     console.log("@");//     this.opacity -= 0.01//     if(this.opacity <= 0)//     {//       this.opacity = 1//     }//   },15)// },// beforeDestroy(){//   clearInterval(this.timer)// }activated(){ //被激活时触发this.timer = setInterval(() => {console.log("@");this.opacity -= 0.01if(this.opacity <= 0){this.opacity = 1}}, 16);},deactivated(){clearInterval(this.timer)}}
</script><style></style>
18.13 全局路由守卫(重要 重要 重要)
案例示图

18.13.1 前置路由守卫
执行的时机:
- 在初始化的时候执行
- 每次路由切换前执行
18.13.2 后置路由守卫
执行的时机:
- 在初始化的时候执行
- 每次路由切换后执行
/*to:表示去哪里from:表示来自哪里next:放行meta:存放是否要进行权限控制
*/
router.beforeEach((to,from,next)=>{console.log("before",to,from);if(to.meta.isAuth)  //判断是否需要权限检验{if(localStorage.getItem('name') === 'Tree'){next()}else{alert("您的权限不够!!")}}else{next()}
})/* to:表示去哪里from:表示来自哪里meta:存放是否要进行权限控制
*/router.afterEach((to,from)=>{console.log("after",to,from);if(to.meta.title){document.title = to.meta.title}else{document.title = "Vue - Test"}
})export default router
18.14 独享路由守卫
beforeEnter(to,from,next){if(to.meta.isAuth){if(localStorage.getItem('name') === 'Tree'){next()}else{lert('您没有权限查看!!')}}}
18.15 组件内守卫
写在需要添加守卫的组件中
export default {name:'News',beforeRouteEnter(to,from,next){console.log("beforeRouteEnter");if(to.meta.isAuth){if(localStorage.getItem("name") ==='Tree'){next()}else{alert("您的权限不够,无法查看!!")}}},beforeRouteLeave(to,from,next){console.log("beforeRouteLeave");next()}}
总结
以上就是今天要讲的内容,本文介绍了路由的相关知识,希望对大家有所帮助!!!
这篇关于【Vue】第十八部分 路由 vue-router(重要 重要 重要)的文章就介绍到这儿,希望我们推荐的文章对编程师们有所帮助!


