本文主要是介绍karpathy build make more --- 2,希望对大家解决编程问题提供一定的参考价值,需要的开发者们随着小编来一起学习吧!
1 Introduction
用多层神经网络实现更复杂一点名字预测器。
2 方案
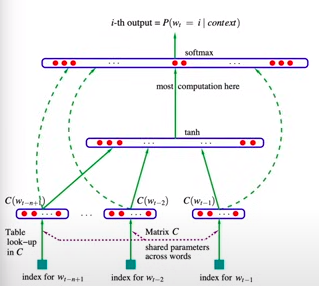
采用两层全连接层,中间采用tanh作为激活函数,最后一层用softmax,loss用cross-entropy.
2.1 实施
step1: 生成输入的字符,输入三个字符,输出一个字符.
采用了队列的方式,好处是能完整覆盖收尾;
import torch
def build_datasets(lines):xs, ys = [], []block_size = 3for line in lines:context = [0] * block_sizefor ch in line + '.':ix = stoi[ch]xs.append(context)ys.append(ix)context = context[1:] + [ix]xs = torch.tensor(xs)ys = torch.tensor(ys)return xs, ys
step2: 对数据划分训练集,测试集和验证集,并进行迭代训练和验证
from sklearn.model_selection import train_test_split
train_set, temp_set = train_test_split(lines, test_size=0.2, random_state=42)
test_set, val_set = train_test_split(temp_set, test_size=0.5, random_state=42)
train_xs, train_ys = build_datasets(train_set)
test_xs, test_ys = build_datasets(test_set)
val_xs, val_ys = build_datasets(val_set)
step3: 对输入的字符进行token化;

从我的理解来说,这里隐式的采用one-hot encoding,然后通过矩阵C进行进行压缩,采用相同的矩阵,保证对于每个词有相同的映射关系,也被称为归纳偏置(inductive bias)。
g = torch.Generator().manual_seed(2147483647)
C = torch.randn((27, 10), generator=g)
batch_size = 32
ix = torch.randint(0, train_xs.shape[0], (batch_size,))
C[train_xs[ix]]
step4: 定义网络结构:
输入向量的维度[batch,27]->[27,10]-(合并)->(30, 200)->(200, 27)
pipeline: 输入向量通过Matrix C进行token化,然后再通过一个全连接层,得到隐藏层h,并对隐藏层进行tanh的激活函数;再经过一个全连接层,得到输出层,并对输出层进行softmax处理
import torch
import torch.nn.functional as F# Assuming the embedding matrix C, W1, B1, W2, B2 have been defined and initialized as beforebatch_size = 32
learning_rate = 0.1
print_interval = 100
for i in range(10000):ix = torch.randint(0, train_xs.shape[0], (batch_size,))emb = C[train_xs[ix]]h = torch.tanh(emb.view(-1, 30) @ W1 + B1)logits = h @ W2 + B2loss = F.cross_entropy(logits, train_ys[ix])loss.backward()with torch.no_grad():  # Update parametersC.data -= learning_rate * C.gradW1.data -= learning_rate * W1.gradB1.data -= learning_rate * B1.gradW2.data -= learning_rate * W2.gradB2.data -= learning_rate * B2.gradC.grad.zero_()W1.grad.zero_()B1.grad.zero_()W2.grad.zero_()B2.grad.zero_()if (i + 1) % print_interval == 0:print(f"Iteration {i+1}: Loss = {loss.item()}")
来看一下这个代码,存在几个问题
1)所有的参数都要搞一遍zero_()太麻烦了
- 可以通过优化器来实现
# 使用 torch.optim 包中的优化器,比如 SGD
optimizer = optim.SGD([C, W1, B1, W2, B2], lr=learning_rate)
# 使用优化器更新参数
optimizer.step()
# 清除所有参数的梯度
optimizer.zero_grad()
- 可以将所有参数放在一个list中
parameters = [C, W1, b1, W2, b2]
for p in parameters:p.requires_grad = True
for p in parameters:p.grad = None
for p in parameters:p.data += -lr * p.grad
- 学习率这个参数不好设置
-
随着迭代的进行,学习率逐渐衰减
lre = torch.linspace(-3, 0, 1000)
lrs = 10**lre -
更简单的二分学习率
lr = 0.1 if i < 100000 else 0.01
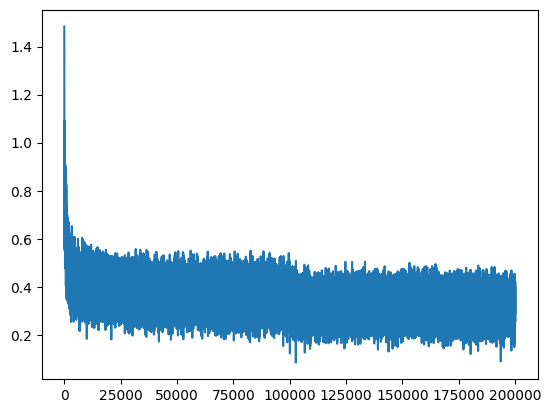
3)没有统计loss的变化情况
lossi = []
stepi = []
stepi.append(i)
lossi.append(loss.log10().item())
将上面这些修正添加进去
import torch
import torch.nn.functional as F# Assuming the embedding matrix C, W1, B1, W2, B2 have been defined and initialized as before
parameters = [C, W1, B1, W2, B2]
batch_size = 32
print_interval = 100
stepi = []
lossi = []
for i in range(200000):ix = torch.randint(0, train_xs.shape[0], (batch_size,))emb = C[train_xs[ix]]h = torch.tanh(emb.view(-1, 30) @ W1 + B1)logits = h @ W2 + B2loss = F.cross_entropy(logits, train_ys[ix])for p in parameters:p.grad = Noneloss.backward()lr = 0.1 if i < 100000 else 0.01for p in parameters:p.data -= lr * p.gradstepi.append(i)lossi.append(loss.log10().item())if (i + 1) % print_interval == 0:print(f"Iteration {i+1}: Loss = {loss.item()}")

step5: 进行检验
# 训练误差
emb = C[train_xs]
h = torch.tanh(emb.view(-1, 30) @ W1 + B1)
logits = h @ W2 + B2
loss = F.cross_entropy(logits, train_ys)
print("training loss:", float(loss.item()))
# training loss: 2.1326515674591064
# test误差
emb = C[test_xs]
h = torch.tanh(emb.view(-1, 30) @ W1 + B1)
logits = h @ W2 + B2
loss = F.cross_entropy(logits, test_ys)
print("test loss:", float(loss.item()))
# test loss: 2.1820669174194336
# valid误差
emb = C[val_xs]
h = torch.tanh(emb.view(-1, 30) @ W1 + B1)
logits = h @ W2 + B2
loss = F.cross_entropy(logits, val_ys)
print("validation loss:", float(loss.item()))
# validation loss: 2.1854469776153564
三个数据集上的误差并不太大
g = torch.Generator().manual_seed(2147483647)
for i in range(10):out = []ix = torch.tensor([0, 0, 0])  # 假设0是起始字符的索引while True:emb = C[ix]  # 只获取最后一个索引的embeddingh = torch.tanh(emb.view(-1, 30) @ W1 + B1)logits = h @ W2 + B2y_prob = torch.softmax(logits, dim=1)next_ix = torch.multinomial(y_prob, num_samples=1, replacement=True, generator=g).item()next_char = itos[next_ix]  # 假设 itos 是已经定义好的out.append(next_char)ix = torch.cat((ix[1:], torch.tensor([next_ix])), dim=0)  # 更新ixif next_ix == 0:  # 假设0是终止字符的索引breakprint(''.join(out))
输出结果:
min.
axuanie.
xiviyah.
anquen.
hida.
ariiseny.
ril.
paitheke.
dakshaldineah.
kareedusar.
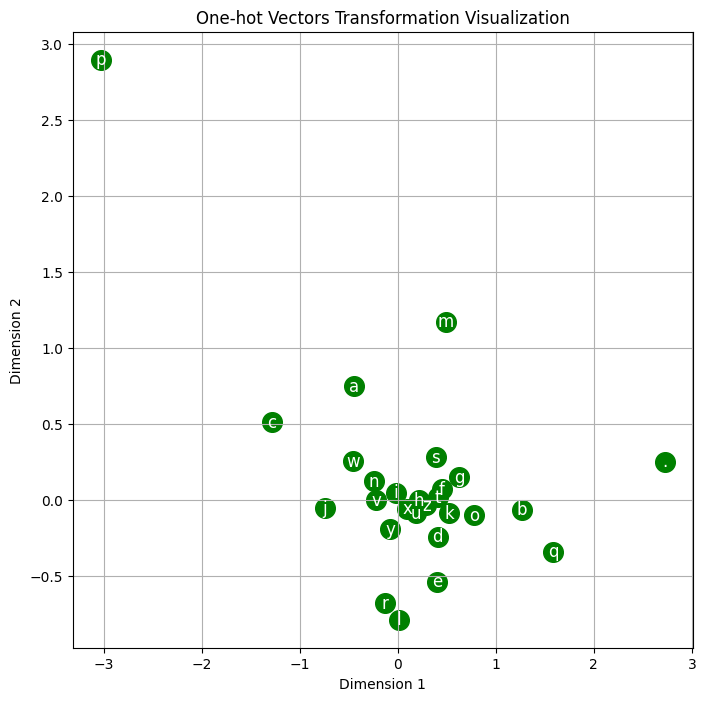
最后作者还介绍了一种字符和高维空间的映射关系图,来说明encoding以后神经网络学到的字符关系。
# 创建散点图
plt.figure(figsize=(8,8))
plt.scatter(C[:, 0].data, C[:, 1].data, s=200, edgecolors='green', facecolors='green')  # 画圈# 在每个点旁边添加文字
for i in range(C.shape[0]):plt.text(C[i, 0].data, C[i, 1].data, itos[i],  color='white', fontsize=12,ha='center', va='center')  # 添加水平和垂直居中对齐# 设置图表标题和坐标轴标签
plt.title('One-hot Vectors Transformation Visualization')
plt.xlabel('Dimension 1')
plt.ylabel('Dimension 2')plt.grid('minor')

在深度学习模型中,字符嵌入(如矩阵C)的作用是将每个字符映射到一个连续的向量空间,这样的向量表示可以捕获和编码字符间的某些关系和语义特征。每个字符的嵌入向量的维度(在您的例子中是10维)通常是通过模型学习得到的,目的是为了最佳地支持模型的任务,比如语言模型的下一个字符预测。
当我们从嵌入矩阵C中选择前两个维度来可视化时,我们试图在一个二维平面上捕捉和理解这些10维向量的结构和关系。C[:,0]和C[:,1]分别代表嵌入向量的第一和第二维度。通过将它们可视化,我们可以:
- 观察字符嵌入的相对位置:字符向量在这个二维空间中的距离可以暗示字符之间的关系。例如,如果两个字符的向量在图中很接近,这可能意味着在模型学习的任务上它们有类似的作用或出现在相似的上下文中。
- 了解模型学到的表示:通过查看字符在两个维度上的分布,我们可以得到一些关于模型如何表示数据的直观了解。
至于嵌入向量数值的大小,我们不能从一个或两个维度直接得出深刻的结论,因为每个维度通常都是在高维空间中与其他维度一起工作的。在优化过程中,模型试图找到一个高维空间,其中向量之间的距离或方向能够支持模型进行准确的预测。
在二维空间中:
- 数值大的结果可能表示该维度在该特定字符嵌入向量中具有较高的数值。这可能意味着对于模型区分字符或其上下文非常重要的特征。
- 数值小的结果可能表示在该维度上特征值不突出,这可能是一个对于当前模型不太重要的特征。
总的来说,这个二维可视化是高维特征的一个简化视图,虽然不能完全捕捉所有的细节,但却提供了一个关于字符向量如何在模型中组织的有用的直观印象。在实际情况中,每个维度的具体物理意义很难解释,因为它们通常是通过模型的学习过程自动发现的,并不直接对应于直观可解释的属性。
这篇关于karpathy build make more --- 2的文章就介绍到这儿,希望我们推荐的文章对编程师们有所帮助!


