本文主要是介绍通过 Function Calling 构建自主 AI Agents,希望对大家解决编程问题提供一定的参考价值,需要的开发者们随着小编来一起学习吧!
原文地址:Build Autonomous AI Agents with Function Calling
将聊天机器人转变为可以与外部 API 交互的代理
2024 年 4 月 2 日
Function Call(函数调用)并不是什么新鲜事。2023 年 7 月,OpenAI 为其 GPT 模型引入了函数调用,该功能现在已被竞争对手采用。Google 的 Gemini API 最近支持它,Anthropic 正在将其集成到 Claude 中。函数调用对于大型语言模型 (LLMs )来说变得至关重要,从而增强了它们的功能。
考虑到这一点,我的目标是编写一个全面的教程,涵盖基本介绍之外的函数调用(已经有很多教程了)。重点将放在实际实施上,构建一个完全自主的人工智能代理,并将其与 Streamlit 集成,以获得类似 ChatGPT 的界面。虽然 OpenAI 用于演示,但本教程可以很容易地适用于其他LLMs支持函数调用,例如 Gemini。
Function Calling是干什么用的?
Function Calling(函数调用)使开发人员能够描述函数(也称为工具,您可以将其视为模型要执行的操作,例如执行计算或下订单),并让模型智能地选择输出包含参数的 JSON 对象来调用这些函数。简单来说,它允许:
- Autonomous decision making(自主决策):模型可以智能地选择工具来回答问题。
- Reliable parsing(可靠的解析): 响应采用 JSON 格式,而不是更典型的类似对话的响应。乍一看似乎并不多,但这就是允许LLM连接到外部系统的原因,例如通过具有结构化输入的 API。
它开辟了许多可能性:
- Autonomous AI assistants(自主人工智能助手): 机器人可以与内部系统交互,完成客户订单和退货等任务,而不仅仅是提供查询的答案
- Personal research assistants(个人研究助理): 假设您正在计划旅行,助理可以在 Excel 中搜索 Web、抓取内容、比较选项和汇总结果。
- IoT voice commands(IoT 语音命令): 模型可以控制设备或根据检测到的意图建议操作,例如调整交流温度。
Function Calling的结构
借用 Gemini 的函数调用文档,函数调用具有以下结构,在 OpenAI 中的工作原理相同
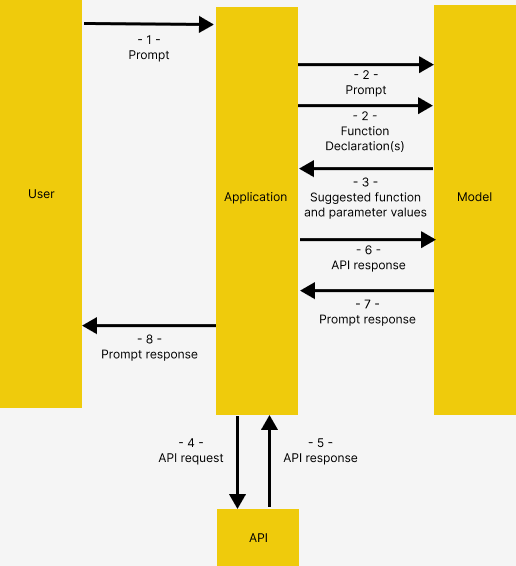
图片来自 Gemini 的函数调用文档
- 用户像应用程序提出问题
- 应用程序传递用户提供的prompt和函数声明,这是对模型可以使用的工具的描述
- 根据函数声明,模型建议要使用的工具以及相关的请求参数。请注意,模型仅输出建议的工具和参数,而不实际调用函数
- 4 & 5 根据响应,应用程序调用相关 API
- 6 & 7 来自 API 的响应再次输入模型,模型再输出人类可读的响应
- 应用程序将最终响应返回给用户,然后从 1 开始重复。
这似乎有些混乱,但我们将通过示例详细说明这个概念
架构
在深入研究代码之前,先介绍一下Demo应用程序的架构。
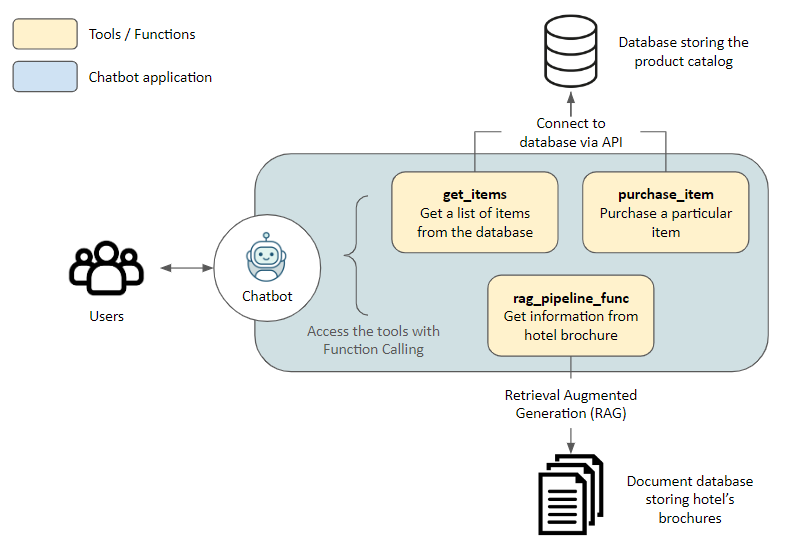
解决方案
在这里,我们为参观酒店的游客建立了一个助手。助手可以访问以下工具,这些工具允许助手访问外部应用程序。
get_items,purchase_item: 通过API连接到存储在数据库中的产品目录,分别用于检索项目列表和进行购买rag_pipeline_func:使用检索增强生成 (RAG) 连接到文档存储,以从非结构化文本(例如酒店手册)中获取信息
技术栈
- Embedding model: all-MiniLM-L6-v2
- Vector Database: Haystack 的 InMemoryDocumentStore
- LLM: 通过 OpenRouter 访问的 GPT-4 Turbo。使用 OpenRouter,您可以在没有 VPN 的情况下从香港访问不同的 LLM API。该流程可以适应使用其他LLMs流程,只需稍作代码更改,只要它们支持函数调用,Gemini
- LLM Framework: Haystack 的易用性、出色的文档和管道建设的透明度。本教程实际上是他们针对同一主题的精彩教程的扩展
现在让我们开始吧!
示例应用程序
准备工作
前往 Github 克隆我的代码。以下内容可以在笔记本中找到 function_calling_demo 。
还请创建并激活虚拟环境,然后 pip install -r requirements.txt 安装所需的软件包
初始化
我们首先连接到 OpenRouter。或者,只要您有 OpenAI API 密钥,使用原始 OpenAIChatGenerator 文件而不覆盖 也可以 api_base_url
1 2 3 4 5 6 7 8 9 10 11 12 13 14 15 | import os
from dotenv import load_dotenv
from haystack.components.generators.chat import OpenAIChatGenerator
from haystack.utils import Secret
from haystack.dataclasses import ChatMessage
from haystack.components.generators.utils import print_streaming_chunk# Set your API key as environment variable before executing this
load_dotenv()
OPENROUTER_API_KEY = os.environ.get('OPENROUTER_API_KEY')chat_generator = OpenAIChatGenerator(api_key=Secret.from_env_var("OPENROUTER_API_KEY"),api_base_url="https://openrouter.ai/api/v1",model="openai/gpt-4-turbo-preview",streaming_callback=print_streaming_chunk)
|
然后我们测试是否可以 chat_generator 成功调用
1 2 3 | chat_generator.run(messages=[ChatMessage.from_user("Return this text: 'test'")])
---------- The response should look like this ----------
{'replies': [ChatMessage(content="'test'", role=<ChatRole.ASSISTANT: 'assistant'>, name=None, meta={'model': 'openai/gpt-4-turbo-preview', 'index': 0, 'finish_reason': 'stop', 'usage': {}})]}
|
Step 1: 建立数据存储
在这里,我们在应用程序和两个数据源之间建立连接:非结构化文本的文档存储和通过 API 的应用程序数据库
使用管道索引文档
我们 documents 为模型提供了示例文本,以执行 Retrival Augmented Generation (RAG)。文本被转换为嵌入并存储在内存中的文档存储中
1 2 3 4 5 6 7 8 9 10 11 12 13 14 15 16 17 18 19 20 21 22 23 24 | from haystack import Pipeline, Document
from haystack.document_stores.in_memory import InMemoryDocumentStore
from haystack.components.writers import DocumentWriter
from haystack.components.embedders import SentenceTransformersDocumentEmbedder# Sample documents
documents = [Document(content="Coffee shop opens at 9am and closes at 5pm."),Document(content="Gym room opens at 6am and closes at 10pm.")
]# Create the document store
document_store = InMemoryDocumentStore()# Create a pipeline to turn the texts into embeddings and store them in the document store
indexing_pipeline = Pipeline()
indexing_pipeline.add_component("doc_embedder", SentenceTransformersDocumentEmbedder(model="sentence-transformers/all-MiniLM-L6-v2")
)
indexing_pipeline.add_component("doc_writer", DocumentWriter(document_store=document_store))indexing_pipeline.connect("doc_embedder.documents", "doc_writer.documents")indexing_pipeline.run({"doc_embedder": {"documents": documents}})
|
它应该输出这个,对应 documents 于我们创建的样本
1 | {'doc_writer': {'documents_written': 2}}
|
启动 API 服务器
使用 Flask 创建的 API 服务器在 db_api.py 下创建,以连接到 SQLite。请通过在您的终端中运行 python db_api.py 来启动它

如果成功执行,这将显示在终端中
另请注意,一些初始数据已添加到 db_api.py
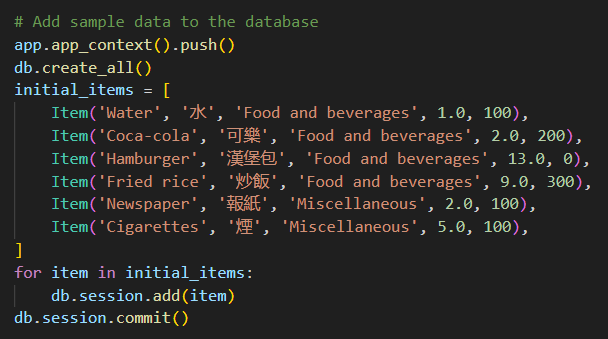
数据库中的示例数据
Step 2: 定义函数
在这里,我们为模型准备实际函数以调用 AFTER 函数调用(步骤 4-5,如函数调用结构中所述)
RAG 函数
即 rag_pipeline_func .这是为了让模型通过搜索存储在文档存储中的文本来提供答案。我们首先将 RAG 检索定义为 Haystack 管道
1 2 3 4 5 6 7 8 9 10 11 12 13 14 15 16 17 18 19 20 21 22 23 24 25 26 27 | from haystack.components.embedders import SentenceTransformersTextEmbedder
from haystack.components.retrievers.in_memory import InMemoryEmbeddingRetriever
from haystack.components.builders import PromptBuilder
from haystack.components.generators import OpenAIGeneratortemplate = """
Answer the questions based on the given context.Context:
{% for document in documents %}{{ document.content }}
{% endfor %}
Question: {{ question }}
Answer:
"""
rag_pipe = Pipeline()
rag_pipe.add_component("embedder", SentenceTransformersTextEmbedder(model="sentence-transformers/all-MiniLM-L6-v2"))
rag_pipe.add_component("retriever", InMemoryEmbeddingRetriever(document_store=document_store))
rag_pipe.add_component("prompt_builder", PromptBuilder(template=template))
# Note to llm: We are using OpenAIGenerator, not the OpenAIChatGenerator, because the latter only accepts List[str] as input and cannot accept prompt_builder's str output
rag_pipe.add_component("llm", OpenAIGenerator(api_key=Secret.from_env_var("OPENROUTER_API_KEY"),api_base_url="https://openrouter.ai/api/v1",model="openai/gpt-4-turbo-preview"))rag_pipe.connect("embedder.embedding", "retriever.query_embedding")
rag_pipe.connect("retriever", "prompt_builder.documents")
rag_pipe.connect("prompt_builder", "llm")
|
测试该函数是否有效
1 2 | query = “When does the coffee shop open?”
rag_pipe.run({"embedder": {"text": query}, "prompt_builder": {"question": query}})
|
这应该会产生以下输出。请注意, replies 该模型给出的样本来自我们之前提供的示例文档
1 2 3 4 5 6 7 8 | {'llm': {'replies': ['The coffee shop opens at 9am.'],'meta': [{'model': 'openai/gpt-4-turbo-preview','index': 0,'finish_reason': 'stop','usage': {'completion_tokens': 9,'prompt_tokens': 60,'total_tokens': 69,'total_cost': 0.00087}}]}}
|
然后,我们可以将其 rag_pipe 转换为一个函数,该函数在不添加其他细节的情况下提供 replies 唯一
1 2 3 4 | def rag_pipeline_func(query: str):result = rag_pipe.run({"embedder": {"text": query}, "prompt_builder": {"question": query}})return {"reply": result["llm"]["replies"][0]}
|
API 调用
我们定义了用于与数据库交互的 get_items and purchase_item 函数
1 2 3 4 5 6 7 8 9 10 11 12 13 14 15 16 17 18 19 20 21 22 23 24 25 26 27 28 29 30 31 32 33 34 35 | # Flask's default local URL, change it if necessary
db_base_url = 'http://127.0.0.1:5000'# Use requests to get the data from the database
import requests
import json# get_categories is supplied as part of the prompt, it is not used as a tool
def get_categories():response = requests.get(f'{db_base_url}/category')data = response.json()return datadef get_items(ids=None,categories=None):params = {'id': ids,'category': categories,}response = requests.get(f'{db_base_url}/item', params=params)data = response.json()return datadef purchase_item(id,quantity):headers = {'Content-type':'application/json', 'Accept':'application/json'}data = {'id': id,'quantity': quantity,}response = requests.post(f'{db_base_url}/item/purchase', json=data, headers=headers)return response.json()
|
定义工具列表
现在我们已经定义了函数,我们需要让模型识别这些函数,并通过为它们提供描述来指导它们如何使用它们。
由于我们在这里使用的是 OpenAI, tools 因此按照 Open AI 要求的格式格式如下
1 2 3 4 5 6 7 8 9 10 11 12 13 14 15 16 17 18 19 20 21 22 23 24 25 26 27 28 29 30 31 32 33 34 35 36 37 38 39 40 41 42 43 44 45 46 47 48 49 50 51 52 53 54 55 56 57 58 59 60 61 | tools = [{"type": "function","function": {"name": "get_items","description": "Get a list of items from the database","parameters": {"type": "object","properties": {"ids": {"type": "string","description": "Comma separated list of item ids to fetch",},"categories": {"type": "string","description": "Comma separated list of item categories to fetch",},},"required": [],},}},{"type": "function","function": {"name": "purchase_item","description": "Purchase a particular item","parameters": {"type": "object","properties": {"id": {"type": "string","description": "The given product ID, product name is not accepted here. Please obtain the product ID from the database first.",},"quantity": {"type": "integer","description": "Number of items to purchase",},},"required": [],},}},{"type": "function","function": {"name": "rag_pipeline_func","description": "Get information from hotel brochure","parameters": {"type": "object","properties": {"query": {"type": "string","description": "The query to use in the search. Infer this from the user's message. It should be a question or a statement",}},"required": ["query"],},},}
]
|
Step 3: 将它们放在一起
现在,我们有了测试函数调用的必要输入!在这里,我们做一些事情:
- 向模型提供初始提示,为其提供一些上下文
- 提供用户生成的消息示例
- 最重要的是,我们将工具列表传递给聊天
tools生成器
1 2 3 4 5 6 7 8 9 10 11 12 13 14 15 16 17 | # 1. Initial prompt
context = f"""You are an assistant to tourists visiting a hotel.
You have access to a database of items (which includes {get_categories()}) that tourists can buy, you also have access to the hotel's brochure.
If the tourist's question cannot be answered from the database, you can refer to the brochure.
If the tourist's question cannot be answered from the brochure, you can ask the tourist to ask the hotel staff.
"""
messages = [ChatMessage.from_system(context),# 2. Sample message from userChatMessage.from_user("Can I buy a coffee?"),]# 3. Passing the tools list and invoke the chat generator
response = chat_generator.run(messages=messages, generation_kwargs= {"tools": tools})
response
---------- Response ----------
{'replies': [ChatMessage(content='[{"index": 0, "id": "call_AkTWoiJzx5uJSgKW0WAI1yBB", "function": {"arguments": "{\\"categories\\":\\"Food and beverages\\"}", "name": "get_items"}, "type": "function"}]', role=<ChatRole.ASSISTANT: 'assistant'>, name=None, meta={'model': 'openai/gpt-4-turbo-preview', 'index': 0, 'finish_reason': 'tool_calls', 'usage': {}})]}
|
现在让我们检查一下响应。请注意,函数调用如何返回模型选择的函数,以及用于调用所选函数的参数。
1 2 3 4 5 6 7 8 | function_call = json.loads(response["replies"][0].content)[0]
function_name = function_call["function"]["name"]
function_args = json.loads(function_call["function"]["arguments"])
print("Function Name:", function_name)
print("Function Arguments:", function_args)
---------- Response ----------
Function Name: get_items
Function Arguments: {‘categories’: ‘Food and beverages’}
|
当出现另一个问题时,模型将使用另一个更相关的工具
1 2 3 4 5 6 7 8 9 10 11 12 13 | # Another question
messages.append(ChatMessage.from_user("Where's the coffee shop?"))# Invoke the chat generator, and passing the tools list
response = chat_generator.run(messages=messages, generation_kwargs= {"tools": tools})
function_call = json.loads(response["replies"][0].content)[0]
function_name = function_call["function"]["name"]
function_args = json.loads(function_call["function"]["arguments"])
print("Function Name:", function_name)
print("Function Arguments:", function_args)
---------- Response ----------
Function Name: rag_pipeline_func
Function Arguments: {'query': "Where's the coffee shop?"}
|
同样,请注意,这里没有调用任何实际函数,这就是我们接下来要做的!
调用函数
然后,我们可以将参数输入到所选函数中
1 2 3 4 5 6 7 | ## Find the correspoding function and call it with the given arguments
available_functions = {"get_items": get_items, "purchase_item": purchase_item,"rag_pipeline_func": rag_pipeline_func}
function_to_call = available_functions[function_name]
function_response = function_to_call(**function_args)
print("Function Response:", function_response)
---------- Response ----------
Function Response: {'reply': 'The provided context does not specify a physical location for the coffee shop, only its operating hours. Therefore, I cannot determine where the coffee shop is located based on the given information.'}
|
然后,将来自 rag_pipeline_func 的响应作为上下文传递到聊天中,方法是将其附加到 messages ,以便模型提供最终答案
1 2 3 4 5 6 7 | messages.append(ChatMessage.from_function(content=json.dumps(function_response), name=function_name)) response = chat_generator.run(messages=messages) response_msg = response["replies"][0]print(response_msg.content) ---------- Response ---------- For the location of the coffee shop within the hotel, I recommend asking the hotel staff directly. They will be able to guide you to it accurately. |
我们现在已经完成了聊天周期!
Step 4: 转为互动聊天
上面的代码显示了如何完成函数调用,但我们希望更进一步,将其转换为交互式聊天
在这里,我展示了两种方法,从将对话打印到笔记本本身的更原始 input() 的方法,到通过 Streamlit 渲染它以提供类似 ChatGPT 的 UI
input() loop
代码是从 Haystack 的教程中复制而来的,它允许我们快速测试模型。注意:此应用程序的创建是为了演示函数调用的想法,并不意味着完全健壮,例如同时支持多个项目的顺序,没有幻觉等。
1 2 3 4 5 6 7 8 9 10 11 12 13 14 15 16 17 18 19 20 21 22 23 24 25 26 27 28 29 30 31 32 33 34 35 36 37 38 | import json
from haystack.dataclasses import ChatMessage, ChatRoleresponse = None
messages = [ChatMessage.from_system(context)
]while True:# if OpenAI response is a tool callif response and response["replies"][0].meta["finish_reason"] == "tool_calls":function_calls = json.loads(response["replies"][0].content)for function_call in function_calls:## Parse function calling informationfunction_name = function_call["function"]["name"]function_args = json.loads(function_call["function"]["arguments"])## Find the correspoding function and call it with the given argumentsfunction_to_call = available_functions[function_name]function_response = function_to_call(**function_args)## Append function response to the messages list using `ChatMessage.from_function`messages.append(ChatMessage.from_function(content=json.dumps(function_response), name=function_name))# Regular Conversationelse:# Append assistant messages to the messages listif not messages[-1].is_from(ChatRole.SYSTEM):messages.append(response["replies"][0])user_input = input("ENTER YOUR MESSAGE .. INFO: Type 'exit' or 'quit' to stop\n")if user_input.lower() == "exit" or user_input.lower() == "quit":breakelse:messages.append(ChatMessage.from_user(user_input))response = chat_generator.run(messages=messages, generation_kwargs={"tools": tools})
|
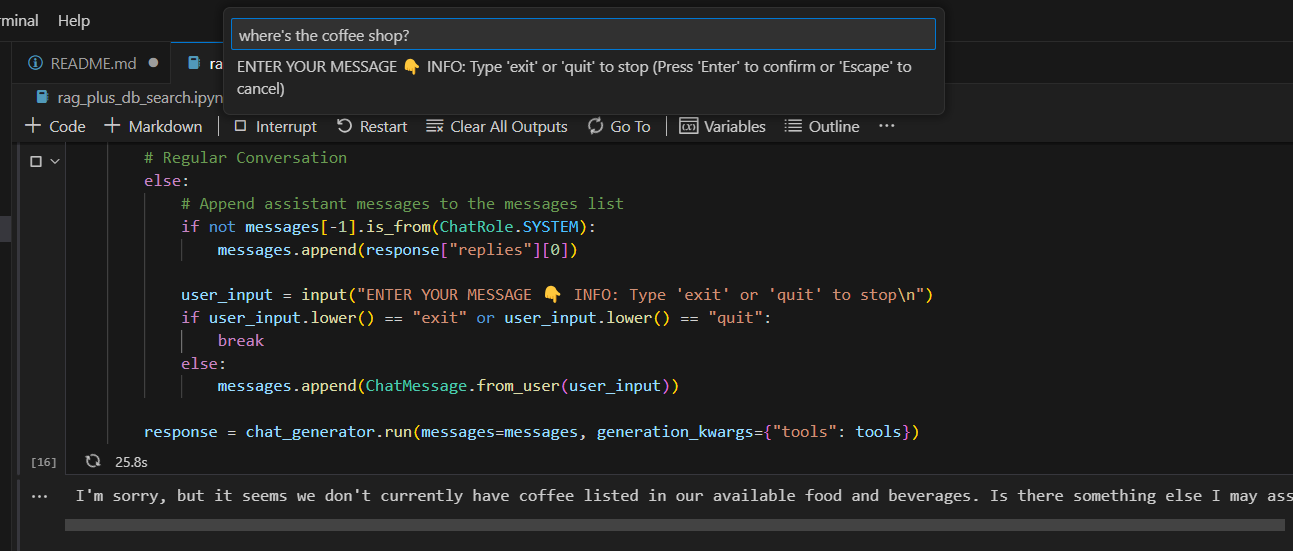
在 IDE 中运行交互式聊天
当它有效时,我们可能想要一些看起来更好的东西。
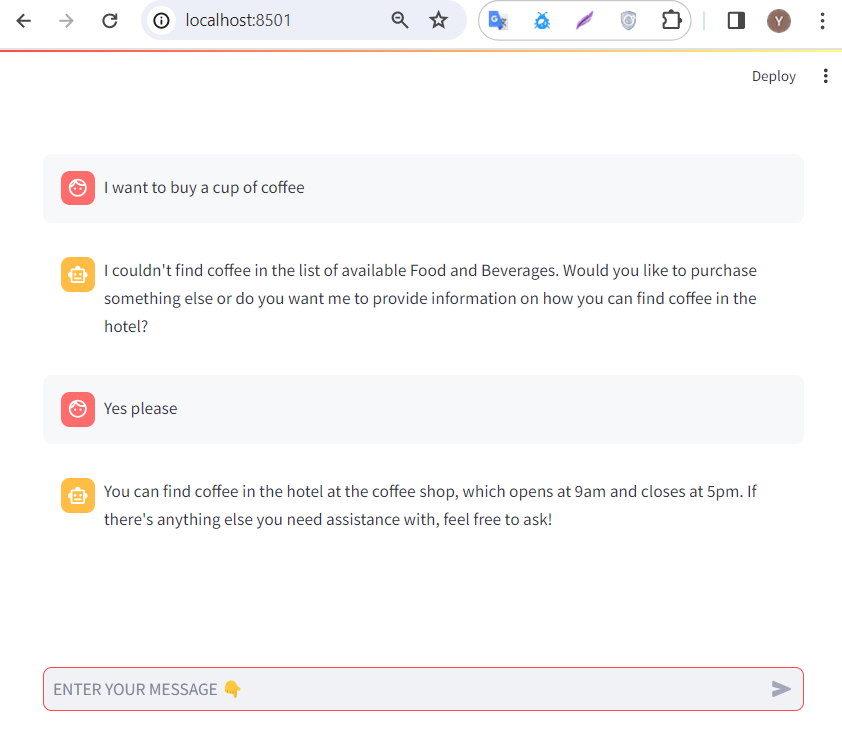
Streamlit界面
Streamlit 将数据脚本转换为可共享的 Web 应用程序,为我们的应用程序提供了一个简洁的 UI。上面显示的代码被改编成我的存储库 streamlit 文件夹下的 Streamlit 应用程序
您可以通过以下方式运行它:
- 如果您尚未这样做,请使用
python db_api.py - 将OPENROUTER_API_KEY设置为环境变量,例如假设
export OPENROUTER_API_KEY = ‘@REPLACE WITH YOUR API KEY’您在 Linux 上/使用 git bash 执行 - 导航到终端
cd streamlit中的streamlit文件夹 - 使用
streamlit run app.py.应在运行应用程序的浏览器中自动创建一个新选项卡
基本上就是这样!我希望你喜欢这篇文章。
这篇关于通过 Function Calling 构建自主 AI Agents的文章就介绍到这儿,希望我们推荐的文章对编程师们有所帮助!


