本文主要是介绍Netty学习——实战篇4 Netty开发Http服务实战、ByteBuf使用、开发群聊系统 备份,希望对大家解决编程问题提供一定的参考价值,需要的开发者们随着小编来一起学习吧!
1 Netty开发Http服务实战
(1)Netty服务器监听8000端口,浏览器发出请求“http://localhost:8000”
(2)服务器可以回复消息给客户端,“你好,我是服务器”,并对特定请求资源进行过滤。
HttpServer.java
public class HttpServer {public static void main(String[] args) throws Exception{//1 创建bossGroup和workerGroup线程组NioEventLoopGroup bossGroup = new NioEventLoopGroup(1);NioEventLoopGroup workerGroup = new NioEventLoopGroup();try {//创建ServerBootstrap对象ServerBootstrap serverBootstrap = new ServerBootstrap();//配置ServerBootstrap对象serverBootstrap.group(bossGroup,workerGroup) // 设置两个线程组.channel(NioServerSocketChannel.class) //使用NIOServerSocketChannel作为服务端的通道.childHandler(new ServerInitializer()); //设置Handler//绑定端口并异步启动ChannelFuture channelFuture = serverBootstrap.bind(8000).sync();// 监听 关闭通道事件channelFuture.channel().closeFuture().sync();}finally {//关闭线程组bossGroup.shutdownGracefully();workerGroup.shutdownGracefully();}}
}
HttpServerHandler.java
/*SimpleChannelInboundHandler 是 ChannelInboundHandlerAdapter的子类HttpObject 封装了客户端和服务端相互通讯的数据*/
@Slf4j
public class HttpServerHandler extends SimpleChannelInboundHandler<HttpObject> {//读取客户端数据@Overrideprotected void channelRead0(ChannelHandlerContext ctx, HttpObject msg) throws Exception {log.info("对应的channel是:{},pipeline是:{},通过pipeline获取channel是:{}",ctx.channel(),ctx.pipeline(),ctx.pipeline().channel());log.info("当前ctx的handler是:{}",ctx.handler());//获取//判断 msg 是不是HttpRequest请求if(msg instanceof HttpRequest){log.info("ctx类型是:{}",ctx.getClass());log.info("pipeline的hashcode是:{},HttpServerHandler的 hashcode是:",ctx.pipeline().hashCode(),this.hashCode());log.info("msg类型是:{}",msg.getClass());log.info("客户端地址是:{}",ctx.channel().remoteAddress());//获取httpRequestHttpRequest request = (HttpRequest) msg;//获取uriString uri = request.uri();//过滤指定的资源if("/favicon.ico".equals(uri)){log.info("请求了 favicon.ico, 不做响应");return;}//回复信息到浏览器(http协议)ByteBuf content = Unpooled.copiedBuffer("hello,我是服务器",CharsetUtil.UTF_8);//构造一个http的响应FullHttpResponse response = new DefaultFullHttpResponse(HttpVersion.HTTP_1_1, HttpResponseStatus.OK,content);response.headers().set(HttpHeaderNames.CONTENT_TYPE,"text/plain");response.headers().set(HttpHeaderNames.CONTENT_LENGTH,content.readableBytes());//把构建好的response返回ctx.writeAndFlush(response);}}
}
ServerInitializer.java
@Slf4j
public class ServerInitializer extends ChannelInitializer<SocketChannel> {@Overrideprotected void initChannel(SocketChannel ch) throws Exception {//向管道加入处理器//获取管道ChannelPipeline pipeline = ch.pipeline();//加入一个netty 提供的httpServerCodec codec =>[coder - decoder]//HttpServerCodec 说明//1. HttpServerCodec 是netty 提供的处理http的 编-解码器pipeline.addLast("MyHttpServerCodec",new HttpServerCodec());//2  加入自定义的handlerpipeline.addLast("MyHandler",new HttpServerHandler());log.info("服务初始化完成");}
}
2 ByteBuf实战
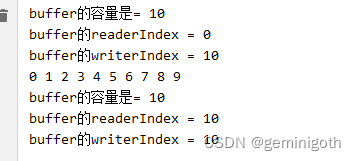
ByteBuf01.java,使用 Unpooled.buffer()方法创建ByteBuf对象
public class ByteBuf01 {public static void main(String[] args) {ByteBuf buffer = Unpooled.buffer(10);//写入数据for (int i = 0; i < 10; i++) {buffer.writeByte(i);}System.out.println("buffer的容量是= "+ buffer.capacity());System.out.println("buffer的readerIndex = "+ buffer.readerIndex());System.out.println("buffer的writerIndex = "+ buffer.writerIndex());//读取数据for (int i = 0; i < buffer.capacity(); i++) {System.out.print(buffer.readByte() + " ");}System.out.println();System.out.println("buffer的容量是= "+ buffer.capacity());System.out.println("buffer的readerIndex = "+ buffer.readerIndex());System.out.println("buffer的writerIndex = "+ buffer.writerIndex());}
}
运行结果:
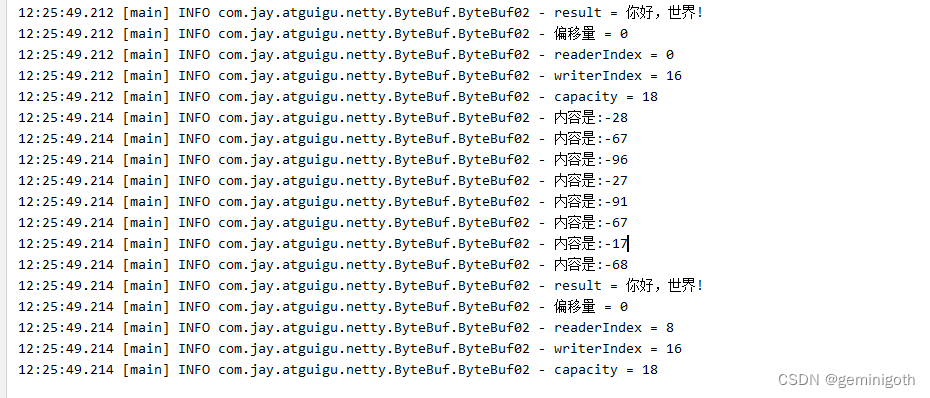
NettyByteBuf02.java.使用 Unpooled.copiedBuffer()创建ByteBuf对象
@Slf4j
public class ByteBuf02 {public static void main(String[] args) {ByteBuf byteBuf = Unpooled.copiedBuffer("你好,世界!", Charset.forName("utf-8"));if(byteBuf.hasArray()){//把ByteBuf转换成byte[]byte[] content = byteBuf.array();//把byte[]转换成字符串String result = new String(content, Charset.forName("utf-8"));log.info("result = {}",result);log.info("偏移量 = {}",byteBuf.arrayOffset());log.info("readerIndex = {}",byteBuf.readerIndex());log.info("writerIndex = {}",byteBuf.writerIndex());log.info("capacity = {}",byteBuf.capacity());for (int i = 0; i < byteBuf.readableBytes(); i++) {log.info("内容是:{}",byteBuf.readByte());}log.info("result = {}",result);log.info("偏移量 = {}",byteBuf.arrayOffset());log.info("readerIndex = {}",byteBuf.readerIndex());log.info("writerIndex = {}",byteBuf.writerIndex());log.info("capacity = {}",byteBuf.capacity());}}
}
运行结果
3 群聊系统
3.1 需求
(1)编写一个Netty群聊系统,实现服务器和客户端之间的数据简单通讯(非阻塞)
(2)实现多人群聊
(3)服务端:可以监测用户上线,离线,并实现消息转发功能
(4)客户端:通过channel可以无阻塞发送消息给其他用户,同时可以接收其他用户发送的消息(通过服务器转发获取)
3.2 服务器代码
NettyChatServer.java
@Slf4j
public class NettyChatServer {//监听端口private int port;public NettyChatServer(int port) {this.port = port;}public void run(){//创建两个线程组 bossGroup和workerGroupNioEventLoopGroup bossGroup = new NioEventLoopGroup(1);NioEventLoopGroup workerGroup = new NioEventLoopGroup();try {//创建ServerBootstrap对象ServerBootstrap serverBootstrap = new ServerBootstrap();//设置serverBootstrapserverBootstrap.group(bossGroup,workerGroup)  //设置bossGroup和workerGroup.channel(NioServerSocketChannel.class) //使用NIOServerSocketChannel作为服务端的通道.option(ChannelOption.SO_BACKLOG,128) // 设置bossGroup 最大连接数量.childOption(ChannelOption.SO_KEEPALIVE,true) //设置workerGroup 保持活动状态.childHandler(new ChannelInitializer<SocketChannel>() {@Overrideprotected void initChannel(SocketChannel ch) throws Exception {//获取pipelineChannelPipeline pipeline = ch.pipeline();//向pipeline加入解码器pipeline.addLast("decoder",new StringDecoder());//向pipeline加入编码器pipeline.addLast("encoder",new StringEncoder());//向pipeline加入自定义handlerpipeline.addLast(new NettyChatServerHandler());}});log.info("服务器启动成功");//绑定端口并启动ChannelFuture channelFuture = serverBootstrap.bind(port).sync();channelFuture.channel().closeFuture().sync();}catch (Exception e){e.printStackTrace();}finally {bossGroup.shutdownGracefully();workerGroup.shutdownGracefully();}}public static void main(String[] args) {new NettyChatServer(8000).run();}
}
3.3 服务端Handler
NettyChatServerHandler.java
@Slf4j
public class NettyChatServerHandler extends SimpleChannelInboundHandler<String> {//创建通道组,管理所有连接的通道。GlobalEventExecutor.INSTANCE 是一个全局事件执行器,为单例private static ChannelGroup channels = new DefaultChannelGroup(GlobalEventExecutor.INSTANCE);//日期SimpleDateFormat sdf = new SimpleDateFormat("yyyy-MM-dd HH:mm:ss");//当有新的连接时,执行该方法@Overridepublic void handlerAdded(ChannelHandlerContext ctx) throws Exception {//获取通道Channel channel = ctx.channel();//通知:客户端上线ctx.writeAndFlush("[客户端]" + channel.remoteAddress() + "在" + sdf.format(new Date()) + "加入聊天");//把通道加入通道组channels.add(channel);}//当连接断开时,执行该方法@Overridepublic void handlerRemoved(ChannelHandlerContext ctx) throws Exception {Channel channel = ctx.channel();ctx.writeAndFlush("[客户端]" + channel.remoteAddress() + "在" + sdf.format(new Date()) + "离开了");}//channel处于活动状态,提示:上线了@Overridepublic void channelActive(ChannelHandlerContext ctx) throws Exception {Channel channel = ctx.channel();log.info("{} 上线了" ,channel.remoteAddress());}//channel 处于不活动状态,提示离线了@Overridepublic void channelInactive(ChannelHandlerContext ctx) throws Exception {Channel channel = ctx.channel();log.info("{} 离线了",channel.remoteAddress());}//转发消息@Overrideprotected void channelRead0(ChannelHandlerContext ctx, String msg) throws Exception {Channel ch1 = ctx.channel();System.out.println("ch1 = " + ch1);channels.forEach(ch ->{System.out.println("ch = " +  ch);if(ch1 != ch){ch.writeAndFlush("[用户]" + ch1.remoteAddress() + "在" +sdf.format(new Date()) + "时间发送了消息" + msg + "\n");}});}//发生异常时,关闭通道@Overridepublic void exceptionCaught(ChannelHandlerContext ctx, Throwable cause) throws Exception {ctx.close();}
}
3.4 客户端代码
NettyChatClient.java
@Slf4j
public class NettyChatClient {private  String host;private  int port;public NettyChatClient(String host, int port) {this.host = host;this.port = port;}private void run(){NioEventLoopGroup loopGroup = new NioEventLoopGroup();try {Bootstrap bootstrap = new Bootstrap();bootstrap.group(loopGroup).channel(NioSocketChannel.class).handler(new ChannelInitializer<SocketChannel>() {@Overrideprotected void initChannel(SocketChannel ch) throws Exception {ChannelPipeline pipeline = ch.pipeline();pipeline.addLast("decoder",new StringDecoder());pipeline.addLast("encoder",new StringEncoder());pipeline.addLast(new NettyChatClientHandler());}});ChannelFuture channelFuture = bootstrap.connect(host, port).sync();Channel channel = channelFuture.channel();log.info("客户端连接成功,地址是:{}",channel.remoteAddress());Scanner scanner = new Scanner(System.in);while (scanner.hasNextLine()){String msg = scanner.nextLine();channel.writeAndFlush(msg + "\r\n");}}catch (Exception e){e.printStackTrace();}finally {loopGroup.shutdownGracefully();}}public static void main(String[] args) {new NettyChatClient("127.0.0.1",8000).run();}
}
3.5 客户端Handler
NettyChatClientHandler.java
public class NettyChatClientHandler extends SimpleChannelInboundHandler<String> {@Overrideprotected void channelRead0(ChannelHandlerContext ctx, String msg) throws Exception {System.out.println(msg.trim());}
}
3.6 运行结果
服务端:

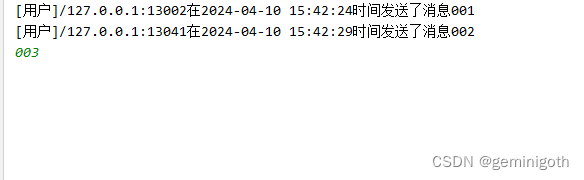
客户端001
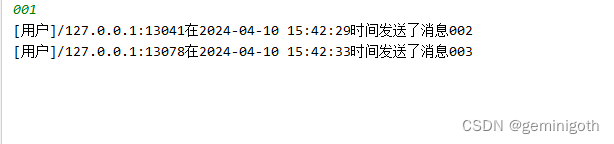
客户端002

客户端003
这篇关于Netty学习——实战篇4 Netty开发Http服务实战、ByteBuf使用、开发群聊系统 备份的文章就介绍到这儿,希望我们推荐的文章对编程师们有所帮助!


