本文主要是介绍010、Python+fastapi,第一个后台管理项目走向第10步:ubutun 20.04下安装ngnix+mysql8+redis5环境,希望对大家解决编程问题提供一定的参考价值,需要的开发者们随着小编来一起学习吧!
一、说明
先吐槽一下,ubuntu 界面还是不习惯,而且用的是云电脑,有些快捷键不好用,只能将就,谁叫我们穷呢?
正在思考怎么往后进行,突然发现没安装mysql 和redis,准备安装,而且配置个远程链接,主要是后续得把mysql导出来
二、安装ngnix
1、安装
sudo apt-get update
sudo apt install nginx
一路yes
p3wr5zfyw:~$ systemctl status nginx
● nginx.service - A high performance web server and a reverse proxy server
Loaded: loaded (/lib/systemd/system/nginx.service; enabled; vendor preset:>
Active: active (running) since Sat 2024-04-13 14:31:29 CST; 21s ago
Docs: man:nginx(8)
Main PID: 4339 (nginx)
Tasks: 5 (limit: 9479)
Memory: 5.7M
CGroup: /system.slice/nginx.service
├─4339 nginx: master process /usr/sbin/nginx -g daemon on; master_>
├─4341 nginx: worker process
├─4342 nginx: worker process
├─4343 nginx: worker process
└─4344 nginx: worker process成功了吧
ps aux|grep nginx
root 4339 0.0 0.0 51432 1524 ? Ss 14:31 0:00 nginx: master process /usr/sbin/nginx -g daemon on; master_process on;
www-data 4341 0.0 0.0 51852 5104 ? S 14:31 0:00 nginx: worker process
www-data 4342 0.0 0.0 51852 5104 ? S 14:31 0:00 nginx: worker process
www-data 4343 0.0 0.0 51852 5104 ? S 14:31 0:00 nginx: worker process
www-data 4344 0.0 0.0 51852 5104 ? S 14:31 0:00 nginx: worker process
jiangkp+ 4909 0.0 0.0 12108 660 pts/0 S+ 14:33 0:00 grep --color=auto nginx
2、修改配置文件
通常情况下,Nginx 的主配置文件位于 /etc/nginx/nginx.conf。而站点特定的配置文件通常位于 /etc/nginx/conf.d目录下。
要创建一个新的站点配置文件,可以在 /etc/nginx/conf.d/ 目录下创建一个新的文件,
例如 my_site.conf,官方配置文件已经读取了conf.d下所有后缀为conf的自定义配置文件。使用文本编辑器(
创建一个新文件sudo vi /etc/nginx/conf.d/victor.conf
server {
listen 8080;
location / {
proxy_set_header Host $http_host;
proxy_set_header X-Real-IP $remote_addr;
proxy_set_header REMOTE-HOST $remote_addr;
proxy_set_header X-Forwarded-For $proxy_add_x_forwarded_for;
proxy_pass http://127.0.0.1:80/;
}location /prod-api {
proxy_set_header Host $http_host;
proxy_set_header X-Real-IP $remote_addr;
proxy_set_header REMOTE-HOST $remote_addr;
proxy_set_header X-Forwarded-For $proxy_add_x_forwarded_for;
proxy_pass http://127.0.0.1:8080/;
rewrite ^/prod-api/(.*)$ /$1 break;
}error_page 500 502 503 504 /50x.html;
location = /50x.html {
root html;
}
}检测文件是否正确
sudo nginx -t
nginx: the configuration file /etc/nginx/nginx.conf syntax is ok
nginx: configuration file /etc/nginx/nginx.conf test is successful
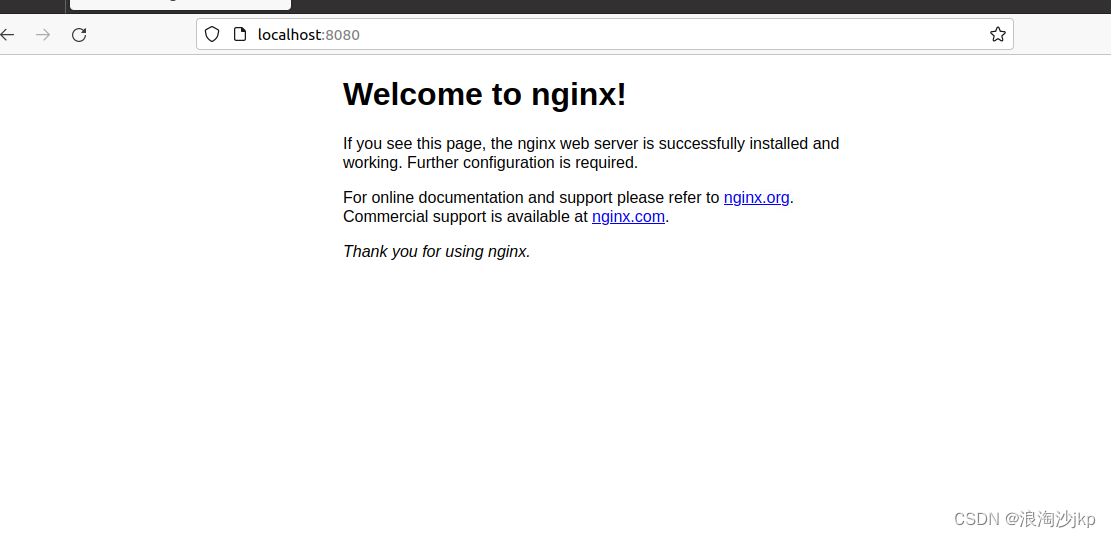
3、测试
sudo systemctl reload nginx
http://localhost:8080/
三、安装mysql (失败了好几次,看后面安装部分,得下载来安装)
sudo apt-get update
sudo apt-get install mysql-server安装不成功
sudo apt remove mysql-server
sudo apt remove mysql-common
sudo apt remove mysql-client
sudo rm -fr /var/lib/mysql
sudo rm -fr /etc/mysql
sudo apt autoremove mysql* --purge
sudo apt remove apparmor删除了,继续安装
以前centos 上安装,ubuntu第一次装,估计就是镜像源的问题,下面换个镜像
我们安装5.7
1、编辑镜像源文件
sudo vim /etc/apt/sources.list
2、在尾部添加清华大学镜像源
deb https://mirrors.tuna.tsinghua.edu.cn/ubuntu/ xenial main restricted universe multiverse
deb-src https://mirrors.tuna.tsinghua.edu.cn/ubuntu/ xenial main restricted universe multiverse
deb https://mirrors.tuna.tsinghua.edu.cn/ubuntu/ xenial-updates main restricted universe multiverse
deb-src https://mirrors.tuna.tsinghua.edu.cn/ubuntu/ xenial-updates main restricted universe multiverse
deb https://mirrors.tuna.tsinghua.edu.cn/ubuntu/ xenial-backports main restricted universe multiverse
deb-src https://mirrors.tuna.tsinghua.edu.cn/ubuntu/ xenial-backports main restricted universe multiverse
deb https://mirrors.tuna.tsinghua.edu.cn/ubuntu/ xenial-security main restricted universe multiverse
deb-src https://mirrors.tuna.tsinghua.edu.cn/ubuntu/ xenial-security main restricted universe multiverse
3、更新镜像
sudo apt-get update
sudo apt-get upgrade
4、安装mysql
sudo apt-get install mysql-server
继续出错,没办法了,下载安装了
5、继续安装(准备下载安)
MySQL :: Download MySQL Community Server![]() https://dev.mysql.com/downloads/mysql/
https://dev.mysql.com/downloads/mysql/
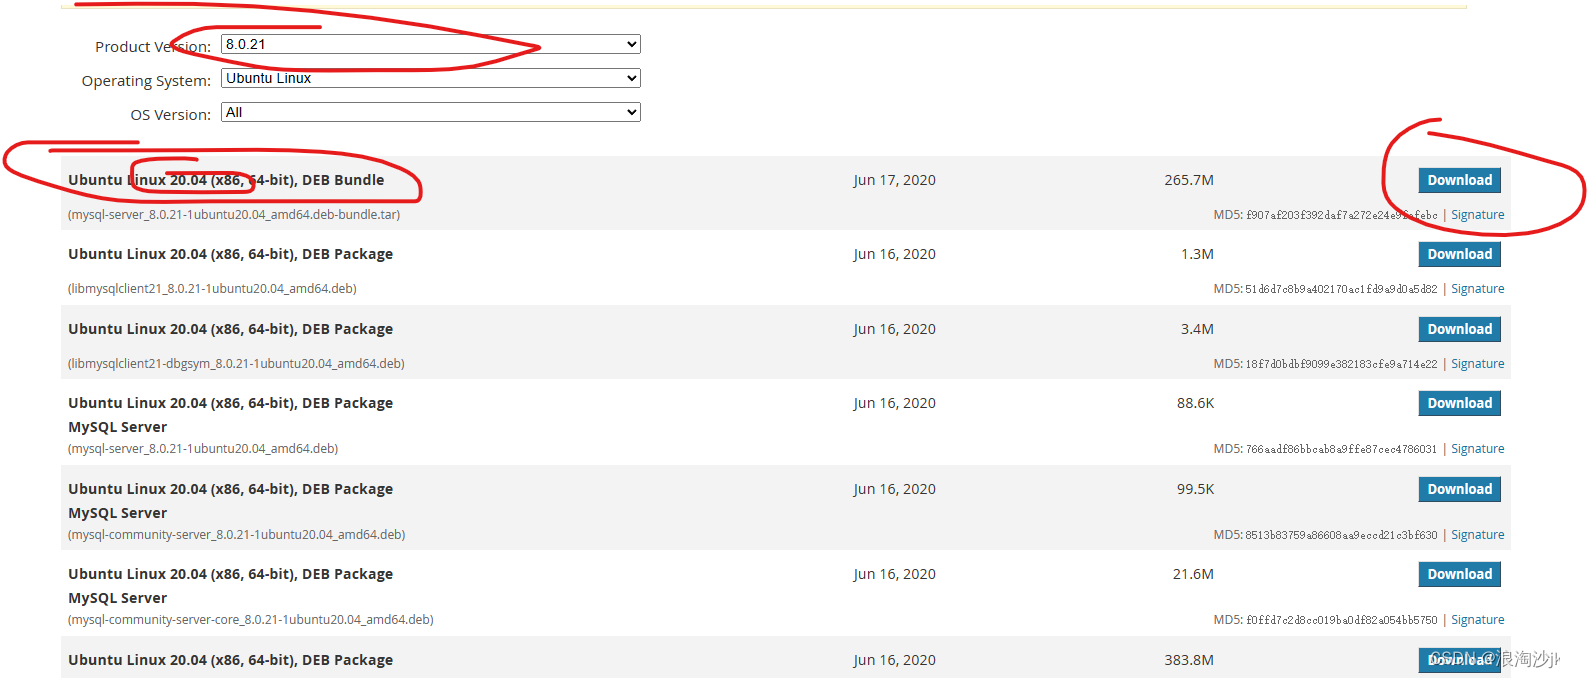
注意ubuntu 的版本,别搞错了
wget https://downloads.mysql.com/archives/get/p/23/file/mysql-server_8.0.21-1ubuntu20.04_amd64.deb-bundle.tar
tar -xvf mysql-server_8.0.21-1ubuntu20.04_amd64.deb-bundle.tar
sudo dpkg -i mysql-community-client-core_8.0.21-1ubuntu20.04_amd64.deb
sudo dpkg -i mysql-common_8.0.21-1ubuntu20.04_amd64.deb
sudo dpkg -i mysql-community-client_8.0.21-1ubuntu20.04_amd64.deb
sudo dpkg -i libmysqlclient21_8.0.21-1ubuntu20.04_amd64.deb
sudo dpkg -i libmysqlclient-dev_8.0.21-1ubuntu20.04_amd64.deb
sudo dpkg -i mysql-client_8.0.21-1ubuntu20.04_amd64.debsudo apt-get install libmecab2
sudo dpkg -i mysql-community-server-core_8.0.21-1ubuntu20.04_amd64.deb
sudo dpkg -i mysql-community-server_8.0.21-1ubuntu20.04_amd64.deb
错误 useradd: cannot open /etc/passwd
jiangkping@bm1dqvp3wr5zfyw:~/Documents$ lsattr /etc/passwd
----i---------e----- /etc/passwd
解决:sudo chattr -i /etc/passwd错误 useradd: cannot open /etc/shadow
iangkping@bm1dqvp3wr5zfyw:~/Documents$ sudo lsattr /etc/shadow
----i---------e----- /etc/shadow
解决 sudo chattr -i /etc/shadow
安装成功
jiangkping@bm1dqvp3wr5zfyw:~/Documents$ mysql -V
mysql Ver 8.0.21 for Linux on x86_64 (MySQL Community Server - GPL)
systemctl status mysql 可以
jiangkping@bm1dqvp3wr5zfyw:~/Documents$ mysql -uroot -p
Enter password:
Welcome to the MySQL monitor. Commands end with ; or \g.
Your MySQL connection id is 8
Server version: 8.0.21 MySQL Community Server - GPLCopyright (c) 2000, 2020, Oracle and/or its affiliates. All rights reserved.
Oracle is a registered trademark of Oracle Corporation and/or its
affiliates. Other names may be trademarks of their respective
owners.Type 'help;' or '\h' for help. Type '\c' to clear the current input statement.
mysql>
终于OK了
四、安装redis
希望不要像mysql一样变态
sudo apt-get update
sudo apt-get install redis-server
jiangkping@bm1dqvp3wr5zfyw:~/Documents$ sudo systemctl status redis-server
● redis-server.service - Advanced key-value store
Loaded: loaded (/lib/systemd/system/redis-server.service; enabled; vendor preset: enabled)
Active: active (running) since Sat 2024-04-13 21:13:16 CST; 2min 22s ago
Docs: http://redis.io/documentation,
man:redis-server(1)
Main PID: 71524 (redis-server)
Tasks: 4 (limit: 9479)
Memory: 2.1M
CGroup: /system.slice/redis-server.service
└─71524 /usr/bin/redis-server 127.0.0.1:6379Apr 13 21:13:16 bm1dqvp3wr5zfyw systemd[1]: Starting Advanced key-value store...
Apr 13 21:13:16 bm1dqvp3wr5zfyw systemd[1]: redis-server.service: Can't open PID file /run/redis/redis-server.pid (yet?) after start: Operation not permitted
Apr 13 21:13:16 bm1dqvp3wr5zfyw systemd[1]: Started Advanced key-value store.
jiangkping@bm1dqvp3wr5zfyw:~/Documents$ redis-server -v
Redis server v=5.0.7 sha=00000000:0 malloc=jemalloc-5.2.1 bits=64 build=66bd629f924ac924
jiangkping@bm1dqvp3wr5zfyw:~/Documents$ redis-cli -h localhost -p 6379
localhost:6379> get n
(nil)
localhost:6379> set n '18'
OK
localhost:6379> get n
"18"
localhost:6379> ping
PONG
localhost:6379>
ubuntu 安装mysql得多大的坑啊,不知道是不是我不会玩,不过服务器还是centos多,平时不用这个系统
这篇关于010、Python+fastapi,第一个后台管理项目走向第10步:ubutun 20.04下安装ngnix+mysql8+redis5环境的文章就介绍到这儿,希望我们推荐的文章对编程师们有所帮助!


