本文主要是介绍(学习记录)双向带头循环链表,希望对大家解决编程问题提供一定的参考价值,需要的开发者们随着小编来一起学习吧!
目录
- 概述
- 链表结构
- 尾插
- 尾插测试
- 尾删
- 查找
- 在pos位置之前插入
- 头插
- 优化尾插
- 在pos位置删除
- 优化尾删
- 头删
- 总结
概述
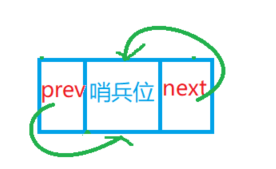
双向带头循环链表,它首先必须有一个带哨兵位的头结点。哨兵位的prev和next都指向它自己。

假设链表有三个值(1,2,3),如图,则
- 哨兵位的next指向1
哨兵位的prev指向3 - 1的next指向2
1的prev指向哨兵位 - 2的next指向3
2的prev指向1 - 3的next指向哨兵位
3的prev指向2

这就是一个完整的双向带头循环链表。
链表结构
首先,创建头文件(List.h), 函数实现文件(List.c)和测试文件(test.c)。
在List.h中:
- 将数据类型重命名,方便以后更改类型。
- 将结构体重命名,方便书写并简化代码。
如下图可知,结构体所需要的是指向前后的两个指针和所存数据。

那么,定义一个数据类型用来存放数据,一个prev的结构体指针和一个next的结构体指针。
代码如下:
typedef int LTDataType;typedef struct ListNode
{LTDataType data;struct ListNode* prev;struct ListNode* next;
}ListNode;
尾插
尾插时,所需要的的参数是
- 链表的头结点
- 想要插入的数据
在List.h中声明尾插函数void ListPushBack(ListNode* phead, LTDataType x);
实现:
- 创建新的节点。
在List.h中声明函数ListNode* BuyListNode(LTDataType x);
在List.c中实现函数
ListNode* BuyListNode(LTDataType x)
{ListNode* newnode = (ListNode*)malloc(sizeof(ListNode));if (newnode == NULL){printf("malloc fail\n");exit(-1);}newnode->data = x;newnode->next = NULL;newnode->prev = NULL;return newnode;
}
- 需要断言。因为在带头链表中,最开始就拥有哨兵位。
- 不需要找到尾结点。因为在双向循环链表中,尾结点的next指向哨兵位,哨兵位的prev指向尾结点。
如图所示,尾结点(tail)是头节点(phead)的prev。

插入newnode后,如图:
- tail->next 指向 newnode。
- newnode->prev 指向tail。
- newnode->next指向头节点(phead)。
- phead->prev 指向newnode。

在在List.c中实现函数
void ListPushBack(ListNode* phead, LTDataType x)
{assert(phead);ListNode* tail = phead->prev;ListNode* newnode = BuyListNode(x);tail->next = newnode;newnode->prev = tail;newnode->next = phead;phead->prev = newnode;
}
时间复杂度为O(1)。
尾插测试
在测试(test.c)中,创建一个头节点(pList)ListNode* pList = NULL;
但这样pList是指向空,无法尾插,所以pList要改为如下图所示的结构。
由于改变的是结构体的指针,要传结构体指针的地址过去。所以要用二级指针。

List.h声明初始化函数void ListInit(ListNode** pphead);
List.c实现函数
void ListInit(ListNode** pphead)
{*pphead = BuyListNode(0);(*pphead)->next = *pphead;(*pphead)->prev = *pphead;
}
最后在test.c中监视窗口查看结果。
void TestLTNodePushBack()
{ListNode* pList = NULL;ListInit(&pList);ListPushBack(pList, 1);ListPushBack(pList, 2);ListPushBack(pList, 3);ListPushBack(pList, 4);
}或者使用打印函数
- List.h中声明函数
void ListPrint(ListNode* phead); - 由于哨兵位不打印,所以从哨兵位下一个节点开始遍历,遍历到哨兵位结束。
实现代码:
void ListPrint(ListNode* phead)
{assert(phead);ListNode* cur = phead->next;//哨兵位下一个节点while (cur != phead){printf("%d ", cur->data);cur = cur->next;}printf("\n");
}
尾删
List.h中声明函数void ListPopBack(ListNode* phead);

如上下两图所示,想要尾删,就需要知道尾结点(tail)的前一个地址(tailPrev)。
- 将tailPrev->next指向哨兵位(phead)。
- 将pheadprev指向tailPrev。
- free尾结点并置为NULL。
- 防止只有哨兵位时,将哨兵位free掉

List.c中代码实现:
void ListPopBack(ListNode* phead)
{assert(phead);assert(phead->next != phead);//防止链表中只有哨兵位ListNode* tail = phead->prev;ListNode* tailPrev = tail->prev;free(tail);tail == NULL;tailPrev->next = phead;phead->prev = tailPrev;
}
查找
List.h中声明函数ListNode* ListFind(ListNode* phead, LTDataType x);
查找函数和打印函数类似,只从哨兵位的下一个节点开始,向后寻找至哨兵位结束。
List.c中代码实现:
ListNode* ListFind(ListNode* phead, LTDataType x)
{assert(phead);ListNode* cur = phead->next;while (cur != phead){if (cur->data == x){return cur;}cur = cur->next;}return NULL;
}
在pos位置之前插入
List.h中声明函数void ListInsert(ListNode* pos, LTDataType x);

如图,假设在pos位置之前插入30,

- posPrev 的next指向新节点
- 新节点的prev指向posPrev
- pos的prev指向新节点
- 新节点的next指向pos
在头尾前插入时,因为是双向带头循环链表,头尾的前后都不为空,所以可以正常插入。
List.c中代码实现:
void ListInsert(ListNode* pos, LTDataType x)
{assert(pos);ListNode* newnode = BuyListNode(x);ListNode* posPrev = pos->prev;posPrev->next = newnode;newnode->prev = posPrev;pos->prev = newnode;newnode->next = pos;
}
头插
在ListInsert函数中发现,头插时只需要将哨兵位的下一个节点传给ListInsert函数,就可以实现头插。
List.h中声明函数void ListPushFront(ListNode* phead, LTDataType x);
List.c中代码实现:
void ListPushFront(ListNode* phead, LTDataType x)
{assert(phead);ListInsert(phead->next, x);
}
优化尾插
既然头插可以用ListInsert函数实现,那么尾插也是类似的道理,只需要将头结点传给ListInsert函数,就可以实现尾插
List.c中代码实现:
void ListPushBack(ListNode* phead, LTDataType x)
{assert(phead);ListInsert(phead, x);
}
在pos位置删除

如图:
- free掉pos
- posPrev的next指向posNext
- posNext的prev指向posPrev
List.c中代码实现:
void ListErase(ListNode* pos)
{assert(pos);ListNode* posPrev = pos->prev;ListNode* posNext = pos->next;free(pos);posPrev->next = posNext;posNext->prev = posPrev;
}
优化尾删
同ListInsert一样,ListErase函数也可以实现尾删。只需要将哨兵位的前一个节点,传给ListErase函数,则完成尾删。
List.c中代码实现:
void ListPopBack(ListNode* phead)
{assert(phead);assert(phead->next != phead);ListErase(phead->prev);
}
头删
头删也是同理,ListErase函数中传入哨兵位的下一个节点,则完成头删
List.c中代码实现:
void ListPopFront(ListNode* phead)
{assert(phead);assert(phead->next != phead);ListErase(phead->next);
}
总结
双向带头循环链表的实现是非常简单,只要实现Insert和Erase这两个函数,其他函数都可以附庸。
List.h
#pragma once#include<stdio.h>
#include<assert.h>
#include<stdlib.h>typedef int LTDataType;typedef struct ListNode
{LTDataType data;struct ListNode* prev;struct ListNode* next;
}ListNode;void ListInit(ListNode** pphead);ListNode* BuyListNode(LTDataType x);void ListPushBack(ListNode* phead, LTDataType x);void ListPopBack(ListNode* phead);void ListPrint(ListNode* phead);void ListPushFront(ListNode* phead, LTDataType x);void ListPopFront(ListNode* phead);ListNode* ListFind(ListNode* phead, LTDataType x);void ListInsert(ListNode* pos, LTDataType x);void ListErase(ListNode* pos);
List.c
#include"list.h"void ListInit(ListNode** pphead)
{*pphead = BuyListNode(0);(*pphead)->next = *pphead;(*pphead)->prev = *pphead;
}ListNode* BuyListNode(LTDataType x)
{ListNode* newnode = (ListNode*)malloc(sizeof(ListNode));if (newnode == NULL){printf("malloc fail\n");exit(-1);}newnode->data = x;newnode->next = NULL;newnode->prev = NULL;return newnode;
}void ListPrint(ListNode* phead)
{assert(phead);ListNode* cur = phead->next;while (cur != phead){printf("%d ", cur->data);cur = cur->next;}printf("\n");
}void ListPushBack(ListNode* phead, LTDataType x)
{assert(phead);/*ListNode* tail = phead->prev;ListNode* newnode = BuyListNode(x);tail->next = newnode;newnode->prev = tail;newnode->next = phead;phead->prev = newnode;*/ListInsert(phead, x);
}void ListPopBack(ListNode* phead)
{assert(phead);assert(phead->next != phead);/*ListNode* tail = phead->prev;ListNode* tailPrev = tail->prev;free(tail);tail = NULL;tailPrev->next = phead;phead->prev = tailPrev;*/ListErase(phead->prev);
}ListNode* ListFind(ListNode* phead, LTDataType x)
{assert(phead);ListNode* cur = phead->next;while (cur != phead){if (cur->data == x){return cur;}cur = cur->next;}return NULL;
}void ListInsert(ListNode* pos, LTDataType x)
{assert(pos);ListNode* newnode = BuyListNode(x);ListNode* posPrev = pos->prev;posPrev->next = newnode;newnode->prev = posPrev;pos->prev = newnode;newnode->next = pos;
}void ListPushFront(ListNode* phead, LTDataType x)
{assert(phead);ListInsert(phead->next, x);
}void ListErase(ListNode* pos)
{assert(pos);ListNode* posPrev = pos->prev;ListNode* posNext = pos->next;free(pos);posPrev->next = posNext;posNext->prev = posPrev;
}void ListPopFront(ListNode* phead)
{assert(phead);assert(phead->next != phead);ListErase(phead->next);
}
这篇关于(学习记录)双向带头循环链表的文章就介绍到这儿,希望我们推荐的文章对编程师们有所帮助!


