本文主要是介绍Mybatis执行器(Executor),希望对大家解决编程问题提供一定的参考价值,需要的开发者们随着小编来一起学习吧!
Executor简介
Executor
Executor是MyBatis的核心接口之一,其中定义了数据库操作的基本方法。在实际应用中经常涉及的SqlSession接口的功能,都是基于Executor接口实现的。
BaseExecutor
BaseExecutor是一个实现了Executor接口的抽象类,它实现了Executor 接口的大部分方法。BaseExecutor 中主要提供了缓存管理和事务管理的基本功能。继承BaseExecutor 的子类只要实现四个基本方法来完成数据库的相关操作即可,这四个方法是:doUpdate()方法、doQuery()方法、doQueryCursor()方法、doFlushstatement()方法, 其余的功能在BaseExecutor中实现。
SimpleExecutor
SimpleExecutor 继承了BaseExecutor 抽象类,它是最简单的 Executor 接口实现。Executor使用了模板方法模式,一级缓存等固定不变的操作都封装到了BaseExecutor中,SimpleExecutor中就不必再关心一级缓存等操作,只需要专注实现4个基本方法的实现即可。
ReuseExecutor
在传统的JDBC编程中,重用Statement对象是常用的一种优化手段,该优化手段可以减少SQL预编译的开销以及创建和销毁 Statement 对象的开销,从而提高性能。
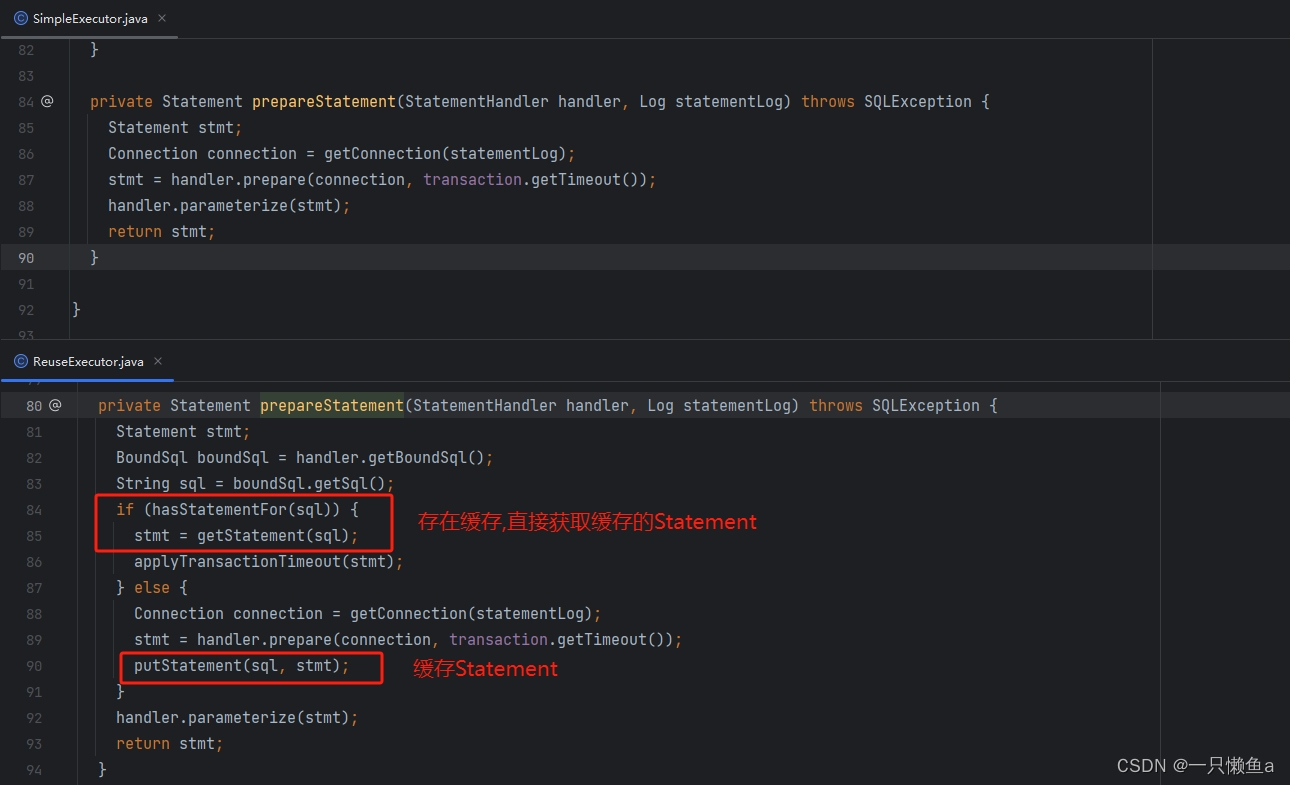
ReuseExecutor提供了Statement重用的功能,ReuseExecutor 中通过statementMap字段(HashMap<String, Statement>类型)缓存使用过的 Statement 对象,key是SQL 语句,value是SQL对应的Statement对象。
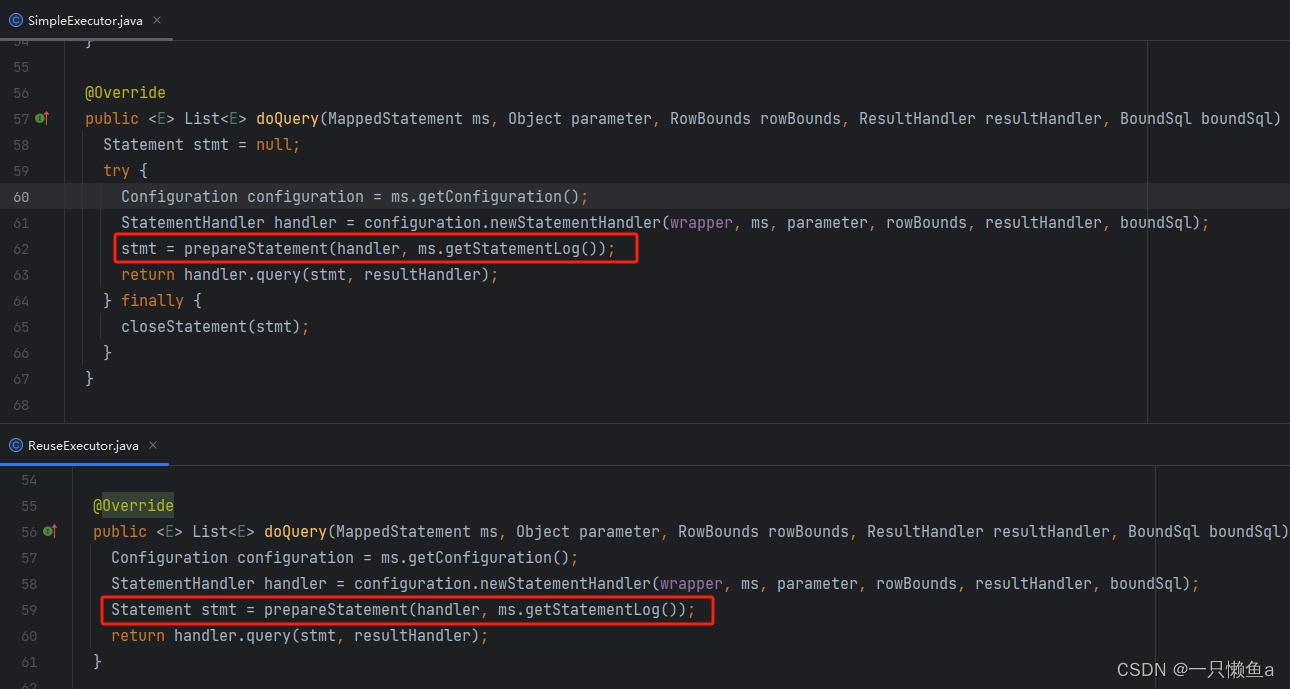
ReuseExecutor.doQuery()、doQueryCursor()、doUpdate()方法的实现与SimpleExecutor 中对应方法的实现一样,区别在于其中调用的 prepareStatement()方法,SimpleExecutor 每次都会通过JDBC Connection创建新的Statement对象,而ReuseExecutor则会先尝试重用StatementMap中缓存的Statement对象。
BatchExecutor
应用系统在执行一条SQL语句时,会将SQL语句以及相关参数通过网络发送到数据库系统。对于频繁操作数据库的应用系统来说,如果执行一条SQL语句就向数据库发送一次请求,很多时间会浪费在网络通信上。使用批量处理的优化方式可以在客户端缓存多条SQL语句,并在合适的时机将多条SQL语句打包发送给数据库执行,从而减少网络方面的开销,提升系统的性能。
不过有一点需要注意,在批量执行多条SQL语句时,每次向数据库发送的SQL语句条数是有上限的,如果超过这个上限,数据库会拒绝执行这些SQL语句并抛出异常。所以批量发送SQL语句的时机很重要。
执行器功能演示
代码准备
创建配置文件mybatis-config.xml
<?xml version="1.0" encoding="UTF-8" ?>
<!DOCTYPE configurationPUBLIC "-//mybatis.org//DTD Config 3.0//EN""http://mybatis.org/dtd/mybatis-3-config.dtd">
<configuration><properties><property name="driver" value="com.mysql.cj.jdbc.Driver" /><property name="url" value="jdbc:mysql://127.0.0.1:3306/test?useUnicode=true&characterEncoding=utf-8&useSSL=false&serverTimezone=Asia/Shanghai&allowPublicKeyRetrieval=true" /><property name="username" value="root" /><property name="password" value="123456" /></properties><settings><setting name="mapUnderscoreToCamelCase" value="true"/></settings><environments default="default"><environment id="default"><transactionManager type="JDBC"/><dataSource type="POOLED"><property name="driver" value="${driver}" /><property name="url" value="${url}" /><property name="username" value="${username}" /><property name="password" value="${password}" /></dataSource></environment></environments><mappers><mapper resource="mapper/EmployeeMapper.xml" /></mappers></configuration>创建实体类EmployeeDO
@Data
@NoArgsConstructor
@AllArgsConstructor
public class EmployeeDO {private Integer id;private String name;private Integer age;private String phone;
}
创建EmployeeMapper接口
public interface EmployeeMapper {EmployeeDO getEmployeeById(Integer id);int addEmployee(EmployeeDO employeeDO);
}
创建EmployeeMapper.xml
<?xml version="1.0" encoding="UTF-8"?>
<!DOCTYPE mapper PUBLIC "-//mybatis.org//DTD Mapper 3.0//EN" "http://mybatis.org/dtd/mybatis-3-mapper.dtd">
<mapper namespace="com.ys.mybatis.mapper.EmployeeMapper"><select id="getEmployeeById" resultType="com.ys.mybatis.DO.EmployeeDO">select * from employee where id = #{id}</select><insert id="addEmployee" useGeneratedKeys="true" keyProperty="id">insert into employee(`name`, `age`, `phone`) VALUES (#{name},#{age},#{phone})</insert></mapper>
创建测试类EmployeeTest
@Slf4j
public class EmployeeTest1 {private SqlSessionFactory sqlSessionFactory;private Configuration configuration;@BeforeEachpublic void before() {InputStream inputStream = ConfigurationTest.class.getClassLoader().getResourceAsStream("mybatis-config.xml");sqlSessionFactory = new SqlSessionFactoryBuilder().build(inputStream);configuration = sqlSessionFactory.getConfiguration();}@Testpublic void queryForSimpleExecutor() {SqlSession sqlSession = sqlSessionFactory.openSession(ExecutorType.SIMPLE);EmployeeMapper employeeMapper = sqlSession.getMapper(EmployeeMapper.class);EmployeeDO firstQuery = employeeMapper.getEmployeeById(1);EmployeeDO secondQuery = employeeMapper.getEmployeeById(2);System.out.println(firstQuery);System.out.println(secondQuery);}@Testpublic void queryForReuseExecutor() {SqlSession sqlSession = sqlSessionFactory.openSession(ExecutorType.REUSE);EmployeeMapper employeeMapper = sqlSession.getMapper(EmployeeMapper.class);EmployeeDO firstQuery = employeeMapper.getEmployeeById(1);EmployeeDO secondQuery = employeeMapper.getEmployeeById(2);System.out.println(firstQuery);System.out.println(secondQuery);}@Testpublic void batchProcessingForSimpleExecutor() {Random random = new Random();SqlSession sqlSession = sqlSessionFactory.openSession(ExecutorType.SIMPLE);EmployeeMapper employeeMapper = sqlSession.getMapper(EmployeeMapper.class);long start = System.currentTimeMillis();for (int i = 0; i < 1000; i++) {EmployeeDO employee = new EmployeeDO(null, getRandomName(), random.nextInt(100), getRandomPhone());employeeMapper.addEmployee(employee);}sqlSession.commit();long end = System.currentTimeMillis();System.out.println("共耗时:" + (end - start) / 1000);}@Testpublic void batchProcessingForReuseExecutor() {Random random = new Random();SqlSession sqlSession = sqlSessionFactory.openSession(ExecutorType.REUSE);EmployeeMapper employeeMapper = sqlSession.getMapper(EmployeeMapper.class);long start = System.currentTimeMillis();for (int i = 0; i < 1000; i++) {EmployeeDO employee = new EmployeeDO(null, getRandomName(), random.nextInt(100), getRandomPhone());employeeMapper.addEmployee(employee);}sqlSession.commit();long end = System.currentTimeMillis();System.out.println("共耗时:" + (end - start) / 1000);}@Testpublic void batchProcessingForBatchExecutor() {boolean autoCommit = false;Environment environment = configuration.getEnvironment();Transaction transaction = environment.getTransactionFactory().newTransaction(environment.getDataSource(), TransactionIsolationLevel.REPEATABLE_READ, autoCommit);BatchExecutor batchExecutor = new BatchExecutor(configuration, transaction);Random random = new Random();try (DefaultSqlSession sqlSession = new DefaultSqlSession(configuration, batchExecutor, autoCommit)) {EmployeeMapper employeeMapper = sqlSession.getMapper(EmployeeMapper.class);long start = System.currentTimeMillis();for (int i = 0; i < 1000; i++) {EmployeeDO employee = new EmployeeDO(null, getRandomName(), random.nextInt(100), getRandomPhone());employeeMapper.addEmployee(employee);}sqlSession.commit();long end = System.currentTimeMillis();System.out.println("共耗时:" + (end - start) / 1000);}}private String getRandomName() {return UUID.randomUUID().toString().replaceAll("-", "").substring(0, 5);}private String getRandomPhone() {StringBuilder sb = new StringBuilder("1");Random random = new Random();IntStream.range(0, 10).forEach(i -> sb.append(random.nextInt(10)));return sb.toString();}}
查询 : SimpleExecutor vs ReuseExecutor
执行queryForSimpleExecutor

每执行一次查询,预编译一次
执行queryForReuseExecutor


多次查询,只预编译一次
批量插入 : SimpleExecutor vs ReuseExecutor vs BatchExecutor
执行batchProcessingForSimpleExecutor

插入1000条数据耗时 : 55s
执行batchProcessingForReuseExecutor

插入1000条数据耗时 : 47s
执行batchProcessingForBatchExecutor

插入1000条数据耗时 : 21s
原因简析
- ReuseExecutor vs SimpleExecutor : 减少了预编译次数
- BatchExecutor vs ReuseExecutor : 减少了与数据库交互次数
PS : ReuseExecutor和SimpleExecutor在执行批量插入的时候其实性能差距不太大,要是执行ReuseExecutor的批量插入时刚好机器负载大,执行SimpleExecutor的批量插入时机器负载小,有可能出现SimpleExecutor的批量插入用时更少的情况
源码简析
SimpleExecutor.doQuery() vs ReuseExecutor.doQuery()


SimpleExecutor的doQuery()方法和ReuseExecutor的doQuery()方法基本上是一致的,主要差异就是prepareStatement这个方法的内部实现。SimpleExecutor每次都重新编译Statement,而ReuseExecutor则是将Statement缓存起来,以供下次查询使用
SimpleExecutor.doQuery() vs BatchExecutor.doQuery()

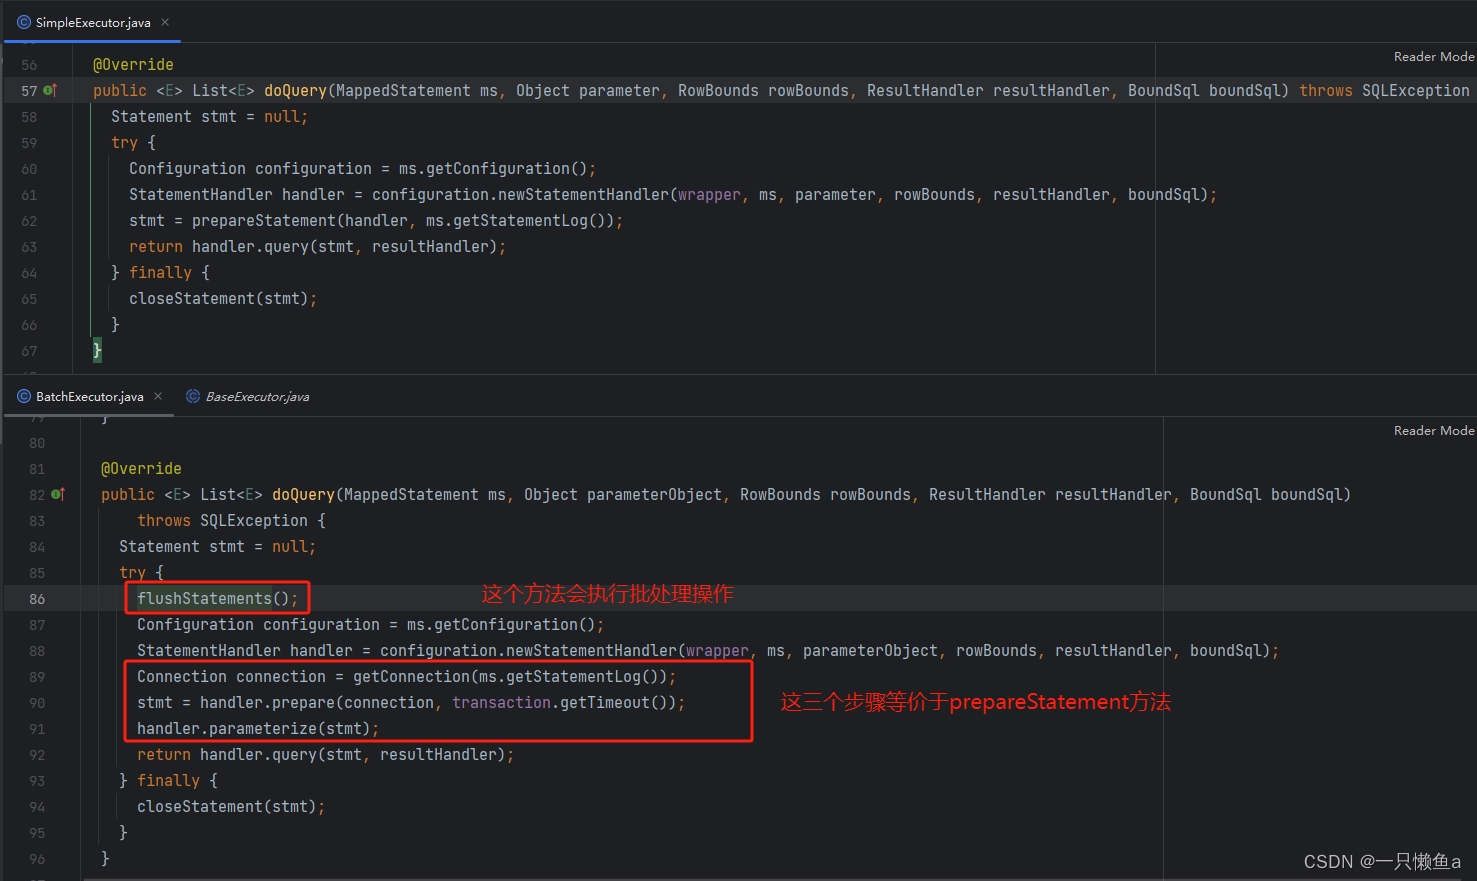
如果仅执行查询操作,SimpleExecutor的doQuery()方法和BatchExecutor的doQuery()方法的效果是一样的,只是BatchExecutor的doQuery()方法会多一个批量刷新的方法。BatchExecutor执行器执行插入或者更新操作的时候不会立即执行,而是封装成BatchResult对象,等执行flushStatements方法的时候才是真正执行相关操作。即BatchExecutor在执行更新操作中间执行了查询操作也会触发批处理,如果更新操作中间没有查询操作,那只有等到执行sqlSession的commit方法才会执行flushStatements
BatchExecutor的更新操作

BatchExecutor会拿本次执行的sql和MappedStatement与上一次的对比,如果是一致的,则从缓存中获取上一次使用的Statement,减少了预编译次数,这一点类似ReuseExecutor的查询。
PS : ReuseExecutor的doQuery是根据sql查找缓存,BatchExecutor的doUpdate是根据sql和MappedStatement查找缓存。个人理解:不同Statement的timeout和fetchSize可能不同,而更新操作是比较重要的,所以不能混用
这篇关于Mybatis执行器(Executor)的文章就介绍到这儿,希望我们推荐的文章对编程师们有所帮助!


