本文主要是介绍第三章 SpringIOC容器的使用,希望对大家解决编程问题提供一定的参考价值,需要的开发者们随着小编来一起学习吧!
第三章 SpringIOC容器的使用
一 SpringIOC容器的实现步骤
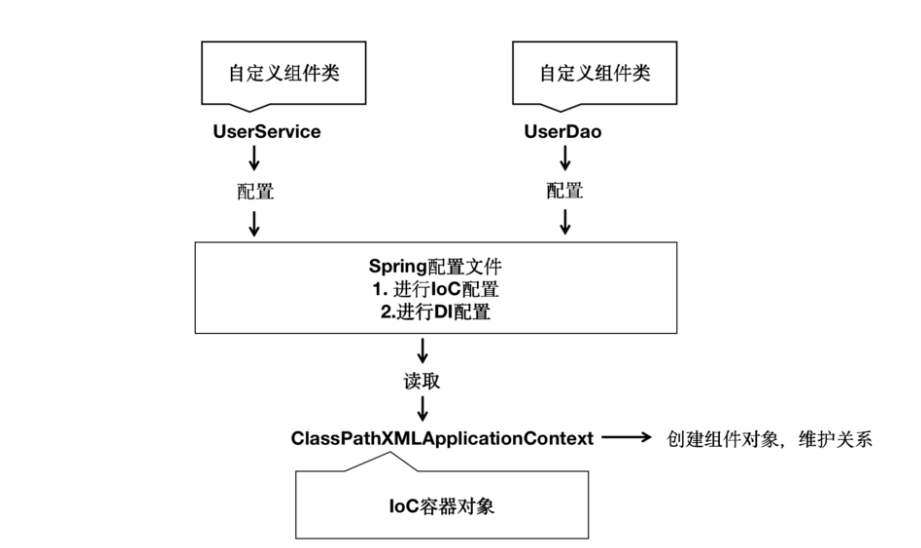
1. 编写元数据(配置)
既是编写交给SpringIoC容器管理组件的信息,配置方式有三种。xml,注解以及配置类。
以下是xml方式配置元数据。
<?xml version="1.0" encoding="UTF-8"?>
<!-- 此处要添加一些约束,配置文件的标签并不是随意命名 -->
<beans xmlns="http://www.springframework.org/schema/beans"xmlns:xsi="http://www.w3.org/2001/XMLSchema-instance"xsi:schemaLocation="http://www.springframework.org/schema/beanshttps://www.springframework.org/schema/beans/spring-beans.xsd"><bean id="..." [1] class="..." [2]>  <!-- collaborators and configuration for this bean go here --></bean><bean id="..." class="..."><!-- collaborators and configuration for this bean go here --></bean><!-- more bean definitions go here -->
</beans>
标签 == 组件信息声明
-
id属性是标识单个 Bean 定义的字符串。 -
class属性定义 Bean 的类型并使用完全限定的类名。
2. 创建IOC容器
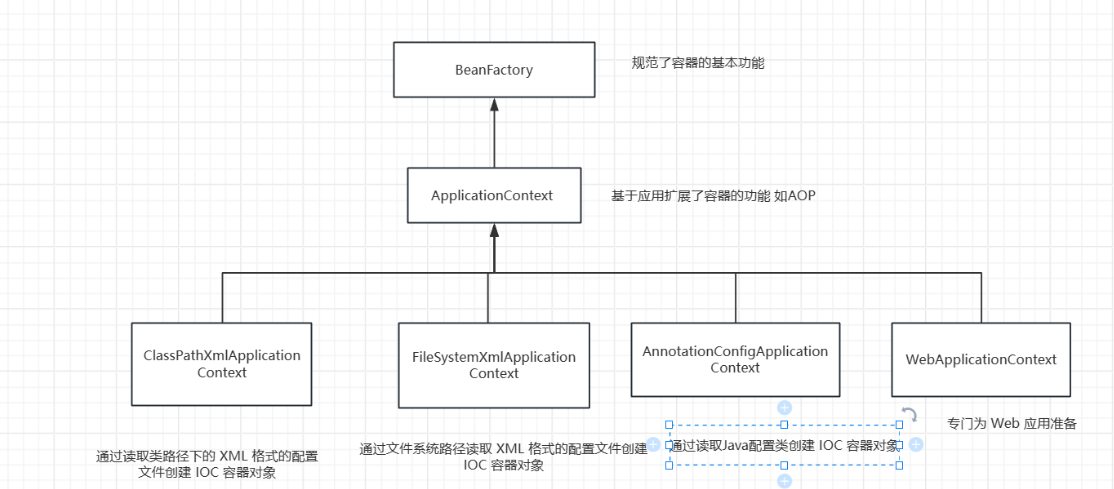
即实例化IOC容器,有四种实现类,ClassPathXmlApplicationContext,FileSystemXmlApplicationContext,AnnotationConfigApplication,WebApplicationContext前面已经介绍。
以下是用ClassPathXmlApplicationContext 类实例化IOC容器
//实例化ioc容器,读取外部配置文件,最终会在容器内进行ioc和di动作
ApplicationContext context = new ClassPathXmlApplicationContext("services.xml", "daos.xml");
3. 通过IOC容器获得组件
ApplicationContext 是一个高级工厂的接口,能够维护不同 bean 及其依赖项的注册表。通过使用方法 T getBean(String name, Class<T> requiredType) ,您可以检索 bean 的实例。
允许读取 Bean 定义并访问它们,如以下示例所示:
//创建ioc容器对象,指定配置文件,ioc也开始实例组件对象
ApplicationContext context = new ClassPathXmlApplicationContext("services.xml", "daos.xml");
//获取ioc容器的组件对象
PetStoreService service = context.getBean("petStore", PetStoreService.class);
//使用组件对象
List<String> userList = service.getUsernameList();
二 XML配置方式管理组件
2.1 组件(bean)的注册
使用xml配置注册组件(bean)思路:
- 准备好自定义的类
- 导入spring依赖
- 编写元数据配置bean
具体实现:
- 准备项目
a.创建maven工程
b.导入springIOC相关依赖
pom.xml
<!--spring context依赖--><!--当你引入Spring Context依赖之后,表示将Spring的基础依赖引入了--><dependency><groupId>org.springframework</groupId><artifactId>spring-context</artifactId><version>6.0.6</version></dependency>
- 对于无参构造器bean的注册
a. 自定义java类
public class Component {public Component() {}
}
b. 编写配置文件 resource/xxx.xml
首先添加spring约束
<?xml version="1.0" encoding="UTF-8"?>
<beans xmlns="http://www.springframework.org/schema/beans"xmlns:xsi="http://www.w3.org/2001/XMLSchema-instance"xsi:schemaLocation="http://www.springframework.org/schema/beans http://www.springframework.org/schema/beans/spring-beans.xsd"></beans>
在idea中约束可以自动生成,如下图(前提是已经导入了spring-context依赖)

c.在spring配置文件中编写标签注册bean
<bean id="component" class="com.ls.ioc_01.Component"/>
2.2 组件(bean)的依赖注入
通过配置文件,实现IOC容器中bean的赋值已经引用(依赖注入DI),有两种场景,基于构造函数依赖注入,和基于setter依赖注入
思路
2.2.1基于构造函数的依赖注入
A. 单个构造参数注入
准备组件
public class UserDao {
}public class UserService {private UserDao userDao;public UserService(UserDao userDao) {this.userDao = userDao;}
}
添加spring约束编写配置bean
<?xml version="1.0" encoding="UTF-8"?>
<beans xmlns="http://www.springframework.org/schema/beans"xmlns:xsi="http://www.w3.org/2001/XMLSchema-instance"xsi:schemaLocation="http://www.springframework.org/schema/beans http://www.springframework.org/schema/beans/spring-beans.xsd"><!--    基于构造器进行依赖注入(单个参数)-->
<!--    首先要确保两个组件都要在[ioc]容器中在需要进行DI的组件中 用<constructor-arg>标签来赋值ref : 引用ioc中其他组件    其他bean的idvalue: 就是普通值-->
<!--    tips: 组件的先后顺序无所谓,因为ioc容器会先创建组件,然后在赋值(DI)--><bean id="userDao" class="com.ls.ioc_02.UserDao"/><bean id="userService" class="com.ls.ioc_02.UserService"><constructor-arg ref="userDao"/></bean>
</beans>
B 多个构造参数注入
准备组件
public class UserDao {
}public class UserService {private UserDao userDao;private int age;private String name;public UserService(UserDao userDao, int age, String name) {this.userDao = userDao;this.age = age;this.name = name;}
}
添加spring约束并编写配置文件
有三种方式DI,推荐使用参数名注入
<?xml version="1.0" encoding="UTF-8"?>
<beans xmlns="http://www.springframework.org/schema/beans"xmlns:xsi="http://www.w3.org/2001/XMLSchema-instance"xsi:schemaLocation="http://www.springframework.org/schema/beans http://www.springframework.org/schema/beans/spring-beans.xsd"><!--    多个参数构造器注入--><bean id="userDao" class="com.ls.ioc_03.UserDao"/>
<!--   按照参数的顺序DI --><bean id="userService" class="com.ls.ioc_03.UserService"><constructor-arg value="20"/><constructor-arg value="ls"/><constructor-arg ref="userDao"/></bean><!--    通过参数的名赋值--><bean id="userService" class="com.ls.ioc_03.UserService"><constructor-arg name = "age" value="20"/><constructor-arg name="name" value="ls"/><constructor-arg name="userDao" ref="userDao"/></bean><!--通过参数下标赋值  从0开始  从左开始--><bean id="userService" class="com.ls.ioc_03.UserService"><constructor-arg index="0" value="20"/><constructor-arg index="1" value="ls"/><constructor-arg index="2" ref="userDao"/></bean>
</beans>
2.2.2基于setter方法注入
开发中,除了构造函数注入(DI)更多的使用的Setter方法进行注入!
准备组件
public class UserDao {
}
public class UserService {private String name;private UserDao userDao;public void setName(String name) {this.name = name;}public void setUserDao(UserDao userDao) {this.userDao = userDao;}
}
添加spring约束并编写配置文件
<?xml version="1.0" encoding="UTF-8"?>
<beans xmlns="http://www.springframework.org/schema/beans"xmlns:xsi="http://www.w3.org/2001/XMLSchema-instance"xsi:schemaLocation="http://www.springframework.org/schema/beans http://www.springframework.org/schema/beans/spring-beans.xsd"><!--    基于setter方法DI-->
<!--    确保组件类中有setter方法编写<property> 进行setter方法注入name  指的是set方法名字改为首字母小写例如   setName   那么参数就是namevalue  基本类型ref    引用其他bean值为其他bean的id
--><bean id="userDao" class="com.ls.ioc_04.UserDao"/><bean id="userService" class="com.ls.ioc_04.UserService"><property name="name" value="ls"/><property name="userDao" ref="userDao"/></bean>
</beans>
依赖注入包括基本类型注入和引用类型注入
2.3 IOC的创建以及使用
了解springIoc容器的接口和实现类
思路:
通过合适的实现类创建springIOC容器
准备组件
public class Dog {public  void   eat(){System.out.println("吃骨头~~");}
}
编写配置文件
<bean id="dog" class="com.ls.ioc_05.Dog"/>
编写测试类,创建springioc容器并获取bean
    public static void main(String[] args) {//方式一:直接创建容器并指定配置文件ClassPathXmlApplicationContext context = new ClassPathXmlApplicationContext("ioc_05.xml");//方式二: 先创建ioc容器,在指定配置文件,在刷新
//        ClassPathXmlApplicationContext context1 = new ClassPathXmlApplicationContext(); //创建ioc容器
//        context1.setConfigLocations("ioc_05.xml");   //配置ioc容器
//        context1.refresh();   //刷新ioc容器。Dog dog = context.getBean("dog", Dog.class);dog.eat();}
}
获得bean的三种方式
//方式1: 根据id获取
//没有指定类型,返回为Object,需要类型转化!
HappyComponent happyComponent = (HappyComponent) iocContainer.getBean("bean的id标识");//方式2: 根据类型获取
//根据类型获取,但是要求,同类型(当前类,或者之类,或者接口的实现类)只能有一个对象交给IoC容器管理
//配置两个或者以上出现: org.springframework.beans.factory.NoUniqueBeanDefinitionException 问题
HappyComponent happyComponent = iocContainer.getBean(HappyComponent.class);//方式3: 根据id和类型获取 推荐
HappyComponent happyComponent = iocContainer.getBean("bean的id标识", HappyComponent.class);
2.4周期方法和作用域
周期方法: 在程序执行的过程中,到了某一时刻和条件,方法会自动执行。就是周期方法。
如servlet,用户向浏览器发出请求,tomcat接受请求,会创建对应的servlet,servlet的init,serviece,destory方法都可以看作是周期方法
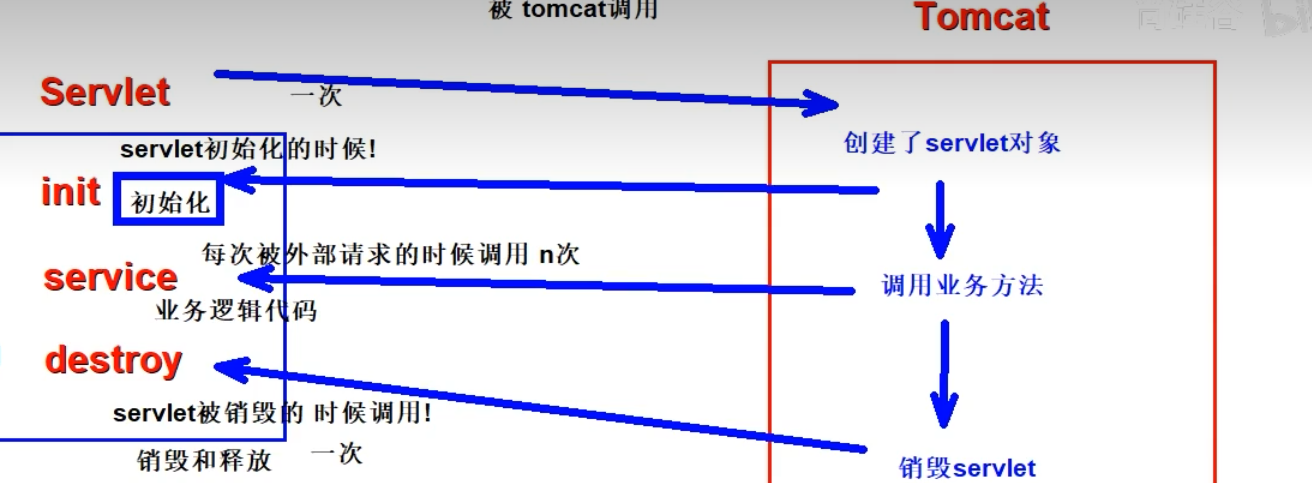
在spring中,springioc容器的创建和销毁也可以看作是周期性的方法
准备组件
/**演示周期性方法*   方法  必须 是  public void 修饰 并且不能有参数*/public class JavaBean {public  void init(){//逻辑代码System.out.println("初始化");}
}
配置
<?xml version="1.0" encoding="UTF-8"?>
<beans xmlns="http://www.springframework.org/schema/beans"xmlns:xsi="http://www.w3.org/2001/XMLSchema-instance"xsi:schemaLocation="http://www.springframework.org/schema/beans http://www.springframework.org/schema/beans/spring-beans.xsd"><!--    周期性方法-->
<!--    destroy-method ="方法名"init-method = "方法名"需要注意的是:方法必须有public void 修饰 并且不能有参数’--><!--    经过测验发现当ioc容器创建并实例化的时候,就执行了周期性方法 由此引入bean的作用域-->
<!--    bean的作用域<bean> 中scope 属性singleton  在实例化ioc容器时就创建bean  默认prototype  在获取bean对象的时候才会创建bean--><bean id="javaBean" class="com.ls.ioc_06.JavaBean"  destroy-method="init" init-method="init"/>
</beans>
作用域:
bean的作用域
中scope 属性
singleton 在实例化ioc容器时就创建bean 默认
prototype 在获取bean对象的时候才会创建bean
- 作用域可选值
| 取值 | 含义 | 创建对象的时机 | 默认值 |
|---|---|---|---|
| singleton | 在 IOC 容器中,这个 bean 的对象始终为单实例 | IOC 容器初始化时 | 是 |
| prototype | 这个 bean 在 IOC 容器中有多个实例 | 获取 bean 时 | 否 |
如果是在WebApplicationContext环境下还会有另外两个作用域(但不常用):
| 取值 | 含义 | 创建对象的时机 | 默认值 |
|---|---|---|---|
| request | 请求范围内有效的实例 | 每次请求 | 否 |
| session | 会话范围内有效的实例 | 每次会话 | 否 |
2.5 FactoryBean的特性和使用
三 XML配置方式管理组件综合练习
3.1环境搭建
- 需求分析
搭建一个三层架构案例,模拟查询全部学生(学生表)信息,持久层使用JdbcTemplate和Druid技术,使用XML方式进行组件管理!

a. 数据库准备
create database studb;use studb;CREATE TABLE students (id INT PRIMARY KEY,name VARCHAR(50) NOT NULL,gender VARCHAR(10) NOT NULL,age INT,class VARCHAR(50)
);INSERT INTO students (id, name, gender, age, class)
VALUES(1, '张三', '男', 20, '高中一班'),(2, '李四', '男', 19, '高中二班'),(3, '王五', '女', 18, '高中一班'),(4, '赵六', '女', 20, '高中三班'),(5, '刘七', '男', 19, '高中二班'),(6, '陈八', '女', 18, '高中一班'),(7, '杨九', '男', 20, '高中三班'),(8, '吴十', '男', 19, '高中二班');
b. 创建项目引入依赖
<dependencies><!--spring context依赖--><!--当你引入SpringContext依赖之后,表示将Spring的基础依赖引入了--><dependency><groupId>org.springframework</groupId><artifactId>spring-context</artifactId><version>6.0.6</version></dependency><!-- 数据库驱动和连接池--><dependency><groupId>mysql</groupId><artifactId>mysql-connector-java</artifactId><version>8.0.25</version></dependency><dependency><groupId>com.alibaba</groupId><artifactId>druid</artifactId><version>1.2.8</version></dependency><!-- spring-jdbc --><dependency><groupId>org.springframework</groupId><artifactId>spring-jdbc</artifactId><version>6.0.6</version></dependency></dependencies>
c. 实体类准备
public class Student {private Integer id;private String name;private String gender;private Integer age;private String classes;public Integer getId() {return id;}public void setId(Integer id) {this.id = id;}public String getName() {return name;}public void setName(String name) {this.name = name;}public String getGender() {return gender;}public void setGender(String gender) {this.gender = gender;}public Integer getAge() {return age;}public void setAge(Integer age) {this.age = age;}public String getClasses() {return classes;}public void setClasses(String classes) {this.classes = classes;}@Overridepublic String toString() {return "Student{" +"id=" + id +", name='" + name + '\'' +", gender='" + gender + '\'' +", age=" + age +", classes='" + classes + '\'' +'}';}
}
d.jdbcTemplate技术
为了在特定领域帮助我们简化代码,Spring 封装了很多 『Template』形式的模板类。例如:RedisTemplate、RestTemplate 等等,包括 JdbcTemplate。
jdbcTemplate使用:
- 创建连接池对象 —>引入Druid
Druid的实例化用Druid依赖提供的实现类实例化,需要填四个必要的参数
//0 创建一个连接池对象DruidDataSource druidDataSource = new DruidDataSource();druidDataSource.setUrl("jdbc:mysql://localhost:3306/studb");druidDataSource.setDriverClassName("com.mysql.cj.jdbc.Driver");druidDataSource.setName("root");druidDataSource.setPassword("root");
-
实例化JdbcTemplate对象
-
引入spring-jdbc依赖,根据该依赖提供的实现类实例化
-
导入数据源
-
调用方法
-
 public  void testForJava(){//0 创建一个连接池对象DruidDataSource druidDataSource = new DruidDataSource();druidDataSource.setUrl("jdbc:mysql://localhost:3306/studb");druidDataSource.setDriverClassName("com.mysql.cj.jdbc.Driver");druidDataSource.setName("root");druidDataSource.setPassword("root");//1. 实例化对象JdbcTemplate jdbcTemplate = new JdbcTemplate();//2.但是只有查询,并没有指定数据库,要先指定数据库才能对数据库操作//jdbcTemplate.setDataSource("数据源");jdbcTemplate.setDataSource(druidDataSource);//3.调用方法//jdbcTemplate.update() DDL DML DCL//jdbcTemplate.query();DQL 查询集合//jdbcTemplate.queryForObject(); 查询单个对象}
}
e. jdbc.properties
jdbc.url=jdbc:mysql://localhost:3306/studb
jdbc.driver=com.mysql.cj.jdbc.Driver
jdbc.username=root
jdbc.password=root
f.spring配置文件的编写.
**外部文件引入和使用**:
因为配置数据源射击隐私问题,通常都是写到.properties中在配置数据源的时候引用文件内的数据所以要引入外部文件 value = ${key}使用context:property-placeholder 引入 这个标签需要引入约束:xmlns:context="http://www.springframework.org/schema/context"location="类地址"
<?xml version="1.0" encoding="UTF-8"?>
<beans xmlns="http://www.springframework.org/schema/beans"xmlns:xsi="http://www.w3.org/2001/XMLSchema-instance"xmlns:context="http://www.springframework.org/schema/context"xsi:schemaLocation="http://www.springframework.org/schema/beans http://www.springframework.org/schema/beans/spring-beans.xsd http://www.springframework.org/schema/context https://www.springframework.org/schema/context/spring-context.xsd"><!--    因为配置数据源射击隐私问题,通常都是写到.properties中在配置数据源的时候引用文件内的数据所以要引入外部文件 value = #{key}使用context:property-placeholder 引入  这个标签需要引入约束:xmlns:context="http://www.springframework.org/schema/context"location="类地址"
--><context:property-placeholder location="classpath:jdbc.properties"/><!--       jdbcTemplate 配置--><bean id="jdbcTemplate" class="org.springframework.jdbc.core.JdbcTemplate">
<!--        setter方法注入  装配数据源--><property name="dataSource" ref="dataSource"/></bean><!--    druidDataSource  配置数据源--><bean id="dataSource" class="com.alibaba.druid.pool.DruidDataSource">
<!--        setter方法注入--><property name="url" value="${jdbc.url}"/><property name="driverClassName" value="${jdbc.driver}"/><property name="username" value="${jdbc.username}"/><property name="password" value="${jdbc.password}"/></bean>
</beans>
3.2 JdbcTemplate的使用
import com.alibaba.druid.pool.DruidDataSource;
import com.ls.pojo.Student;
import org.junit.Test;
import org.springframework.context.ApplicationContext;
import org.springframework.context.support.ClassPathXmlApplicationContext;
import org.springframework.jdbc.core.BeanPropertyRowMapper;
import org.springframework.jdbc.core.JdbcTemplate;
import org.springframework.jdbc.core.RowMapper;import java.sql.ResultSet;
import java.sql.SQLException;
import java.util.List;/** jdbcTemplate的使用*     作用时简化数据库的CRUD 但是不提供连接池*     连接池引入 DruidDataSource 负责连接的创建和数据库驱动的注册*   1.实例化对象*   2.调用方法*/
public class JdbcTemplateTest {@Testpublic  void testForJava(){//在springioc容器中已经将数据源注入了jdbcTemplate,减少了代码的耦合度ApplicationContext context = new ClassPathXmlApplicationContext("application.xml");JdbcTemplate jdbcTemplate = context.getBean(JdbcTemplate.class);//jdbcTemplate.update()方法  插入 删除  修改//插入一条语句String sql = "insert into students (id,name,gender,age,class) values(?,?,?,?,?)";/** 参数1: sql语句 参数可以用? 占位符*  参数2: Object ....param  可变参数,依次传入值*  return: 改变的行数*/int rows = jdbcTemplate.update(sql, 499, "ls", "男", "20", "软工二班");System.out.println("更改了" + rows +"行");//查询单条数据 jdbcTemplate.queryForObject() ,并返回对应的数据对象,映射sql ="select *from students where id = ?";/** 参数1: sql* 参数2: RowMapper<T>  列名和属性名的映射器接口*          要实现接口的方法映射 手动创建所映射的对象,然后从结果集获取值对应赋值给对象,然后返回对象* 参数3:object .....param* return :  映射的类型*/Student student = jdbcTemplate.queryForObject(sql, new RowMapper<Student>() {@Overridepublic Student mapRow(ResultSet rs, int rowNum) throws SQLException {//rs 是sql的结果集  rownum 行数 不在意即可//手动将结果集映射到实体对象上Student student = new Student();student.setId(rs.getInt("id"));student.setAge(rs.getInt("age"));student.setName(rs.getString("name"));student.setGender(rs.getString("gender"));student.setClasses(rs.getString("class"));return student;}}, new Object[]{1});System.out.println(student);//查询多条语句 jdbcTemplate.query()sql = "select id,name,gender,age,class as classes from students";/** 参数一: sql*  参数二:RowMapper<T>  列名和属性名的映射器接口,*             接口可以自己实现如上所示,也可以用其实现类BeanPropertyRowMapper<T>(xxx.class)*                  自动将结果集映射,但是前提是列明和属性名一致,如果有不一致的可以as起别名*                  BeanPropertyRowMapper<T>(xxx.class) 会自动映射列和属性值* return : list<T>*/List<Student> studentList = jdbcTemplate.query(sql, new BeanPropertyRowMapper<>(Student.class));System.out.println(studentList);}
}
3.3编写实战
基于上述搭建,写一个查询所有学生信息的业务。
三层架构结构图
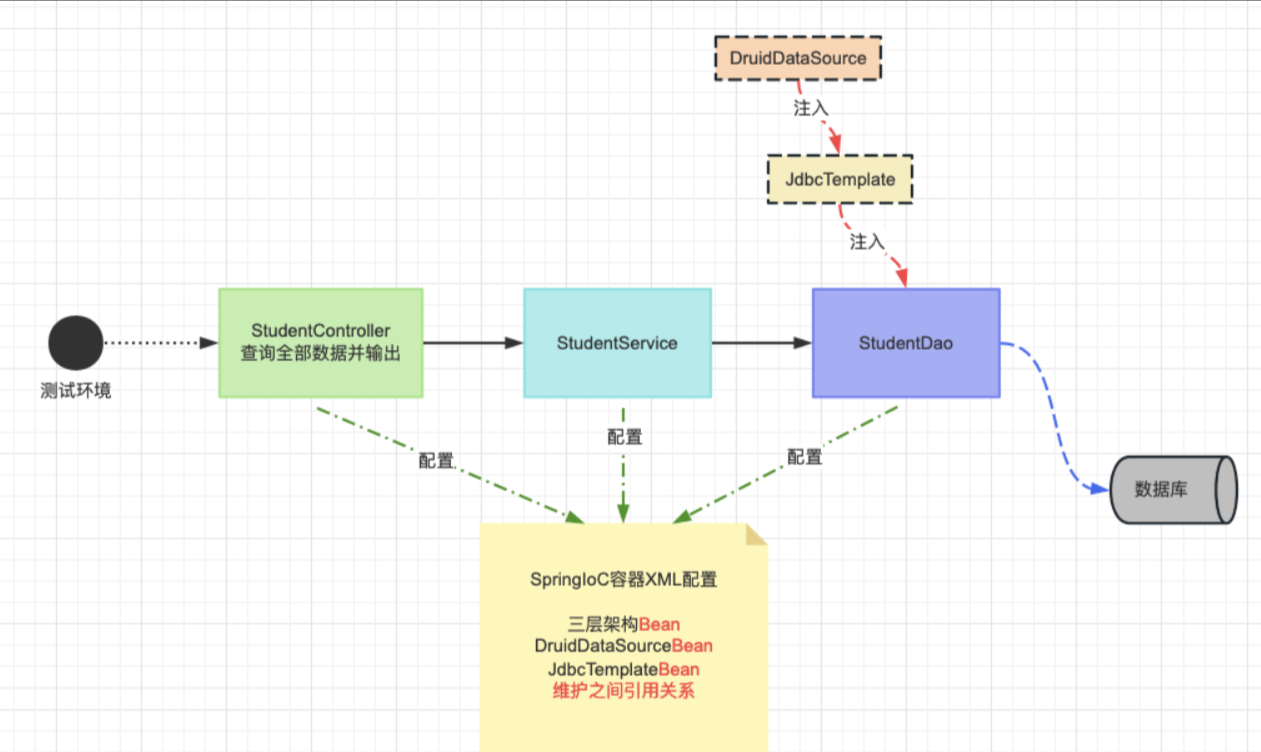
持久层:
/*** 操作学生类数据库的接口*/
public interface StudentDao {/*** 查询所有学生数据* @return  学生集合*/List<Student> findAllStudents();
}//实现类
public class StudentDaoImp implements StudentDao {//使用jdbcTemplateprivate JdbcTemplate jdbcTemplate;//要使用setter注入 将jdbcTemplate 注入到 Dao层中public void setJdbcTemplate(JdbcTemplate jdbcTemplate) {this.jdbcTemplate = jdbcTemplate;}/*** 查找所有的学生信息* @return*/@Overridepublic List<Student> findAllStudents() {String sql = "select id,name,age,gender,class as classes from students";List<Student> studentList = jdbcTemplate.query(sql, new BeanPropertyRowMapper<>(Student.class));System.out.println(studentList);return studentList;}
}
业务层:
//service 层接口
public interface StudentService {/*** 查询所有学生信息 ---业务* @return*/List<Student> findAllStudent();
}//实现类
public class StudentServiceImp implements StudentService {//需要调用Dao层服务private StudentDao studentDao;//通过setter注入public void setStudentDao(StudentDao studentDao) {this.studentDao = studentDao;}/*** 查询所有学生信息 业务的实现* @return*/@Overridepublic List<Student> findAllStudent() {List<Student> allStudents = studentDao.findAllStudents();System.out.println("Service层----"+allStudents);return allStudents;}
}
表述层:
//控制层: 接受用户请求,处理请求参数 --->调用服务层,处理业务逻辑 --->将响应结果返回给用户(页面跳转)
public class StudentController {//调用服务层,处理业务逻辑private StudentService studentService;public void setStudentService(StudentService studentService) {this.studentService = studentService;}public  void findAll(){List<Student> studentList = studentService.findAllStudent();System.out.println("controller---------"+studentList);}
}
springioc的依赖注入
<?xml version="1.0" encoding="UTF-8"?>
<beans xmlns="http://www.springframework.org/schema/beans"xmlns:xsi="http://www.w3.org/2001/XMLSchema-instance"xmlns:context="http://www.springframework.org/schema/context"xsi:schemaLocation="http://www.springframework.org/schema/beans http://www.springframework.org/schema/beans/spring-beans.xsd http://www.springframework.org/schema/context https://www.springframework.org/schema/context/spring-context.xsd"><!--    因为配置数据源射击隐私问题,通常都是写到.properties中在配置数据源的时候引用文件内的数据所以要引入外部文件 value = #{key}使用context:property-placeholder 引入  这个标签需要引入约束:xmlns:context="http://www.springframework.org/schema/context"location="类地址"
--><context:property-placeholder location="classpath:jdbc.properties"/><!--       jdbcTemplate 配置--><bean id="jdbcTemplate" class="org.springframework.jdbc.core.JdbcTemplate">
<!--        setter方法注入  装配数据源--><property name="dataSource" ref="dataSource"/></bean><!--    druidDataSource  配置数据源--><bean id="dataSource" class="com.alibaba.druid.pool.DruidDataSource">
<!--        setter方法注入  装配数据源--><property name="url" value="${jdbc.url}"/><property name="driverClassName" value="${jdbc.driver}"/><property name="username" value="${jdbc.username}"/><property name="password" value="${jdbc.password}"/></bean><!--   Dao层组件   实现类--><bean id="studentDao" class="com.ls.Dao.imp.StudentDaoImp"><property name="jdbcTemplate" ref="jdbcTemplate"/></bean>
<!--    Service 层组件--><bean id="studentServiceImp" class="com.ls.service.imp.StudentServiceImp"><!--        注入 Dao的实现类--><property name="studentDao" ref="studentDao"/></bean><!--        Controller 层组件--><bean id="studentController" class="com.ls.controller.StudentController"><property name="studentService" ref="studentServiceImp"/></bean>
</beans>
测试代码
public class MvcPractice {public static void main(String[] args) {ApplicationContext applicationContext =new ClassPathXmlApplicationContext("application.xml");//发送请求,controller接受请求StudentController controller = applicationContext.getBean(StudentController.class);controller.findAll();}
}

XMLIoC方式问题总结
优点:创建对象交给springioc容器管理确实减少了代码耦合度。
缺点:
- 注入的属性必须添加setter方法、代码结构乱!
- 配置文件和Java代码分离、编写不是很方便!
- XML配置文件解析效率低
这篇关于第三章 SpringIOC容器的使用的文章就介绍到这儿,希望我们推荐的文章对编程师们有所帮助!


