本文主要是介绍K8S - Service简介和 1个简单NodePort例子,希望对大家解决编程问题提供一定的参考价值,需要的开发者们随着小编来一起学习吧!
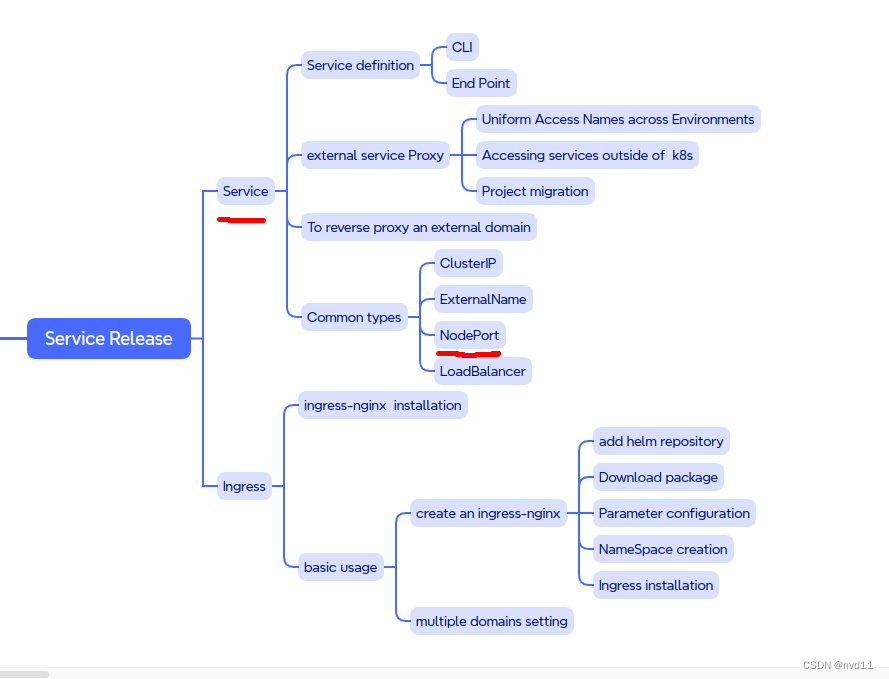
大纲图
流量方向
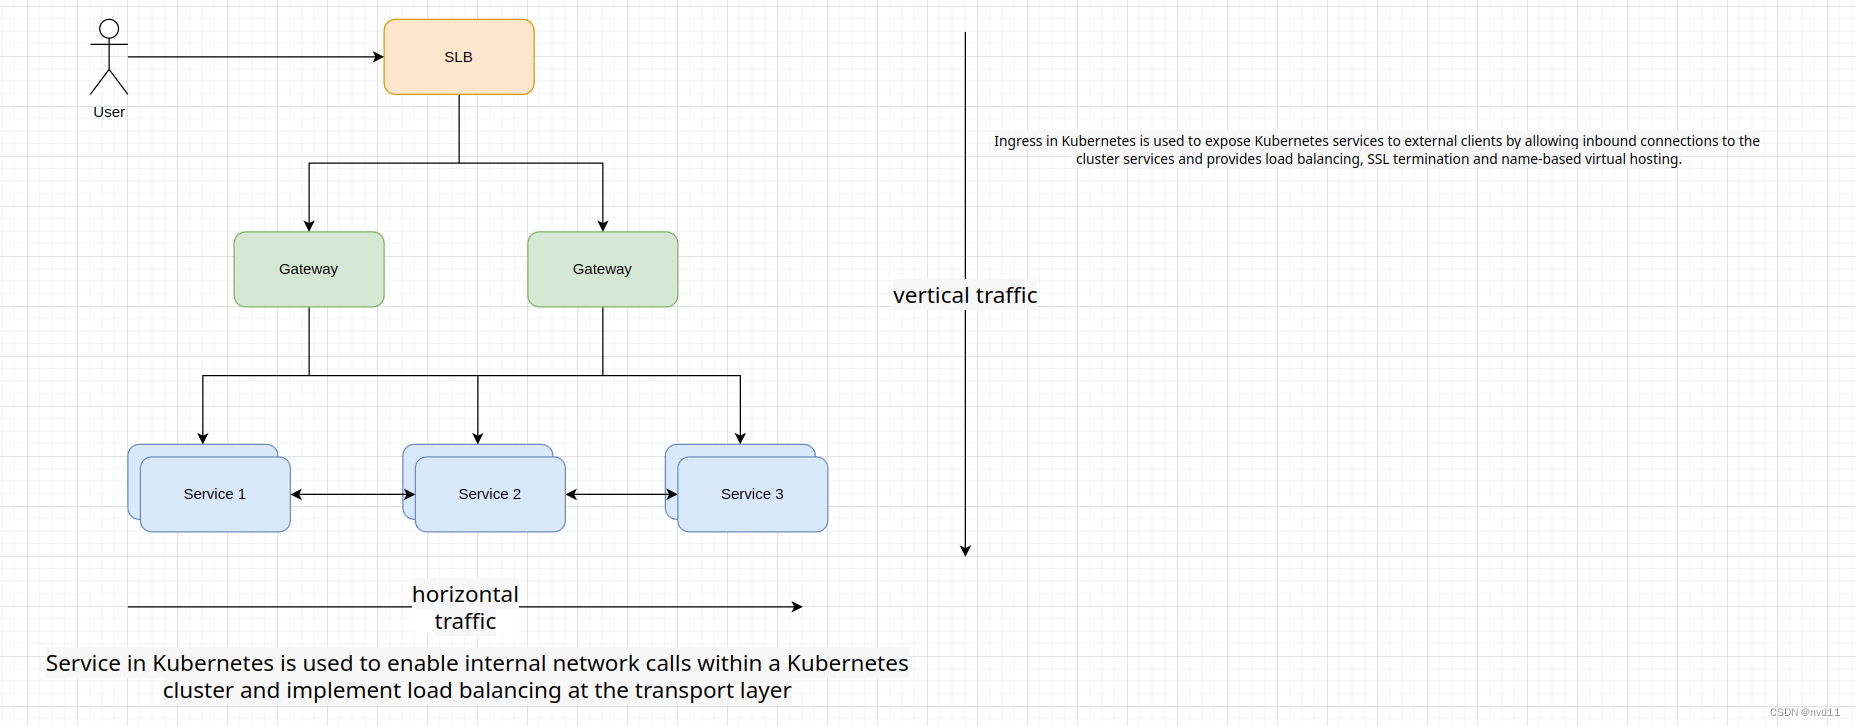
如上图, 当用户or 别的service 从k8s 集群外部访问 集群内的services 流量方向有两种
一种是垂直方向, 通过域名 -> Load Balancer -> gateway -> services , 在k8s 一般是通过ingress 来实现, 而ingress 不是本文的范围内
另一种是横向流量, 因为每个service 基本都在不同的pods, 甚至是不同的nodes, 它们如何互相沟通, 这就是k8s service 的负责范围.
Service 的基本定义
严格来说,Kubernetes中的Service仅仅包括ClusterIP、NodePort和LoadBalancer这三种类型。
ClusterIP:
是默认的Service类型,为 Pod集合分配一个仅集群内部可达的虚拟IP地址。只能从集群内访问。
通常用来定义内部微服务。
NodePort:
除了分配 ClusterIP 外,还会在每一个 Node 上享有一个高端口号暴露服务。
可以通过 : 从集群外访问服务。但不经常使用,局限性较大。
LoadBalancer:
使用云平台本身的负载均衡功能,会在平台上创建一个负载均衡器。
外部流量进入负载均衡器,会转发到集群中能处理请求的节点。
这种类型的Service需要云平台原生支持。
所以总体来说,ClusterIP用于内部服务发现和通信,NodePort和LoadBalancer可以在某种程度上从外部访问服务,但不如Ingress功能全面。
NodePort 基本介绍
NodePort类型的Service是Kubernetes中最常见的一种服务类型。让我来详细介绍一下NodePort Service:
NodePort Service会在每个NodeNode上随机分配一个端口(默认范围30000-32767),通过这个端口就可以从集群外访问Service。
与ClusterIP不同,NodePort Service不仅分配一个内部ClusterIP,还会将服务暴露到每个Node的同一端口上。
客户端可以通过任何一个Node的IP和端口进行访问,例如:NodeIP:NodePort。
NodePort使得外部应用能够找到服务,但不提供负载均衡。流量直接到达Node上服务的首个Pod。
这种类型适用于测试和非生产环境,在生产环境一般不推荐直接使用。
它可以作为集群负载测试的简单方式,也可用于开发和调试服务。
和LoadBalancer相比,NodePort不需要外部负载均衡器支持,在任何云环境下都可以使用。
所以总结来说,NodePort Service通过在集群中的每个节点上映射一个端口,来暴露服务至外部,实现了较为简单的外部访问能力。
即使NodePort 更常用与测试环境, 但是学习nodePort 对k8s 可以加深对k8s 内部网络访问规则的理解
NodePort 的个例子
构造1个接口用于return hostname信息
/actuator/info
@Configuration
@Slf4j
public class MainConfigs {@Bean("hostname")public String hostname() {return getHostName();}private String getHostName() {log.info("MainConfigs: getHostName ...");String hostName = "unknown";try {hostName = java.net.InetAddress.getLocalHost().getHostName();} catch (Exception e) {log.error("Error in getting hostname...", e);}return hostName;}
}
@Component
@Slf4j
public class AppVersionInfo implements InfoContributor {@Value("${pom.version}") // https://stackoverflow.com/questions/3697449/retrieve-version-from-maven-pom-xml-in-codeprivate String appVersion;@Autowiredprivate String hostname;@Overridepublic void contribute(Info.Builder builder) {log.info("AppVersionInfo: contribute ...");builder.withDetail("app", "Sales API").withDetail("version", appVersion).withDetail("hostname",hostname).withDetail("description", "This is a simple Spring Boot application to demonstrate the use of BigQuery in GCP.");}
}
编写yaml
---
apiVersion: apps/v1
kind: Deployment
metadata:labels: # label of this deploymentapp: bq-api-service # custom definedauthor: Jasonname: bq-api-service-deploy-samplenamespace: default
spec:replicas: 3           # desired replica count, Please note that the replica Pods in a Deployment are typically distributed across multiple nodes.revisionHistoryLimit: 10selector: # label of the Pod that the Deployment is managing,, it's mandatory, without it , we will get this error # error: error validating data: ValidationError(Deployment.spec.selector): missing required field "matchLabels" in io.k8s.apimachinery.pkg.apis.meta.v1.LabelSelector ..matchLabels:app: bq-api-servicestrategy: # Strategy of upodatetype: RollingUpdate # RollingUpdate or RecreaterollingUpdate:maxSurge: 25% # The maximum number of Pods that can be created over the desired number of Pods during the updatemaxUnavailable: 25% # The maximum number of Pods that can be unavailable during the updatetemplate: # Pod templatemetadata:labels:app: bq-api-service # label of the Pod that the Deployment is managing. must match the selector, otherwise, will get the error Invalid value: map[string]string{"app":"bq-api-xxx"}: `selector` does not match template `labels`spec:containers:- image: europe-west2-docker.pkg.dev/jason-hsbc/my-docker-repo/bq-api-service:1.1.4 # image of the containerimagePullPolicy: IfNotPresentname: bq-api-service-containerrestartPolicy: Always # Restart policy for all containers within the PodterminationGracePeriodSeconds: 10 # The period of time in seconds given to the Pod to terminate gracefully---
apiVersion: v1 #  api version can be v1 or apps/v1
kind: Service
metadata:name: bq-api-service-1 # name of the servicelabels:app: bq-api-service # label of the service
spec:selector: # Label of the Pod that the Service is selecting app: bq-api-serviceports:- port: 32111 # port of the servicetargetPort: 8080 # port of the Podname: 8080-port # name of the porttype: NodePort # type of the service, NodePort, ClusterIP, LoadBalancer
在这个yaml 中
我们构建了1个deployment, 包括3个pod 副本
还有1个nodePort service, 定义了service pod 是 32111 (随便定义, 一般跟target port一样), target port 是 8080 (必须跟docker file 暴露的端口一至)
执行yaml
正常用kubectl 命令执行
root@k8s-master:~/k8s-s/services# kubectl apply -f bq-api-service-sample.yaml
deployment.apps/bq-api-service-deploy-sample created
service/bq-api-service-1 created
查看resource
先看 nodes
NAME         STATUS   ROLES                  AGE   VERSION   INTERNAL-IP    EXTERNAL-IP   OS-IMAGE                         KERNEL-VERSION          CONTAINER-RUNTIME   LABELS
k8s-master   Ready    control-plane,master   43d   v1.23.6   192.168.0.3    <none>        Debian GNU/Linux 11 (bullseye)   5.10.0-28-cloud-amd64   docker://25.0.3     beta.kubernetes.io/arch=amd64,beta.kubernetes.io/os=linux,kubernetes.io/arch=amd64,kubernetes.io/hostname=k8s-master,kubernetes.io/os=linux,node-role.kubernetes.io/control-plane=,node-role.kubernetes.io/master=,node.kubernetes.io/exclude-from-external-load-balancers=
k8s-node0    Ready    <none>                 43d   v1.23.6   192.168.0.6    <none>        Debian GNU/Linux 11 (bullseye)   5.10.0-28-cloud-amd64   docker://25.0.3     beta.kubernetes.io/arch=amd64,beta.kubernetes.io/os=linux,kubernetes.io/arch=amd64,kubernetes.io/hostname=k8s-node0,kubernetes.io/os=linux
k8s-node1    Ready    <none>                 43d   v1.23.6   192.168.0.44   <none>        Debian GNU/Linux 11 (bullseye)   5.10.0-28-cloud-amd64   docker://25.0.3     beta.kubernetes.io/arch=amd64,beta.kubernetes.io/os=linux,kubernetes.io/arch=amd64,kubernetes.io/hostname=k8s-node1,kubernetes.io/os=linux
k8s-node3    Ready    <none>                 23d   v1.23.6   192.168.0.45   <none>        Debian GNU/Linux 11 (bullseye)   5.10.0-28-cloud-amd64   docker://25.0.3     beta.kubernetes.io/arch=amd64,beta.kubernetes.io/os=linux,kubernetes.io/arch=amd64,kubernetes.io/hostname=k8s-node3,kubernetes.io/os=linux
可以查看各个node的ip 我们有1个master 和3 台nodes
再看pods
root@k8s-master:~/k8s-s/services# kubectl get pods -o wide --show-labels
NAME                                           READY   STATUS    RESTARTS   AGE     IP             NODE        NOMINATED NODE   READINESS GATES   LABELS
bq-api-service-deploy-sample-f448cf6ff-c8zlp   1/1     Running   0          6m47s   10.244.2.104   k8s-node0   <none>           <none>            app=bq-api-service,pod-template-hash=f448cf6ff
bq-api-service-deploy-sample-f448cf6ff-tkxck   1/1     Running   0          6m47s   10.244.1.45    k8s-node1   <none>           <none>            app=bq-api-service,pod-template-hash=f448cf6ff
bq-api-service-deploy-sample-f448cf6ff-vvkt9   1/1     Running   0          6m47s   10.244.3.54    k8s-node3   <none>           <none>            app=bq-api-service,pod-template-hash=f448cf6ff
root@k8s-master:~/k8s-s/services#
可以见3个pods 被create, 分布在3个不同的nodes node0, node1 和 node3
再看service
root@k8s-master:~/k8s-s/services# kubectl get svc -o wide --show-labels
NAME               TYPE        CLUSTER-IP      EXTERNAL-IP   PORT(S)           AGE     SELECTOR             LABELS
bq-api-service-1   NodePort    10.105.158.88   <none>        32111:31372/TCP   7m58s   app=bq-api-service   app=bq-api-service
kubernetes         ClusterIP   10.96.0.1       <none>        443/TCP           21h     <none>               component=apiserver,provider=kubernetes
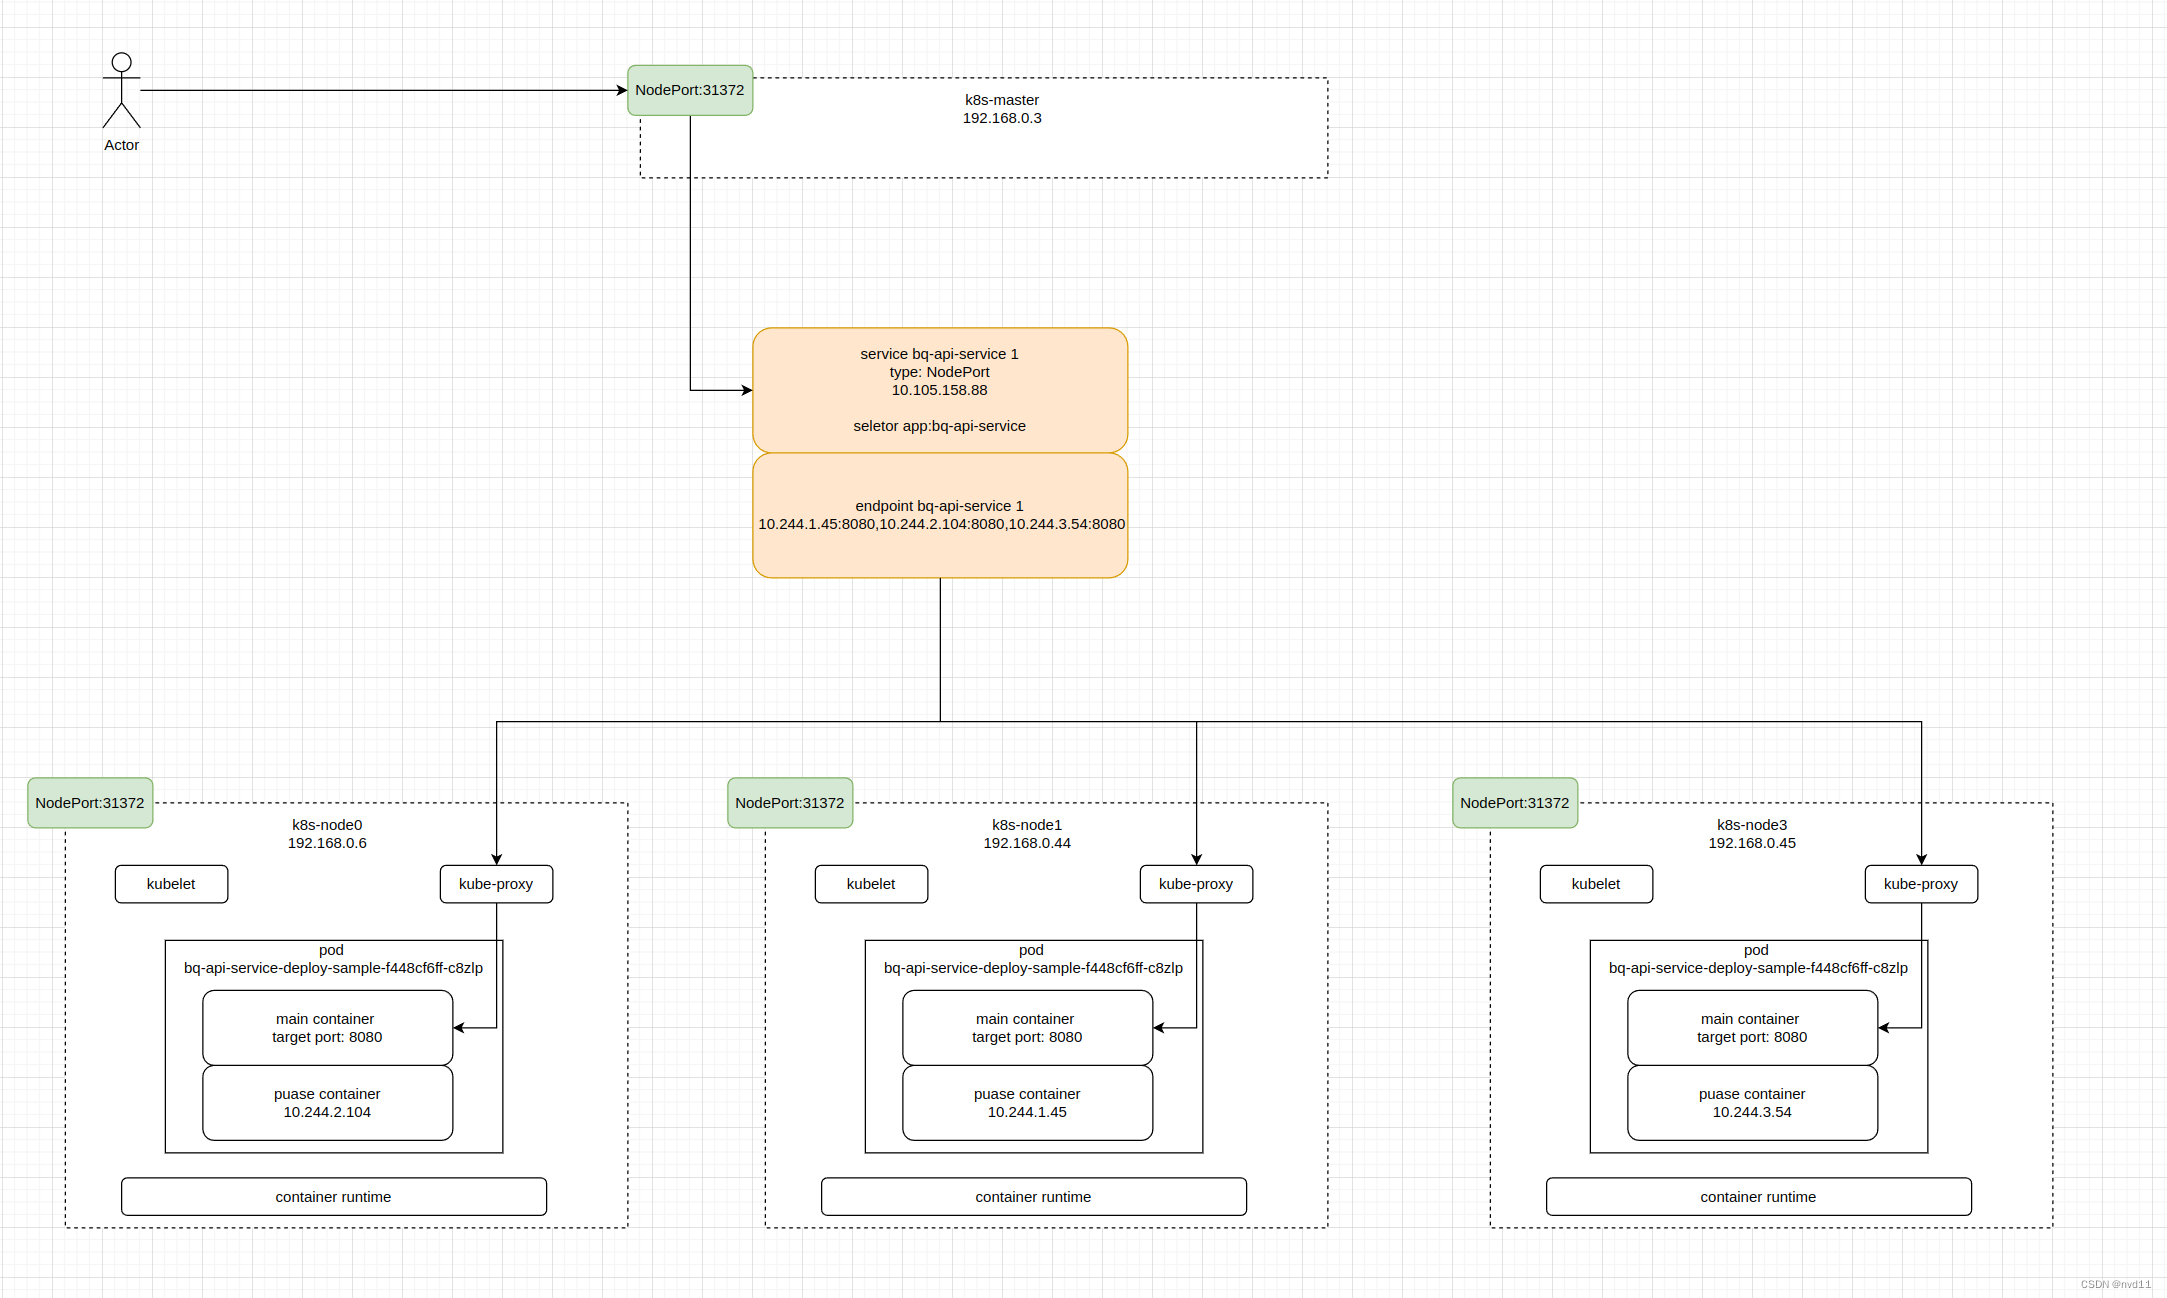
可见1个名字是 bq-api-service-1的NodePort service 被创建, 在PORT(S) 属性里 的值是 32111:31372
其中这个32111是service 本身的port, 而31372 是1个随机生成的port, 可以让k8s外部通过 node ip:31372 去访问这个service
而kubectl get svc 这个命令是不能显示target port 信息
要查看taget port则要查看yaml 信息
root@k8s-master:~/k8s-s/services# kubectl get svc bq-api-service-1 -o yaml
apiVersion: v1
kind: Service
metadata:annotations:kubectl.kubernetes.io/last-applied-configuration: |{"apiVersion":"v1","kind":"Service","metadata":{"annotations":{},"labels":{"app":"bq-api-service"},"name":"bq-api-service-1","namespace":"default"},"spec":{"ports":[{"name":"8080-port","port":32111,"targetPort":8080}],"selector":{"app":"bq-api-service"},"type":"NodePort"}}creationTimestamp: "2024-04-07T14:44:56Z"labels:app: bq-api-servicename: bq-api-service-1namespace: defaultresourceVersion: "2301903"uid: 6dc89e70-6d6f-4965-a613-246c085ca1ef
spec:clusterIP: 10.105.158.88clusterIPs:- 10.105.158.88externalTrafficPolicy: ClusterinternalTrafficPolicy: ClusteripFamilies:- IPv4ipFamilyPolicy: SingleStackports:- name: 8080-portnodePort: 31372port: 32111protocol: TCPtargetPort: 8080selector:app: bq-api-servicesessionAffinity: Nonetype: NodePort
status:loadBalancer: {}
再看endpoint
root@k8s-master:~/k8s-s/services# kubectl get endpoints -o wide --show-labels
NAME               ENDPOINTS                                             AGE   LABELS
bq-api-service-1   10.244.1.45:8080,10.244.2.104:8080,10.244.3.54:8080   17m   app=bq-api-service
kubernetes         192.168.0.3:6443                                      21h   endpointslice.kubernetes.io/skip-mirror=true
重点来了, 一个与service 同名的endpoint 被创建出来, 其实service 与 endpoint 是1 1 对应的, 可以把endpoint 看作service 的属性
endpoints 有3个
10.244.1.45:8080,10.244.2.104:8080,10.244.3.54:8080
其实他们正是 是3个nodes的内部ip + target port
测试
正常我们要通过随机生成的端口nodePort: 31372 来访问
我们先登陆一台k8s 集群外的server
1: lo: <LOOPBACK,UP,LOWER_UP> mtu 65536 qdisc noqueue state UNKNOWN group default qlen 1000link/loopback 00:00:00:00:00:00 brd 00:00:00:00:00:00inet 127.0.0.1/8 scope host lovalid_lft forever preferred_lft foreverinet6 ::1/128 scope host valid_lft forever preferred_lft forever
2: ens4: <BROADCAST,MULTICAST,UP,LOWER_UP> mtu 1460 qdisc mq state UP group default qlen 1000link/ether 42:01:c0:a8:00:23 brd ff:ff:ff:ff:ff:ffaltname enp0s4inet 192.168.0.35/32 brd 192.168.0.35 scope global dynamic ens4valid_lft 53636sec preferred_lft 53636secinet6 fe80::4001:c0ff:fea8:23/64 scope link valid_lft forever preferred_lft forever
3: docker0: <NO-CARRIER,BROADCAST,MULTICAST,UP>
...
用curl 命令来测试
gateman@tf-vpc0-subnet0-main-server:~$ curl 192.168.0.6:31372/actuator/info
{"app":"Sales API","version":"1.1.4","hostname":"bq-api-service-deploy-sample-f448cf6ff-tkxck","description":"This is a simple Spring Boot application to demonstrate the use of BigQuery in GCP."}
gateman@tf-vpc0-subnet0-main-server:~$ curl 192.168.0.6:31372/actuator/info
{"app":"Sales API","version":"1.1.4","hostname":"bq-api-service-deploy-sample-f448cf6ff-c8zlp","description":"This is a simple Spring Boot application to demonstrate the use of BigQuery in GCP."}
gateman@tf-vpc0-subnet0-main-server:~$ curl 192.168.0.6:31372/actuator/info
{"app":"Sales API","version":"1.1.4","hostname":"bq-api-service-deploy-sample-f448cf6ff-c8zlp","description":"This is a simple Spring Boot application to demonstrate the use of BigQuery in GCP."}
gateman@tf-vpc0-subnet0-main-server:~$ curl 192.168.0.6:31372/actuator/info
{"app":"Sales API","version":"1.1.4","hostname":"bq-api-service-deploy-sample-f448cf6ff-vvkt9","description":"This is a simple Spring Boot application to demonstrate the use of BigQuery in GCP."}
gateman@tf-vpc0-subnet0-main-server:~$
在多次执行的情况下, 虽然我们curl 指定是 node0 的ip , 但是实际上, 返回的hostname 是随机的, 包含其他node 的结果, 所以nodeport service 是包含Loadbalance 的功能的
NodePort, service port, target port的作用
从service 的yaml 可以看出, 当这个service 被创建后, 3个ports 出现了
分别是
nodePort: 31372
port: 32111
targetPort: 8080
其中nodePort 31372 是用于被集群外访问的端口, targetPort 是Pod 的端口 , 置于port 32111 是什么来的
其实我之前的文章已经介绍过, 这里的32111 port 是service 本身的port
https://editor.csdn.net/md/?articleId=131278799
也就是讲 service 有两个端口, 1个是被外部访问的, 另1个是service自己内部端口
其实如果我们在集群内任何台主机, 是可以同过service 的ip 和 service 的port去访问的
root@k8s-master:~/k8s-s/services# kubectl get svc bq-api-service-1
NAME               TYPE       CLUSTER-IP      EXTERNAL-IP   PORT(S)           AGE
bq-api-service-1   NodePort   10.105.158.88   <none>        32111:31372/TCP   47m
root@k8s-master:~/k8s-s/services# curl 10.105.158.88:32111/actuator/info
{"app":"Sales API","version":"1.1.4","hostname":"bq-api-service-deploy-sample-f448cf6ff-tkxck","description":"This is a simple Spring Boot application to demonstrate the use of BigQuery in GCP."}
如何我们进入某个pod的容器
甚至可以用service name 和 service port 去访问
root@k8s-master:~# kubectl get pods
NAME                                           READY   STATUS    RESTARTS   AGE
bq-api-service-deploy-sample-f448cf6ff-c8zlp   1/1     Running   0          56m
bq-api-service-deploy-sample-f448cf6ff-tkxck   1/1     Running   0          56m
bq-api-service-deploy-sample-f448cf6ff-vvkt9   1/1     Running   0          56m
root@k8s-master:~# kubectl exec -it bq-api-service-deploy-sample-f448cf6ff-c8zlp -- /bin/bash
root@bq-api-service-deploy-sample-f448cf6ff-c8zlp:/app# curl http://bq-api-service-1:32111/actuator/info
{"app":"Sales API","version":"1.1.4","hostname":"bq-api-service-deploy-sample-f448cf6ff-tkxck","description":"This is a simple Spring Boot application to demonstrate the use of BigQuery in GCP."}
所以看出service port 32111 是被pod 容器内部用的
nodePort 图例
还是重新画张图加深理解
这篇关于K8S - Service简介和 1个简单NodePort例子的文章就介绍到这儿,希望我们推荐的文章对编程师们有所帮助!


