本文主要是介绍ruoyi-nbcio-plus基于vue3的flowable流程元素选择区面板的升级修改,希望对大家解决编程问题提供一定的参考价值,需要的开发者们随着小编来一起学习吧!
更多ruoyi-nbcio功能请看演示系统
gitee源代码地址
前后端代码: https://gitee.com/nbacheng/ruoyi-nbcio
演示地址:RuoYi-Nbcio后台管理系统 http://122.227.135.243:9666/
更多nbcio-boot功能请看演示系统
gitee源代码地址
后端代码: https://gitee.com/nbacheng/nbcio-boot
前端代码:https://gitee.com/nbacheng/nbcio-vue.git
在线演示(包括H5) : http://122.227.135.243:9888
1、流程面板ProcessPalette.vue的原有vue2代码如下:
<template><div class="my-process-palette"><p>简易palette</p><el-collapse><el-collapse-item title="任务" name="1"><!--  可以简化。。。 --><div class="custom-button" @click="createElement($event, 'Task')" @mousedown="createElement($event, 'Task')">任务</div><div class="custom-button" @click="createElement($event, 'UserTask')" @mousedown="createElement($event, 'UserTask')">用户任务</div><div class="custom-button" @click="createElement($event, 'SendTask')" @mousedown="createElement($event, 'SendTask')">发送任务</div><div class="custom-button" @click="createElement($event, 'ReceiveTask')" @mousedown="createElement($event, 'ReceiveTask')">接收任务</div><div class="custom-button" @click="createElement($event, 'ScriptTask')" @mousedown="createElement($event, 'ScriptTask')">脚本任务</div><div class="custom-button" @click="createElement($event, 'ServiceTask')" @mousedown="createElement($event, 'ServiceTask')">服务任务</div></el-collapse-item><el-collapse-item title="网关" name="2"><div class="custom-button" @click="createElement($event, 'Gateway')" @mousedown="createElement($event, 'Gateway')">网关</div></el-collapse-item><el-collapse-item title="开始" name="3"><div class="custom-button" @click="createElement($event, 'StartEvent')" @mousedown="createElement($event, 'StartEvent')">开始</div></el-collapse-item><el-collapse-item title="结束" name="4"><div class="custom-button" @click="createElement($event, 'EndEvent')" @mousedown="createElement($event, 'EndEvent')">结束</div></el-collapse-item><el-collapse-item title="工具" name="5"><div class="custom-button" @click="startTool($event, 'handTool')" @mousedown="startTool($event, 'handTool')">手型工具</div><div class="custom-button" @click="startTool($event, 'lassoTool')" @mousedown="startTool($event, 'lassoTool')">框选工具</div><div class="custom-button" @click="startTool($event, 'connectTool')" @mousedown="startTool($event, 'connectTool')">连线工具</div></el-collapse-item></el-collapse></div>
</template><script>
import { assign } from 'min-dash';export default {name: 'MyProcessPalette',data() {return {};},mounted() {},methods: {createElement(event, type, options = {}) {const ElementFactory = window.bpmnInstances.elementFactory;const create = window.bpmnInstances.modeler.get('create');const shape = ElementFactory.createShape(assign({ type: `bpmn:${type}` }, options));if (options) {shape.businessObject.di.isExpanded = options.isExpanded;}create.start(event, shape);},startTool(event, type) {if (type === 'handTool') {window.bpmnInstances.modeler.get('handTool').activateHand(event);}if (type === 'lassoTool') {window.bpmnInstances.modeler.get('lassoTool').activateSelection(event);}if (type === 'connectTool') {window.bpmnInstances.modeler.get('globalConnect').toggle(event);}}}
};
</script><style scoped lang="scss">
.my-process-palette {box-sizing: border-box;padding: 8px;.custom-button {box-sizing: border-box;padding: 4px 8px;border-radius: 4px;border: 1px solid rgba(24, 144, 255, 0.8);cursor: pointer;margin-bottom: 8px;&:first-child {margin-top: 8px;}}
}
</style>
2、修改后的vue3代码如下:
<template><div class="my-process-palette"><p>简易palette</p><el-collapse><el-collapse-item title="任务" name="1"><!--  可以简化。。。 --><div class="custom-button" @click="createElement($event, 'Task')" @mousedown="createElement($event, 'Task')">任务</div><div class="custom-button" @click="createElement($event, 'UserTask')" @mousedown="createElement($event, 'UserTask')">用户任务</div><div class="custom-button" @click="createElement($event, 'SendTask')" @mousedown="createElement($event, 'SendTask')">发送任务</div><div class="custom-button" @click="createElement($event, 'ReceiveTask')" @mousedown="createElement($event, 'ReceiveTask')">接收任务</div><div class="custom-button" @click="createElement($event, 'ScriptTask')" @mousedown="createElement($event, 'ScriptTask')">脚本任务</div><div class="custom-button" @click="createElement($event, 'ServiceTask')" @mousedown="createElement($event, 'ServiceTask')">服务任务</div></el-collapse-item><el-collapse-item title="网关" name="2"><div class="custom-button" @click="createElement($event, 'Gateway')" @mousedown="createElement($event, 'Gateway')">网关</div></el-collapse-item><el-collapse-item title="开始" name="3"><div class="custom-button" @click="createElement($event, 'StartEvent')" @mousedown="createElement($event, 'StartEvent')">开始</div></el-collapse-item><el-collapse-item title="结束" name="4"><div class="custom-button" @click="createElement($event, 'EndEvent')" @mousedown="createElement($event, 'EndEvent')">结束</div></el-collapse-item><el-collapse-item title="工具" name="5"><div class="custom-button" @click="startTool($event, 'handTool')" @mousedown="startTool($event, 'handTool')">手型工具</div><div class="custom-button" @click="startTool($event, 'lassoTool')" @mousedown="startTool($event, 'lassoTool')">框选工具</div><div class="custom-button" @click="startTool($event, 'connectTool')" @mousedown="startTool($event, 'connectTool')">连线工具</div></el-collapse-item></el-collapse></div>
</template><script lang="ts" setup>import { assign } from 'min-dash';defineOptions({ name: 'MyProcessPalette' })const bpmnInstances = () => (window as any)?.bpmnInstancesconst createElement = (event, type, options = {}) => {const ElementFactory = bpmnInstances().elementFactory;const create = bpmnInstances().modeler.get('create');const shape = ElementFactory.createShape(assign({ type: `bpmn:${type}` }, options));if (options) {shape.businessObject.di.isExpanded = options.isExpanded;}create.start(event, shape);}const startTool = (event, type) => {if (type === 'handTool') {bpmnInstances().modeler.get('handTool').activateHand(event);}if (type === 'lassoTool') {bpmnInstances().modeler.get('lassoTool').activateSelection(event);}if (type === 'connectTool') {bpmnInstances().modeler.get('globalConnect').toggle(event);}}
</script><style scoped lang="scss">
.my-process-palette {box-sizing: border-box;padding: 8px;.custom-button {box-sizing: border-box;padding: 4px 8px;border-radius: 4px;border: 1px solid rgba(24, 144, 255, 0.8);cursor: pointer;margin-bottom: 8px;&:first-child {margin-top: 8px;}}
}
</style>
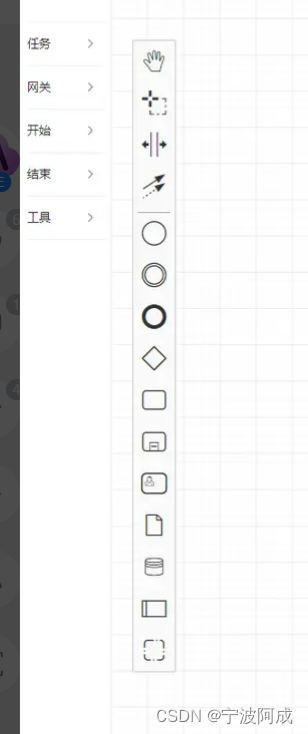
3、界面,不过这个目前去掉了,没有再用

这篇关于ruoyi-nbcio-plus基于vue3的flowable流程元素选择区面板的升级修改的文章就介绍到这儿,希望我们推荐的文章对编程师们有所帮助!


