本文主要是介绍使用Rust编写推箱子游戏功能篇,希望对大家解决编程问题提供一定的参考价值,需要的开发者们随着小编来一起学习吧!
教程已翻译完成可以从Github查看也可以在线查看
你好棒棒哦,已经读到第2章啦!在这一章中我们将实现一些游戏的基本功能比如:加载地图,让角色动起来等,总之完成了这一章,我们的程序就有点游戏的意思了.激不激动,让我们继续前进,前进,前进进!
加载地图
在上一章中为了测试渲染系统是否正常,我们编写了一些实体.接下来是时候渲染一个合适的地图了.在这一节中我们就先创建一个文本格式的地图配置文件,后面再加载这个配置文件.以此学习怎么创建加载地图.
地图配置
首先让我们看一个二维的地图:
    N N W W W W W WW W W . . . . WW . . . B . . WW . . . . . . W W . P . . . . WW . . . . . . WW . . S . . . WW . . . . . . WW W W W W W W Wwhere:
. is an empty spot
W is a wall
P is the player
B is a box
S is a box spot
N is nothing: used for the outer edges of the map
为了简单起见我们直接使用一个字符串常量保存地图信息,就不把它放在一个文件中再读取了:
pub fn initialize_level(world: &mut World) {const MAP: &str = "N N W W W W W WW W W . . . . WW . . . B . . WW . . . . . . W W . P . . . . WW . . . . . . WW . . S . . . WW . . . . . . WW W W W W W W W";load_map(world, MAP.to_string());
}
接下来是编写加载地图(函数load_map)的代码:
#![allow(unused)]
fn main() {
pub fn load_map(world: &mut World, map_string: String) {// read all lineslet rows: Vec<&str> = map_string.trim().split('\n').map(|x| x.trim()).collect();for (y, row) in rows.iter().enumerate() {let columns: Vec<&str> = row.split(' ').collect();for (x, column) in columns.iter().enumerate() {// Create the position at which to create something on the maplet position = Position {x: x as u8,y: y as u8,z: 0, // we will get the z from the factory functions};// Figure out what object we should creatematch *column {"." => create_floor(world, position),"W" => {create_floor(world, position);create_wall(world, position);}"P" => {create_floor(world, position);create_player(world, position);}"B" => {create_floor(world, position);create_box(world, position);}"S" => {create_floor(world, position);create_box_spot(world, position);}"N" => (),c => panic!("unrecognized map item {}", c),}}}
}
}
这里特别适合使用Rust提供的特别有意思的功能match.不过这里我们只是用简单的模式匹配功能分别处理地图配置中的每一个字符,模式匹配(match)还有很多更高级的用法,比如:条件判断,类型匹配等.
MORE: 想了解更多模式匹配的功能可以看 这里.
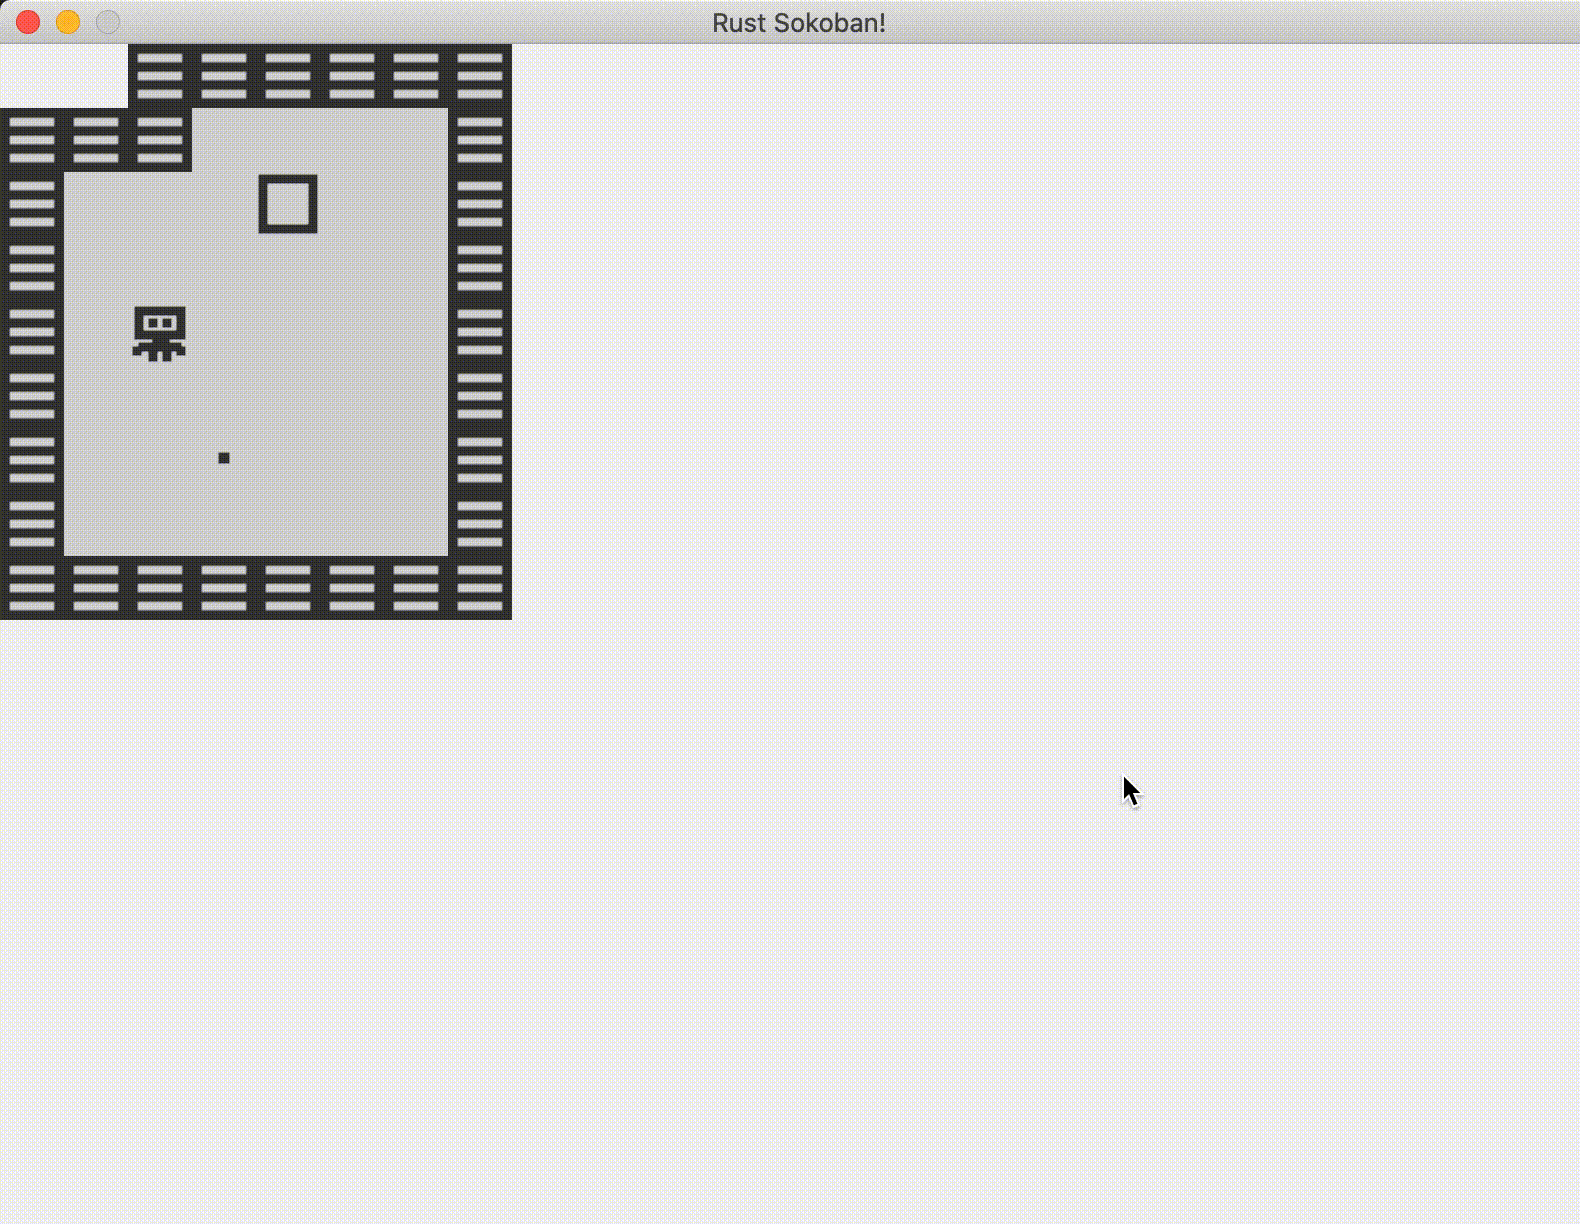
现在可以运行下我们的游戏,如果你是跟这我们一起编写的,它看起来应该像这样:

下面是完整代码:
use ggez;
use ggez::graphics;
use ggez::graphics::DrawParam;
use ggez::graphics::Image;
use ggez::nalgebra as na;
use ggez::{conf, event, Context, GameResult};
use specs::{join::Join, Builder, Component, ReadStorage, RunNow, System, VecStorage, World, WorldExt,
};use std::path;const TILE_WIDTH: f32 = 32.0;// Components
#[derive(Debug, Component, Clone, Copy)]
#[storage(VecStorage)]
pub struct Position {x: u8,y: u8,z: u8,
}#[derive(Component)]
#[storage(VecStorage)]
pub struct Renderable {path: String,
}#[derive(Component)]
#[storage(VecStorage)]
pub struct Wall {}#[derive(Component)]
#[storage(VecStorage)]
pub struct Player {}#[derive(Component)]
#[storage(VecStorage)]
pub struct Box {}#[derive(Component)]
#[storage(VecStorage)]
pub struct BoxSpot {}// Systems
pub struct RenderingSystem<'a> {context: &'a mut Context,
}// System implementation
impl<'a> System<'a> for RenderingSystem<'a> {// Datatype SystemData = (ReadStorage<'a, Position>, ReadStorage<'a, Renderable>);fn run(&mut self, data: Self::SystemData) {let (positions, renderables) = data;// Clearing the screen (this gives us the backround colour)graphics::clear(self.context, graphics::Color::new(0.95, 0.95, 0.95, 1.0));// Get all the renderables with their positions and sort by the position z// This will allow us to have entities layered visually.let mut rendering_data = (&positions, &renderables).join().collect::<Vec<_>>();rendering_data.sort_by_key(|&k| k.0.z);// Iterate through all pairs of positions & renderables, load the image// and draw it at the specified position.for (position, renderable) in rendering_data.iter() {// Load the imagelet image = Image::new(self.context, renderable.path.clone()).expect("expected image");let x = position.x as f32 * TILE_WIDTH;let y = position.y as f32 * TILE_WIDTH;// drawlet draw_params = DrawParam::new().dest(na::Point2::new(x, y));graphics::draw(self.context, &image, draw_params).expect("expected render");}// Finally, present the context, this will actually display everything// on the screen.graphics::present(self.context).expect("expected to present");}
}// This struct will hold all our game state
// For now there is nothing to be held, but we'll add
// things shortly.
struct Game {world: World,
}// This is the main event loop. ggez tells us to implement
// two things:
// - updating
// - rendering
impl event::EventHandler for Game {fn update(&mut self, _context: &mut Context) -> GameResult {Ok(())}fn draw(&mut self, context: &mut Context) -> GameResult {// Render game entities{let mut rs = RenderingSystem { context };rs.run_now(&self.world);}Ok(())}
}// Register components with the world
pub fn register_components(world: &mut World) {world.register::<Position>();world.register::<Renderable>();world.register::<Player>();world.register::<Wall>();world.register::<Box>();world.register::<BoxSpot>();
}// Create a wall entity
pub fn create_wall(world: &mut World, position: Position) {world.create_entity().with(Position { z: 10, ..position }).with(Renderable {path: "/images/wall.png".to_string(),}).with(Wall {}).build();
}pub fn create_floor(world: &mut World, position: Position) {world.create_entity().with(Position { z: 5, ..position }).with(Renderable {path: "/images/floor.png".to_string(),}).build();
}pub fn create_box(world: &mut World, position: Position) {world.create_entity().with(Position { z: 10, ..position }).with(Renderable {path: "/images/box.png".to_string(),}).with(Box {}).build();
}pub fn create_box_spot(world: &mut World, position: Position) {world.create_entity().with(Position { z: 9, ..position }).with(Renderable {path: "/images/box_spot.png".to_string(),}).with(BoxSpot {}).build();
}pub fn create_player(world: &mut World, position: Position) {world.create_entity().with(Position { z: 10, ..position }).with(Renderable {path: "/images/player.png".to_string(),}).with(Player {}).build();
}// Initialize the level
pub fn initialize_level(world: &mut World) {const MAP: &str = "N N W W W W W WW W W . . . . WW . . . B . . WW . . . . . . W W . P . . . . WW . . . . . . WW . . S . . . WW . . . . . . WW W W W W W W W";load_map(world, MAP.to_string());
}pub fn load_map(world: &mut World, map_string: String) {// read all lineslet rows: Vec<&str> = map_string.trim().split('\n').map(|x| x.trim()).collect();for (y, row) in rows.iter().enumerate() {let columns: Vec<&str> = row.split(' ').collect();for (x, column) in columns.iter().enumerate() {// Create the position at which to create something on the maplet position = Position {x: x as u8,y: y as u8,z: 0, // we will get the z from the factory functions};// Figure out what object we should creatematch *column {"." => create_floor(world, position),"W" => {create_floor(world, position);create_wall(world, position);}"P" => {create_floor(world, position);create_player(world, position);}"B" => {create_floor(world, position);create_box(world, position);}"S" => {create_floor(world, position);create_box_spot(world, position);}"N" => (),c => panic!("unrecognized map item {}", c),}}}
}
pub fn main() -> GameResult {let mut world = World::new();register_components(&mut world);initialize_level(&mut world);// Create a game context and event looplet context_builder = ggez::ContextBuilder::new("rust_sokoban", "sokoban").window_setup(conf::WindowSetup::default().title("Rust Sokoban!")).window_mode(conf::WindowMode::default().dimensions(800.0, 600.0)).add_resource_path(path::PathBuf::from("./resources"));let (context, event_loop) = &mut context_builder.build()?;// Create the game statelet game = &mut Game { world };// Run the main event loopevent::run(context, event_loop, game)
}
CODELINK: 可以从这里获取当前实例的完整代码.
让角色动起来
严格来说当前我们编写的还称不上游戏,因为还不能让玩家操作角色动起来.在这一节我们就开始学习怎么获取用户输入事件从而让角色动起来.
输入事件
要让玩家可以操作角色动起来,首先我们需要监听用户输入事件.怎么监听呢?可以参考ggez提供的例子.其中有监听鼠标和键盘事件的示例代码,现在我们只需要监听键盘按下(key_down_event)事件.比虎画猫让我们开始编写代码吧!
首先引入下需要用到的模块:
#![allow(unused)]
fn main() {
use ggez;
use ggez::event::{KeyCode, KeyMods};
use ggez::graphics;
use ggez::graphics::DrawParam;
use ggez::graphics::Image;
use ggez::nalgebra as na;
use ggez::{conf, event, Context, GameResult};
use specs::{join::Join, Builder, Component, Read, ReadStorage, RunNow, System, VecStorage, World, WorldExt,Write, WriteStorage,
};
}
接下来为Game实现event::EventHandler,这样我们的游戏就可以监听到键盘按键按下的事件了:
#![allow(unused)]
fn main() {
impl event::EventHandler for Game {// ...fn key_down_event(&mut self,_context: &mut Context,keycode: KeyCode,_keymod: KeyMods,_repeat: bool,) {println!("Key pressed: {:?}", keycode);}// ...}
}
你可以运行代码,按下方向键试一下,在控制台中就会输出类似下面的信息:
Key pressed: Left
Key pressed: Left
Key pressed: Right
Key pressed: Up
Key pressed: Down
Key pressed: Left
是不是很神奇?
在使用println输出信息时使用了{:?},这个是Rust提供的方便调试的,比如我们这里输出的keycode其实是一个枚举对象,因为它实现了Debug特征,所以这里可以很方便的把它转换为字符串输出到控制台.如果要对没有实现Debug特征的对象使用{:?},代码就该编译出错了,好在Rust提供了Debug宏可以非常简单方便实现Debug特征.我们在第1章的第3节介绍过宏,如果对宏不是很了解也可以回头再看一下.
资源
资源是用于在系统中共享状态信息的.为什么需要资源呢?因为组件实体模型不适合干这样的事.
接下来我们将添加一个资源,一个用于记录用户按键的队列.
#![allow(unused)]
fn main() {
// Resources
#[derive(Default)]
pub struct InputQueue {pub keys_pressed: Vec<KeyCode>,
}
}
当用户按下了按键,Game的方法key_down_event就会执行,这个我们上面已经试过了.现在我们需要在key_down_event方法中把keycode添加到队列里:
#![allow(unused)]
fn main() {
impl event::EventHandler for Game {// ...fn key_down_event(&mut self,_context: &mut Context,keycode: KeyCode,_keymod: KeyMods,_repeat: bool,) {println!("Key pressed: {:?}", keycode);let mut input_queue = self.world.write_resource::<InputQueue>();input_queue.keys_pressed.push(keycode);}// ...}
}
最后我们还需要注册下资源,就像注册组件一样.
// Registering resources
pub fn register_resources(world: &mut World) {world.insert(InputQueue::default())
}// Registering resources in main
pub fn main() -> GameResult {let mut world = World::new();register_components(&mut world);register_resources(&mut world);initialize_level(&mut world);// Create a game context and event looplet context_builder = ggez::ContextBuilder::new("rust_sokoban", "sokoban").window_setup(conf::WindowSetup::default().title("Rust Sokoban!")).window_mode(conf::WindowMode::default().dimensions(800.0, 600.0)).add_resource_path(path::PathBuf::from("./resources"));let (context, event_loop) = &mut context_builder.build()?;// Create the game statelet game = &mut Game { world };// Run the main event loopevent::run(context, event_loop, game)
输入处理
到这里我们已经有了一个持续记录用户按键的队列,接下来就是在系统中处理这个队列了,准确来说是处理队列中记录的按键.
#![allow(unused)]
fn main() {
pub struct InputSystem {}impl<'a> System<'a> for InputSystem {// Datatype SystemData = (Write<'a, InputQueue>,WriteStorage<'a, Position>,ReadStorage<'a, Player>,);fn run(&mut self, data: Self::SystemData) {let (mut input_queue, mut positions, players) = data;for (position, _player) in (&mut positions, &players).join() {// Get the first key pressedif let Some(key) = input_queue.keys_pressed.pop() {// Apply the key to the positionmatch key {KeyCode::Up => position.y -= 1,KeyCode::Down => position.y += 1,KeyCode::Left => position.x -= 1,KeyCode::Right => position.x += 1,_ => (),}}}}
}
}
最后我们还需要在渲染循环中运行输入处理代码.
#![allow(unused)]
fn main() {fn update(&mut self, _context: &mut Context) -> GameResult {// Run input system{let mut is = InputSystem {};is.run_now(&self.world);}Ok(())}
}
当前的输入处理代码非常简单,就是根据玩家的输入控制角色的位置(虽然我们当前只有一个角色,但是理论上对于多个玩家多个角色的场景也可以这么玩).
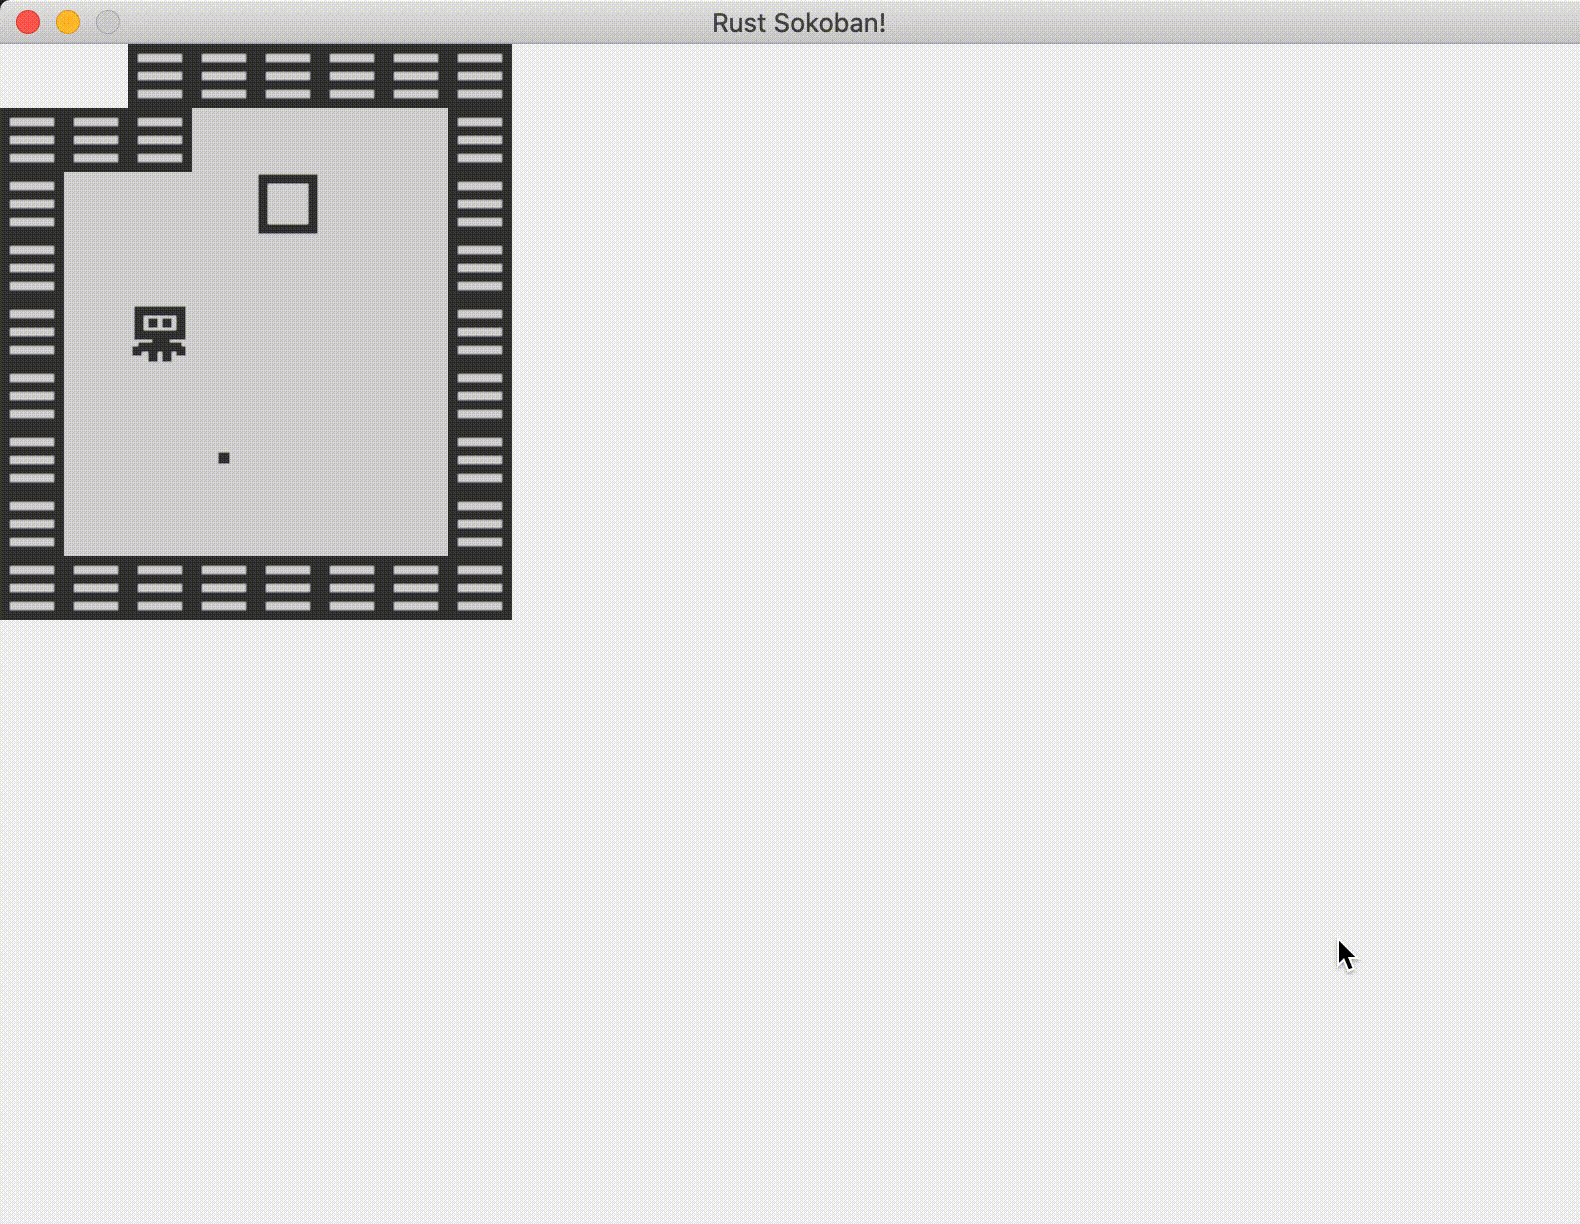
酷不? 运行下代码应该就是这样的:
注意到没?现在角色可以穿过墙和盒子.没关系,我们下一节就修复这个问题.
CODELINK: 可以点这里获取当前完整代码.
推箱子
在前一节中我们可以控制角色移动了,但是角色可以穿越墙和盒子,对环境中的其它东西根本都不care.做人不能这么横,咋能这么目中无箱子呢?这样还咋推箱子呢?接下来我们就在角色移动的时候添加些逻辑判断让它智能起来.
可移动的组件
首先我们需要让代码更通用些.在先前场景我们完成了让玩家控制角色移动的功能,后面我们还需要让箱子也移动起来.说不定以后我们还需要移动其它的什么东西.所以很有必要把组件区分为可移动的和不可移动的.比如:角色箱子是可以移动的;墙是不能移动,角色也不能穿过的;另外还有方框即不像可移动的角色也不像不可移动的墙.
接下来我们增加2个新组件,除了一些小的改变其实也没什么新的:
- 我们使用
NullStorage而不是VecStorage,因为这俩个组件没什么属性,只是用做标记,使用NullStorage更高效. - 为了使用
NullStorage还需要实现Default特征. - 把这俩个组件添加到register_components函数中.
#![allow(unused)]
fn main() {
#[derive(Component, Default)]
#[storage(NullStorage)]
pub struct Movable;#[derive(Component, Default)]
#[storage(NullStorage)]
pub struct Immovable;world.register::<Wall>();world.register::<Box>();world.register::<BoxSpot>();world.register::<Movable>();world.register::<Immovable>();
}pub fn register_resources(world: &mut World) {world.insert(InputQueue::default())
}
}
接下来:
- 为角色和箱子实现with(Movable)
- 为墙实现with(Immovable)
- 地板和方框就不做什么处理了(就像我们先前分析的,方框即不能移动也不能像墙一样阻止角色箱子移动)
#![allow(unused)]
fn main() {.with(Renderable {path: "/images/wall.png".to_string(),}).with(Wall {}).with(Immovable).build();
}pub fn create_floor(world: &mut World, position: Position) {world.create_entity().with(Position { z: 5, ..position }).with(Renderable {path: "/images/floor.png".to_string(),}).build();
}pub fn create_box(world: &mut World, position: Position) {world.create_entity().with(Position { z: 10, ..position }).with(Renderable {path: "/images/box.png".to_string(),}).with(Box {}).with(Movable).build();
}pub fn create_box_spot(world: &mut World, position: Position) {world.create_entity().with(Position { z: 9, ..position }).with(Renderable {path: "/images/box_spot.png".to_string(),}).with(BoxSpot {}).build();
}pub fn create_player(world: &mut World, position: Position) {world.create_entity().with(Position { z: 10, ..position }).with(Renderable {path: "/images/player.png".to_string(),}).with(Player {}).with(Movable).build();
}// Initialize the level
pub fn initialize_level(world: &mut World) {const MAP: &str = "
}
移动需求分析
现在我们可以想几种不同的移动场景,这样有助于更好的使用Moveable和Immovable.
场景:
(player, floor)+RIGHT-> 角色应右移(player, wall)+RIGHT-> 角色不能移动(player, box, floor)+RIGHT-> 角色和盒子右移(player, box, wall)+RIGHT-> 啥都不移动(player, box, box, floor)+RIGHT-> 角色, box1 和 box2 都应右移(player, box, box, wall)+RIGHT-> 啥都不移动
由此可以得出:
- 碰撞(移动)检测需要所有相关对象一起完成.比如场景6, 如果我们一次检测一个对象,我们就会移动角色,然后移动box1,直到我们检测到box2,才发现box2是不能移动的,因为它前面是个墙,那先前移动的角色和box1还得移动回去.
- 可移动对象碰到空点可以移动的(这里的空点代表即不是可移动对象也不是不可移动对象).
- 可移动对象碰到不可移动对象不可移动.
- 虽然我们只是根据向右移动的场景分析的,但这些结论同样适用于其它方向.
基于此,就可以编写代码了. 以下是一些我们需要实现的逻辑片段:
- 找出所有的可移动实体和不可移动实体 - 这样我们才能区分它们是否对应对有影响.
- 确定基于按键移动实体的方法 - 这个我们先前章节中已经介绍过,可以根据按键在实体位置相应分支上+1或-1;
- 遍历从角色当前位置到地图末尾的所有位置 需要根据移动方向判断地图末尾位置,比如按下的向右方向键,那我们就需要遍历玩家当前位置到
地图宽度的所有位置信息;如果按下的是向上方向键,那就需要从0遍历到player.y. - 对于序列中的每个图块 我们需要:
- 如果当前图块是可移动的,就继续执行并记录下当前的图块.
- 如果当前图块是不可移动的,就停止执行,什么也不需要移动.
- 如果当前图块既不是可移动的也不是不可移动的,就移动我们先前记录的所有可移动图块.
下面是新的输入处理的代码,虽然代码有点长但功能实现了!
#![allow(unused)]
fn main() {// Datatype SystemData = (Write<'a, InputQueue>,Entities<'a>,WriteStorage<'a, Position>,ReadStorage<'a, Player>,ReadStorage<'a, Movable>,ReadStorage<'a, Immovable>,);fn run(&mut self, data: Self::SystemData) {let (mut input_queue, entities, mut positions, players, movables, immovables) = data;let mut to_move = Vec::new();for (position, _player) in (&positions, &players).join() {// Get the first key pressedif let Some(key) = input_queue.keys_pressed.pop() {// get all the movables and immovableslet mut mov: HashMap<(u8, u8), Index> = (&entities, &movables, &positions).join().map(|t| ((t.2.x, t.2.y), t.0.id())).collect::<HashMap<_, _>>();let mut immov: HashMap<(u8, u8), Index> = (&entities, &immovables, &positions).join().map(|t| ((t.2.x, t.2.y), t.0.id())).collect::<HashMap<_, _>>();// Now iterate through current position to the end of the map// on the correct axis and check what needs to move.let (start, end, is_x) = match key {KeyCode::Up => (position.y, 0, false),KeyCode::Down => (position.y, MAP_HEIGHT, false),KeyCode::Left => (position.x, 0, true),KeyCode::Right => (position.x, MAP_WIDTH, true),_ => continue,};let range = if start < end {(start..=end).collect::<Vec<_>>()} else {(end..=start).rev().collect::<Vec<_>>()};for x_or_y in range {let pos = if is_x {(x_or_y, position.y)} else {(position.x, x_or_y)};// find a movable// if it exists, we try to move it and continue// if it doesn't exist, we continue and try to find an immovable insteadmatch mov.get(&pos) {Some(id) => to_move.push((key, id.clone())),None => {// find an immovable// if it exists, we need to stop and not move anything// if it doesn't exist, we stop because we found a gapmatch immov.get(&pos) {Some(id) => to_move.clear(),None => break,}}}}}}// Now actually move what needs to be movedfor (key, id) in to_move {let position = positions.get_mut(entities.entity(id));if let Some(position) = position {match key {KeyCode::Up => position.y -= 1,KeyCode::Down => position.y += 1,KeyCode::Left => position.x -= 1,KeyCode::Right => position.x += 1,_ => (),}}}}
}
}
现在再运行代码,你会发现角色不再穿越墙了还能推动箱子了.
下面是完整代码:
use ggez;
use ggez::event::KeyCode;
use ggez::event::KeyMods;
use ggez::graphics;
use ggez::graphics::DrawParam;
use ggez::graphics::Image;
use ggez::nalgebra as na;
use ggez::{conf, event, Context, GameResult};
use specs::world::Index;
use specs::Entities;
use specs::NullStorage;
use specs::WriteStorage;
use specs::{join::Join, Builder, Component, Read, ReadStorage, RunNow, System, VecStorage, World, WorldExt,Write,
};
use std::collections::HashMap;
use std::path;const TILE_WIDTH: f32 = 32.0;
const MAP_WIDTH: u8 = 8;
const MAP_HEIGHT: u8 = 9;// Components
#[derive(Debug, Component, Clone, Copy)]
#[storage(VecStorage)]
pub struct Position {x: u8,y: u8,z: u8,
}#[derive(Component)]
#[storage(VecStorage)]
pub struct Renderable {path: String,
}#[derive(Component)]
#[storage(VecStorage)]
pub struct Wall {}#[derive(Component)]
#[storage(VecStorage)]
pub struct Player {}#[derive(Component)]
#[storage(VecStorage)]
pub struct Box {}#[derive(Component)]
#[storage(VecStorage)]
pub struct BoxSpot {}#[derive(Component, Default)]
#[storage(NullStorage)]
pub struct Movable;#[derive(Component, Default)]
#[storage(NullStorage)]
pub struct Immovable;// Resources
#[derive(Default)]
pub struct InputQueue {pub keys_pressed: Vec<KeyCode>,
}// Systems
pub struct RenderingSystem<'a> {context: &'a mut Context,
}// System implementation
impl<'a> System<'a> for RenderingSystem<'a> {// Datatype SystemData = (ReadStorage<'a, Position>, ReadStorage<'a, Renderable>);fn run(&mut self, data: Self::SystemData) {let (positions, renderables) = data;// Clearing the screen (this gives us the backround colour)graphics::clear(self.context, graphics::Color::new(0.95, 0.95, 0.95, 1.0));// Get all the renderables with their positions and sort by the position z// This will allow us to have entities layered visually.let mut rendering_data = (&positions, &renderables).join().collect::<Vec<_>>();rendering_data.sort_by_key(|&k| k.0.z);// Iterate through all pairs of positions & renderables, load the image// and draw it at the specified position.for (position, renderable) in rendering_data.iter() {// Load the imagelet image = Image::new(self.context, renderable.path.clone()).expect("expected image");let x = position.x as f32 * TILE_WIDTH;let y = position.y as f32 * TILE_WIDTH;// drawlet draw_params = DrawParam::new().dest(na::Point2::new(x, y));graphics::draw(self.context, &image, draw_params).expect("expected render");}// Finally, present the context, this will actually display everything// on the screen.graphics::present(self.context).expect("expected to present");}
}pub struct InputSystem {}// System implementation
impl<'a> System<'a> for InputSystem {// Datatype SystemData = (Write<'a, InputQueue>,Entities<'a>,WriteStorage<'a, Position>,ReadStorage<'a, Player>,ReadStorage<'a, Movable>,ReadStorage<'a, Immovable>,);fn run(&mut self, data: Self::SystemData) {let (mut input_queue, entities, mut positions, players, movables, immovables) = data;let mut to_move = Vec::new();for (position, _player) in (&positions, &players).join() {// Get the first key pressedif let Some(key) = input_queue.keys_pressed.pop() {// get all the movables and immovableslet mut mov: HashMap<(u8, u8), Index> = (&entities, &movables, &positions).join().map(|t| ((t.2.x, t.2.y), t.0.id())).collect::<HashMap<_, _>>();let mut immov: HashMap<(u8, u8), Index> = (&entities, &immovables, &positions).join().map(|t| ((t.2.x, t.2.y), t.0.id())).collect::<HashMap<_, _>>();// Now iterate through current position to the end of the map// on the correct axis and check what needs to move.let (start, end, is_x) = match key {KeyCode::Up => (position.y, 0, false),KeyCode::Down => (position.y, MAP_HEIGHT, false),KeyCode::Left => (position.x, 0, true),KeyCode::Right => (position.x, MAP_WIDTH, true),_ => continue,};let range = if start < end {(start..=end).collect::<Vec<_>>()} else {(end..=start).rev().collect::<Vec<_>>()};for x_or_y in range {let pos = if is_x {(x_or_y, position.y)} else {(position.x, x_or_y)};// find a movable// if it exists, we try to move it and continue// if it doesn't exist, we continue and try to find an immovable insteadmatch mov.get(&pos) {Some(id) => to_move.push((key, id.clone())),None => {// find an immovable// if it exists, we need to stop and not move anything// if it doesn't exist, we stop because we found a gapmatch immov.get(&pos) {Some(id) => to_move.clear(),None => break,}}}}}}// Now actually move what needs to be movedfor (key, id) in to_move {let position = positions.get_mut(entities.entity(id));if let Some(position) = position {match key {KeyCode::Up => position.y -= 1,KeyCode::Down => position.y += 1,KeyCode::Left => position.x -= 1,KeyCode::Right => position.x += 1,_ => (),}}}}
}// This struct will hold all our game state
// For now there is nothing to be held, but we'll add
// things shortly.
struct Game {world: World,
}// This is the main event loop. ggez tells us to implement
// two things:
// - updating
// - rendering
impl event::EventHandler for Game {fn update(&mut self, _context: &mut Context) -> GameResult {// Run input system{let mut is = InputSystem {};is.run_now(&self.world);}Ok(())}fn draw(&mut self, context: &mut Context) -> GameResult {// Render game entities{let mut rs = RenderingSystem { context };rs.run_now(&self.world);}Ok(())}fn key_down_event(&mut self,_context: &mut Context,keycode: KeyCode,_keymod: KeyMods,_repeat: bool,) {println!("Key pressed: {:?}", keycode);let mut input_queue = self.world.write_resource::<InputQueue>();input_queue.keys_pressed.push(keycode);}
}// Register components with the world
pub fn register_components(world: &mut World) {world.register::<Position>();world.register::<Renderable>();world.register::<Player>();world.register::<Wall>();world.register::<Box>();world.register::<BoxSpot>();world.register::<Movable>();world.register::<Immovable>();
}pub fn register_resources(world: &mut World) {world.insert(InputQueue::default())
}// Create a wall entity
pub fn create_wall(world: &mut World, position: Position) {world.create_entity().with(Position { z: 10, ..position }).with(Renderable {path: "/images/wall.png".to_string(),}).with(Wall {}).with(Immovable).build();
}pub fn create_floor(world: &mut World, position: Position) {world.create_entity().with(Position { z: 5, ..position }).with(Renderable {path: "/images/floor.png".to_string(),}).build();
}pub fn create_box(world: &mut World, position: Position) {world.create_entity().with(Position { z: 10, ..position }).with(Renderable {path: "/images/box.png".to_string(),}).with(Box {}).with(Movable).build();
}pub fn create_box_spot(world: &mut World, position: Position) {world.create_entity().with(Position { z: 9, ..position }).with(Renderable {path: "/images/box_spot.png".to_string(),}).with(BoxSpot {}).build();
}pub fn create_player(world: &mut World, position: Position) {world.create_entity().with(Position { z: 10, ..position }).with(Renderable {path: "/images/player.png".to_string(),}).with(Player {}).with(Movable).build();
}// Initialize the level
pub fn initialize_level(world: &mut World) {const MAP: &str = "N N W W W W W WW W W . . . . WW . . . B . . WW . . . . . . W W . P . . . . WW . . . . . . WW . . S . . . WW . . . . . . WW W W W W W W W";load_map(world, MAP.to_string());
}pub fn load_map(world: &mut World, map_string: String) {// read all lineslet rows: Vec<&str> = map_string.trim().split('\n').map(|x| x.trim()).collect();for (y, row) in rows.iter().enumerate() {let columns: Vec<&str> = row.split(' ').collect();for (x, column) in columns.iter().enumerate() {// Create the position at which to create something on the maplet position = Position {x: x as u8,y: y as u8,z: 0, // we will get the z from the factory functions};// Figure out what object we should creatematch *column {"." => create_floor(world, position),"W" => {create_floor(world, position);create_wall(world, position);}"P" => {create_floor(world, position);create_player(world, position);}"B" => {create_floor(world, position);create_box(world, position);}"S" => {create_floor(world, position);create_box_spot(world, position);}"N" => (),c => panic!("unrecognized map item {}", c),}}}
}
pub fn main() -> GameResult {let mut world = World::new();register_components(&mut world);register_resources(&mut world);initialize_level(&mut world);// Create a game context and event looplet context_builder = ggez::ContextBuilder::new("rust_sokoban", "sokoban").window_setup(conf::WindowSetup::default().title("Rust Sokoban!")).window_mode(conf::WindowMode::default().dimensions(800.0, 600.0)).add_resource_path(path::PathBuf::from("./resources"));let (context, event_loop) = &mut context_builder.build()?;// Create the game statelet game = &mut Game { world };// Run the main event loopevent::run(context, event_loop, game)
}
CODELINK: 你可以点 这里获取目前的完整代码.
模块化
main.rs文件已经太大了,随着功能的增加,这样下去还会越来越大,越来越难于维护.怎么办呢?还好Rust支持模块,可以把程序按照功能拆分到不同的文件中.
那么现在就让我们开始拆分吧,先看下目录结构:
├── resources
│   └── images
│       ├── box.png
│       ├── box_spot.png
│       ├── floor.png
│       ├── player.png
│       └── wall.png
├── src
│   ├── systems
│   │   ├── input_system.rs
│   │   ├── mod.rs
│   │   └── rendering_system.rs
│   ├── components.rs
│   ├── constants.rs
│   ├── entities.rs
│   ├── main.rs
│   ├── map.rs
│   └── resources.rs
└── Cargo.toml
MORE: 想了解更多关于模块的知识可以点 这里.
接下来我们就开始把每一个组件放到一个文件中.放到单独的文件中后除了要把属性声明成public的,也没什么不一样的.之所以现在需要把属性声明成public的是因为先前都在一个文件中,刚开始可以都放在一个文件中,但随着文件越来越大我们就需要把代码拆分到不同的文件中了,为了保证不同的文件(模块)间还能互相访问的到就需要把属性声明成public的,这样代码就不会报错了.我们后面也会介绍另外一种拆分方式.另外把注册组件的代码放到文件的下面.拆分好后如果需要修改或者增加组件只需要修改对应的文件就可以了.
#![allow(unused)]
fn main() {
// components.rs
use specs::{Component, NullStorage, VecStorage, World, WorldExt};// Components
#[derive(Debug, Component, Clone, Copy)]
#[storage(VecStorage)]
pub struct Position {pub x: u8,pub y: u8,pub z: u8,
}#[derive(Component)]
#[storage(VecStorage)]
pub struct Renderable {pub path: String,
}#[derive(Component)]
#[storage(VecStorage)]
pub struct Wall {}#[derive(Component)]
#[storage(VecStorage)]
pub struct Player {}#[derive(Component)]
#[storage(VecStorage)]
pub struct Box {}#[derive(Component)]
#[storage(VecStorage)]
pub struct BoxSpot {}#[derive(Component, Default)]
#[storage(NullStorage)]
pub struct Movable;#[derive(Component, Default)]
#[storage(NullStorage)]
pub struct Immovable;pub fn register_components(world: &mut World) {world.register::<Position>();world.register::<Renderable>();world.register::<Player>();world.register::<Wall>();world.register::<Box>();world.register::<BoxSpot>();world.register::<Movable>();world.register::<Immovable>();
}
}
下面是资源文件:
#![allow(unused)]
fn main() {
// resources.rs
use ggez::event::KeyCode;
use specs::World;// Resources
#[derive(Default)]
pub struct InputQueue {pub keys_pressed: Vec<KeyCode>,
}pub fn register_resources(world: &mut World) {world.insert(InputQueue::default())
}
}
接下来我们把常量也拆分到一个单独文件中.先前地图的维度信息是在代码中硬编码的,最好是根据加载地图的维度动态设置.
#![allow(unused)]
fn main() {
// constants.rs
pub const TILE_WIDTH: f32 = 32.0;
pub const MAP_WIDTH: u8 = 8;
pub const MAP_HEIGHT: u8 = 9;
}
接下来把创建实体的代码放到entities.rs文件中:
#![allow(unused)]
fn main() {
// entities.rs
use crate::components::*;
use specs::{Builder, World, WorldExt};// Create a wall entity
pub fn create_wall(world: &mut World, position: Position) {world.create_entity().with(Position { z: 10, ..position }).with(Renderable {path: "/images/wall.png".to_string(),}).with(Wall {}).with(Immovable).build();
}pub fn create_floor(world: &mut World, position: Position) {world.create_entity().with(Position { z: 5, ..position }).with(Renderable {path: "/images/floor.png".to_string(),}).build();
}pub fn create_box(world: &mut World, position: Position) {world.create_entity().with(Position { z: 10, ..position }).with(Renderable {path: "/images/box.png".to_string(),}).with(Box {}).with(Movable).build();
}pub fn create_box_spot(world: &mut World, position: Position) {world.create_entity().with(Position { z: 9, ..position }).with(Renderable {path: "/images/box_spot.png".to_string(),}).with(BoxSpot {}).build();
}pub fn create_player(world: &mut World, position: Position) {world.create_entity().with(Position { z: 10, ..position }).with(Renderable {path: "/images/player.png".to_string(),}).with(Player {}).with(Movable).build();
}
}
下面是地图加载的代码:
#![allow(unused)]
fn main() {
// map.rs
use crate::components::Position;
use crate::entities::*;
use specs::World;pub fn load_map(world: &mut World, map_string: String) {// read all lineslet rows: Vec<&str> = map_string.trim().split('\n').map(|x| x.trim()).collect();for (y, row) in rows.iter().enumerate() {let columns: Vec<&str> = row.split(' ').collect();for (x, column) in columns.iter().enumerate() {// Create the position at which to create something on the maplet position = Position {x: x as u8,y: y as u8,z: 0, // we will get the z from the factory functions};// Figure out what object we should creatematch *column {"." => create_floor(world, position),"W" => {create_floor(world, position);create_wall(world, position);}"P" => {create_floor(world, position);create_player(world, position);}"B" => {create_floor(world, position);create_box(world, position);}"S" => {create_floor(world, position);create_box_spot(world, position);}"N" => (),c => panic!("unrecognized map item {}", c),}}}
}
}
最后我们再把渲染代码放到randering_system.rs文件中,把输入处理代码放到input_system.rs文件中,其实也就是复制粘贴改下导入语句.
现在还有个有意思的事,在一个文件夹下包含了多个文件.如果不做些其它操作在main.rs文件中要使用RenderingSystem或者InputSystem程序会报错的.咋办呢?只需在文件夹下添加一个mod.rs文件告诉Rust当前这个文件夹下包含那些内容.这样在外部就可以访问RenderingSystem和InputSystem了.
#![allow(unused)]
fn main() {
// systems/mod.rs
mod input_system;
mod rendering_system;pub use self::input_system::InputSystem;
pub use self::rendering_system::RenderingSystem;
}
齐活了!现在再看main.rs是不是清爽多了!注意我们用了一些mod告诉Rust需要用到的模块.
// main.rs
use ggez;
use ggez::event::KeyCode;
use ggez::event::KeyMods;
use ggez::{conf, event, Context, GameResult};
use specs::{RunNow, World, WorldExt};
use std::path;mod components;
mod constants;
mod entities;
mod map;
mod resources;
mod systems;use crate::components::*;
use crate::map::*;
use crate::resources::*;
use crate::systems::*;struct Game {world: World,
}impl event::EventHandler for Game {fn update(&mut self, _context: &mut Context) -> GameResult {// Run input system{let mut is = InputSystem {};is.run_now(&self.world);}Ok(())}fn draw(&mut self, context: &mut Context) -> GameResult {// Render game entities{let mut rs = RenderingSystem { context };rs.run_now(&self.world);}Ok(())}fn key_down_event(&mut self,_context: &mut Context,keycode: KeyCode,_keymod: KeyMods,_repeat: bool,) {println!("Key pressed: {:?}", keycode);let mut input_queue = self.world.write_resource::<InputQueue>();input_queue.keys_pressed.push(keycode);}
}// Initialize the level
pub fn initialize_level(world: &mut World) {const MAP: &str = "N N W W W W W WW W W . . . . WW . . . B . . WW . . . . . . W W . P . . . . WW . . . . . . WW . . S . . . WW . . . . . . WW W W W W W W W";load_map(world, MAP.to_string());
}pub fn main() -> GameResult {let mut world = World::new();register_components(&mut world);register_resources(&mut world);initialize_level(&mut world);// Create a game context and event looplet context_builder = ggez::ContextBuilder::new("rust_sokoban", "sokoban").window_setup(conf::WindowSetup::default().title("Rust Sokoban!")).window_mode(conf::WindowMode::default().dimensions(800.0, 600.0)).add_resource_path(path::PathBuf::from("./resources"));let (context, event_loop) = &mut context_builder.build()?;// Create the game statelet game = &mut Game { world };// Run the main event loopevent::run(context, event_loop, game)
}
至此拆分模块的任务就完成了,运行下代码应该跟先前的功能是一样的,但代码没那么臃肿了也方便后续添加新功能了.
CODELINK: 点 这里获取当前完整代码.
实现游戏基本功能
现在角色可以推动箱子在区域内移动了.有些(并不是全部)游戏还会设定些目标让玩家去完成.比如有些推箱子类的游戏会让玩家把箱子推到特定的点才算赢.目前我们还没实现类似的功能,还没有检查什么时候玩家赢了并停止游戏,有可能玩家已经把箱子推到目标点了,但我们的游戏并没意识到.接下来就让我们完成这些功能吧!
首先我们需要想一下要检查是否赢了并通知玩家需要添加那些功能. 当玩家闯关时:
- 需要一个用于保存游戏状态的
resource- 游戏是在进行中还是已经完成了?
- 玩家目前一共走了多少步了?
- 需要一个用于检查玩家是否完成任务的
system - 需要一个用于更新移动步数的
system - 需要一个用于展示游戏状态的界面(UI )
游戏状态资源
我们之所以选择使用资源(resource)保存游戏状态,是因为游戏状态信息不跟任何一个实体绑定.接下来我们就开始定义一个Gameplay资源.
#![allow(unused)]
fn main() {
// resources.rs
#[derive(Default)]
pub struct Gameplay {pub state: GameplayState,pub moves_count: u32
}
}
Gameplay 有俩个属性: state 和 moves_count. 分别用于保存当前游戏状态(当前游戏正在进行还是已经有了赢家)和玩家操作的步数. state 是枚举(enum)类型, 可以这样定义:
#![allow(unused)]
fn main() {
// resources.rs
pub enum GameplayState {Playing,Won
}
}
眼尖的你应该已经发现,我们使用了宏为Gameplay实现了Default特征,但是枚举GameplayState却没有.如果我们需要把Gameplay用做资源,那它必须具备Default特征.Rust并没有提供为枚举类型实现Default特征的宏,我们只能自己为枚举GameplayState实现Default特征了.
#![allow(unused)]
fn main() {
// resources.rs
impl Default for GameplayState {fn default() -> Self {Self::Playing}
}
}
定义好资源别忘了注册下:
#![allow(unused)]
fn main() {
// resources.rs
pub fn register_resources(world: &mut World) {world.insert(InputQueue::default());world.insert(Gameplay::default());
}
}
当游戏开始时,资源Gameplay应该是这样地:
#![allow(unused)]
fn main() {
Gameplay {state: GameplayState::Playing,moves_count: 0
}
}
计步System
我们可以通过增加Gameplay的moves_count属性值来记录玩家操作的步数.
可以在先前定义的处理用户输入的InputSystem中实现计步的功能.因为我们需要在InputSystem中修改Gameplay的属性值,所以需要在InputSystem中定义SystemData类型时使用Write<'a, Gameplay>.
#![allow(unused)]
fn main() {
// input_system.rs
use crate::components::*;
use crate::constants::*;
use crate::resources::{InputQueue, Gameplay};
use ggez::event::KeyCode;
use specs::world::Index;
use specs::{Entities, Join, ReadStorage, System, Write, WriteStorage};
use std::collections::HashMap;pub struct InputSystem {}// System implementation
impl<'a> System<'a> for InputSystem {// Datatype SystemData = (Write<'a, InputQueue>,Write<'a, Gameplay>,Entities<'a>,WriteStorage<'a, Position>,ReadStorage<'a, Player>,ReadStorage<'a, Movable>,ReadStorage<'a, Immovable>,);fn run(&mut self, data: Self::SystemData) {let (mut input_queue, mut gameplay, entities, mut positions, players, movables, immovables) = data;...
}
我们先前已经编写过根据玩家按键移动角色的代码,在此基础上再添加增加操作步骤计数的代码就可以了.
#![allow(unused)]
fn main() {
// input_system.rs...// We've just moved, so let's increase the number of movesif to_move.len() > 0 {gameplay.moves_count += 1;}// Now actually move what needs to be movedfor (key, id) in to_move {let position = positions.get_mut(entities.entity(id));if let Some(position) = position {match key {KeyCode::Up => position.y -= 1,KeyCode::Down => position.y += 1,KeyCode::Left => position.x -= 1,KeyCode::Right => position.x += 1,_ => (),}}}}
}
}
Gameplay System
接下来是添加一个GamePlayStateSystem用于检查所有的箱子是否已经推到了目标点,如果已经推到了就赢了.除了 Gameplay, 要完成这个功能还需要只读访问Position, Box, 和 BoxSpot.这里使用 Join 结合Box(箱子) 和 Position(位置)创建一个包含每个箱子位置信息的Vector(集合).我们只需要遍历这个集合判断每个箱子是否在目标点上,如果在就胜利了,如果不在游戏继续.
#![allow(unused)]
fn main() {
// gameplay_state_system.rs
use specs::{Join, ReadStorage, System, Write};
use std::collections::HashMap;use crate::{components::{Box, BoxSpot, Position},resources::{Gameplay, GameplayState},
};pub struct GameplayStateSystem {}impl<'a> System<'a> for GameplayStateSystem {// Datatype SystemData = (Write<'a, Gameplay>,ReadStorage<'a, Position>,ReadStorage<'a, Box>,ReadStorage<'a, BoxSpot>,);fn run(&mut self, data: Self::SystemData) {let (mut gameplay_state, positions, boxes, box_spots) = data;// get all boxes indexed by positionlet boxes_by_position: HashMap<(u8, u8), &Box> = (&positions, &boxes).join().map(|t| ((t.0.x, t.0.y), t.1)).collect::<HashMap<_, _>>();// loop through all box spots and check if there is a corresponding// box at that positionfor (_box_spot, position) in (&box_spots, &positions).join() {if boxes_by_position.contains_key(&(position.x, position.y)) {// continue} else {gameplay_state.state = GameplayState::Playing;return;}}// If we made it this far, then all box spots have boxes on them, and the// game has been wongameplay_state.state = GameplayState::Won;}
}
}
最后还需要在渲染循环中执行我们的代码:
#![allow(unused)]
fn main() {
// main.rs
impl event::EventHandler for Game {fn update(&mut self, _context: &mut Context) -> GameResult {// Run input system{let mut is = InputSystem {};is.run_now(&self.world);}// Run gameplay state system{let mut gss = GameplayStateSystem {};gss.run_now(&self.world);}Ok(())}// ...
}
}
游戏信息界面
最后一步是需要提供一个向玩家展示当前游戏状态的界面.我们需要一个用于记录游戏状态的资源和一个更新状态信息的System.可以把这些放到资源GameplayState和RenderingSystem中.
首先需要为GameplayState实现Display特征,这样才能以文本的形式展示游戏状态.这里又用到了模式匹配,根据游戏的状态显示"Playing(进行中)"或"Won(赢了)".
#![allow(unused)]
fn main() {
// resources.rsimpl Display for GameplayState {fn fmt(&self, fmt: &mut fmt::Formatter) -> fmt::Result {fmt.write_str(match self {GameplayState::Playing => "Playing",GameplayState::Won => "Won"})?;Ok(())}
}
}
接下来我们需要在RenderingSystem中添加一个方法draw_text,这样它就可以把游戏状态信息GameplayState显示到屏幕上了.
#![allow(unused)]
fn main() {
// rendering_systems.rs
impl RenderingSystem<'_> {pub fn draw_text(&mut self, text_string: &str, x: f32, y: f32) {let text = graphics::Text::new(text_string);let destination = na::Point2::new(x, y);let color = Some(Color::new(0.0, 0.0, 0.0, 1.0));let dimensions = na::Point2::new(0.0, 20.0);graphics::queue_text(self.context, &text, dimensions, color);graphics::draw_queued_text(self.context,graphics::DrawParam::new().dest(destination),None,graphics::FilterMode::Linear,).expect("expected drawing queued text");}
}
}
...为了调用drwa_text我们还需要把资源 Gameplay 添加 RenderingSystem 中,这样 RenderingSystem 才能获取到资源 Gameplay.
#![allow(unused)]
fn main() {
// rendering_system.rs
impl<'a> System<'a> for RenderingSystem<'a> {// Datatype SystemData = (Read<'a, Gameplay>, ReadStorage<'a, Position>, ReadStorage<'a, Renderable>);fn run(&mut self, data: Self::SystemData) {let (gameplay, positions, renderables) = data;// Clearing the screen (this gives us the backround colour)graphics::clear(self.context, graphics::Color::new(0.95, 0.95, 0.95, 1.0));// Get all the renderables with their positions and sort by the position z// This will allow us to have entities layered visually.let mut rendering_data = (&positions, &renderables).join().collect::<Vec<_>>();rendering_data.sort_by_key(|&k| k.0.z);// Iterate through all pairs of positions & renderables, load the image// and draw it at the specified position.for (position, renderable) in rendering_data.iter() {// Load the imagelet image = Image::new(self.context, renderable.path.clone()).expect("expected image");let x = position.x as f32 * TILE_WIDTH;let y = position.y as f32 * TILE_WIDTH;// drawlet draw_params = DrawParam::new().dest(na::Point2::new(x, y));graphics::draw(self.context, &image, draw_params).expect("expected render");}// Render any textself.draw_text(&gameplay.state.to_string(), 525.0, 80.0);self.draw_text(&gameplay.moves_count.to_string(), 525.0, 100.0);// Finally, present the context, this will actually display everything// on the screen.graphics::present(self.context).expect("expected to present");}
}
}
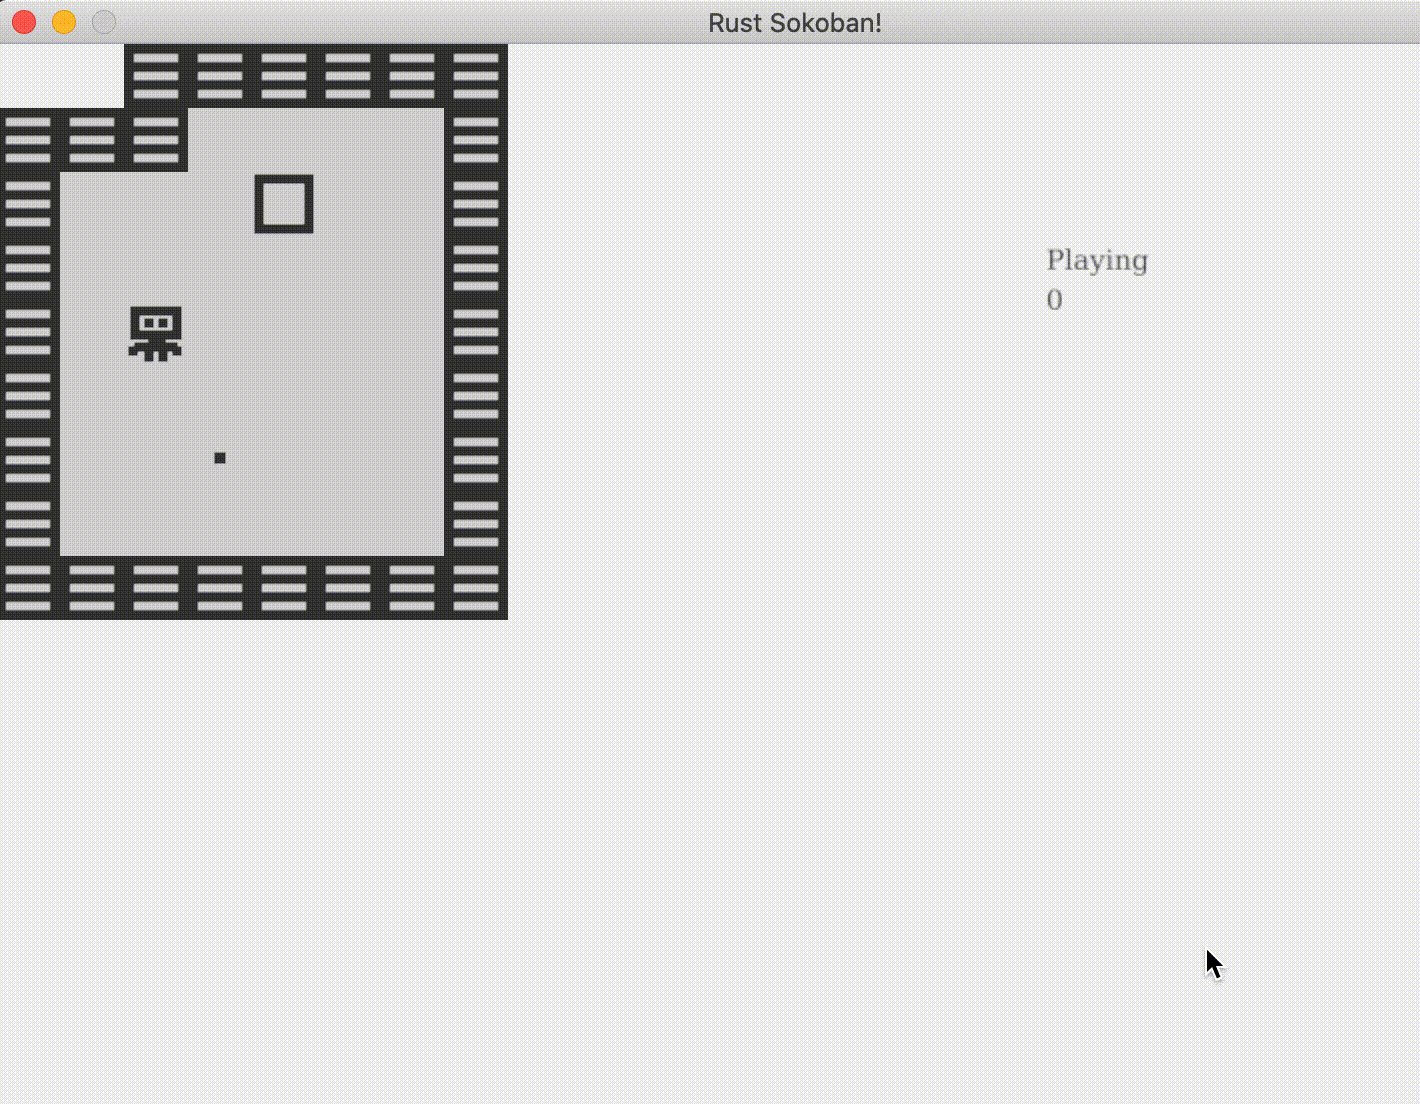
至此我们编写的推箱子游戏已经可以向玩家展示基本的信息了:
- 当前的操作步数
- 当玩家胜利时告诉他们
看起来就像这个样子:
还有很多可以改进增强的!
CODELINK: 点 这里获取目前的完整代码.
第二章已完...也可以在线阅读完整内容
这篇关于使用Rust编写推箱子游戏功能篇的文章就介绍到这儿,希望我们推荐的文章对编程师们有所帮助!


