本文主要是介绍基础布局之RelativeLayout相对布局,希望对大家解决编程问题提供一定的参考价值,需要的开发者们随着小编来一起学习吧!
目录
- 概述
- 一、属性分类
- 二、父容器定位属性
- 2.1 示例1
- 2.2 示例2
- 三、相对定位属性
- 3.1 示例1
- 3.2 示例2
- 3.3 示例3
概述
相对布局(RelativeLayout)是一种根据父容器和兄弟控件作为参照来确定控件位置的布局方式。
使用相对布局,需要将布局节点改成RelativeLayout,基本格式如下:
<?xml version="1.0" encoding="utf-8"?>
<RelativeLayout xmlns:android="http://schemas.android.com/apk/res/android"android:layout_width="match_parent"android:layout_height="match_parent"></RelativeLayout>
一、属性分类
线性布局和相对布局是兼容的,在线性布局常用的属性外,最常用的属性如下:
与父容器定位相关属性
| 属性 | 作用 |
|---|---|
| android:layout_alignParentTop | 控件顶部与父布局的顶部对齐。 |
| android:layout_alignParentBottom | 控件底部与父布局的底部对齐。 |
| android:layout_alignParentLeft | 控件左边与父布局的左边对齐。 |
| android:layout_alignParentRight | 控件右边与父布局的右边对齐。 |
| android:layout_alignParentStart | 将控件的起始边(根据布局方向,可能是左边或右边)与父容器的起始边对齐。 |
| android:layout_alignParentEnd | 将控件的结束边(根据布局方向,可能是右边或左边)与父容器的结束边对齐。 |
| android:layout_centerHorizontal | 将控件水平居中对齐。 |
| android:layout_centerVertical | 将控件垂直居中对齐。 |
| android:layout_centerInParent | 水平垂直都居中 |
相对定位属性:
| 属性 | 作用 |
|---|---|
| android:layout_above | 控件放置在指定控件的上方。 |
| android:layout_below | 控件放置在指定控件的下方。 |
| android:layout_toLeftOf | 控件放置在指定控件的左边。 |
| android:layout_toRightOf | 控件放置在指定控件的右边。 |
| android:layout_alignTop | 控件的顶部与指定控件的顶部对齐。 |
| android:layout_alignBottom | 控件的底部与指定控件的底部对齐。 |
| android:layout_alignLeft | 控件的左边与指定控件的左边对齐。 |
| android:layout_alignRight | 控件的右边与指定控件的右边对齐。 |
| android:layout_alignStart | 将控件的起始边(根据布局方向,可能是左边或右边)与指定控件的起始边对齐。 |
| android:layout_alignEnd | 将控件的结束边(根据布局方向,可能是右边或左边)与指定控件的结束边对齐。 |
| android:layout_alignBaseline | 控件的基线与指定控件的基线对齐。 |
其中start、end相关的两个属性通常用于支持不同语言的布局需求,例如从右到左的阿拉伯语布局。在安卓开发中,可以通过设置这两个属性来实现适应不同语言布局方向的界面设计。
二、父容器定位属性
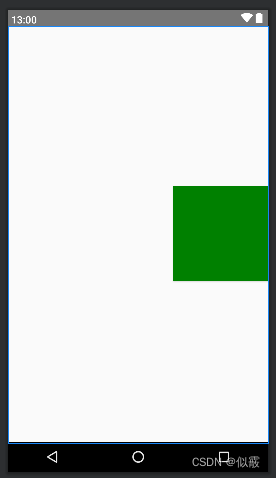
2.1 示例1
简单举例一下:
<?xml version="1.0" encoding="utf-8"?>
<RelativeLayout xmlns:android="http://schemas.android.com/apk/res/android"android:layout_width="match_parent"android:layout_height="match_parent"><Buttonandroid:layout_width="150dp"android:layout_height="150dp"android:layout_alignParentRight="true"android:layout_centerVertical="true"android:background="@color/green" /></RelativeLayout>
与父布局右边对齐,垂直居中
2.2 示例2
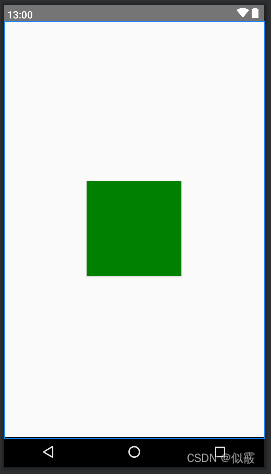
看一下 android:layout_centerInParent=“true”
在父布局中垂直、水平方向都居中。
<?xml version="1.0" encoding="utf-8"?>
<RelativeLayout xmlns:android="http://schemas.android.com/apk/res/android"android:layout_width="match_parent"android:layout_height="match_parent"><Buttonandroid:layout_width="150dp"android:layout_height="150dp"android:layout_centerInParent="true"android:background="@color/green" /></RelativeLayout>
三、相对定位属性
3.1 示例1
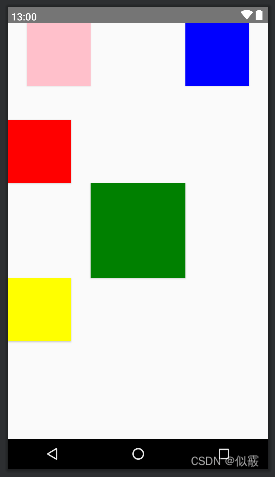
看一下
android:layout_above 控件放置在指定控件的上方。
android:layout_below 控件放置在指定控件的下方。
android:layout_toLeftOf 控件放置在指定控件的左边。
android:layout_toRightOf 控件放置在指定控件的右边。
<?xml version="1.0" encoding="utf-8"?>
<RelativeLayout xmlns:android="http://schemas.android.com/apk/res/android"android:layout_width="match_parent"android:layout_height="match_parent"><Buttonandroid:id="@+id/center"android:layout_width="150dp"android:layout_height="150dp"android:layout_centerInParent="true"android:background="@color/green" /><Buttonandroid:id="@+id/left"android:layout_width="100dp"android:layout_height="100dp"android:layout_toLeftOf="@+id/center"android:background="@color/pink" /><Buttonandroid:id="@+id/right"android:layout_width="100dp"android:layout_height="100dp"android:layout_toRightOf="@+id/center"android:background="@color/blue" /><Buttonandroid:id="@+id/top"android:layout_width="100dp"android:layout_height="100dp"android:layout_above="@+id/center"android:background="@color/red" /><Buttonandroid:id="@+id/below"android:layout_width="100dp"android:layout_height="100dp"android:layout_below="@+id/center"android:background="@color/yellow" />
</RelativeLayout>
3.2 示例2
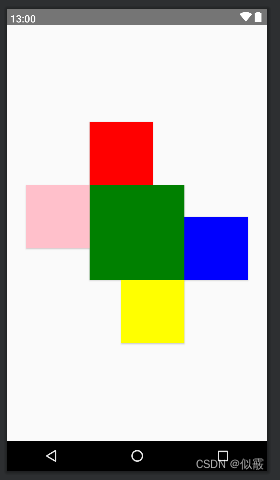
在上面的基础上添加
android:layout_alignTop 控件的顶部与指定控件的顶部对齐。
android:layout_alignBottom 控件的底部与指定控件的底部对齐。
android:layout_alignLeft 控件的左边与指定控件的左边对齐。
android:layout_alignRight 控件的右边与指定控件的右边对齐。
分别与中心控件的顶部、底部、左边、右边对齐。
<?xml version="1.0" encoding="utf-8"?>
<RelativeLayout xmlns:android="http://schemas.android.com/apk/res/android"android:layout_width="match_parent"android:layout_height="match_parent"><Buttonandroid:id="@+id/center"android:layout_width="150dp"android:layout_height="150dp"android:layout_centerInParent="true"android:background="@color/green" /><Buttonandroid:id="@+id/left"android:layout_width="100dp"android:layout_height="100dp"android:layout_alignTop="@+id/center"android:layout_toLeftOf="@+id/center"android:background="@color/pink" /><Buttonandroid:id="@+id/right"android:layout_width="100dp"android:layout_height="100dp"android:layout_alignBottom="@id/center"android:layout_toRightOf="@+id/center"android:background="@color/blue" /><Buttonandroid:id="@+id/top"android:layout_width="100dp"android:layout_height="100dp"android:layout_above="@+id/center"android:layout_alignLeft="@+id/center"android:background="@color/red" /><Buttonandroid:id="@+id/below"android:layout_width="100dp"android:layout_height="100dp"android:layout_below="@+id/center"android:layout_alignRight="@+id/center"android:background="@color/yellow" />
</RelativeLayout>
3.3 示例3
看一下android:layout_alignBaseline的使用:
在安卓相对布局中,android:layout_alignBaseline 是用于将控件的基线与指定控件的基线对齐的属性。基线是文本行中字符底部对齐的虚拟线,通常用于对齐文本或文字相关的控件。
使用详解如下:
当一个控件设置了 android:layout_alignBaseline=“@id/otherView”,该控件的基线会与指定控件(@id/otherView)的基线对齐。
如果两个控件都设置了 android:layout_alignBaseline,则它们的基线会对齐。
如果指定的控件没有基线(比如非文本控件),则基线对齐的效果可能不明显。
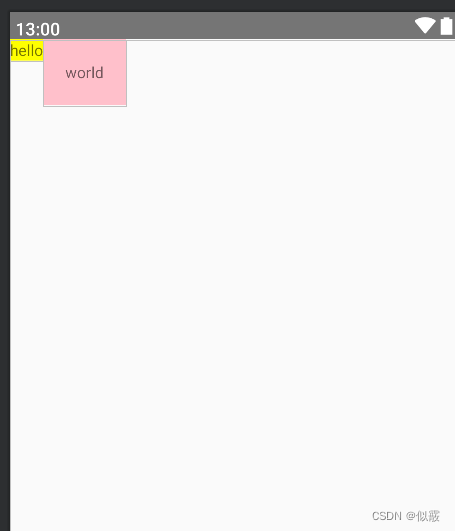
没有添加layout_alignBaseline的效果:
<?xml version="1.0" encoding="utf-8"?>
<RelativeLayout xmlns:android="http://schemas.android.com/apk/res/android"android:layout_width="match_parent"android:layout_height="match_parent"><TextViewandroid:id="@+id/text1"android:layout_width="wrap_content"android:layout_height="wrap_content"android:background="@color/yellow"android:text="hello" /><TextViewandroid:layout_width="wrap_content"android:layout_height="wrap_content"android:layout_toRightOf="@id/text1"android:background="@color/pink"android:padding="20dp"android:text="world" />
</RelativeLayout>
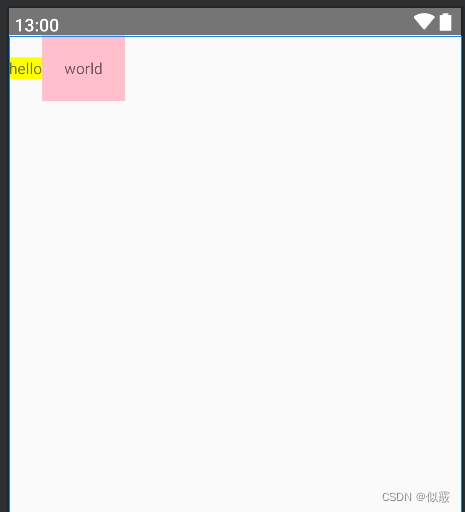
添加layout_alignBaseline的效果:
给textview1添加
<?xml version="1.0" encoding="utf-8"?>
<RelativeLayout xmlns:android="http://schemas.android.com/apk/res/android"android:layout_width="match_parent"android:layout_height="match_parent"><TextViewandroid:id="@+id/text1"android:layout_width="wrap_content"android:layout_height="wrap_content"android:background="@color/yellow"android:layout_alignBaseline="@+id/text2"android:text="hello" /><TextViewandroid:id="@+id/text2"android:layout_width="wrap_content"android:layout_height="wrap_content"android:layout_toRightOf="@id/text1"android:background="@color/pink"android:padding="20dp"android:text="world"/>
</RelativeLayout>
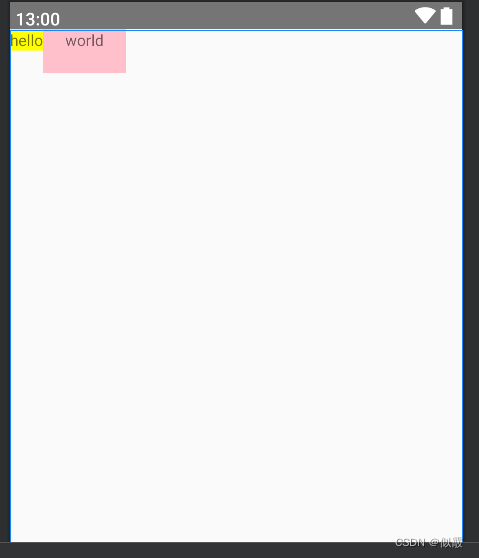
给textview2添加
<?xml version="1.0" encoding="utf-8"?>
<RelativeLayout xmlns:android="http://schemas.android.com/apk/res/android"android:layout_width="match_parent"android:layout_height="match_parent"><TextViewandroid:id="@+id/text1"android:layout_width="wrap_content"android:layout_height="wrap_content"android:background="@color/yellow"android:text="hello" /><TextViewandroid:id="@+id/text2"android:layout_width="wrap_content"android:layout_height="wrap_content"android:layout_toRightOf="@id/text1"android:background="@color/pink"android:padding="20dp"android:text="world"android:layout_alignBaseline="@+id/text1"/>
</RelativeLayout>
这篇关于基础布局之RelativeLayout相对布局的文章就介绍到这儿,希望我们推荐的文章对编程师们有所帮助!


