本文主要是介绍政安晨:【Keras机器学习实践要点】(八)—— 在 TensorFlow 中从头开始编写训练循环,希望对大家解决编程问题提供一定的参考价值,需要的开发者们随着小编来一起学习吧!
目录
介绍
导入
第一个端对端示例
指标的低级处理
低层次处理模型跟踪的损失
总结
端到端示例:从零开始的 GAN 训练循环
政安晨的个人主页:政安晨
欢迎 👍点赞✍评论⭐收藏
收录专栏: TensorFlow与Keras机器学习实战
希望政安晨的博客能够对您有所裨益,如有不足之处,欢迎在评论区提出指正!
介绍
Keras 提供默认的训练和评估循环、fit() 和 evaluate()。
使用内置方法进行训练和评估,本文将介绍它们的用法。
如果您想自定义模型的学习算法,同时还想利用 fit() 的便利性(例如,使用 fit() 训练 GAN),您可以子类化模型类并实现自己的 train_step() 方法,该方法会在 fit() 过程中重复调用。
现在,如果您想对训练和评估进行非常底层的控制,您应该从头开始编写自己的训练和评估循环。这就是本文的内容。
导入
import time
import os# This guide can only be run with the TensorFlow backend.
os.environ["KERAS_BACKEND"] = "tensorflow"import tensorflow as tf
import keras
import numpy as np
第一个端对端示例
让我们考虑一个简单的 MNIST 模型:
def get_model():inputs = keras.Input(shape=(784,), name="digits")x1 = keras.layers.Dense(64, activation="relu")(inputs)x2 = keras.layers.Dense(64, activation="relu")(x1)outputs = keras.layers.Dense(10, name="predictions")(x2)model = keras.Model(inputs=inputs, outputs=outputs)return modelmodel = get_model()让我们使用mini-batch批量梯度和自定义训练循环来训练它。
首先,我们需要一个优化器、一个损失函数和一个数据集:
# Instantiate an optimizer.
optimizer = keras.optimizers.Adam(learning_rate=1e-3)
# Instantiate a loss function.
loss_fn = keras.losses.SparseCategoricalCrossentropy(from_logits=True)# Prepare the training dataset.
batch_size = 32
(x_train, y_train), (x_test, y_test) = keras.datasets.mnist.load_data()
x_train = np.reshape(x_train, (-1, 784))
x_test = np.reshape(x_test, (-1, 784))# Reserve 10,000 samples for validation.
x_val = x_train[-10000:]
y_val = y_train[-10000:]
x_train = x_train[:-10000]
y_train = y_train[:-10000]# Prepare the training dataset.
train_dataset = tf.data.Dataset.from_tensor_slices((x_train, y_train))
train_dataset = train_dataset.shuffle(buffer_size=1024).batch(batch_size)# Prepare the validation dataset.
val_dataset = tf.data.Dataset.from_tensor_slices((x_val, y_val))
val_dataset = val_dataset.batch(batch_size)
下载数据集:

在 GradientTape 作用域内调用模型,可以获取该层可训练权重相对于损失值的梯度。
使用优化器实例,您可以使用这些梯度来更新这些变量(您可以使用 model.trainable_weights 来检索这些变量)。
下面是我们一步一步的训练循环:
× 我们打开一个 for 循环,迭代epochs
× 对于每个 epoch,我们打开一个 for 循环,分批迭代数据集
× 对于每个批次,我们打开一个 GradientTape() 作用域
× 在此作用域内,我们调用模型(前向传递)并计算损失
× 在作用域之外,我们检索模型权重与损失的梯度
× 最后,我们使用优化器根据梯度更新模型的权重
epochs = 3
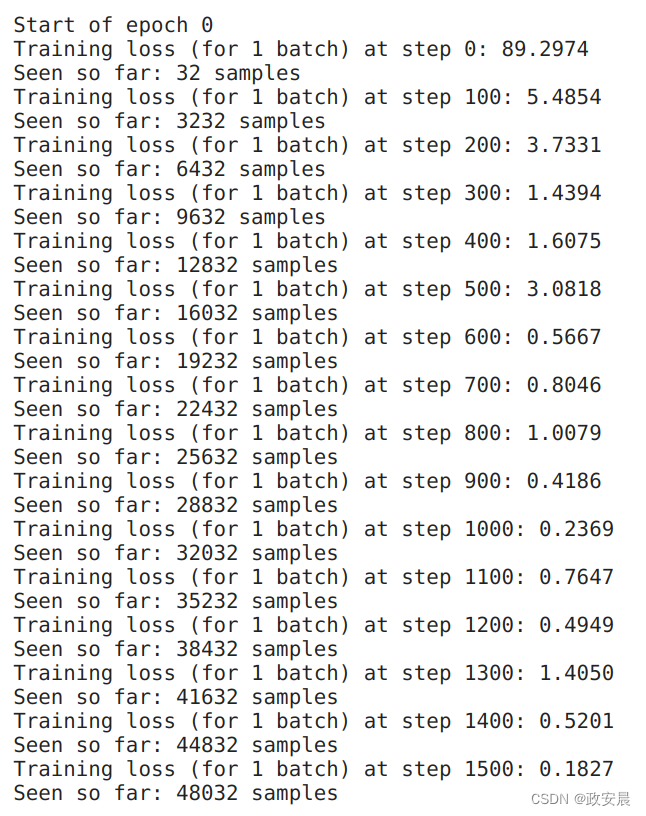
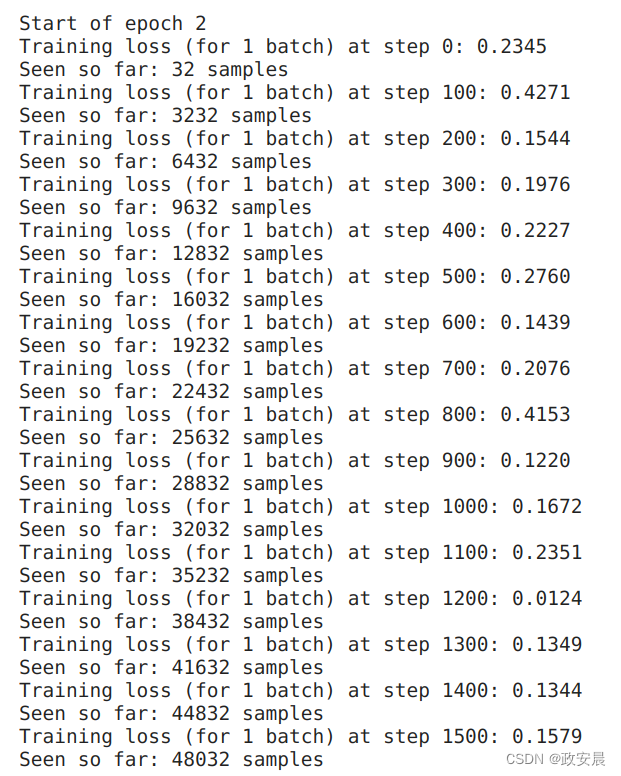
for epoch in range(epochs):print(f"\nStart of epoch {epoch}")# Iterate over the batches of the dataset.for step, (x_batch_train, y_batch_train) in enumerate(train_dataset):# Open a GradientTape to record the operations run# during the forward pass, which enables auto-differentiation.with tf.GradientTape() as tape:# Run the forward pass of the layer.# The operations that the layer applies# to its inputs are going to be recorded# on the GradientTape.logits = model(x_batch_train, training=True) # Logits for this minibatch# Compute the loss value for this minibatch.loss_value = loss_fn(y_batch_train, logits)# Use the gradient tape to automatically retrieve# the gradients of the trainable variables with respect to the loss.grads = tape.gradient(loss_value, model.trainable_weights)# Run one step of gradient descent by updating# the value of the variables to minimize the loss.optimizer.apply(grads, model.trainable_weights)# Log every 100 batches.if step % 100 == 0:print(f"Training loss (for 1 batch) at step {step}: {float(loss_value):.4f}")print(f"Seen so far: {(step + 1) * batch_size} samples")训练演绎如下:
(epoch 0)
(epoch 1)

(epoch 2)
指标的低级处理
让我们为这个基本循环添加指标监控功能。
在这种从头开始编写的训练循环中,您可以随时重用内置指标(或您自定义的指标)。
流程如下:
在循环开始时实例化指标
在每个批次后调用 metric.update_state()
需要显示度量的当前值时,调用 metric.result()
需要清除度量值的状态时(通常是在一个纪元结束时),调用 metric.reset_state()
让我们利用这些知识,在每个epoch结束时计算训练数据和验证数据的稀疏分类准确率(SparseCategoricalAccuracy):
# Get a fresh model
model = get_model()# Instantiate an optimizer to train the model.
optimizer = keras.optimizers.Adam(learning_rate=1e-3)
# Instantiate a loss function.
loss_fn = keras.losses.SparseCategoricalCrossentropy(from_logits=True)# Prepare the metrics.
train_acc_metric = keras.metrics.SparseCategoricalAccuracy()
val_acc_metric = keras.metrics.SparseCategoricalAccuracy()
以下是我们的培训和评估循环:
epochs = 2
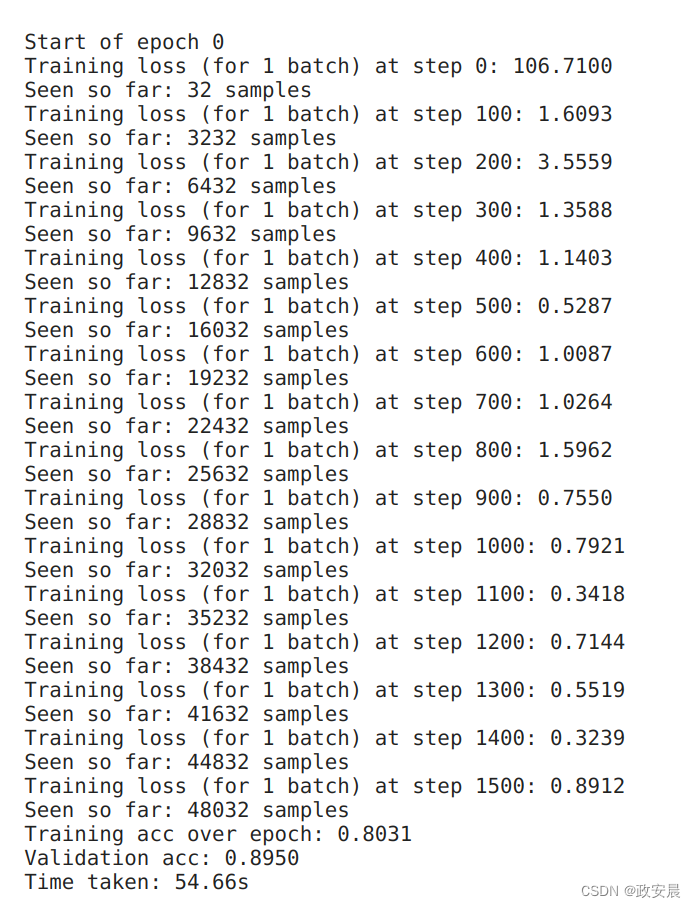
for epoch in range(epochs):print(f"\nStart of epoch {epoch}")start_time = time.time()# Iterate over the batches of the dataset.for step, (x_batch_train, y_batch_train) in enumerate(train_dataset):with tf.GradientTape() as tape:logits = model(x_batch_train, training=True)loss_value = loss_fn(y_batch_train, logits)grads = tape.gradient(loss_value, model.trainable_weights)optimizer.apply(grads, model.trainable_weights)# Update training metric.train_acc_metric.update_state(y_batch_train, logits)# Log every 100 batches.if step % 100 == 0:print(f"Training loss (for 1 batch) at step {step}: {float(loss_value):.4f}")print(f"Seen so far: {(step + 1) * batch_size} samples")# Display metrics at the end of each epoch.train_acc = train_acc_metric.result()print(f"Training acc over epoch: {float(train_acc):.4f}")# Reset training metrics at the end of each epochtrain_acc_metric.reset_state()# Run a validation loop at the end of each epoch.for x_batch_val, y_batch_val in val_dataset:val_logits = model(x_batch_val, training=False)# Update val metricsval_acc_metric.update_state(y_batch_val, val_logits)val_acc = val_acc_metric.result()val_acc_metric.reset_state()print(f"Validation acc: {float(val_acc):.4f}")print(f"Time taken: {time.time() - start_time:.2f}s")
训练评估过程如下:
(epoch 0)
(epoch 1)

使用 tf.function 加快训练步骤
TensorFlow 的默认运行时是急迫执行。因此,我们上面的训练循环也是急迫执行的。
这对调试很有帮助,但图形编译在性能上有一定优势。将计算描述为静态图可以让框架应用全局性能优化。如果框架受限于贪婪地执行一个又一个操作,而不知道下一个操作是什么,就不可能做到这一点。
你可以将任何将张量作为输入的函数编译成静态图。
只需在其上添加一个 @tf.function 装饰器,如下所示:
@tf.function
def train_step(x, y):with tf.GradientTape() as tape:logits = model(x, training=True)loss_value = loss_fn(y, logits)grads = tape.gradient(loss_value, model.trainable_weights)optimizer.apply(grads, model.trainable_weights)train_acc_metric.update_state(y, logits)return loss_value
评估步骤也是如此:
@tf.function
def test_step(x, y):val_logits = model(x, training=False)val_acc_metric.update_state(y, val_logits)
现在,让我们用这个编译过的训练步骤重新运行训练循环:
epochs = 2
for epoch in range(epochs):print(f"\nStart of epoch {epoch}")start_time = time.time()# Iterate over the batches of the dataset.for step, (x_batch_train, y_batch_train) in enumerate(train_dataset):loss_value = train_step(x_batch_train, y_batch_train)# Log every 100 batches.if step % 100 == 0:print(f"Training loss (for 1 batch) at step {step}: {float(loss_value):.4f}")print(f"Seen so far: {(step + 1) * batch_size} samples")# Display metrics at the end of each epoch.train_acc = train_acc_metric.result()print(f"Training acc over epoch: {float(train_acc):.4f}")# Reset training metrics at the end of each epochtrain_acc_metric.reset_state()# Run a validation loop at the end of each epoch.for x_batch_val, y_batch_val in val_dataset:test_step(x_batch_val, y_batch_val)val_acc = val_acc_metric.result()val_acc_metric.reset_state()print(f"Validation acc: {float(val_acc):.4f}")print(f"Time taken: {time.time() - start_time:.2f}s")
演绎如下:
(epoch 0)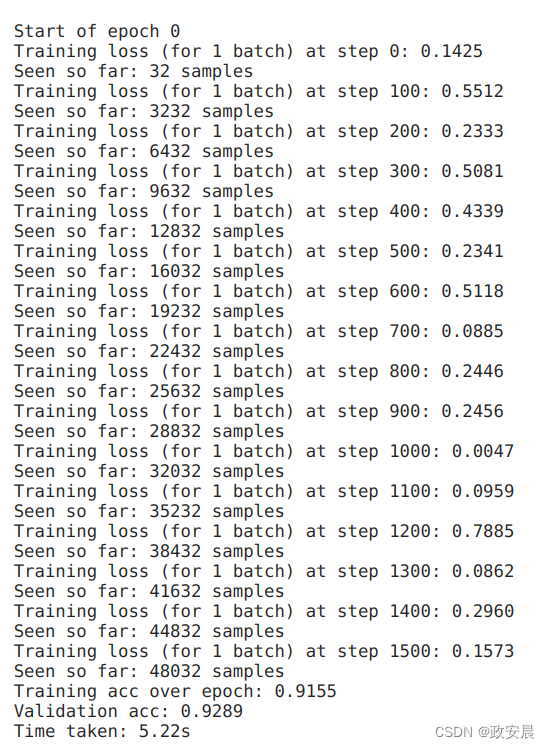
(epoch 1)
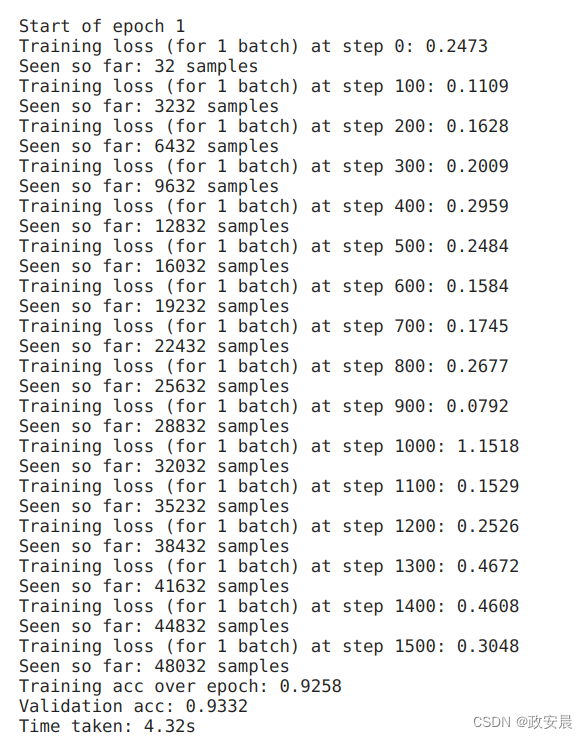
是不是快多了哈?呵呵
低层次处理模型跟踪的损失
图层和模型会递归地跟踪调用 self.add_loss(value) 的图层在向前传递过程中产生的任何损失。
由此产生的标量损失值列表可在前向传递结束时通过属性 model.losses 查看。
如果要使用这些损失成分,应在训练步骤中将它们相加并添加到主损失中。
请看这一层,它创建了一个活动正则化损失:
class ActivityRegularizationLayer(keras.layers.Layer):def call(self, inputs):self.add_loss(1e-2 * tf.reduce_sum(inputs))return inputs让我们用它建立一个非常简单的模型:
inputs = keras.Input(shape=(784,), name="digits")
x = keras.layers.Dense(64, activation="relu")(inputs)
# Insert activity regularization as a layer
x = ActivityRegularizationLayer()(x)
x = keras.layers.Dense(64, activation="relu")(x)
outputs = keras.layers.Dense(10, name="predictions")(x)model = keras.Model(inputs=inputs, outputs=outputs)
下面是我们的训练步骤:
@tf.function
def train_step(x, y):with tf.GradientTape() as tape:logits = model(x, training=True)loss_value = loss_fn(y, logits)# Add any extra losses created during the forward pass.loss_value += sum(model.losses)grads = tape.gradient(loss_value, model.trainable_weights)optimizer.apply(grads, model.trainable_weights)train_acc_metric.update_state(y, logits)return loss_value
总结
现在你已经了解了使用内置训练循环和从头开始编写自己的训练循环的所有知识。
最后,这里有一个简单的端到端示例,可以将您在本指南中学到的所有知识串联起来:在 MNIST 数字上训练的 DCGAN。
端到端示例:从零开始的 GAN 训练循环
您可能对生成对抗网络(GAN)并不陌生。
GANs 可以通过学习图像训练数据集(图像的 "潜在空间")的潜在分布,生成看起来几乎真实的新图像。
GAN 由两部分组成:
一个 "生成器 "模型,用于将潜空间中的点映射到图像空间中的点;
一个 "判别器 "模型,即一个分类器,用于区分真实图像(来自训练数据集)和虚假图像(生成器网络的输出)。
一个 GAN 训练循环是这样的:
1) 训练判别器。- 在潜空间中采样一批随机点。- 通过 "生成器 "模型将这些点转化为假图像。
- 获取一批真实图像,并将它们与生成的图像相结合。- 训练 "判别器 "模型,对生成图像和真实图像进行分类。
2) 训练生成器。- 在潜空间中随机采样点。- 通过 "生成器 "网络将这些点转化为假图像。
- 获取一批真实图像,并将它们与生成的图像相结合。- 训练 "生成器 "模型,使其 "骗过 "判别器,将假图像分类为真图像。
让我们来实现这个训练循环。
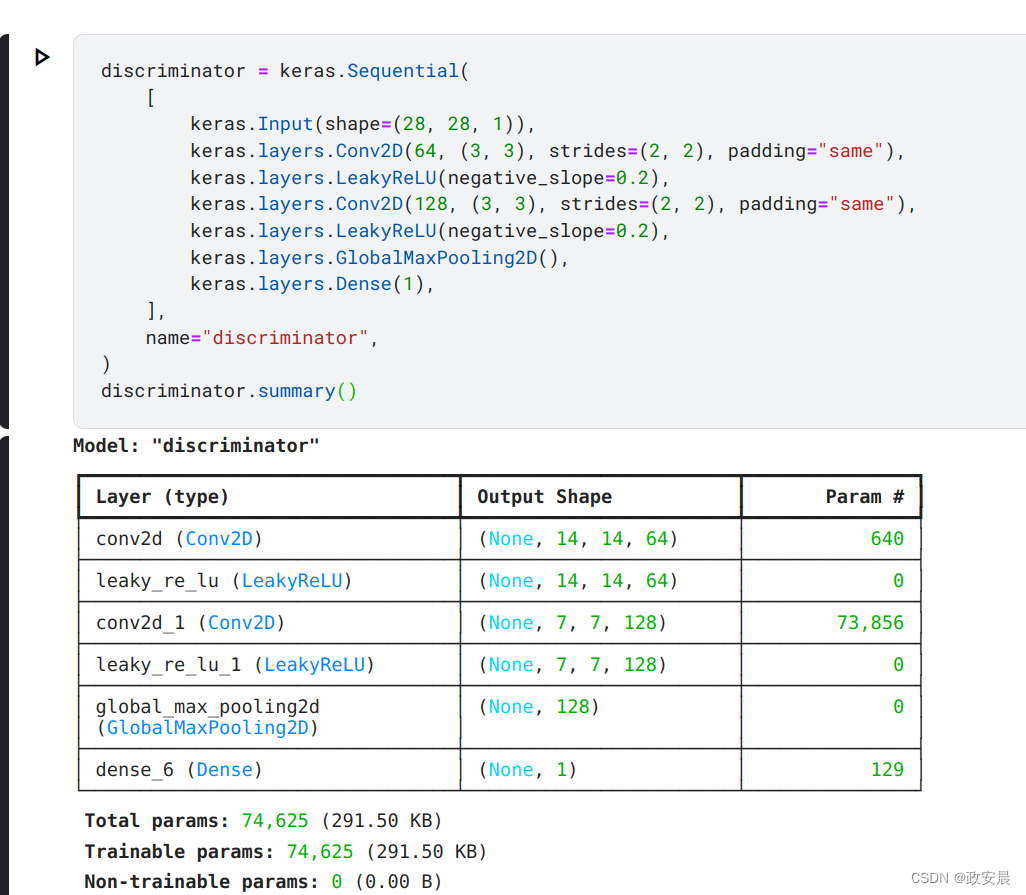
首先,创建用于将假数字与真数字进行分类的判别器:
discriminator = keras.Sequential([keras.Input(shape=(28, 28, 1)),keras.layers.Conv2D(64, (3, 3), strides=(2, 2), padding="same"),keras.layers.LeakyReLU(negative_slope=0.2),keras.layers.Conv2D(128, (3, 3), strides=(2, 2), padding="same"),keras.layers.LeakyReLU(negative_slope=0.2),keras.layers.GlobalMaxPooling2D(),keras.layers.Dense(1),],name="discriminator",
)
discriminator.summary()
演绎如下:
然后,让我们创建一个生成器网络,将潜在向量转化为形状为 (28, 28, 1) 的输出(代表 MNIST 数字):
latent_dim = 128generator = keras.Sequential([keras.Input(shape=(latent_dim,)),# We want to generate 128 coefficients to reshape into a 7x7x128 mapkeras.layers.Dense(7 * 7 * 128),keras.layers.LeakyReLU(negative_slope=0.2),keras.layers.Reshape((7, 7, 128)),keras.layers.Conv2DTranspose(128, (4, 4), strides=(2, 2), padding="same"),keras.layers.LeakyReLU(negative_slope=0.2),keras.layers.Conv2DTranspose(128, (4, 4), strides=(2, 2), padding="same"),keras.layers.LeakyReLU(negative_slope=0.2),keras.layers.Conv2D(1, (7, 7), padding="same", activation="sigmoid"),],name="generator",
)下面是关键部分:训练循环。正如你所看到的,它非常简单。训练步骤函数只需 17 行。
# Instantiate one optimizer for the discriminator and another for the generator.
d_optimizer = keras.optimizers.Adam(learning_rate=0.0003)
g_optimizer = keras.optimizers.Adam(learning_rate=0.0004)# Instantiate a loss function.
loss_fn = keras.losses.BinaryCrossentropy(from_logits=True)@tf.function
def train_step(real_images):# Sample random points in the latent spacerandom_latent_vectors = tf.random.normal(shape=(batch_size, latent_dim))# Decode them to fake imagesgenerated_images = generator(random_latent_vectors)# Combine them with real imagescombined_images = tf.concat([generated_images, real_images], axis=0)# Assemble labels discriminating real from fake imageslabels = tf.concat([tf.ones((batch_size, 1)), tf.zeros((real_images.shape[0], 1))], axis=0)# Add random noise to the labels - important trick!labels += 0.05 * tf.random.uniform(labels.shape)# Train the discriminatorwith tf.GradientTape() as tape:predictions = discriminator(combined_images)d_loss = loss_fn(labels, predictions)grads = tape.gradient(d_loss, discriminator.trainable_weights)d_optimizer.apply(grads, discriminator.trainable_weights)# Sample random points in the latent spacerandom_latent_vectors = tf.random.normal(shape=(batch_size, latent_dim))# Assemble labels that say "all real images"misleading_labels = tf.zeros((batch_size, 1))# Train the generator (note that we should *not* update the weights# of the discriminator)!with tf.GradientTape() as tape:predictions = discriminator(generator(random_latent_vectors))g_loss = loss_fn(misleading_labels, predictions)grads = tape.gradient(g_loss, generator.trainable_weights)g_optimizer.apply(grads, generator.trainable_weights)return d_loss, g_loss, generated_images
让我们在成批图像上反复调用 train_step 来训练我们的 GAN。
由于我们的判别器和生成器都是卷积网络,因此需要在 GPU 上运行这段代码。
# Prepare the dataset. We use both the training & test MNIST digits.
batch_size = 64
(x_train, _), (x_test, _) = keras.datasets.mnist.load_data()
all_digits = np.concatenate([x_train, x_test])
all_digits = all_digits.astype("float32") / 255.0
all_digits = np.reshape(all_digits, (-1, 28, 28, 1))
dataset = tf.data.Dataset.from_tensor_slices(all_digits)
dataset = dataset.shuffle(buffer_size=1024).batch(batch_size)epochs = 1  # In practice you need at least 20 epochs to generate nice digits.
save_dir = "./"for epoch in range(epochs):print(f"\nStart epoch {epoch}")for step, real_images in enumerate(dataset):# Train the discriminator & generator on one batch of real images.d_loss, g_loss, generated_images = train_step(real_images)# Logging.if step % 100 == 0:# Print metricsprint(f"discriminator loss at step {step}: {d_loss:.2f}")print(f"adversarial loss at step {step}: {g_loss:.2f}")# Save one generated imageimg = keras.utils.array_to_img(generated_images[0] * 255.0, scale=False)img.save(os.path.join(save_dir, f"generated_img_{step}.png"))# To limit execution time we stop after 10 steps.# Remove the lines below to actually train the model!if step > 10:break
演绎结果如下:

就是这样哒!只需在 Colab GPU 上进行约 30 秒的训练,你就能得到漂亮的伪造 MNIST 数字。

这篇关于政安晨:【Keras机器学习实践要点】(八)—— 在 TensorFlow 中从头开始编写训练循环的文章就介绍到这儿,希望我们推荐的文章对编程师们有所帮助!


