本文主要是介绍iOS开发进阶(十一):ViewController 控制器详解,希望对大家解决编程问题提供一定的参考价值,需要的开发者们随着小编来一起学习吧!
文章目录
- 一、前言
- 二、UIViewController
- 三、UINavigationController
- 四、UITabBarController
- 五、UIPageViewController
- 六、拓展阅读
一、前言
iOS 界面开发最重要的首属ViewController和View,ViewController是View的控制器,也就是一般的页面,用来管理页面的生命周期(它相当于安卓里的Activity,两者很像,但又有一些差异)。
ViewController的特点是它有好几种。一种最基本的UIViewController,和另外三种容器:UINavigationController、UITabBarController、UIPageViewController。
所谓容器,就是它们本身不能单独用来显示,必须在里面放一个或几个UIViewController。
不同容器有不同的页面管理方式和展示效果:
UINavigationController用于导航栏管理页面;UITabBarController用于底部tab管理页面;UIPageViewController用于切换器管理页面;
容器还可以嵌套,比如把UITabBarController放进UINavigationController里面,这样在tab页面里,可以用启动导航栏样式的二级子页面。
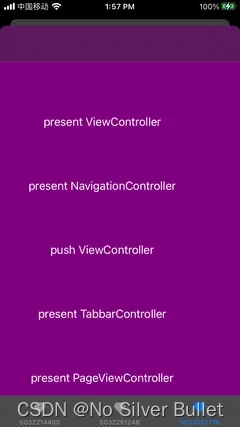
二、UIViewController
这是最简单的页面,没有导航栏。
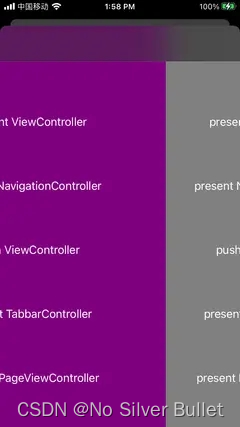
使用present方法展示,展示时从底部弹起,可以用下滑手势关闭,也可以多次启动叠加多个页面。

代码实现如下:
class ViewController: UIViewController {override func viewDidLoad() {super.viewDidLoad()// Do any additional setup after loading the view.title = "\(self.hash)"var label = UIButton(frame: CGRect(x: 10, y: 100, width: 300, height: 100))label.setTitle("present ViewController", for: .normal)view.addSubview(label)label.addTarget(self, action: #selector(presentVC), for: .touchUpInside)label = UIButton(frame: CGRect(x: 10, y: 200, width: 300, height: 100))label.setTitle("present NavigationController", for: .normal)view.addSubview(label)label.addTarget(self, action: #selector(presentNC), for: .touchUpInside)label = UIButton(frame: CGRect(x: 10, y: 300, width: 300, height: 100))label.setTitle("push ViewController", for: .normal)view.addSubview(label)label.addTarget(self, action: #selector(pushVC), for: .touchUpInside)label = UIButton(frame: CGRect(x: 10, y: 400, width: 300, height: 100))label.setTitle("present TabbarController", for: .normal)view.addSubview(label)label.addTarget(self, action: #selector(presentTC), for: .touchUpInside)label = UIButton(frame: CGRect(x: 10, y: 500, width: 300, height: 100))label.setTitle("present PageViewController", for: .normal)view.addSubview(label)label.addTarget(self, action: #selector(presentPC), for: .touchUpInside)}@objc func presentVC() {let vc = ViewController()vc.view.backgroundColor = .darkGraypresent(vc, animated: true)}@objc func presentNC() {let vc = ViewController()vc.view.backgroundColor = .graylet nc = UINavigationController(rootViewController: vc)present(nc, animated: true)}@objc func presentTC() {let tc = MyTabbarController()tc.view.backgroundColor = .bluelet nc = UINavigationController(rootViewController: tc)present(nc, animated: true)}@objc func presentPC() {let pc = MyPageViewController()pc.view.backgroundColor = .redlet nc = UINavigationController(rootViewController: pc)present(nc, animated: true)}@objc func pushVC() {let vc = ViewController()vc.view.backgroundColor = .purpleif let nc = navigationController {nc.pushViewController(vc, animated: true)} else {print("navigationController nil!")}}
}
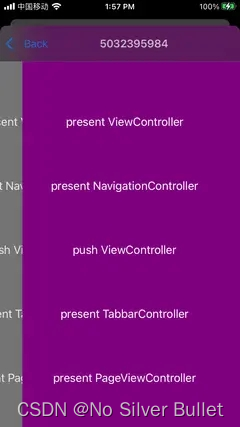
三、UINavigationController
这是最常用的页面导航方式,顶部展示导航栏,有标题、返回按钮。
使用pushViewController方法展示,展示时从右往左出现,可以用右滑手势关闭,也可以多次启动叠加多个页面。
注意⚠️:UINavigationController用来管理一组UIViewController,这些UIViewController共用一个导航栏。
一般来说,UINavigationController能很好地控制导航栏上面的元素显示和转场效果。
如果需要定制导航栏元素,尽量修改UIViewController的导航栏,不要直接修改UINavigationController的导航栏。
四、UITabBarController
这个一般用来做主页面的展示,下面配置多个tab,用于切换页面。
示例代码如下:
class MyTabbarController: UITabBarController {init() {super.init(nibName: nil, bundle: nil)self.tabBar.backgroundColor = .graylet vc1 = ViewController()vc1.tabBarItem.image = UIImage(named: "diamond")vc1.tabBarItem.title = "tab1"vc1.view.backgroundColor = .redlet vc2 = ViewController()vc2.tabBarItem.image = UIImage(named: "diamond")vc2.tabBarItem.title = "tab2"vc2.view.backgroundColor = .bluelet vc3 = ViewController()vc3.tabBarItem.image = UIImage(named: "diamond")vc3.tabBarItem.title = "tab3"vc3.view.backgroundColor = .purpleself.viewControllers = [vc1,vc2,vc3,]}required init?(coder: NSCoder) {fatalError("init(coder:) has not been implemented")}
}
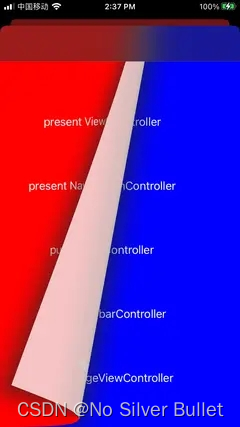
五、UIPageViewController
这个用来做翻页的页面,比如电子书或者广告banner。可以配置左右或上下翻译,翻页效果可以配置滚动或者模拟翻书。
用viewControllerBefore和viewControllerAfter回调方法控制页面切换。viewControllerBefore方法提供当前页面的前一个页面,viewControllerAfter方法提供当前页面的后一个页面。
注意⚠️:UIPageViewController有预加载机制,它会提前加载当前页面的前后页面。但是没有实现页面缓存机制,需要在外部做缓存。
如果页面非常多,但又是同一个类的实例,那么一般创建三个实例就够了,然后在viewControllerBefore和viewControllerAfter方法里循环使用这三个。
示例代码如下:
class MyPageViewController: UIPageViewController, UIPageViewControllerDataSource {lazy var vcs = [ViewController(),ViewController(),ViewController(),ViewController(),ViewController(),]init() {super.init(transitionStyle: .scroll, navigationOrientation: .horizontal)self.dataSource = selflet vc1 = ViewController()vc1.view.backgroundColor = .redlet vc2 = ViewController()vc2.view.backgroundColor = .bluelet vc3 = ViewController()vc3.view.backgroundColor = .purplelet vc4 = ViewController()vc4.view.backgroundColor = .grayvcs = [vc1,vc2,vc3,vc4]self.setViewControllers([vcs[0]], direction: .forward, animated: false)}required init?(coder: NSCoder) {fatalError("init(coder:) has not been implemented")}func pageViewController(_ pageViewController: UIPageViewController, viewControllerBefore viewController: UIViewController) -> UIViewController? {let i = (vcs.firstIndex(of: viewController as! ViewController) ?? 0) - 1if i < 0 {return nil}return vcs[i]}func pageViewController(_ pageViewController: UIPageViewController, viewControllerAfter viewController: UIViewController) -> UIViewController? {let i = (vcs.firstIndex(of: viewController as! ViewController) ?? 0) + 1if i >= vcs.count {return nil}return vcs[i]}
}
六、拓展阅读
- 《iOS开发进阶(十):viewController生命周期讲解》
这篇关于iOS开发进阶(十一):ViewController 控制器详解的文章就介绍到这儿,希望我们推荐的文章对编程师们有所帮助!


