本文主要是介绍@EnableWebMvc 导致自定义序列化器失效,希望对大家解决编程问题提供一定的参考价值,需要的开发者们随着小编来一起学习吧!
目录
前言
一. 自定义序列化器失效
1.1 @EnableWebMvc 的作用
1.2 @EnableWebMvc 带来了什么后果
1.3 原理分析
1.4 问题解决
二. 总结
前言
在使用Swagger的时候用 到了@EnableWebMvc,发现之前为了解决Long类型、日期类型等自定义序列化器失效了
@Configuration
@EnableOpenApi
@EnableWebMvc
public class SwaggerConfig {@Beanpublic Docket api() {return new Docket(DocumentationType.OAS_30).select().apis(RequestHandlerSelectors.withClassAnnotation(RestController.class)).paths(PathSelectors.any()).build();}
}
Swagger3/2+Spring boot 使用小结_spring boot3 + swagger3-CSDN博客
我们有时候,可能需要自定义一个序列化器来满足自己的需要,但是如果项目中不正确使用了@EnableWebMvc注解,可能会导致这个自定义的序列化器失效。
一. 自定义序列化器失效
首先我们应该看下@EnableWebMvc这个注解是拿来干啥的吧。
1.1 @EnableWebMvc 的作用
@EnableWebMvc用于快捷配置SpringWebMVC。用于自定义MVC的相关配置用的。相当于xml配置:
<mvc:annotation-driven/>当我们需要自定义实现MVC的时候,有三种选择:
- 实现
WebMvcConfigurer接口 - 继承
WebMvcConfigurerAdapter类 - 继承
WebMvcConfigurationSupport类
我们这里通过一个案例来更直观的看这个注解。本文通过第一种方式来实现。
1.我们自定义一个拦截器MyInterceptor:
public class MyInterceptor implements HandlerInterceptor {// 目标方法运行之前执行@Overridepublic boolean preHandle(HttpServletRequest request, HttpServletResponse response, Object handler) throws Exception {System.out.println("preHandle: " + request.getRequestURI());return true;}} 2.自定义MVC配置:添加我们刚刚定义好的拦截器。
@EnableWebMvc@Configurationpublic class MyWebMvcConfig implements WebMvcConfigurer {public void addInterceptors(InterceptorRegistry registry) {registry.addInterceptor(new MyInterceptor());}}3.定义Controller:
@RestControllerpublic class MyController {@PostMapping("/hello")public User hello(@RequestBody User user){return user;}}4.访问对应的路径,就能在控制台上看到信息:
 还可以配置其他的一些功能,例如:视图解析器、静态资源映射等等。
1.2 @EnableWebMvc 带来了什么后果
假设我们这个项目使用了fastjson来作为默认的转换器,
@Beanpublic HttpMessageConverters fastJsonHttpMessageConverters() {FastJsonHttpMessageConverter fastConverter = new FastJsonHttpMessageConverter();FastJsonConfig fastJsonConfig = new FastJsonConfig();fastJsonConfig.setSerializerFeatures(SerializerFeature.PrettyFormat);fastConverter.setFastJsonConfig(fastJsonConfig);HttpMessageConverter<?> converter = fastConverter;return new HttpMessageConverters(converter);}然后我们访问下案例的接口,结果:
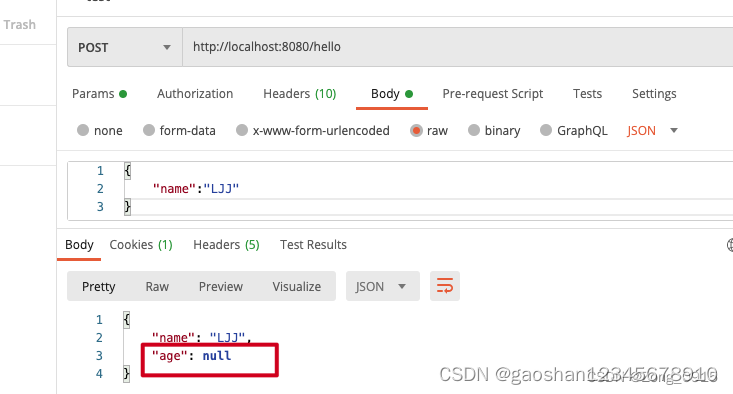
我们知道,fastjson默认情况下是不会输出null这个结果的,会被过滤掉,并且我们自定义序列化器的时候也没有去指定SerializerFeature.WriteMapNullValue属性。那么问题来了,底层进行解析的时候,到底用的是什么转换器?难道不是我们自定义的fastjson吗?
在Spring常见问题解决 - Body返回体中对应值为null的不输出?这篇文章的基础上,我们直接定位到转换器的代码部分,看下返回结果最终用的是什么序列化器:
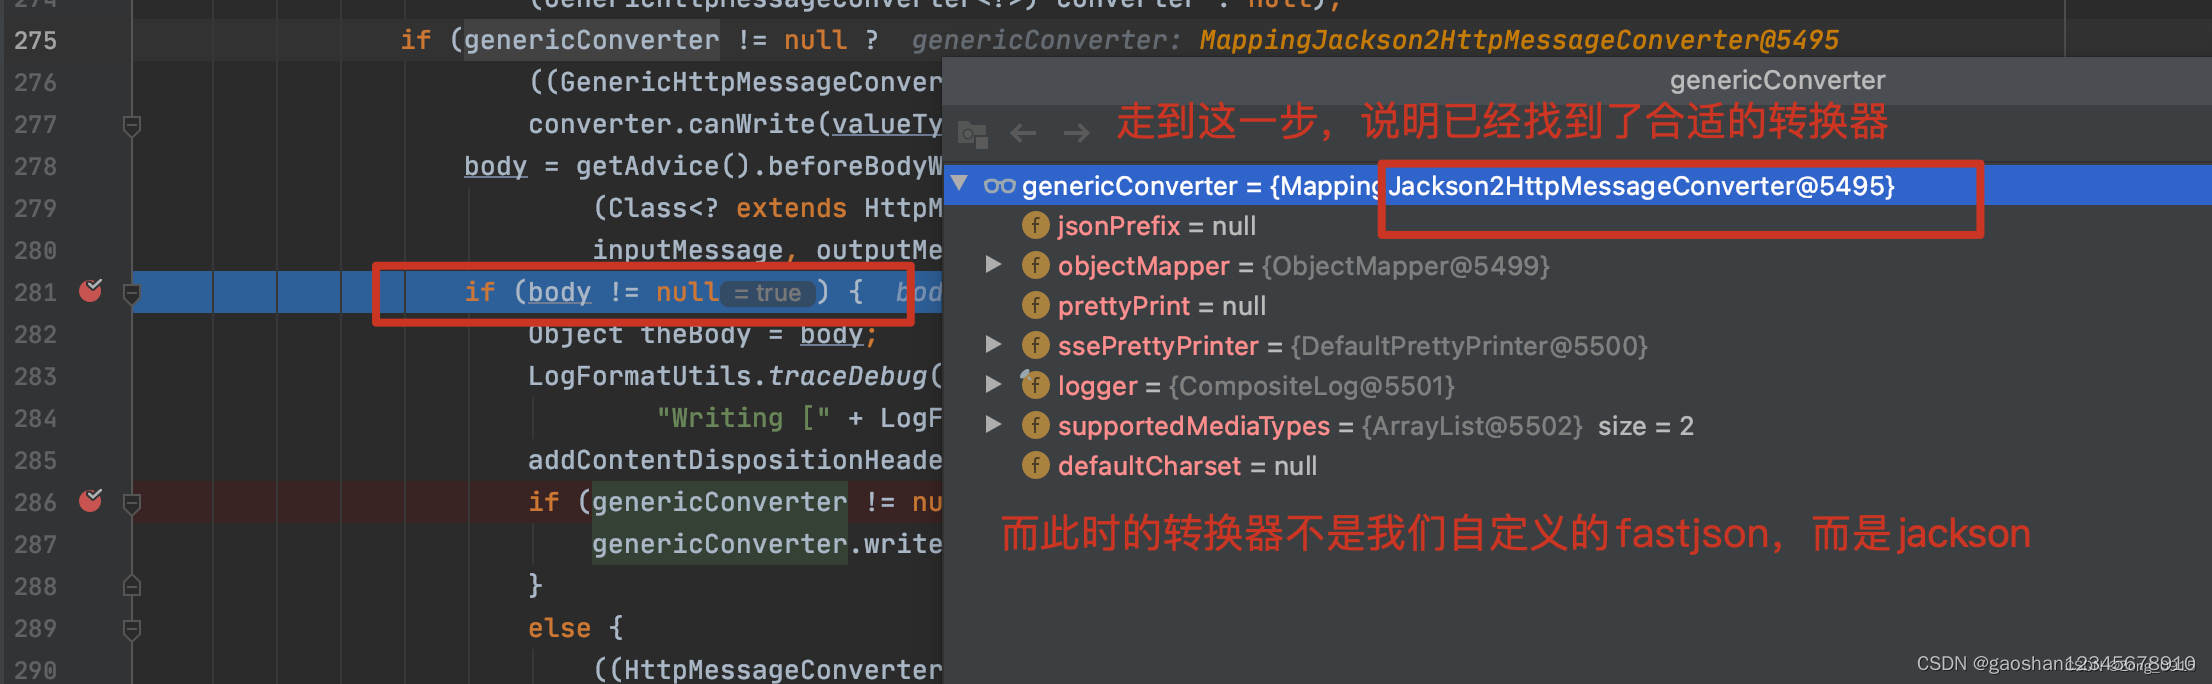
总结下就是:自定义序列化器失效了。 当然,咱们这里为止,我是基于我知道底层原理的情况下,指明了这个问题是由于@EnableWebMvc的使用引起的。那么接下来就开始分析。
1.3 原理分析
首先说下本质原因:@EnableWebMvc 导致SpringBoot中 WebMvc的自动配置失效。
再从代码角度来看,我们先看下@EnableWebMvc 注解:
@Retention(RetentionPolicy.RUNTIME)@Target(ElementType.TYPE)@Documented@Import(DelegatingWebMvcConfiguration.class)public @interface EnableWebMvc {} 这里引入了DelegatingWebMvcConfiguration类。而他属于WebMvcConfigurationSupport的子类:
-
@Configuration(proxyBeanMethods = false) -
public class DelegatingWebMvcConfiguration extends WebMvcConfigurationSupport
另一方面,SpringBoot实际上是整合了MVC的功能的,主要通过自动装配机制来完成功能的加载,入口在于:WebMvcAutoConfiguration类中。
-
@ConditionalOnMissingBean(WebMvcConfigurationSupport.class) -
public class WebMvcAutoConfiguration {}
可以发现,自动装配里面,引入了WebMvcConfigurationSupport这个类。只不过是通过@ConditionalOnMissingBean注解来注入的。注意了,这个注解的用处在于:
- 当这个类型的
Bean被注册之后,就不会再注册。它会保证你的Bean只有一个。 - 也就是说
WebMvcConfigurationSupport类型的(包括它的子类)Bean只能有一个。 - 即如果我们使用了
@EnableWebMvc注解,就会和SpringBoot对于MVC的自动装配产生冲突,因为其注入了DelegatingWebMvcConfiguration类,属于WebMvcConfigurationSupport类的子类。 - 如果存在
@EnableWebMvc注解,优先以我们自定义的MVC配置为主。
那么问题来了,我们从上一篇文章Spring常见问题解决 - Body返回体中对应值为null的不输出?中得到一个点就是:Spring是通过ObjectMapper对象进行请求和返回体的转换的。
那么@EnableWebMvc和他有啥子关系呢?我们再回到@EnableWebMvc本身。我们根据上文得知,它会引入一个WebMvcConfigurationSupport的子类。我们看下这个父类中的代码:
@ConditionalOnMissingBean(WebMvcConfigurationSupport.class)public class WebMvcAutoConfiguration {@Configuration(proxyBeanMethods = false)@Import(EnableWebMvcConfiguration.class)@EnableConfigurationProperties({ WebMvcProperties.class, ResourceProperties.class })@Order(0)public static class WebMvcAutoConfigurationAdapter implements WebMvcConfigurer {}}可以发现有个静态内部类WebMvcAutoConfigurationAdapter。它通过@Import注解引入了EnableWebMvcConfiguration:
@Configuration(proxyBeanMethods = false)public static class EnableWebMvcConfiguration extends DelegatingWebMvcConfiguration implements ResourceLoaderAware {@Bean@Overridepublic RequestMappingHandlerAdapter requestMappingHandlerAdapter(@Qualifier("mvcContentNegotiationManager") ContentNegotiationManager contentNegotiationManager,@Qualifier("mvcConversionService") FormattingConversionService conversionService,@Qualifier("mvcValidator") Validator validator) {RequestMappingHandlerAdapter adapter = super.requestMappingHandlerAdapter(contentNegotiationManager,conversionService, validator);adapter.setIgnoreDefaultModelOnRedirect(this.mvcProperties == null || this.mvcProperties.isIgnoreDefaultModelOnRedirect());return adapter;}}这个又引入了RequestMappingHandlerAdapter类:我们关注requestMappingHandlerAdapter()函数:
RequestMappingHandlerAdapter adapter = super.requestMappingHandlerAdapter(contentNegotiationManager,conversionService, validator);public class WebMvcConfigurationSupport implements ApplicationContextAware, ServletContextAware {@Beanpublic RequestMappingHandlerAdapter requestMappingHandlerAdapter(@Qualifier("mvcContentNegotiationManager") ContentNegotiationManager contentNegotiationManager,@Qualifier("mvcConversionService") FormattingConversionService conversionService,@Qualifier("mvcValidator") Validator validator) {RequestMappingHandlerAdapter adapter = createRequestMappingHandlerAdapter();// 设置HttpMessageConverteradapter.setMessageConverters(getMessageConverters());// ..return adapter;}↓↓↓protected final List<HttpMessageConverter<?>> getMessageConverters() {if (this.messageConverters == null) {// ...addDefaultHttpMessageConverters(this.messageConverters);}return this.messageConverters;}↓↓↓// 添加默认的消息转换器protected final void addDefaultHttpMessageConverters(List<HttpMessageConverter<?>> messageConverters) {messageConverters.add(new ByteArrayHttpMessageConverter());messageConverters.add(new StringHttpMessageConverter());messageConverters.add(new ResourceHttpMessageConverter());messageConverters.add(new ResourceRegionHttpMessageConverter());try {messageConverters.add(new SourceHttpMessageConverter<>());}catch (Throwable ex) {// Ignore when no TransformerFactory implementation is available...}messageConverters.add(new AllEncompassingFormHttpMessageConverter());if (romePresent) {messageConverters.add(new AtomFeedHttpMessageConverter());messageConverters.add(new RssChannelHttpMessageConverter());}if (jackson2XmlPresent) {Jackson2ObjectMapperBuilder builder = Jackson2ObjectMapperBuilder.xml();if (this.applicationContext != null) {builder.applicationContext(this.applicationContext);}messageConverters.add(new MappingJackson2XmlHttpMessageConverter(builder.build()));}else if (jaxb2Present) {messageConverters.add(new Jaxb2RootElementHttpMessageConverter());}// 这里还能发现,jackson优先级高于gson。if (jackson2Present) {Jackson2ObjectMapperBuilder builder = Jackson2ObjectMapperBuilder.json();if (this.applicationContext != null) {builder.applicationContext(this.applicationContext);}messageConverters.add(new MappingJackson2HttpMessageConverter(builder.build()));}else if (gsonPresent) {messageConverters.add(new GsonHttpMessageConverter());}else if (jsonbPresent) {messageConverters.add(new JsonbHttpMessageConverter());}if (jackson2SmilePresent) {Jackson2ObjectMapperBuilder builder = Jackson2ObjectMapperBuilder.smile();if (this.applicationContext != null) {builder.applicationContext(this.applicationContext);}messageConverters.add(new MappingJackson2SmileHttpMessageConverter(builder.build()));}if (jackson2CborPresent) {Jackson2ObjectMapperBuilder builder = Jackson2ObjectMapperBuilder.cbor();if (this.applicationContext != null) {builder.applicationContext(this.applicationContext);}messageConverters.add(new MappingJackson2CborHttpMessageConverter(builder.build()));}}}总而言之就是,默认的解析器里面不包含我们自定义的fastjson。因此在进行HTTP请求的时候,对结果进行反序列化输出的时候,使用的序列化器是jackson。
1.4 问题解决
解决方式很简单,我们只需要将@EnableWebMvc注解去掉即可。去掉后重启下项目,我们看下结果:
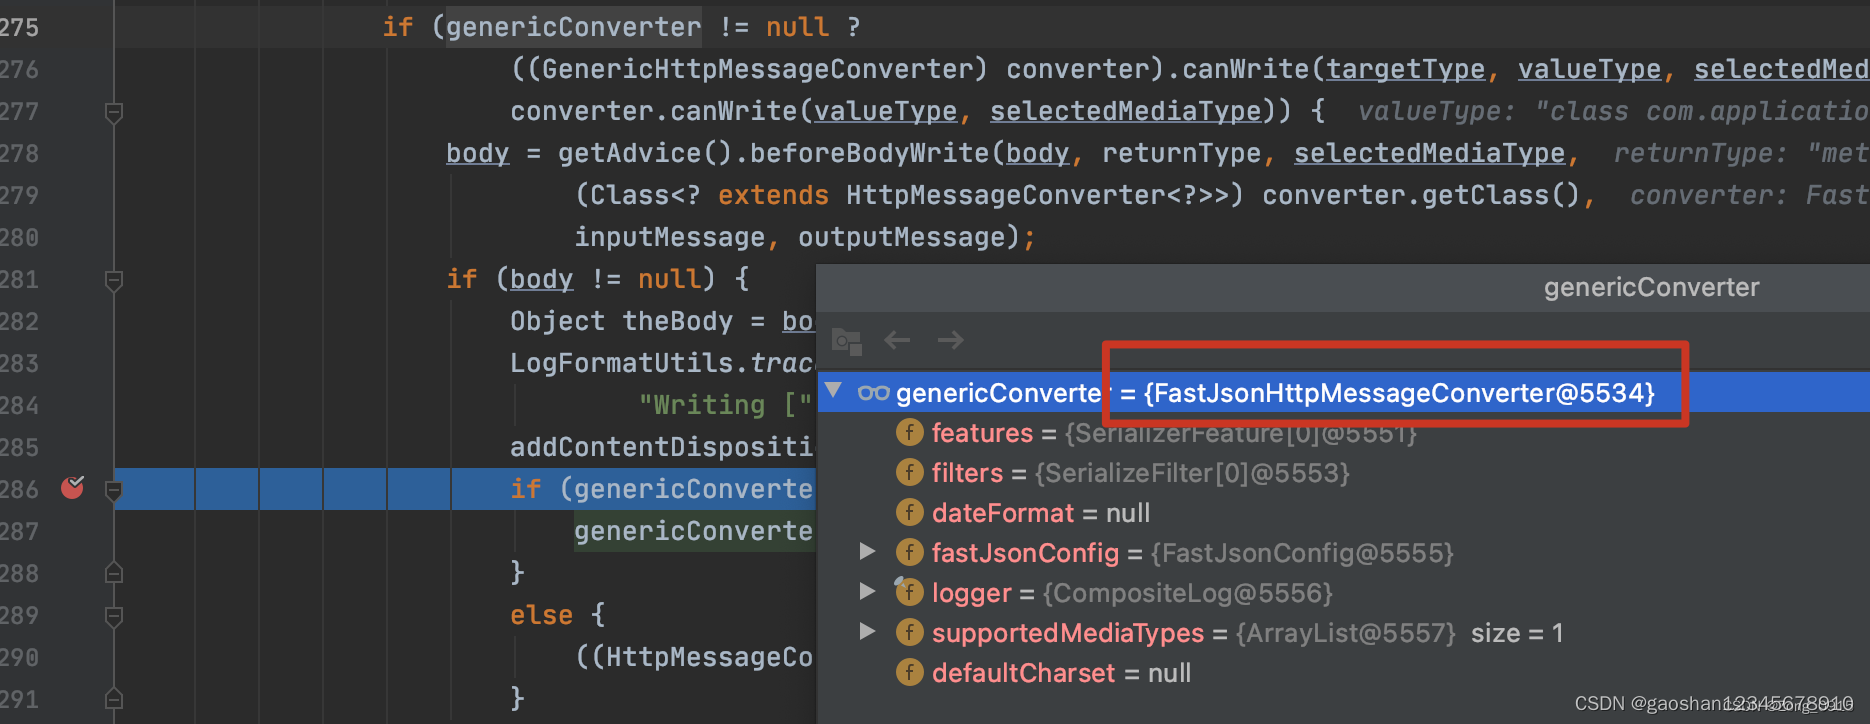 可以发现确实反序列化的时候使用的是
fastjson而不是jackson了:
 再看下我们自定义的拦截器是否生效了:
二. 总结
- 项目中,如果我们希望自定义一些
MVC的功能,我们只需要实现WebMvcConfigurer接口即可。无需添加@EnableWebMvc注解。 - 添加
@EnableWebMvc注解,会导致SpringBoot对MVC的自动装配失效。因为Spring对于WebMvcConfigurationSupport类型的Bean只允许存在一个(包括其子类)。 - 此时以序列化器为例,使用
@EnableWebMvc注解会导致自定义的序列化器失效。例如本文案例的fastjson。而Spring源码中对于默认注入的序列化器类型中并不包含fastjson。 Spring官网就已经说了,针对于SpringBoot而言,项目已经对MVC进行自动装配了,因此在自定义MVC功能的时候,不要使用@EnableWebMvc注解。加一个@Configuration即可。
这篇关于@EnableWebMvc 导致自定义序列化器失效的文章就介绍到这儿,希望我们推荐的文章对编程师们有所帮助!


