本文主要是介绍(七)Android布局类型(网格布局GridLayout),希望对大家解决编程问题提供一定的参考价值,需要的开发者们随着小编来一起学习吧!
从表格布局中可以了解到,无法实现跨行。网格布局不仅能实现跨行、还能实现跨列,并且,该种布局能自动进行子元素的定位,在使用上,更加灵活。
知识点1:设置最大行数和最大列数
最大行数设置(假设为2):android:rowCount="2"
最大列数设置(假设为4):android:columnCount="4"
案例1:设置最大行数和最大列数(但是无法限制组件个数)
<?xml version="1.0" encoding="utf-8"?>
<GridLayout xmlns:android="http://schemas.android.com/apk/res/android"xmlns:tools="http://schemas.android.com/tools"android:layout_width="match_parent"android:layout_height="match_parent"android:rowCount="2"android:columnCount="4"tools:context=".MainActivity"><Button android:layout_width="wrap_content"android:layout_height="wrap_content"android:text="按钮1"/><Button android:layout_width="wrap_content"android:layout_height="wrap_content"android:text="按钮2"/><Button android:layout_width="wrap_content"android:layout_height="wrap_content"android:text="按钮3"/><Button android:layout_width="wrap_content"android:layout_height="wrap_content"android:text="按钮4"/><Button android:layout_width="wrap_content"android:layout_height="wrap_content"android:text="按钮5"/><Button android:layout_width="wrap_content"android:layout_height="wrap_content"android:text="按钮6"/><Button android:layout_width="wrap_content"android:layout_height="wrap_content"android:text="按钮7"/><Button android:layout_width="wrap_content"android:layout_height="wrap_content"android:text="按钮8"/>
</GridLayout>
从结果中可以看出,右方的布局中,看起来好像是有3行似的,前两行的右侧也没有填满
注意:设置最大行数为2,最大列数为4,并不表示只能放置8个组件,还是可以多增加组件的。

刚刚说到,“该种布局能自动进行子元素的定位”,也就是说,刚刚的行数为2,列数为4,如果只放8个组件,那么就是2行4列。如果想要把组件排列为4行2列,则只需要修改代码为:
android:rowCount="4"
android:columnCount="2"
知识点2:实现跨列
核心代码:
设置跨列(假设跨2列):android:layout_columnSpan="2"
此时发现,按钮1并没有横跨按钮2的位置;按钮2空出来了,把按钮8挤到了下一行。
此时需要做两件事:1)实现跨列;2)按钮8的位置不能动
设置横向填充(具体设置代码如下),按钮1占了按钮2的位置,他们两个组件是水平方向上相邻组件,所以设置横向填充,使得按钮1不仅占据自己的位置,还要占据被跨列的位置。
android:layout_gravity="fill_horizontal"
由于按钮1占据了按钮2的位置,所有的组件都往后移了一位,导致按钮8也出现了移位。既然按钮2被按钮1占了,那么,按钮2就不应该再存在。所以,解决方法有两个,要么删除按钮2,要么注释掉按钮2。下图展示的是注释掉按钮2。

完整代码:
<?xml version="1.0" encoding="utf-8"?>
<GridLayout xmlns:android="http://schemas.android.com/apk/res/android"xmlns:tools="http://schemas.android.com/tools"android:layout_width="match_parent"android:layout_height="match_parent"android:rowCount="2"android:columnCount="4"tools:context=".MainActivity"><Button android:layout_width="wrap_content"android:layout_height="wrap_content"android:layout_columnSpan="2"android:layout_gravity="fill_horizontal"android:text="按钮1"/>
<!--    <Button android:layout_width="wrap_content"-->
<!--        android:layout_height="wrap_content"-->
<!--        android:text="按钮2"/>--><Button android:layout_width="wrap_content"android:layout_height="wrap_content"android:text="按钮3"/><Button android:layout_width="wrap_content"android:layout_height="wrap_content"android:text="按钮4"/><Button android:layout_width="wrap_content"android:layout_height="wrap_content"android:text="按钮5"/><Button android:layout_width="wrap_content"android:layout_height="wrap_content"android:text="按钮6"/><Button android:layout_width="wrap_content"android:layout_height="wrap_content"android:text="按钮7"/><Button android:layout_width="wrap_content"android:layout_height="wrap_content"android:text="按钮8"/>
</GridLayout>
知识点3:实现跨行
按照跨列的思路,跨行的实现基本思路是:1)设置跨行;2)设置占满;3)将被占的组件注释掉。
1)设置跨行
android:layout_rowSpan="2"
2)设置占满
注意,由于按钮3占用的是按钮7的位置,它们两个组件是垂直关系,所以设置占满方式,要选用垂直占满。
核心代码:
android:layout_gravity="fill_vertical"
3)3)将被占的组件注释掉,由于占用的是按钮7,所以应该注释掉按钮7对应的代码

此时发现,按钮3确实占了按钮7的位置,目的是达到了,但是高度超出了两个按钮,这是因为网格布局的高度设置为填满父容器(android:layout_height="match_parent")

所以,将父容器的高度填满方式改为根据内容进行填充(wrap_content),那么两个按钮的高度就是网格布局的高度。

整体代码:
<?xml version="1.0" encoding="utf-8"?>
<GridLayout xmlns:android="http://schemas.android.com/apk/res/android"xmlns:tools="http://schemas.android.com/tools"android:layout_width="match_parent"android:layout_height="wrap_content"android:rowCount="2"android:columnCount="4"tools:context=".MainActivity"><Button android:layout_width="wrap_content"android:layout_height="wrap_content"android:layout_columnSpan="2"android:layout_gravity="fill_horizontal"android:text="按钮1"/>
<!--    <Button android:layout_width="wrap_content"-->
<!--        android:layout_height="wrap_content"-->
<!--        android:text="按钮2"/>--><Button android:layout_width="wrap_content"android:layout_height="wrap_content"android:layout_rowSpan="2"android:layout_gravity="fill_vertical"android:text="按钮3"/><Button android:layout_width="wrap_content"android:layout_height="wrap_content"android:text="按钮4"/><Button android:layout_width="wrap_content"android:layout_height="wrap_content"android:text="按钮5"/><Button android:layout_width="wrap_content"android:layout_height="wrap_content"android:text="按钮6"/>
<!--    <Button android:layout_width="wrap_content"-->
<!--        android:layout_height="wrap_content"-->
<!--        android:text="按钮7"/>--><Button android:layout_width="wrap_content"android:layout_height="wrap_content"android:text="按钮8"/>
</GridLayout>
进阶
首先设置2行4列的排版
<?xml version="1.0" encoding="utf-8"?>
<GridLayout xmlns:android="http://schemas.android.com/apk/res/android"xmlns:tools="http://schemas.android.com/tools"android:layout_width="match_parent"android:layout_height="wrap_content"android:rowCount="2"android:columnCount="4"tools:context=".MainActivity"><Button android:layout_width="wrap_content"android:layout_height="wrap_content"android:text="按钮1"/><Button android:layout_width="wrap_content"android:layout_height="wrap_content"android:text="按钮2"/><Button android:layout_width="wrap_content"android:layout_height="wrap_content"android:text="按钮3"/><Button android:layout_width="wrap_content"android:layout_height="wrap_content"android:text="按钮4"/><Button android:layout_width="wrap_content"android:layout_height="wrap_content"android:text="按钮5"/><Button android:layout_width="wrap_content"android:layout_height="wrap_content"android:text="按钮6"/><Button android:layout_width="wrap_content"android:layout_height="wrap_content"android:text="按钮7"/><Button android:layout_width="wrap_content"android:layout_height="wrap_content"android:text="按钮8"/>
</GridLayout>
实现水平均分铺满排版

原谅:手动绘制四个水平均分的按钮,很难绘制准确。大家看上图的时候,务必把四个蓝色组件框看成是一样大小的,每个宽度占红色宽度的1/4
思路:1)水平铺满,则网格布局的宽度要设置为占满父容器;2)其次,每个按钮要均分宽度,那么宽度就是不知道的,所以设置为0dp,并且还要告诉每个组件所占相等。
第一步:设置网格布局的宽度要设置为占满父容器

第二步:设置组件宽度为0dp,占比相等
核心代码:
android:layout_width="0dp"
android:layout_columnWeight="1"
注意:设置的是列占比权重相等,水平方向上均分列,看起来水平方向上每个组件宽度相等。
完整代码:
<?xml version="1.0" encoding="utf-8"?>
<GridLayout xmlns:android="http://schemas.android.com/apk/res/android"xmlns:tools="http://schemas.android.com/tools"android:layout_width="match_parent"android:layout_height="wrap_content"android:rowCount="2"android:columnCount="4"tools:context=".MainActivity"><Button android:layout_width="0dp"android:layout_columnWeight="1"android:layout_height="wrap_content"android:text="按钮1"/><Button android:layout_width="0dp"android:layout_columnWeight="1"android:layout_height="wrap_content"android:text="按钮2"/><Button android:layout_width="0dp"android:layout_columnWeight="1"android:layout_height="wrap_content"android:text="按钮3"/><Button android:layout_width="0dp"android:layout_columnWeight="1"android:layout_height="wrap_content"android:text="按钮4"/><Button android:layout_width="0dp"android:layout_columnWeight="1"android:layout_height="wrap_content"android:text="按钮5"/><Button android:layout_width="0dp"android:layout_columnWeight="1"android:layout_height="wrap_content"android:text="按钮6"/><Button android:layout_width="0dp"android:layout_columnWeight="1"android:layout_height="wrap_content"android:text="按钮7"/><Button android:layout_width="0dp"android:layout_columnWeight="1"android:layout_height="wrap_content"android:text="按钮8"/>
</GridLayout>
实现垂直均分铺满排版
希望的结果是:

当然,如果每列都设置为垂直均分,那么,每列效果都应该和第一列效果一致。
思路:1)垂直铺满,则网格布局的高度要设置为占满父容器;2)其次,每个按钮要均分宽度,那么高度就是不知道的,所以设置为0dp,并且还要告诉每个组件所占相等。
核心代码:
android:layout_height="0dp"android:layout_rowWeight="1"1)垂直铺满,则网格布局的高度要设置为占满父容器

第二步:设置组件高度为0dp,占比相等
android:layout_height="0dp"
android:layout_rowWeight="1"
完整代码:
<?xml version="1.0" encoding="utf-8"?>
<GridLayout xmlns:android="http://schemas.android.com/apk/res/android"xmlns:tools="http://schemas.android.com/tools"android:layout_width="match_parent"android:layout_height="match_parent"android:rowCount="2"android:columnCount="4"tools:context=".MainActivity"><Button android:layout_width="wrap_content"android:layout_height="0dp"android:layout_rowWeight="1"android:text="按钮1"/><Button android:layout_width="wrap_content"android:layout_height="0dp"android:layout_rowWeight="1"android:text="按钮2"/><Button android:layout_width="wrap_content"android:layout_height="0dp"android:layout_rowWeight="1"android:text="按钮3"/><Button android:layout_width="wrap_content"android:layout_height="0dp"android:layout_rowWeight="1"android:text="按钮4"/><Button android:layout_width="wrap_content"android:layout_height="0dp"android:layout_rowWeight="1"android:text="按钮5"/><Button android:layout_width="wrap_content"android:layout_height="0dp"android:layout_rowWeight="1"android:text="按钮6"/><Button android:layout_width="wrap_content"android:layout_height="0dp"android:layout_rowWeight="1"android:text="按钮7"/><Button android:layout_width="wrap_content"android:layout_height="0dp"android:layout_rowWeight="1"android:text="按钮8"/>
</GridLayout>
实现全屏均分铺满排版
根据上述两个案例的学习,可以发现,水平均分则垂直方向出现空白,垂直均分,则右侧出现空白


要实现垂直和水平方向都实现均分,则将两则融合起来即可。
思路:1)网格布局的宽高均要填充满父容器;2)设置宽高均为0dp,列和行上的占比均相等

核心代码:
android:layout_width="0dp"
android:height="0dp"
android:layout_rowWeight="1"
android:layout_columnWeight="1"
完整代码和效果
<?xml version="1.0" encoding="utf-8"?>
<GridLayout xmlns:android="http://schemas.android.com/apk/res/android"xmlns:tools="http://schemas.android.com/tools"android:layout_width="match_parent"android:layout_height="match_parent"android:rowCount="2"android:columnCount="4"tools:context=".MainActivity"><Button android:layout_width="0dp"android:height="0dp"android:layout_rowWeight="1"android:layout_columnWeight="1"android:text="按钮1"/><Button android:layout_width="0dp"android:height="0dp"android:layout_rowWeight="1"android:layout_columnWeight="1"android:text="按钮2"/><Button android:layout_width="0dp"android:height="0dp"android:layout_rowWeight="1"android:layout_columnWeight="1"android:text="按钮3"/><Button android:layout_width="0dp"android:height="0dp"android:layout_rowWeight="1"android:layout_columnWeight="1"android:text="按钮4"/><Button android:layout_width="0dp"android:height="0dp"android:layout_rowWeight="1"android:layout_columnWeight="1"android:text="按钮5"/><Button android:layout_width="0dp"android:height="0dp"android:layout_rowWeight="1"android:layout_columnWeight="1"android:text="按钮6"/><Button android:layout_width="0dp"android:height="0dp"android:layout_rowWeight="1"android:layout_columnWeight="1"android:text="按钮7"/><Button android:layout_width="0dp"android:height="0dp"android:layout_rowWeight="1"android:layout_columnWeight="1"android:text="按钮8"/>
</GridLayout>
测试1:你真的学会了吗?试试吧
目标:设计如下界面

参考代码:
<?xml version="1.0" encoding="utf-8"?>
<GridLayout xmlns:android="http://schemas.android.com/apk/res/android"android:layout_width="match_parent"android:layout_height="wrap_content"android:rowCount="6"android:columnCount="4"android:useDefaultMargins="true"><EditText android:layout_width="wrap_content"android:layout_height="wrap_content"android:layout_columnWeight="3"android:layout_columnSpan="3"android:hint="0"android:gravity="right"android:background="@null"/><TextView android:layout_width="wrap_content"android:layout_height="wrap_content"android:layout_columnWeight="1"android:gravity="center"android:text="/"/><TextView android:layout_width="wrap_content"android:layout_height="wrap_content"android:layout_columnWeight="1"android:background="#eeeeee"android:gravity="center"android:text="1"/><TextView android:layout_width="wrap_content"android:layout_height="wrap_content"android:layout_columnWeight="1"android:background="#eeeeee"android:gravity="center"android:text="2"/><TextView android:layout_width="wrap_content"android:layout_height="wrap_content"android:layout_columnWeight="1"android:background="#eeeeee"android:gravity="center"android:text="3"/><TextView android:layout_width="wrap_content"android:layout_height="wrap_content"android:layout_columnWeight="1"android:background="#eeeeee"android:gravity="center"android:text="*"/><!--第3行--><TextView android:layout_width="wrap_content"android:layout_height="wrap_content"android:layout_columnWeight="1"android:background="#eeeeee"android:gravity="center"android:text="4"/><TextView android:layout_width="wrap_content"android:layout_height="wrap_content"android:layout_columnWeight="1"android:background="#eeeeee"android:gravity="center"android:text="5"/><TextView android:layout_width="wrap_content"android:layout_height="wrap_content"android:layout_columnWeight="1"android:background="#eeeeee"android:gravity="center"android:text="6"/><TextView android:layout_width="wrap_content"android:layout_height="wrap_content"android:layout_columnWeight="1"android:background="#eeeeee"android:gravity="center"android:text="-"/><!--第4行--><TextView android:layout_width="wrap_content"android:layout_height="wrap_content"android:layout_columnWeight="1"android:background="#eeeeee"android:gravity="center"android:text="7"/><TextView android:layout_width="wrap_content"android:layout_height="wrap_content"android:layout_columnWeight="1"android:background="#eeeeee"android:gravity="center"android:text="8"/><TextView android:layout_width="wrap_content"android:layout_height="wrap_content"android:layout_columnWeight="1"android:background="#eeeeee"android:gravity="center"android:text="9"/><TextView android:layout_width="wrap_content"android:layout_height="wrap_content"android:layout_columnWeight="1"android:background="#eeeeee"android:layout_rowSpan="3"android:layout_gravity="fill"android:gravity="center"android:text="+"/><TextView android:layout_width="wrap_content"android:layout_height="wrap_content"android:layout_columnWeight="1"android:background="#eeeeee"android:gravity="center"android:text="0"/><TextView android:layout_width="wrap_content"android:layout_height="wrap_content"android:layout_columnWeight="1"android:background="#eeeeee"android:gravity="center"android:layout_columnSpan="2"android:text="00"/><TextView android:layout_width="wrap_content"android:layout_height="wrap_content"android:layout_columnWeight="1"android:background="#eeeeee"android:gravity="center"android:layout_columnSpan="3"android:text="="/>
</GridLayout>
相信排版是没有问题的,但是和效果图一模一样,还是需要进行精细化处理
1)由于底部有空白,所以高度不可能是占满,可以选择根据内容自动设置高度
2)其次,组件之间有间隔,可以使用默认的外边距
综合核心代码是:
android:layout_height="wrap_content"
android:useDefaultMargins="true"
3)然后是第一个组件,特点是占据了3列,所以不仅要设置跨列,还要设置占比为其他组件的3倍;文字右对齐;如果使用的是编辑框,则会出现下划线,这个下划线需要去掉
综合核心代码是:
android:layout_columnWeight="3"
android:layout_columnSpan="3"
android:gravity="right"
android:background="@null"
4) 其他组件依次排列,实现跨行和跨列即可
测试2:你真的学会了吗?把界面放大试试

参考代码:
<?xml version="1.0" encoding="utf-8"?>
<GridLayout xmlns:android="http://schemas.android.com/apk/res/android"android:layout_width="match_parent"android:layout_height="match_parent"android:rowCount="6"android:columnCount="4"android:useDefaultMargins="true"><EditTextandroid:layout_width="0dp"android:layout_height="wrap_content"android:layout_columnSpan="3"android:layout_columnWeight="3"android:layout_rowWeight="1"android:layout_gravity="fill"android:background="@null"android:gravity="right|center_vertical"android:hint="0" /><TextViewandroid:layout_width="wrap_content"android:layout_height="wrap_content"android:layout_columnWeight="1"android:layout_rowWeight="1"android:gravity="center"android:background="#eeeeee"android:text="/" /><TextViewandroid:layout_width="wrap_content"android:layout_height="wrap_content"android:layout_columnWeight="1"android:background="#eeeeee"android:layout_rowWeight="1"android:gravity="center"android:text="1" /><TextViewandroid:layout_width="wrap_content"android:layout_height="wrap_content"android:layout_columnWeight="1"android:background="#eeeeee"android:layout_rowWeight="1"android:gravity="center"android:text="2" /><TextViewandroid:layout_width="wrap_content"android:layout_height="wrap_content"android:layout_columnWeight="1"android:background="#eeeeee"android:gravity="center"android:layout_rowWeight="1"android:text="3" /><TextViewandroid:layout_width="wrap_content"android:layout_height="wrap_content"android:layout_columnWeight="1"android:background="#eeeeee"android:layout_rowWeight="1"android:gravity="center"android:text="*" /><!--第3行--><TextViewandroid:layout_width="wrap_content"android:layout_height="wrap_content"android:layout_columnWeight="1"android:background="#eeeeee"android:layout_rowWeight="1"android:gravity="center"android:text="4" /><TextViewandroid:layout_width="wrap_content"android:layout_height="wrap_content"android:layout_columnWeight="1"android:layout_rowWeight="1"android:background="#eeeeee"android:gravity="center"android:text="5" /><TextViewandroid:layout_width="wrap_content"android:layout_height="wrap_content"android:layout_columnWeight="1"android:layout_rowWeight="1"android:background="#eeeeee"android:gravity="center"android:text="6" /><TextViewandroid:layout_width="wrap_content"android:layout_height="wrap_content"android:layout_columnWeight="1"android:background="#eeeeee"android:layout_rowWeight="1"android:gravity="center"android:text="-" /><!--第4行--><TextViewandroid:layout_width="wrap_content"android:layout_height="wrap_content"android:layout_columnWeight="1"android:background="#eeeeee"android:layout_rowWeight="1"android:gravity="center"android:text="7" /><TextViewandroid:layout_width="wrap_content"android:layout_height="wrap_content"android:layout_columnWeight="1"android:background="#eeeeee"android:layout_rowWeight="1"android:gravity="center"android:text="8" /><TextViewandroid:layout_width="wrap_content"android:layout_height="wrap_content"android:layout_columnWeight="1"android:background="#eeeeee"android:layout_rowWeight="1"android:gravity="center"android:text="9" /><TextViewandroid:layout_width="wrap_content"android:layout_height="wrap_content"android:layout_rowSpan="3"android:layout_columnWeight="1"android:layout_gravity="fill"android:background="#eeeeee"android:gravity="center"android:layout_rowWeight="1"android:text="+" /><TextViewandroid:layout_width="wrap_content"android:layout_height="wrap_content"android:layout_columnWeight="1"android:background="#eeeeee"android:gravity="center"android:layout_rowWeight="1"android:text="0" /><TextViewandroid:layout_width="wrap_content"android:layout_height="wrap_content"android:layout_columnSpan="2"android:layout_columnWeight="1"android:background="#eeeeee"android:gravity="center"android:layout_rowWeight="1"android:text="00" /><TextViewandroid:layout_width="wrap_content"android:layout_height="wrap_content"android:layout_columnSpan="3"android:layout_columnWeight="1"android:background="#eeeeee"android:gravity="center"android:layout_rowWeight="1"android:text="=" />
</GridLayout>
核心思想:1)要铺满,所以宽高都要占满父容器
android:layout_width="match_parent"
android:layout_height="match_parent"
2) 其次,第一个编辑框,要设置右对齐,且要文字垂直居中对齐
核心代码:
android:gravity="right|center_vertical"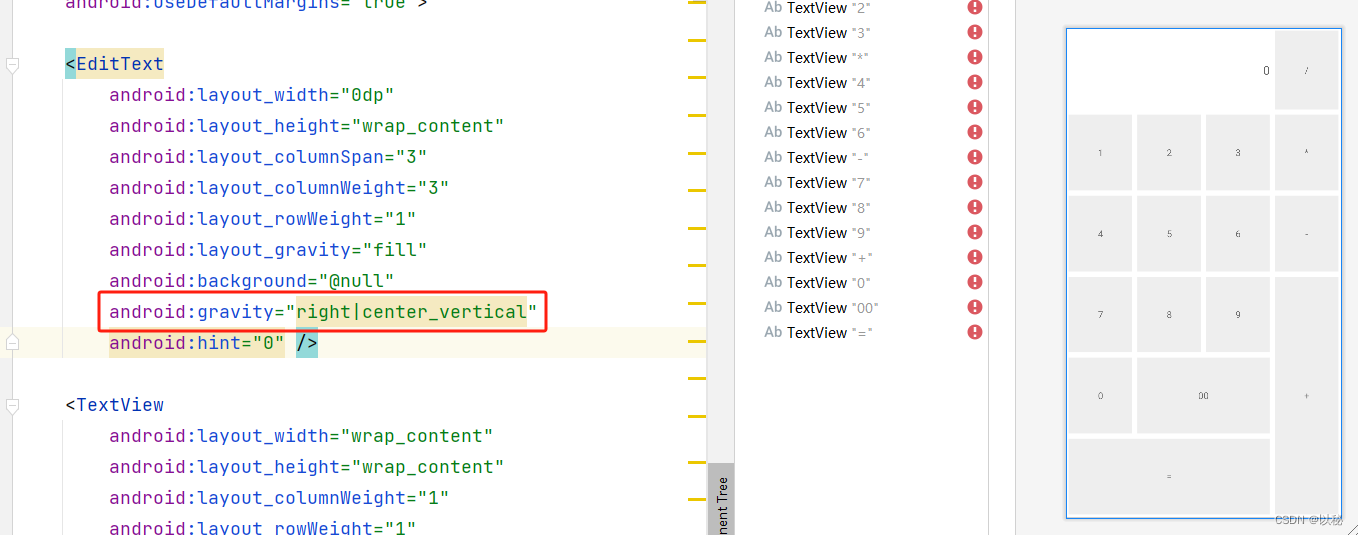
PS:
android:gravity="center"这个属性的设置,目的是让TextView中的文字在TextView内部垂直水平居中显示。
这篇关于(七)Android布局类型(网格布局GridLayout)的文章就介绍到这儿,希望我们推荐的文章对编程师们有所帮助!


