本文主要是介绍【Poi-tl Documentation】区块对标签显示隐藏改造,希望对大家解决编程问题提供一定的参考价值,需要的开发者们随着小编来一起学习吧!
前置说明:
<dependency><groupId>com.deepoove</groupId><artifactId>poi-tl</artifactId><version>1.12.1</version>
</dependency>
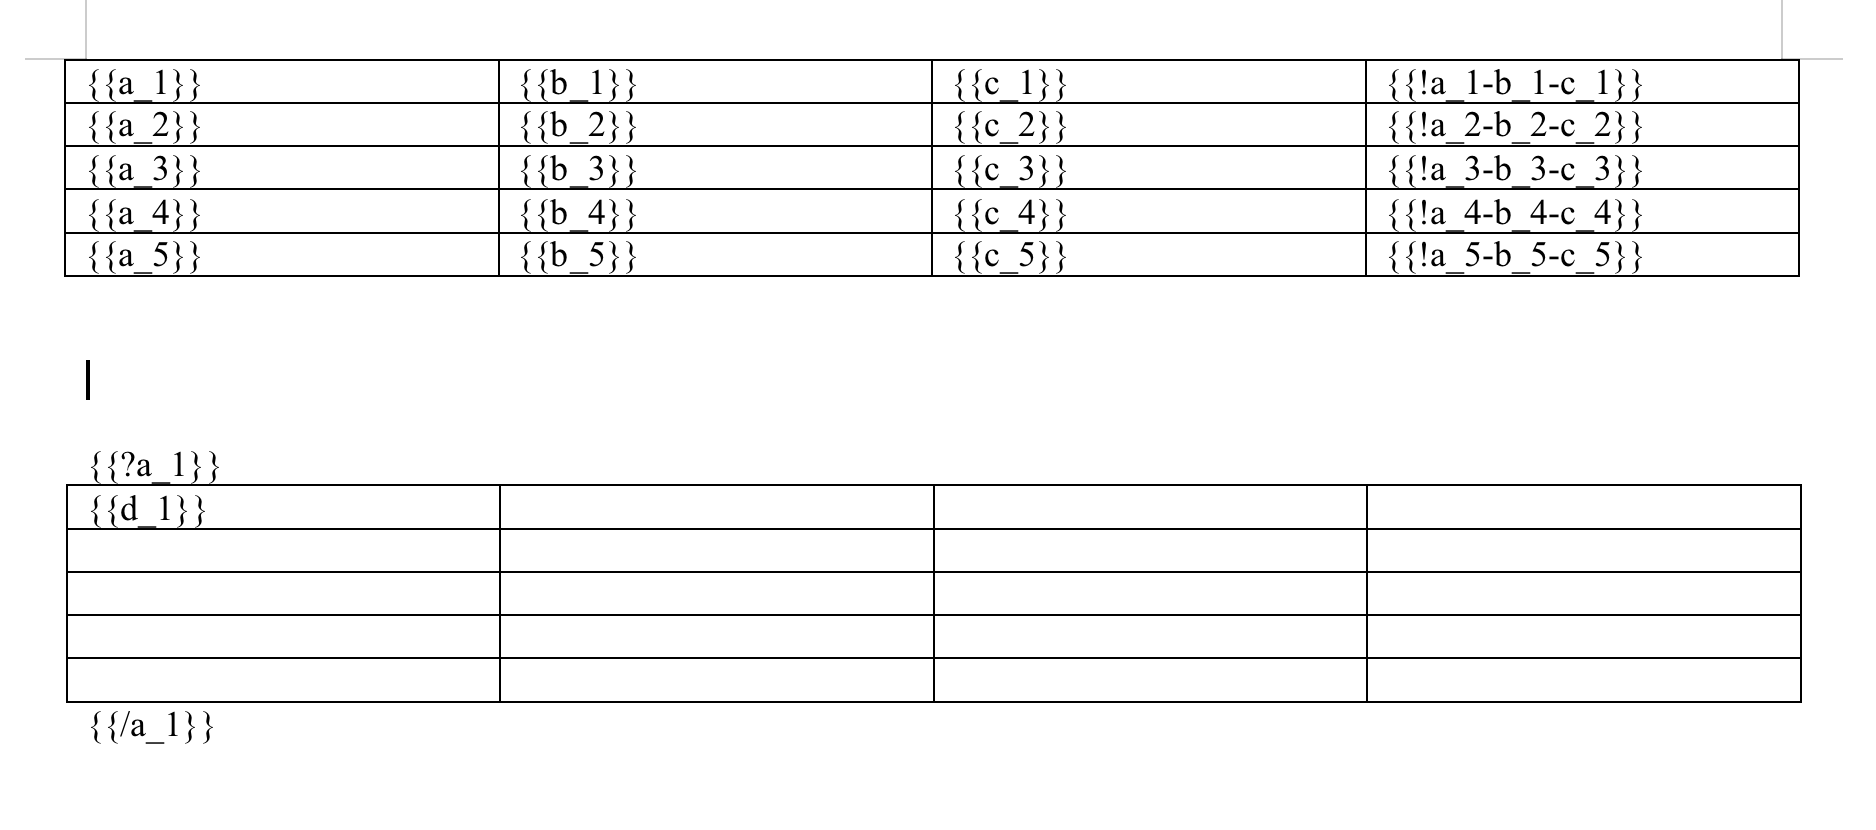
模板:
删除行表格测试.docx
改造前测试效果
package run.siyuan.poi.tl.区对块的改造;import com.deepoove.poi.XWPFTemplate;
import com.deepoove.poi.config.Configure;
import com.deepoove.poi.config.ConfigureBuilder;
import com.deepoove.poi.render.RenderContext;
import com.deepoove.poi.xwpf.BodyContainer;
import com.deepoove.poi.xwpf.BodyContainerFactory;
import org.apache.poi.xwpf.usermodel.XWPFRun;
import run.siyuan.poi.tl.policy.CustomRenderPolicy;import java.io.*;
import java.util.HashMap;
import java.util.Map;public class Main {public static void main(String[] args) throws Exception {test1();}public static void test1() throws IOException {// 读取模板文件FileInputStream fileInputStream = new FileInputStream("/Users/wuzhiqian/Desktop/HY/删除行表格测试.docx");// 创建模板配置ConfigureBuilder configureBuilder = Configure.builder();configureBuilder.buildGrammerRegex("((#)?[\\w\\u4e00-\\u9fa5\\-]+(\\.[\\w\\u4e00-\\u9fa5\\-]+)*)?");configureBuilder.setValidErrorHandler(new Configure.ClearHandler() {@Overridepublic void handler(RenderContext<?> context) {System.out.println("++++++++++++++++++++++++++++++++++++++++++++++++++++++");try {XWPFRun run = context.getRun();run.setText("/");BodyContainer bodyContainer = BodyContainerFactory.getBodyContainer(run);bodyContainer.clearPlaceholder(run);} catch (Exception e) {System.out.println("标签不存在-------------------------------------------");}}});// 创建模板上下文Map<String, Object> context = new HashMap<>();context.put("a_1", "1");context.put("b_1", "2");context.put("c_1", "3");context.put("a_2", "4");context.put("b_2", "5");context.put("c_2", "6");context.put("a_3", "7");context.put("b_3", "8");context.put("c_3", "9");context.put("a_4", "10");context.put("b_4", "11");context.put("c_4", "12");context.put("a_5", "13");context.put("b_5", "14");context.put("c_5", "15");context.put("d_1", "16");configureBuilder.addPlugin('!', new CustomRenderPolicy(context));// 使用模板引擎替换文本标签XWPFTemplate compile = XWPFTemplate.compile(fileInputStream, configureBuilder.build());compile.render(context);// 保存生成的文档FileOutputStream outputStream = new FileOutputStream("/Users/wuzhiqian/Desktop/HY/删除行表格测试_" + System.currentTimeMillis() + ".docx");compile.write(outputStream);outputStream.close();compile.close();fileInputStream.close();}}
运行后的效果:

显示没有问题,但是不是我想要的效果,我想要的效果
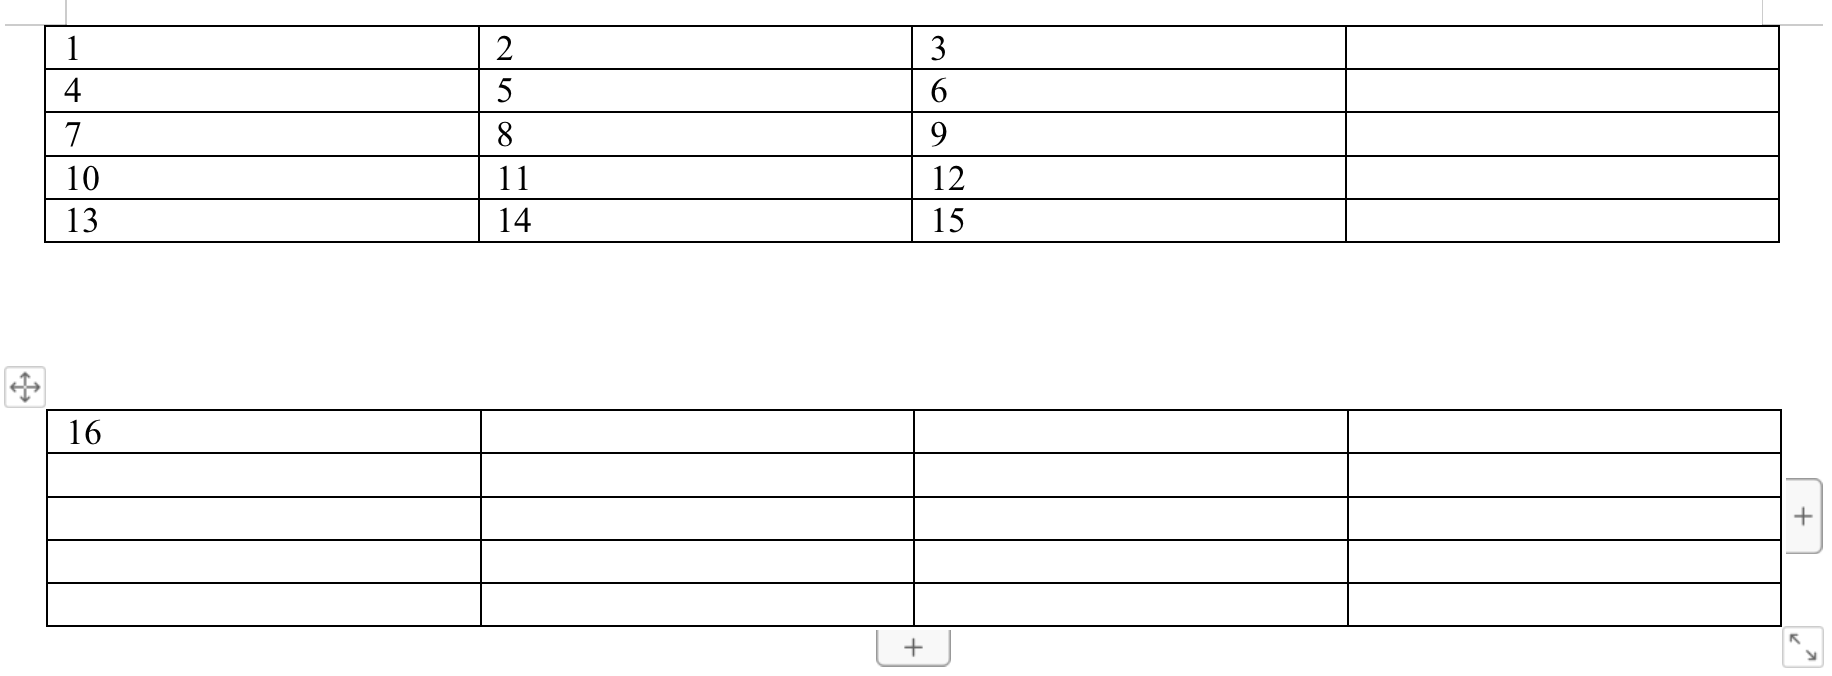
就是通过一个非bool的字段就能判断出我这个区块对的是否显示。
改造开始中
package run.siyuan.poi.tl.区对块的改造;import com.deepoove.poi.XWPFTemplate;
import com.deepoove.poi.render.compute.RenderDataCompute;
import com.deepoove.poi.render.processor.DocumentProcessor;
import com.deepoove.poi.render.processor.IterableProcessor;
import com.deepoove.poi.resolver.Resolver;
import com.deepoove.poi.template.IterableTemplate;
import com.deepoove.poi.template.MetaTemplate;
import com.deepoove.poi.xwpf.BodyContainer;
import com.deepoove.poi.xwpf.BodyContainerFactory;import java.util.List;/*** @ClassName CustomIterableProcessor* @Description TODO 自定义迭代起处理方法* @Author siyuan* @Date 2024/3/14 23:32*/
public class CustomIterableProcessor extends IterableProcessor {public CustomIterableProcessor(XWPFTemplate template, Resolver resolver, RenderDataCompute renderDataCompute) {super(template, resolver, renderDataCompute);}public void visit(IterableTemplate iterableTemplate) {this.logger.info("【custom】 Process iterableTemplate:{}", iterableTemplate);
//        super.visit(iterableTemplate);BodyContainer bodyContainer = BodyContainerFactory.getBodyContainer(iterableTemplate);// 数据Object compute = this.renderDataCompute.compute(iterableTemplate.getStartMark().getTagName());if (null == compute || compute instanceof Boolean && !(Boolean) compute) {this.handleNever(iterableTemplate, bodyContainer);} else if (compute instanceof Iterable) { // 数据为集合时this.handleIterable(iterableTemplate, bodyContainer, (Iterable) compute);} else if (compute instanceof Boolean && (Boolean) compute) { // 数据为 bool 时this.handleOnceWithScope(iterableTemplate, this.renderDataCompute);} else if (compute instanceof String) { // TODO 数据为字符串时this.handleOnceWithScope(iterableTemplate, this.renderDataCompute);} else if (compute instanceof Number) { // TODO 数据为数字时this.handleOnceWithScope(iterableTemplate, this.renderDataCompute);} else {// 初上出两种类型意外的数据this.handleOnce(iterableTemplate, compute);}this.afterHandle(iterableTemplate, bodyContainer);}}
这块代码主要是新增了 String 和 Number 判断,this.renderDataCompute 相当于示例中的 context,conpute 相当于 a_1 对应的值 1。
package run.siyuan.poi.tl.区对块的改造;import com.deepoove.poi.XWPFTemplate;
import com.deepoove.poi.render.compute.RenderDataCompute;
import com.deepoove.poi.render.processor.DocumentProcessor;
import com.deepoove.poi.render.processor.ElementProcessor;
import com.deepoove.poi.render.processor.InlineIterableProcessor;
import com.deepoove.poi.resolver.Resolver;
import com.deepoove.poi.template.*;
import com.deepoove.poi.template.run.RunTemplate;
import com.deepoove.poi.xwpf.XWPFTextboxContent;
import org.apache.commons.collections4.CollectionUtils;
import org.apache.poi.xwpf.usermodel.XWPFParagraph;import java.util.HashSet;
import java.util.List;
import java.util.Set;/*** @ClassName CustomDocumentProcessor* @Description TODO* @Author siyuan* @Date 2024/3/16 15:27*/
public class CustomDocumentProcessor extends DocumentProcessor {private ElementProcessor elementProcessor;private CustomIterableProcessor iterableProcessor;private InlineIterableProcessor inlineIterableProcessor;public CustomDocumentProcessor(XWPFTemplate template, Resolver resolver, RenderDataCompute renderDataCompute) {super(template, resolver, renderDataCompute);this.elementProcessor = new ElementProcessor(template, resolver, renderDataCompute);this.iterableProcessor = new CustomIterableProcessor(template, resolver, renderDataCompute);this.inlineIterableProcessor = new InlineIterableProcessor(template, resolver, renderDataCompute);}public void process(List<MetaTemplate> templates) {templates.forEach((template) -> {template.accept(this);});Set<XWPFTextboxContent> textboxs = this.obtainTextboxes(templates);textboxs.forEach((content) -> {content.getXmlObject().set(content.getCTTxbxContent());});}private Set<XWPFTextboxContent> obtainTextboxes(List<MetaTemplate> templates) {Set<XWPFTextboxContent> textboxs = new HashSet();if (CollectionUtils.isEmpty(templates)) {return textboxs;} else {templates.forEach((template) -> {RunTemplate checkTemplate = template instanceof RunTemplate ? (RunTemplate) template : (template instanceof BlockTemplate ? ((BlockTemplate) template).getStartMark() : null);if (null != checkTemplate && checkTemplate.getRun().getParent() instanceof XWPFParagraph && checkTemplate.getRun().getParagraph().getBody() instanceof XWPFTextboxContent) {textboxs.add((XWPFTextboxContent) checkTemplate.getRun().getParagraph().getBody());}});return textboxs;}}public void visit(InlineIterableTemplate iterableTemplate) {iterableTemplate.accept(this.inlineIterableProcessor);}public void visit(IterableTemplate iterableTemplate) {iterableTemplate.accept(this.iterableProcessor);}public void visit(RunTemplate runTemplate) {runTemplate.accept(this.elementProcessor);}public void visit(PictureTemplate pictureTemplate) {pictureTemplate.accept(this.elementProcessor);}public void visit(PictImageTemplate pictImageTemplate) {pictImageTemplate.accept(this.elementProcessor);}public void visit(ChartTemplate chartTemplate) {chartTemplate.accept(this.elementProcessor);}
}
新增完 CustomIterableProcessor 类之后就是使用起来,在 CustomDocumentProcessor 中使用起来。
package run.siyuan.poi.tl.区对块的改造;import com.deepoove.poi.XWPFTemplate;
import com.deepoove.poi.exception.RenderException;
import com.deepoove.poi.policy.DocxRenderPolicy;
import com.deepoove.poi.policy.RenderPolicy;
import com.deepoove.poi.render.DefaultRender;
import com.deepoove.poi.render.compute.RenderDataCompute;
import com.deepoove.poi.render.processor.DelegatePolicy;
import com.deepoove.poi.render.processor.LogProcessor;
import com.deepoove.poi.template.MetaTemplate;
import com.deepoove.poi.template.run.RunTemplate;
import com.deepoove.poi.xwpf.NiceXWPFDocument;
import org.apache.commons.lang3.time.StopWatch;
import org.slf4j.Logger;
import org.slf4j.LoggerFactory;import java.io.IOException;
import java.util.List;
import java.util.Objects;
import java.util.concurrent.TimeUnit;/*** @ClassName CustomDefaultRender* @Description TODO* @Author siyuan* @Date 2024/3/16 15:25*/
public class CustomDefaultRender extends DefaultRender {private static final Logger LOGGER = LoggerFactory.getLogger(DefaultRender.class);public CustomDefaultRender() {}public void render(XWPFTemplate template, Object root) {Objects.requireNonNull(template, "Template must not be null.");Objects.requireNonNull(root, "Data root must not be null");LOGGER.info("Render template start...");RenderDataCompute renderDataCompute = template.getConfig().getRenderDataComputeFactory().newCompute(root);StopWatch watch = new StopWatch();try {watch.start();this.renderTemplate(template, renderDataCompute);this.renderInclude(template, renderDataCompute);} catch (Exception var9) {if (var9 instanceof RenderException) {throw (RenderException)var9;}throw new RenderException("Cannot render docx template", var9);} finally {watch.stop();}LOGGER.info("Successfully Render template in {} millis", TimeUnit.NANOSECONDS.toMillis(watch.getNanoTime()));}private void renderTemplate(XWPFTemplate template, RenderDataCompute renderDataCompute) {(new LogProcessor()).process(template.getElementTemplates());// TODO 调用自定义的 DocumentProcessorCustomDocumentProcessor documentRender = new CustomDocumentProcessor(template, template.getResolver(), renderDataCompute);documentRender.process(template.getElementTemplates());}private void renderInclude(XWPFTemplate template, RenderDataCompute renderDataCompute) throws IOException {List<MetaTemplate> elementTemplates = template.getElementTemplates();long docxCount = elementTemplates.stream().filter((meta) -> {return meta instanceof RunTemplate && ((RunTemplate)meta).findPolicy(template.getConfig()) instanceof DocxRenderPolicy;}).count();if (docxCount >= 1L) {template.reload(template.getXWPFDocument().generate());this.applyDocxPolicy(template, renderDataCompute, docxCount);}}private void applyDocxPolicy(XWPFTemplate template, RenderDataCompute renderDataCompute, long docxItems) {RenderPolicy policy = null;NiceXWPFDocument current = template.getXWPFDocument();List<MetaTemplate> elementTemplates = template.getElementTemplates();int k = 0;while(true) {while(k < elementTemplates.size()) {for(int j = 0; j < elementTemplates.size(); k = j) {MetaTemplate metaTemplate = (MetaTemplate)elementTemplates.get(j);if (metaTemplate instanceof RunTemplate) {RunTemplate runTemplate = (RunTemplate)metaTemplate;policy = runTemplate.findPolicy(template.getConfig());if (policy instanceof DocxRenderPolicy) {DelegatePolicy.invoke(policy, runTemplate, renderDataCompute.compute(runTemplate.getTagName()), template);if (current != template.getXWPFDocument()) {current = template.getXWPFDocument();elementTemplates = template.getElementTemplates();k = 0;break;}}}++j;}}return;}}}
接着就是使用 CustomDocumentProcessor 类型了,CustomDefaultRender 中的 64 行。
package run.siyuan.poi.tl.区对块的改造;import com.deepoove.poi.XWPFTemplate;
import com.deepoove.poi.config.Configure;
import com.deepoove.poi.exception.ResolverException;
import com.deepoove.poi.resolver.TemplateResolver;
import com.deepoove.poi.xwpf.NiceXWPFDocument;import java.io.InputStream;
import java.lang.reflect.Constructor;
import java.lang.reflect.Field;/*** @ClassName CustomXWPFTemplate* @Description TODO* @Author siyuan* @Date 2024/3/16 15:23*/
public class CustomXWPFTemplate {/*** 模拟 {@link XWPFTemplate} 类 {@link #compile(InputStream, Configure)} 方法,通过反射的方式来创建 {@link XWPFTemplate} 并给属性赋值,** @param inputStream* @param config* @return {@link XWPFTemplate}*/public static XWPFTemplate compile(InputStream inputStream, Configure config) {try {Class<XWPFTemplate> xwpfTemplateClass = XWPFTemplate.class;Field docFiled = xwpfTemplateClass.getDeclaredField("doc");docFiled.setAccessible(true);NiceXWPFDocument niceXWPFDocument = new NiceXWPFDocument(inputStream);Field configFiled = xwpfTemplateClass.getDeclaredField("config");configFiled.setAccessible(true);Field resolverFiled = xwpfTemplateClass.getDeclaredField("resolver");resolverFiled.setAccessible(true);Field rendererFiled = xwpfTemplateClass.getDeclaredField("renderer");rendererFiled.setAccessible(true);Field eleTemplatesFiled = xwpfTemplateClass.getDeclaredField("eleTemplates");eleTemplatesFiled.setAccessible(true);Constructor<XWPFTemplate> declaredConstructor = xwpfTemplateClass.getDeclaredConstructor();declaredConstructor.setAccessible(true);XWPFTemplate xwpfTemplate = declaredConstructor.newInstance();docFiled.set(xwpfTemplate, niceXWPFDocument);configFiled.set(xwpfTemplate, config);TemplateResolver templateResolver = new TemplateResolver(config);resolverFiled.set(xwpfTemplate, templateResolver);// TODO 使用自定义的 CustomDefaultRenderrendererFiled.set(xwpfTemplate, new CustomDefaultRender());eleTemplatesFiled.set(xwpfTemplate, templateResolver.resolveDocument(niceXWPFDocument));return xwpfTemplate;} catch (Exception e) {throw new ResolverException("Compile template failed", e);}}}
最后就是用我们自定义的 CustomDefaultRender 了,因为 XWPFTemplate 构造函数是 private,不能使用继承的方式实现,最后我们通过反射的方式来处理,模拟 XWPFTemplate.compile(InputStream, Configure) 方法,通过反射的方式来创建 XWPFTemplate 并给属性赋值,renderer 使用我们自定会的 CustomDefaultRender。
这次改造过程中涉及到的很多方法都是从原有的方法中赋值,改动的部分很少。
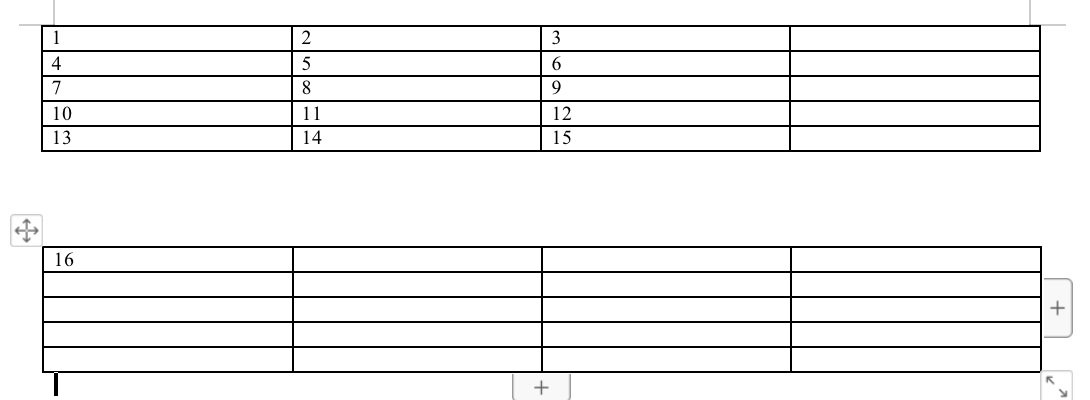
改造后测试效果
package run.siyuan.poi.tl.区对块的改造;import com.deepoove.poi.XWPFTemplate;
import com.deepoove.poi.config.Configure;
import com.deepoove.poi.config.ConfigureBuilder;
import com.deepoove.poi.render.RenderContext;
import com.deepoove.poi.xwpf.BodyContainer;
import com.deepoove.poi.xwpf.BodyContainerFactory;
import org.apache.poi.xwpf.usermodel.XWPFRun;
import run.siyuan.poi.tl.policy.CustomRenderPolicy;import java.io.*;
import java.util.HashMap;
import java.util.Map;public class Main {public static void main(String[] args) throws Exception {test1();}public static void test1() throws IOException {// 读取模板文件FileInputStream fileInputStream = new FileInputStream("/Users/wuzhiqian/Desktop/HY/删除行表格测试.docx");// 创建模板配置ConfigureBuilder configureBuilder = Configure.builder();configureBuilder.buildGrammerRegex("((#)?[\\w\\u4e00-\\u9fa5\\-]+(\\.[\\w\\u4e00-\\u9fa5\\-]+)*)?");configureBuilder.setValidErrorHandler(new Configure.ClearHandler() {@Overridepublic void handler(RenderContext<?> context) {System.out.println("++++++++++++++++++++++++++++++++++++++++++++++++++++++");try {XWPFRun run = context.getRun();run.setText("/");BodyContainer bodyContainer = BodyContainerFactory.getBodyContainer(run);bodyContainer.clearPlaceholder(run);} catch (Exception e) {System.out.println("标签不存在-------------------------------------------");}}});// 创建模板上下文Map<String, Object> context = new HashMap<>();context.put("a_1", "1");context.put("b_1", "2");context.put("c_1", "3");context.put("a_2", "4");context.put("b_2", "5");context.put("c_2", "6");context.put("a_3", "7");context.put("b_3", "8");context.put("c_3", "9");context.put("a_4", "10");context.put("b_4", "11");context.put("c_4", "12");context.put("a_5", "13");context.put("b_5", "14");context.put("c_5", "15");context.put("d_1", "16");configureBuilder.addPlugin('!', new CustomRenderPolicy(context));// 使用模板引擎替换文本标签XWPFTemplate compile = CustomXWPFTemplate.compile(fileInputStream, configureBuilder.build());compile.render(context);// 保存生成的文档FileOutputStream outputStream = new FileOutputStream("/Users/wuzhiqian/Desktop/HY/删除行表格测试_" + System.currentTimeMillis() + ".docx");compile.write(outputStream);outputStream.close();compile.close();fileInputStream.close();}}
这篇关于【Poi-tl Documentation】区块对标签显示隐藏改造的文章就介绍到这儿,希望我们推荐的文章对编程师们有所帮助!


