本文主要是介绍第五节 Electron 模块介绍 remote模块详细介绍,希望对大家解决编程问题提供一定的参考价值,需要的开发者们随着小编来一起学习吧!
系列文章目录
第一节 electron 介绍
第二节 创建electron项目并启动
第三节 Electron运行流程 、 主进程渲染进程并使用nodejs
第四节 Electron 调用H5事件结合node模块fs 实现文件拖拽读取
目录
系列文章 目录
前言
实现方法
一、环境及页面搭建
二、重点来了 remote模块的安装及使用
1.安装
2.主进程里配置启用remote模块
4、项目结构及完整代码 (html参考上面)
总结
前言
electron模块分为主进程模块和渲染进程模块,其中很多模块既可以在主进程中使用也可以在渲染进程中使用比如sell、nativeImage。有很多功能可以使用H5的Api及node模块就可以实现,但顶部菜单及底部托盘只能用electron模块可以修改等,electron提供了很多模块。
本节案例:在渲染进程中点击按钮调用主进程的BrowserWindow打开一个新的窗口。
实现方法
- 利用渲染进程的ipcRenderer给主进程发送信息让主进程调用BrowserWindow
- 利用remote模块实现(以下使用这个方法)
使用注意事项:Electron10.x 之前可以直接使用 Remote 模块,Electron10.x 以后 Electron14.x 以前要 使用 remote 模块的话必须得在 BrowserWindow 中通过 enableRemoteModule: true 开启, Electron14.x 以后官方把内置的 remote 挪到了第三方模块里面,下面我们给大家看看如何在 Electron 最新版本中使用@electron/remote 模块
说明:我现在的electron版本是19.0.6
一、环境及页面搭建
index.html:
<!DOCTYPE html>
<html lang="en"><head><title></title><meta charset="UTF-8"><meta name="viewport" content="width=device-width, initial-scale=1"><script src="./renderer/renderer.js"></script><style></style>
</head><body><button id="openNewWindow">打开新窗口</button>
</body></html>
second.html
<!DOCTYPE html>
<html lang="en"><head><title></title><meta charset="UTF-8"><meta name="viewport" content="width=device-width, initial-scale=1"><script src="./renderer/renderer.js"></script><style>div{color: red; text-align: center;}</style>
</head><body><div>我是第二个页面</div>
</body></html>
二、重点来了 remote模块的安装及使用
1.安装
在index.html renderer.js编写代码
2.主进程里配置启用remote模块
- 主进程引入
const remote = require("@electron/remote/main"); // 1>引入 - 主进程初始化
remote.initialize() // 2>初始化 - 主进程启用
remote.enable(mainWindow.webContents) //3>启用remote - 渲染进程引入BrowserWindow
const { BrowserWindow } = require("@electron/remote")
3.渲染进程获取页面button并绑定事件
window.onload = ()=>{var btnDom = document.querySelector("#openNewWindow")btnDom.onclick = function(){const secWindow = new BrowserWindow({width: 300,height: 200,});secWindow.loadFile(path.join(__dirname, "second.html"))}
}
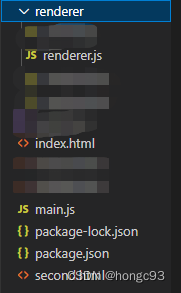
4、项目结构及完整代码 (html参考上面)

renderer.js
const {BrowserWindow} = require("@electron/remote")
const path = require("path");window.onload = ()=>{var btnDom = document.querySelector("#openNewWindow")btnDom.onclick = function(){const secWindow = new BrowserWindow({width: 300,height: 200,});secWindow.loadFile(path.join(__dirname, "second.html"))}
}
main.js
const { app, BrowserWindow } = require("electron");
const path = require("path");
const remote = require("@electron/remote/main");  // 1>引入
remote.initialize()  // 2>初始化const createWindow = () => {const mainWindow = new BrowserWindow({width: 1000,height: 800,webPreferences:{// preload:path.join(__dirname,"renderer/preload.js")// 渲染进程使用node模块nodeIntegration:true, // 允许渲染进程使用nodejscontextIsolation:false, // 允许渲染进程使用nodejs},});// 打开调试模式mainWindow.webContents.openDevTools();mainWindow.loadFile(path.join(__dirname, "index.html")); // 渲染进程remote.enable(mainWindow.webContents)  //3>启用remote
};
// 监听应用的启动事件
app.on("ready", createWindow);
//监听窗口关闭的事件,关闭的时候退出应用,macOs 需要排除
app.on("window-all-closed", () => {if (process.platform !== "darwin") {app.quit();}
});
//Macos 中点击 dock 中的应用图标的时候重新创建窗口
app.on("activate", () => {if (BrowserWindow.getAllWindows().length === 0) {createWindow();}
});
总结
以上就是今天要讲的内容,主要思路就是利用remote模块调用主进程模块。
每天记录一点,助力成长!
欢迎大家来浏览我的博客,如发现我有写错的地方,欢迎交流指正。
如果你觉得本文对你有帮助,欢迎点赞收藏转载,烦请注明出处,谢谢!
这篇关于第五节 Electron 模块介绍 remote模块详细介绍的文章就介绍到这儿,希望我们推荐的文章对编程师们有所帮助!


