本文主要是介绍[可视化] rviz的可视化(python),希望对大家解决编程问题提供一定的参考价值,需要的开发者们随着小编来一起学习吧!
文章目录
- 1. ros jsk_recognition_msgs 中BoundingBox绘制(目前只有ros1,ros2中无组件)
- 2. ros marker 绘制bounding box (适用ros1, ros2)
- 2.1 利用LINE绘制box
- 2.2 利用CUBE绘制box
- 2.3 利用arrow绘制heading
- 2.4 利用text绘制box's score
- 2.5 利用DELETEALL实现实时刷新
- 2.6 运行ros2 测试示例 (in ros2)
- 3. 绘制points
- 3.1 不带反射强度(intensity)
- 3.2 带反射强度
- 3.3 带RGB颜色和各种相加的信息
- 4. 绘制image输出
- 参考文献
1. ros jsk_recognition_msgs 中BoundingBox绘制(目前只有ros1,ros2中无组件)
- TODO
2. ros marker 绘制bounding box (适用ros1, ros2)
uint8 ARROW=0
uint8 CUBE=1
uint8 SPHERE=2
uint8 CYLINDER=3
uint8 LINE_STRIP=4
uint8 LINE_LIST=5
uint8 CUBE_LIST=6
uint8 SPHERE_LIST=7
uint8 POINTS=8
uint8 TEXT_VIEW_FACING=9 //绘制文字
uint8 MESH_RESOURCE=10
uint8 TRIANGLE_LIST=11uint8 ADD=0
uint8 MODIFY=0
uint8 DELETE=2
uint8 DELETEALL=3  # 用于清除上一次发出的markers, 因为marker特性是一致保留,不清除,会导致上下帧之间对象共存
2.1 利用LINE绘制box
- LINE_LIST 方式
知乎-ros marker 绘制box
注意通过marker 的LINE绘制的box框某些角度会导致线条消失,可视化效果不是很完美
- LINE_STRIP方式
import numpy as np
import rclpy
from rclpy.node import Nodefrom visualization_msgs.msg import MarkerArray, Marker
from std_msgs.msg import Header
from geometry_msgs.msg import Pointpub = create_publisher(MarkerArray, "box", 10)# code refs: OpenPCDet (mmlab)
def boxes_to_corners_3d(boxes3d):"""7 -------- 4/|         /|6 -------- 5 .| |        | |. 3 -------- 0|/         |/2 -------- 1Args:boxes3d:  (N, 8) cls_id, x,y,z,l,w,h,angle[-pi,pi], (x, y, z) is the box centerReturns:corners3d: (N, 8, 3)"""boxes3d, is_numpy = common_utils.check_numpy_to_torch(boxes3d)template = boxes3d.new_tensor(([1, 1, -1], [1, -1, -1], [-1, -1, -1], [-1, 1, -1],[1, 1, 1], [1, -1, 1], [-1, -1, 1], [-1, 1, 1],)) / 2corners3d = boxes3d[:, None, 4:7].repeat(1, 8, 1) * template[None, :, :]corners3d = common_utils.rotate_points_along_z(corners3d.view(-1, 8, 3), boxes3d[:, 7]).view(-1, 8, 3)corners3d += boxes3d[:, None, 1:4]return corners3d.numpy() if is_numpy else corners3ddef pub_my_boxes(bboxes, topic='gt', color=(1.0,0.0,0.0,1.0), line_width=0.1):"""Args:bboxes[np.ndarray]:(M, 7)topic[str]:ros topic color[tuple]: (R,G,B,A)line_width: width of line of bouding box = marker.scale.x"""# clear last time markerspub.publish(markerD)  # 2.5 章节介绍bboxes = boxes_to_corners_3d(bboxes)  # 获取8个点位置信息mArr = MarkerArray()for i, box in enumerate(bboxes):marker = Marker()marker.header.frame_id = 'map'marker.id = i  # must be uniquemarker.type = Marker.LINE_STRIPmarker.action = Marker.ADDmarker.points = [Point(x=float(b[0]), y=float(b[1]), z=float(b[2])) for b in box[:4]]marker.points.append(Point(x=float(box[0,0]), y=float(box[0,1]), z=float(box[0,2])))marker.points += [Point(x=float(b[0]), y=float(b[1]), z=float(b[2])) for b in box[4:]]marker.points.append(Point(x=float(box[4,0]), y=float(box[4,1]), z=float(box[4,2])))temp = [5,1,2,6,7,3]marker.points += [Point(x=float(box[i, 0]), y=float(box[i, 1]), z=float(box[i, 2])) for i in temp]marker.scale.x = float(line_width)marker.color.r = float(color[0])marker.color.g = float(color[1])marker.color.b = float(color[2])marker.color.a = float(color[3])mArr.markers.append(marker)pub.publish(mArr)
2.2 利用CUBE绘制box
主要设置半透明,否则看不出来里面的点
# 参考他人代码,用于将heading表示为四元数, 正在绘制box的时候,赋值给pos.orientation
_AXES2TUPLE = {'sxyz': (0,0,0,0), 'sxyx': (0,0,1,0), 'sxzy':(0,1,0,0),'sxzx': (0,1,1,0), 'syzx': (1,0,0,0), 'syzy':(1,0,1,0),'syxz': (1,1,0,0), 'syxy': (1,1,1,0), 'szxy':(2,0,0,0),'szxz': (2,0,1,0), 'szyx': (2,1,0,0), 'szyz':(2,1,1,0),'rzyx': (0,0,0,1), 'rxyx': (0,0,1,1), 'ryzx':(0,1,0,1),'rxzx': (0,1,1,1), 'rxzy': (1,0,0,1), 'ryzy':(1,0,1,1),'rzxy': (1,1,0,1), 'ryxy': (1,1,1,1), 'ryxz':(2,0,0,1),'rzxz': (2,0,1,1), 'rxyz': (2,1,0,1), 'rzyz':(2,1,1,1),
}_NEXT_AXIS = [1,2,0,1]def quaternion_from_euler(ai, aj, ak, axes='sxyz'):try:firstaxis, parity, repetition, frame = _AXES2TUPLE[axes.lower()]except (AttributeError, KeyError):# _ = _TUPLE2AXES[axes]firstaxis, parity, repetition, frame = axesi = firstaxisj = _NEXT_AXIS[i+parity]k = _NEXT_AXIS[i - parity + 1]if frame:ai, ak = ak, aiif parity:aj = -ajai /= 2.0aj /= 2.0ak /= 2.0 ci = math.cos(ai)si = math.sin(ai)cj = math.cos(aj)sj = math.sin(aj)ck = math.cos(ak)sk = math.sin(ak)cc = ci * ckcs = ci * sksc = si * ckss = si * skquaternion = np.empty((4, ), dtype=np.float64)if repetition:quaternion[i] = cj * (cs + sc)quaternion[j] = sj * (cc + ss)quaternion[k] = sj * (cs - sc)quaternion[3] = cj * (cc - ss)else:quaternion[i] = cj * sc - sj * csquaternion[j] = cj * ss + sj * ccquaternion[k] = cj * cs - sj * scquaternion[3] = cj * cc + sj * ssif parity:quaternion[j] *= -1return quaterniondef pub_my_boxes(bboxes, topic='box', color=(1.0,0.0,0.0, 0.3)):"""Args:bboxes[np.ndarray]:(M, 8) cls_id, x,y,z,l,w,h,angle[-pi,pi]topic[str]: ros topiccolor[tuple]: (r,g,b,a)"""# clear last time markerspub.publish(self.markerD)mArr = MarkerArray()for i, box in enumerate(bboxes):marker = Marker()marker.header.frame_id = 'map'marker.id = i  # must be uniquemarker.type = Marker.CUBEmarker.action = Marker.ADDmarker.pose.position.x = float(box[1])marker.pose.position.y = float(box[2])marker.pose.position.z = float(box[3])# 用四元数设置朝向q = quaternion_from_euler(0, 0, box[7])marker.pose.orientation.x = q[0]marker.pose.orientation.y = q[1]marker.pose.orientation.z = q[2]marker.pose.orientation.w = q[3]marker.scale.x = float(box[4])marker.scale.y = float(box[5])marker.scale.z = float(box[6])marker.color.r = float(color[0])marker.color.g = float(color[1])marker.color.b = float(color[2])marker.color.a = float(color[3])mArr.markers.append(marker)
2.3 利用arrow绘制heading
其他代码与CUBE绘制box 类似,此处省略
... ...marker_arrow = Marker()
marker_arrow.header.frame_id = 'map'
marker_arrow.id = i + offset_id  # must be unique for all of markers
marker_arrow.type = Marker.ARROW
marker_arrow.action = Marker.ADD
# base position of arrow; 在框的正前方面中心
marker_arrow.pose.position.x = float(box[1]) + float(box[4]) / 2.0 * math.cos(box[7])
marker_arrow.pose.position.y = float(box[2]) + float(box[4]) / 2.0 * math.sin(box[7])
marker_arrow.pose.position.z = float(box[3])marker_arrow.scale.x = 0.1 # 箭柄
marker_arrow.scale.y = 0.2 # 箭头
marker_arrow.scale.z = 0.0
marker_arrow.points.clear()
start_p = Point()
end_p = Point()
length = 1.0   # length of box # 相对与base position的
start_p.x = 0.0
start_p.y = 0.0
end_p.x = length * math.cos(box[7])
end_p.y = length * math.sin(box[7])marker_arrow.points.append(start_p)
marker_arrow.points.append(end_p)marker_arrow.color.r = 1.0
marker_arrow.color.g = 1.0
marker_arrow.color.b = 1.0
marker_arrow.color.a = 1.0marker_arrow.pose.orientation.w = 1.0
mArr.markers.append(marker_arrow)
2.4 利用text绘制box’s score
可以设置小数点精度
... ...
marker_txt = Marker()
marker_txt.header.frame_id = 'map'
marker_txt.id = offest_txt_id + i  # must be unique
marker_txt.type = Marker.TEXT_VIEW_FACING
marker_txt.action = Marker.ADD
# 框中心顶部
marker_txt.pose.position.x = float(box[1])
marker_txt.pose.position.y = float(box[2])
marker_txt.pose.position.z = float(box[3] + box[6] / 2.0)
marker_txt.color.r = 1.0
marker_txt.color.g = 1.0
marker_txt.color.b = 1.0
marker_txt.color.a = 1.0
marker_txt.scale.z = 0.3  # size of text
marker_txt.text = label  # str
mArr.markers.append(marker_txt)
2.5 利用DELETEALL实现实时刷新
注意如果不清除上一次发送的marker对象,下一帧发送的会与上一帧重叠,无法实现实时每帧刷新的效果
markerD = MarkerArray()
marker = Marker()
marker.action = Marker.DELETEALL  # 会清除同一个通道中所有的markers
markerD.markers.append(marker)
2.6 运行ros2 测试示例 (in ros2)
可视化box的简单实例,需要集成Node,这是ros2的写法,ros1有一点不同
import rclpy
from rclpy.node import Nodefrom visualization_msgs.msg import MarkerArray, Marker
# from std_msgs.msg import Headerclass MyPublisher(Node):def __init__(self, node_name='my_publisher'):super().__init__(node_name)self.pub = self.create_publisher(MarkerArray, "gt", 10)self.markerD = MarkerArray()marker = Marker()marker.action = Marker.DELETEALLself.markerD.markers.append(marker)def publish_boxes(self, bboxes, topic='box', color=(1.0,0.0,0.0, 0.3)):"""Args:bboxes[np.ndarray]:(M, 8) xyzlwh headingtopic[str]: ros topiccolor[tuple]: (r,g,b,a)"""# clear last time markersself.pub.publish(self.markerD)mArr = MarkerArray()for i, box in enumerate(bboxes.astype(np.float32)):marker = Marker()marker.header.frame_id = self.header.frame_idmarker.id = i  # must be uniquemarker.type = Marker.CUBEmarker.action = Marker.ADDmarker.pose.position.x = float(box[1])marker.pose.position.y = float(box[2])marker.pose.position.z = float(box[3])q = quaternion_from_euler(0, 0, box[7])  # 上面有写marker.pose.orientation.x = q[0]marker.pose.orientation.y = q[1]marker.pose.orientation.z = q[2]marker.pose.orientation.w = q[3]marker.scale.x = float(box[4])marker.scale.y = float(box[5])marker.scale.z = float(box[6])marker.color.r = float(color[0])marker.color.g = float(color[1])marker.color.b = float(color[2])marker.color.a = float(color[3])mArr.markers.append(marker)self.pub.publish(mArr)if __name__ == '__main__':rclpy.init()  # 必须有pub = MyPublisher("test_ros_pub")for i in range(30):bboxes = np.load(f"../box.npy")bboxes = np.concatenate([np.zeros((bboxes.shape[0],1), dtype=np.float32), bboxes], axis=1)pub.publish_boxes2(bboxes, 'box')time.sleep(1)rclpy.shutdown()
3. 绘制points
3.1 不带反射强度(intensity)
import rclpy
from rclpy.node import Nodefrom sensor_msgs.msg import PointCloud2, PointField
from sensor_msgs_py import point_cloud2
from std_msgs.msg import Headerheader = Header()
header.frame_id = 'map'dtype = PointField.FLOAT32xyz_fields = [PointField(name='x', offset=0, datatype=dtype, count=1),PointField(name='y', offset=4, datatype=dtype, count=1),PointField(name='z', offset=8, datatype=dtype, count=1)]def publish(points, topic='point_cloud'):"""Args:points: (N, 3), topic: string, """fields = xyz_fieldsheader.stamp = self.get_clock().now().to_msg()# points (N,3)pc2_msg = point_cloud2.create_cloud(header, fields, points)self.pub_p.publish(pc2_msg)
3.2 带反射强度
主要用于对于感知过程中,一些点的感知权重显示( 将weights设置到intensity通道上),是否符合预期
# 将xyz_fields 换成xyzi_fields,并且保证points(N,4)
xyzi_fields = [PointField(name='x', offset=0, datatype=dtype, count=1),PointField(name='y', offset=4, datatype=dtype, count=1),PointField(name='z', offset=8, datatype=dtype, count=1),PointField(name='intensity', offset=12, datatype=dtype, count=1)]
3.3 带RGB颜色和各种相加的信息
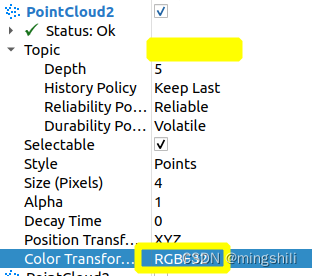
- 如果要带RGB信息,这需要rviz中选择RGB作为color transform; 只在rviz2中测试,rviz不知道可不可以。
# 将xyz_fields 换成xyzrgb_fields,并且保证points(N,6)
xyzrgb_fields = [PointField(name='x', offset=0, datatype=dtype, count=1),PointField(name='y', offset=4, datatype=dtype, count=1),PointField(name='z', offset=8, datatype=dtype, count=1),PointField(name='r', offset=12, datatype=dtype, count=1),PointField(name='g', offset=16, datatype=dtype, count=1),PointField(name='b', offset=20, datatype=dtype, count=1)]
# 当然也支持其他附带信息
# 感觉这个A透明度不太起作用,因为这个topic 本身就有Alpha表示透明度
xyzrgba_fields = [PointField(name='x', offset=0, datatype=dtype, count=1),PointField(name='y', offset=4, datatype=dtype, count=1),PointField(name='z', offset=8, datatype=dtype, count=1),PointField(name='r', offset=12, datatype=dtype, count=1),PointField(name='g', offset=16, datatype=dtype, count=1),PointField(name='b', offset=20, datatype=dtype, count=1),PointField(name='a', offset=24, datatype=dtype, count=1)]
# x,y,z,r,g,b, cls_id, cls_score. 当使用selection功能的时候,可以查看当前点的预测类别和置信度。
xyzrgbcs_fields = [PointField(name='x', offset=0, datatype=dtype, count=1),PointField(name='y', offset=4, datatype=dtype, count=1),PointField(name='z', offset=8, datatype=dtype, count=1),PointField(name='r', offset=12, datatype=dtype, count=1),PointField(name='g', offset=16, datatype=dtype, count=1),PointField(name='b', offset=20, datatype=dtype, count=1),PointField(name='cls_id', offset=24, datatype=dtype, count=1),PointField(name='score', offset=24, datatype=dtype, count=1)]
4. 绘制image输出
from sensor_msgs.msg import Image
from cv_bridge import CvBridgeclass MyPublisher(Node):rate = 10moving = Trueheader = Header()header.frame_id = 'my_frame_id'dtype = PointField.FLOAT32point_step =16def __init__(self, node_name='pc_publisher', interval=10, prefix=""):super().__init__(node_name)self.pubs_dict = dict()self.pubs_dict['myimage'] = self.create_publisher(Image, "myimage", 10)self.br = CvBridge()def publish_image(self, range_image, topic='myimage'):assert (len(range_image.shape) == 3 and range_image.shape[2] == 3) or \len(range_image.shape) == 2, "my image shape error"self.pubs_dict[topic].publish(self.br.cv2_to_imgmsg(range_image))if __name__ == '__main__':rclpy.init()pub = PointCloudPublisher("test_pub", interval=5)########## test publish image typeimport timefrom PIL import Image as PILImagefor i in range(30):image = PILImage.open('./{}.png'.format((i % 2) + 1)).convert('RGB')im_width, im_height = image.sizeimage_numpy = np.array(image.getdata()).astype('float32') / 255.0# image_numpy = image_numpy.reshape(im_height, im_width, 3)[:,:,0]pub.publish_image(image_numpy)time.sleep(1)rclpy.shutdown()
参考文献
- ros marker 绘制box
- ros2 官方github代码示例
这篇关于[可视化] rviz的可视化(python)的文章就介绍到这儿,希望我们推荐的文章对编程师们有所帮助!


