本文主要是介绍hardhat入门教程,希望对大家解决编程问题提供一定的参考价值,需要的开发者们随着小编来一起学习吧!
文章目录
- 概述
- 安装
- 快速开始
- 运行任务
- 编译合约
- 测试合约
- 部署合约
- 连接钱包或Dapp到Hardhat网络
- 部署主网/测试网
概述
Hardhat是一个编译、部署、测试和调试以太坊应用的开发环境。它可以帮助开发人员管理和自动化构建智能合约和dApps过程中固有的重复性任务,并围绕这一工作流程轻松引入更多功能。这意味着hardhat在最核心的地方是编译、运行和测试智能合约。
Hardhat内置了Hardhat网络,这是一个专为开发设计的本地以太坊网络。主要功能有Solidity调试,跟踪调用堆栈、console.log()和交易失败时的明确错误信息提示等。
Hardhat Runner是与Hardhat交互的CLI命令,是一个可扩展的任务运行器。它是围绕任务和插件的概念设计的。每次你从CLI运行Hardhat时,你都在运行一个任务。例如,npx hardhat compile运行的是内置的compile任务。任务可以调用其他任务,允许定义复杂的工作流程。用户和插件可以覆盖现有的任务,从而定制和扩展工作流程。
Hardhat的很多功能都来自于插件,而作为开发者,你可以自由选择想使用的插件。Hardhat不限制使用什么工具的,但它确实有一些内置的默认值。所有这些都可以覆盖。
安装
Hardhat是通过本地安装在项目中使用的。这样你的环境就可以重现,也可以避免未来的版本冲突。
要安装它,你需要创建一个npm项目,进入一个空文件夹,运行npm init。 并遵循其指示操作。项目初始化之后,运行:
npm install --save-dev hardhat
快速开始
通过在项目文件夹中运行npx hardhat来创建Hardhat项目:
$ npx hardhat
888    888                      888 888               888
888    888                      888 888               888
888    888                      888 888               888
8888888888  8888b.  888d888 .d88888 88888b.   8888b.  888888
888    888     "88b 888P"  d88" 888 888 "88b     "88b 888
888    888 .d888888 888    888  888 888  888 .d888888 888
888    888 888  888 888    Y88b 888 888  888 888  888 Y88b.
888    888 "Y888888 888     "Y88888 888  888 "Y888888  "Y888Welcome to Hardhat v2.19.4? What do you want to do? ...
> Create a JavaScript projectCreate a TypeScript projectCreate a TypeScript project (with Viem)Create an empty hardhat.config.jsQuit
我们选择创建JavaScript项目
Hardhat会让提示你如何安装,但是,如果你错过了,你可以用npm install --save-dev @nomiclabs/hardhat-waffle ethereum-waffle chai @nomiclabs/hardhat-ethers ethers来安装它们。
运行任务
$ npx hardhat
Hardhat version 2.0.8Usage: hardhat [GLOBAL OPTIONS] <TASK> [TASK OPTIONS]GLOBAL OPTIONS:--config              A Hardhat config file.--emoji               Use emoji in messages.--help                Shows this message, or a task's help if its name is provided--max-memory          The maximum amount of memory that Hardhat can use.--network             The network to connect to.--show-stack-traces   Show stack traces.--tsconfig            Reserved hardhat argument -- Has no effect.--verbose             Enables Hardhat verbose logging--version             Shows hardhat's version.AVAILABLE TASKS:accounts      Prints the list of accountscheck         Check whatever you needclean         Clears the cache and deletes all artifactscompile       Compiles the entire project, building all artifactsconsole       Opens a hardhat consoleflatten       Flattens and prints contracts and their dependencieshelp          Prints this messagenode          Starts a JSON-RPC server on top of Hardhat Networkrun           Runs a user-defined script after compiling the projecttest          Runs mocha testsTo get help for a specific task run: npx hardhat help [task]
编译合约
合约目录contracts/
要编译它,只需运行:
npx hardhat compile
测试合约
在test/目录下,可以找到Lock.js文件:
const {time,loadFixture,
} = require("@nomicfoundation/hardhat-toolbox/network-helpers");
const { anyValue } = require("@nomicfoundation/hardhat-chai-matchers/withArgs");
const { expect } = require("chai");describe("Lock", function () {// We define a fixture to reuse the same setup in every test.// We use loadFixture to run this setup once, snapshot that state,// and reset Hardhat Network to that snapshot in every test.async function deployOneYearLockFixture() {const ONE_YEAR_IN_SECS = 365 * 24 * 60 * 60;const ONE_GWEI = 1_000_000_000;const lockedAmount = ONE_GWEI;const unlockTime = (await time.latest()) + ONE_YEAR_IN_SECS;// Contracts are deployed using the first signer/account by defaultconst [owner, otherAccount] = await ethers.getSigners();const Lock = await ethers.getContractFactory("Lock");const lock = await Lock.deploy(unlockTime, { value: lockedAmount });return { lock, unlockTime, lockedAmount, owner, otherAccount };}describe("Deployment", function () {it("Should set the right unlockTime", async function () {const { lock, unlockTime } = await loadFixture(deployOneYearLockFixture);expect(await lock.unlockTime()).to.equal(unlockTime);});it("Should set the right owner", async function () {const { lock, owner } = await loadFixture(deployOneYearLockFixture);expect(await lock.owner()).to.equal(owner.address);});it("Should receive and store the funds to lock", async function () {const { lock, lockedAmount } = await loadFixture(deployOneYearLockFixture);expect(await ethers.provider.getBalance(lock.target)).to.equal(lockedAmount);});it("Should fail if the unlockTime is not in the future", async function () {// We don't use the fixture here because we want a different deploymentconst latestTime = await time.latest();const Lock = await ethers.getContractFactory("Lock");await expect(Lock.deploy(latestTime, { value: 1 })).to.be.revertedWith("Unlock time should be in the future");});});describe("Withdrawals", function () {describe("Validations", function () {it("Should revert with the right error if called too soon", async function () {const { lock } = await loadFixture(deployOneYearLockFixture);await expect(lock.withdraw()).to.be.revertedWith("You can't withdraw yet");});it("Should revert with the right error if called from another account", async function () {const { lock, unlockTime, otherAccount } = await loadFixture(deployOneYearLockFixture);// We can increase the time in Hardhat Networkawait time.increaseTo(unlockTime);// We use lock.connect() to send a transaction from another accountawait expect(lock.connect(otherAccount).withdraw()).to.be.revertedWith("You aren't the owner");});it("Shouldn't fail if the unlockTime has arrived and the owner calls it", async function () {const { lock, unlockTime } = await loadFixture(deployOneYearLockFixture);// Transactions are sent using the first signer by defaultawait time.increaseTo(unlockTime);await expect(lock.withdraw()).not.to.be.reverted;});});describe("Events", function () {it("Should emit an event on withdrawals", async function () {const { lock, unlockTime, lockedAmount } = await loadFixture(deployOneYearLockFixture);await time.increaseTo(unlockTime);await expect(lock.withdraw()).to.emit(lock, "Withdrawal").withArgs(lockedAmount, anyValue); // We accept any value as `when` arg});});describe("Transfers", function () {it("Should transfer the funds to the owner", async function () {const { lock, unlockTime, lockedAmount, owner } = await loadFixture(deployOneYearLockFixture);await time.increaseTo(unlockTime);await expect(lock.withdraw()).to.changeEtherBalances([owner, lock],[lockedAmount, -lockedAmount]);});});});
});可以使用npx hardhat test来运行测试:
$npx hardhat testLockDeployment✔ Should set the right unlockTime (1438ms)✔ Should set the right owner✔ Should receive and store the funds to lock✔ Should fail if the unlockTime is not in the future (56ms)WithdrawalsValidations✔ Should revert with the right error if called too soon✔ Should revert with the right error if called from another account✔ Shouldn't fail if the unlockTime has arrived and the owner calls itEvents✔ Should emit an event on withdrawalsTransfers✔ Should transfer the funds to the owner9 passing (2s)
部署合约
我们使用Hardhat脚本部署合约。 在 scripts/里面,你会发现 Lock.js的代码如下:
// SPDX-License-Identifier: UNLICENSED
pragma solidity ^0.8.9;// Uncomment this line to use console.log
// import "hardhat/console.sol";contract Lock {uint public unlockTime;address payable public owner;event Withdrawal(uint amount, uint when);constructor(uint _unlockTime) payable {require(block.timestamp < _unlockTime,"Unlock time should be in the future");unlockTime = _unlockTime;owner = payable(msg.sender);}function withdraw() public {// Uncomment this line, and the import of "hardhat/console.sol", to print a log in your terminal// console.log("Unlock time is %o and block timestamp is %o", unlockTime, block.timestamp);require(block.timestamp >= unlockTime, "You can't withdraw yet");require(msg.sender == owner, "You aren't the owner");emit Withdrawal(address(this).balance, block.timestamp);owner.transfer(address(this).balance);}
}用npx hardhat run .\scripts\deploy.js运行它:
$npx hardhat run .\scripts\deploy.js
Lock with 0.001ETH and unlock timestamp 1705461023 deployed to 0x5FbDB2315678afecb367f032d93F642f64180aa3
连接钱包或Dapp到Hardhat网络
Hardhat在启动时,默认情况下总会启动一个Hardhat Network的内存实例,你也可以以独立的方式运行Hardhat Network,以便外部客户(可能是MetaMask,你的Dapp前端,或者一个脚本)可以连接到它。
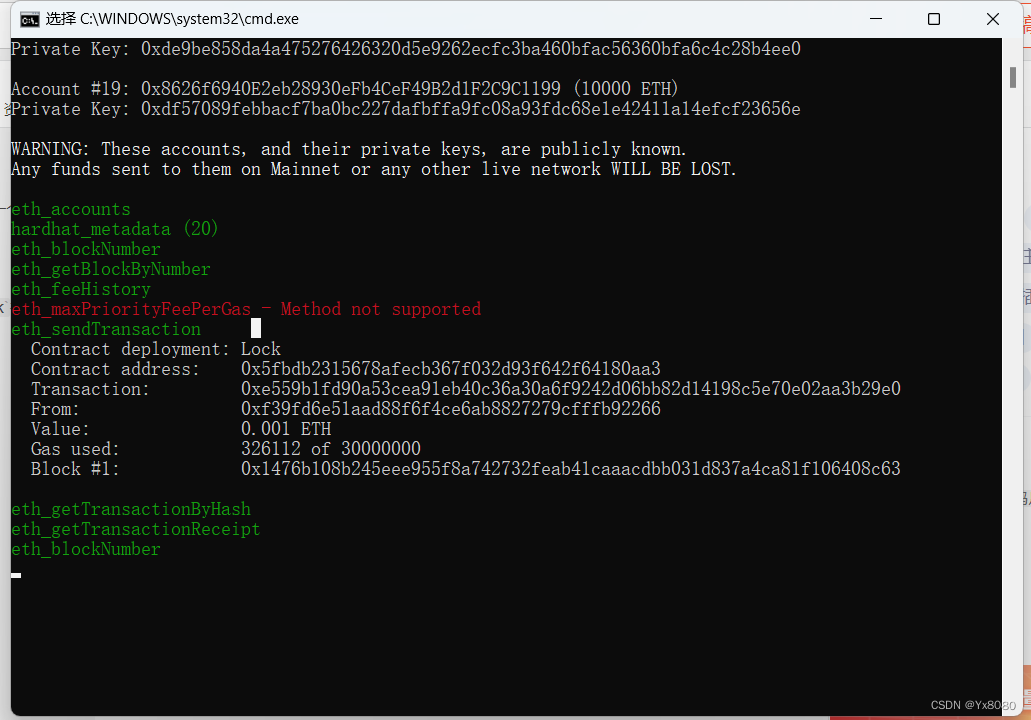
要以独立的方式运行Hardhat Network,运行npx hardhat node:
$npx hardhat node
Started HTTP and WebSocket JSON-RPC server at http://127.0.0.1:8545/Accounts
========WARNING: These accounts, and their private keys, are publicly known.
Any funds sent to them on Mainnet or any other live network WILL BE LOST.Account #0: 0xf39Fd6e51aad88F6F4ce6aB8827279cffFb92266 (10000 ETH)
Private Key: 0xac0974bec39a17e36ba4a6b4d238ff944bacb478cbed5efcae784d7bf4f2ff80Account #1: 0x70997970C51812dc3A010C7d01b50e0d17dc79C8 (10000 ETH)
Private Key: 0x59c6995e998f97a5a0044966f0945389dc9e86dae88c7a8412f4603b6b78690dAccount #2: 0x3C44CdDdB6a900fa2b585dd299e03d12FA4293BC (10000 ETH)
Private Key: 0x5de4111afa1a4b94908f83103eb1f1706367c2e68ca870fc3fb9a804cdab365aAccount #3: 0x90F79bf6EB2c4f870365E785982E1f101E93b906 (10000 ETH)
Private Key: 0x7c852118294e51e653712a81e05800f419141751be58f605c371e15141b007a6Account #4: 0x15d34AAf54267DB7D7c367839AAf71A00a2C6A65 (10000 ETH)
Private Key: 0x47e179ec197488593b187f80a00eb0da91f1b9d0b13f8733639f19c30a34926aAccount #5: 0x9965507D1a55bcC2695C58ba16FB37d819B0A4dc (10000 ETH)
Private Key: 0x8b3a350cf5c34c9194ca85829a2df0ec3153be0318b5e2d3348e872092edffbaAccount #6: 0x976EA74026E726554dB657fA54763abd0C3a0aa9 (10000 ETH)
Private Key: 0x92db14e403b83dfe3df233f83dfa3a0d7096f21ca9b0d6d6b8d88b2b4ec1564eAccount #7: 0x14dC79964da2C08b23698B3D3cc7Ca32193d9955 (10000 ETH)
Private Key: 0x4bbbf85ce3377467afe5d46f804f221813b2bb87f24d81f60f1fcdbf7cbf4356Account #8: 0x23618e81E3f5cdF7f54C3d65f7FBc0aBf5B21E8f (10000 ETH)
Private Key: 0xdbda1821b80551c9d65939329250298aa3472ba22feea921c0cf5d620ea67b97Account #9: 0xa0Ee7A142d267C1f36714E4a8F75612F20a79720 (10000 ETH)
Private Key: 0x2a871d0798f97d79848a013d4936a73bf4cc922c825d33c1cf7073dff6d409c6Account #10: 0xBcd4042DE499D14e55001CcbB24a551F3b954096 (10000 ETH)
Private Key: 0xf214f2b2cd398c806f84e317254e0f0b801d0643303237d97a22a48e01628897Account #11: 0x71bE63f3384f5fb98995898A86B02Fb2426c5788 (10000 ETH)
Private Key: 0x701b615bbdfb9de65240bc28bd21bbc0d996645a3dd57e7b12bc2bdf6f192c82Account #12: 0xFABB0ac9d68B0B445fB7357272Ff202C5651694a (10000 ETH)
Private Key: 0xa267530f49f8280200edf313ee7af6b827f2a8bce2897751d06a843f644967b1Account #13: 0x1CBd3b2770909D4e10f157cABC84C7264073C9Ec (10000 ETH)
Private Key: 0x47c99abed3324a2707c28affff1267e45918ec8c3f20b8aa892e8b065d2942ddAccount #14: 0xdF3e18d64BC6A983f673Ab319CCaE4f1a57C7097 (10000 ETH)
Private Key: 0xc526ee95bf44d8fc405a158bb884d9d1238d99f0612e9f33d006bb0789009aaaAccount #15: 0xcd3B766CCDd6AE721141F452C550Ca635964ce71 (10000 ETH)
Private Key: 0x8166f546bab6da521a8369cab06c5d2b9e46670292d85c875ee9ec20e84ffb61Account #16: 0x2546BcD3c84621e976D8185a91A922aE77ECEc30 (10000 ETH)
Private Key: 0xea6c44ac03bff858b476bba40716402b03e41b8e97e276d1baec7c37d42484a0Account #17: 0xbDA5747bFD65F08deb54cb465eB87D40e51B197E (10000 ETH)
Private Key: 0x689af8efa8c651a91ad287602527f3af2fe9f6501a7ac4b061667b5a93e037fdAccount #18: 0xdD2FD4581271e230360230F9337D5c0430Bf44C0 (10000 ETH)
Private Key: 0xde9be858da4a475276426320d5e9262ecfc3ba460bfac56360bfa6c4c28b4ee0Account #19: 0x8626f6940E2eb28930eFb4CeF49B2d1F2C9C1199 (10000 ETH)
Private Key: 0xdf57089febbacf7ba0bc227dafbffa9fc08a93fdc68e1e42411a14efcf23656eWARNING: These accounts, and their private keys, are publicly known.
Any funds sent to them on Mainnet or any other live network WILL BE LOST.
这将暴露一个JSON-RPC接口链接到Hardhat网络。只要将钱包或应用程序连接到http://localhost:8545就可以使用它。
如果要把Hardhat连接到这个节点上,例如,要在这个网络上运行一个部署脚本,只需要使用--network localhost来运行脚本。
你可以试一试,先用npx hardhat node启动一个节点,并使用network参数重新运行示例脚本:
$npx hardhat run .\scripts\deploy.js --network localhost部署成功后,节点中会有对应执行日志。
部署主网/测试网
可以--network在运行任何任务时使用该参数,如下所示:
$npx hardhat run scripts/deploy.js --network <network-name>
在deploy.js的main方法中第一行添加签名
const [deployer] = await ethers.getSigners();
在hardhat.config.js文件中添加新的网络。我们将在本示例中使用 Sepolia:
require("@nomicfoundation/hardhat-toolbox");// Go to https://infura.io, sign up, create a new API key
// in its dashboard, and replace "KEY" with it
const INFURA_API_KEY = "f12202b025d24f9e8ebc5d0a786";// Replace this private key with your Sepolia account private key
// To export your private key from Coinbase Wallet, go to
// Settings > Developer Settings > Show private key
// To export your private key from Metamask, open Metamask and
// go to Account Details > Export Private Key
// Beware: NEVER put real Ether into testing accounts
const SEPOLIA_PRIVATE_KEY = "钱包私钥";module.exports = {solidity: "0.8.23",networks: {sepolia: {url: `https://sepolia.infura.io/v3/${INFURA_API_KEY}`,accounts: [SEPOLIA_PRIVATE_KEY]}}
};
最后运行:
$npx hardhat run scripts/deploy.js --network sepolia
Hardhat官网
这篇关于hardhat入门教程的文章就介绍到这儿,希望我们推荐的文章对编程师们有所帮助!