本文主要是介绍Spring-AOP基础(全在这里),希望对大家解决编程问题提供一定的参考价值,需要的开发者们随着小编来一起学习吧!
八股文部分来源于网络,例子为原创
OOP(Object-oriented programming)
也就是面向对象编程,继承,封装,多态。
局限性
- 静态语言:类结构一旦定义,不容易被修改(并不是无法修改)。
- 只能侵入性扩展:通过继承和组合组织新的类结构(比如我们继承一个类然后重写法,在子类里面就可以使用super关键字调用父类的方法,同时在子类拓展我们的逻辑。)
AOP 应用场景
- 日志场景:比如log4j或logback中的MDC,比如打印方法的执行时间。
- 统计场景:比如方法执行次数,执行异常次数,数据抽样,
- 安防场景:比如熔断(Hystrix),限流和降级(Sentinel),认证和授权(Spring Security),监控(JMX)
- 性能场景:比如缓存(Spring Cache),超时控制
AOP的术语
AOP主要是拦截OOP中的方法,在Spirng中只支持拦截方法。让我们关注横切面,进行拦截。
1 切面(Aspect)
各个方面都是针对横切问题的模块化单位。它们的行为有点类似于Java类,但也可能包括切入点、建议和类型间声明。也就是把我们关注的公共的东西抽象处来形成一个切面。
2 连接点(Join Point)
程序执行过程中的一个点,例如方法的执行或异常的处理。在Spring AOP中,连接点总是表示方法的执行。
3 切点 Pointcut
用于匹配Joint Point 的条件,决定了我们是不是在这些切入点进行接入。
4 Advice 通知(befroe, after, around需要手动调用)
我们找到了切入点,我们需要执行的动作,在一个特定的Joint Poiont 进行操作。一个Aspect 多应多个JointPoint,一个Join Point对应多个Advice。
AOP的设计模式
- 代理模式 静态代理和动态代理
- 判断模式 类,方法,注解,参数,异常
- 拦截模式 前置,后置,返回,异常
使用方式
添加依赖
<dependency><groupId>org.springframework</groupId><artifactId>spring-aop</artifactId><version>5.2.2.RELEASE</version></dependency><dependency><groupId>org.springframework</groupId><artifactId>spring-context</artifactId><version>5.2.2.RELEASE</version></dependency><dependency><groupId>org.aspectj</groupId><artifactId>aspectjweaver</artifactId><version>1.9.6</version></dependency>
aspectjweaver包含aspectjrt,所以我们只需要引入aspectjweaver依赖包就可以了
基于注解
1 前置通知
2 后置通知
3 环绕通知
首先我们定义一个切面类
@Aspect
public class AspectDemo {private String templateStr = "=========================== %s ==============";@Pointcut("execution(public * *(..))")private void anyPublicPointCut() {}@Before("anyPublicPointCut()")public void anyPublicBefore() {System.out.println(String.format(templateStr, "前置拦截"));}@After("anyPublicPointCut()")public void anyPublicAfter() {System.out.println(String.format(templateStr, "后置拦截"));}@Around("anyPublicPointCut()")public void anyPublicAround(ProceedingJoinPoint joinPoint) throws Throwable{System.out.println(String.format(templateStr, "环绕拦截"));// 特别注意这里需要我们手动去调用joinPoint.proceed();}
}
在客户端进行使用:
@EnableAspectJAutoProxy
public class Client {public static void main(String[] args) {AnnotationConfigApplicationContext context = new AnnotationConfigApplicationContext();context.register(Client.class, AspectDemo.class);context.refresh();Client bean = context.getBean(Client.class);bean.execute();}public void execute() {System.out.println("================== 执行方法内部逻辑 ==============");}
}
执行结果:

小结:
1 关于顺序问题我们可以看到在同一切面遵循环绕通知 -> 前置通知 -> 后置通知的顺序 当然后置通知里面又有分类,后文会进行介绍。
2 前置通知,后置通知都是框架主动执行,只有环绕通知需要我们手动去调用。
基于xml
1 切面申明
2 前置通知
3 后置通知
4 环绕通知
// 切面的方法
public class InterceptConfig {private String templateStr = "=========================== xml %s ==============";public void anyPublicBefore() {System.out.println(String.format(templateStr, "前置拦截"));}public void anyPublicAfter() {System.out.println(String.format(templateStr, "后置拦截"));}public void anyPublicAround(ProceedingJoinPoint joinPoint) throws Throwable{System.out.println(String.format(templateStr, "环绕拦截"));joinPoint.proceed();}
}
配置切面
<?xml version="1.0" encoding="UTF-8"?>
<beansxmlns="http://www.springframework.org/schema/beans"xmlns:aop="http://www.springframework.org/schema/aop"xmlns:xsi="http://www.w3.org/2001/XMLSchema-instance"xsi:schemaLocation="http://www.springframework.org/schema/beanshttps://www.springframework.org/schema/beans/spring-beans.xsdhttp://www.springframework.org/schema/aophttps://www.springframework.org/schema/aop/spring-aop.xsd"><bean id="aspectActionConfig" class="com.liyong.learn.aop.annotation.InterceptConfig"></bean><bean id="client" class="com.liyong.learn.aop.annotation.Client"></bean><aop:config><aop:aspect ref="aspectActionConfig" ><aop:before method="anyPublicBefore" pointcut="execution(public * *(..))"></aop:before><aop:after method="anyPublicAfter" pointcut="execution(public * *(..))"></aop:after><aop:around method="anyPublicAround" pointcut="execution(public * *(..))"></aop:around></aop:aspect></aop:config>
</beans>
public class Client {public static void main(String[] args) {ClassPathXmlApplicationContext context = new ClassPathXmlApplicationContext("aop.xml");Client bean = context.getBean(Client.class);bean.execute();}public void execute() {System.out.println("================== 执行方法内部逻辑 ==============");}
}
可以看到和上面的运行结果一样:

基于API
1 切面申明
2 前置通知
3 后置通知
4 环绕通知
定义切面表达式:
public class ApiPointCut extends StaticMethodMatcherPointcut {// 要拦截的方法private final String methodName;// 要拦截的类private final Class targetClass;public ApiPointCut(String methodName, Class targetClass) {super();this.methodName = methodName;this.targetClass = targetClass;}@Overridepublic boolean matches(Method method, Class<?> targetClass) {return Objects.equals(methodName, method.getName())&& (this.targetClass.isAssignableFrom(targetClass) || this.targetClass == targetClass);}
}
定义拦截器:
public class CustomMethodInterceptor implements MethodInterceptor {@Overridepublic Object invoke(MethodInvocation invocation) throws Throwable {Method method = invocation.getMethod();System.out.println("==========执行拦截===" + method);// 这里一定要调用否则方法不会执行return invocation.proceed();}
}
使用方式:
public class Client {public static void main(String[] args) {// 定义一个切面 里面制定了我们要拦截的方法及我们要拦截的规则ApiPointCut pointCut = new ApiPointCut("execute", Client.class);// 定义一个对象Client client = new Client();// 这是SpirngAop 给我们提供的生产代理后的对象的工厂 当然这个工厂也可以通过配置的方式配置在xmlProxyFactory proxy = new ProxyFactory(client);DefaultPointcutAdvisor advisor = new DefaultPointcutAdvisor(pointCut, new CustomMethodInterceptor());proxy.addAdvisor(advisor);// 通过代理获取对象Client proxyClient = (Client) proxy.getProxy();proxyClient.execute();}public void execute() {System.out.println("================== 执行方法内部逻辑 ==============");}
}
执行结果:

当然我们还可以使用其它的工厂类,通过API的方式来使用AOP:
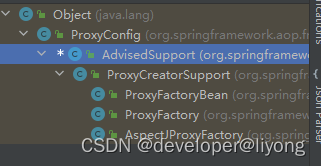
我们可以看到ProxyFactoryBean,ProxyFactory,AspectJProxyFactory都是来源于几类AdviceSupport。所以我们可以通过这几个工厂去创建AOP.
// 这个例子对map的put方法进行拦截
public static void main(String[] args) {Map<String, Object> cache = new HashMap<>();AspectJProxyFactory aspectJProxyFactory = new AspectJProxyFactory(cache);aspectJProxyFactory.addAdvice(new MethodBeforeAdvice() {@Overridepublic void before(Method method, Object[] args, Object target) throws Throwable {if ("put".equals(method.getName()) && args.length == 2) {System.out.println("========== 前置拦截 ==========");}}});Map<String, Object>  proxy = aspectJProxyFactory.getProxy();proxy.put("1", "1");
}
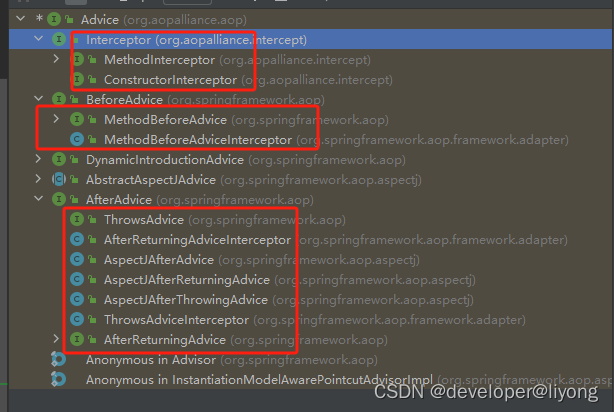
addAdvice可以有很多方式前置后置,环绕等,他们的顶级接口都是Advice:
自动动态代理
1 BeanNameAutoProxyCreator 通过bean名称的方式进行判断是否需要代理
<?xml version="1.0" encoding="UTF-8"?>
<beansxmlns="http://www.springframework.org/schema/beans"xmlns:xsi="http://www.w3.org/2001/XMLSchema-instance"xsi:schemaLocation="http://www.springframework.org/schema/beanshttps://www.springframework.org/schema/beans/spring-beans.xsd"><bean id="aspectActionConfig" class="com.liyong.learn.aop.annotation.InterceptConfig"></bean><bean id="client" class="com.liyong.learn.auto.Client"></bean><!--定义拦截器--><bean id="interceptor" class="com.liyong.learn.aop.annotation.CustomMethodInterceptor"></bean><bean class="org.springframework.aop.framework.autoproxy.BeanNameAutoProxyCreator"><property name="beanNames" value="*"></property><property name="interceptorNames" ><!--指定拦截器--><value>interceptor</value></property></bean>
</beans>
public class Client {public static void main(String[] args) {ClassPathXmlApplicationContext context = new ClassPathXmlApplicationContext("auto.xml");Client bean = context.getBean(Client.class);bean.execute();}public void execute() {System.out.println("================== 执行方法内部逻辑 ==============");}
}

2 DefaultAdvisorAutoProxyCreator
<?xml version="1.0" encoding="UTF-8"?>
<beansxmlns="http://www.springframework.org/schema/beans"xmlns:xsi="http://www.w3.org/2001/XMLSchema-instance"xsi:schemaLocation="http://www.springframework.org/schema/beanshttps://www.springframework.org/schema/beans/spring-beans.xsd"><bean id="defaultCreator" class="org.springframework.aop.framework.autoproxy.DefaultAdvisorAutoProxyCreator"></bean><bean id="client" class="com.liyong.learn.auto.Client"></bean><bean id="clientOne" class="com.liyong.learn.auto.ClientOne"></bean><bean id="interceptor" class="com.liyong.learn.aop.annotation.CustomMethodInterceptor"></bean><bean id="pointCut" class="com.liyong.learn.aop.annotation.ApiPointCut"><!-- 指定方法名 --><constructor-arg index="0" value="execute"></constructor-arg><!-- 指定类名 --><constructor-arg index="1" value="com.liyong.learn.auto.Client"></constructor-arg></bean><!--  配置一个通知 就需要配置pointCut 以及要执行的动作 --><bean class="org.springframework.aop.support.DefaultPointcutAdvisor" name="advice"><constructor-arg index="0" ref="pointCut"></constructor-arg><constructor-arg index="1" ref="interceptor"></constructor-arg></bean>
</beans>
public class Client {public static void main(String[] args) {ClassPathXmlApplicationContext context = new ClassPathXmlApplicationContext("auto.xml");Client bean = context.getBean(Client.class);bean.execute();}public void execute() {System.out.println("================== 执行方法内部逻辑 ==============");}
}
DefaultAdvisorAutoProxyCreator读取了上下文环境,发现配置的又AOP于是自动代理了,我们得到的是道理以后的对象

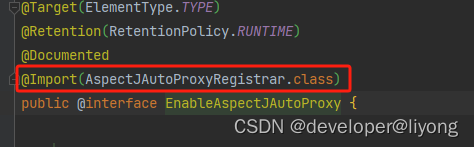
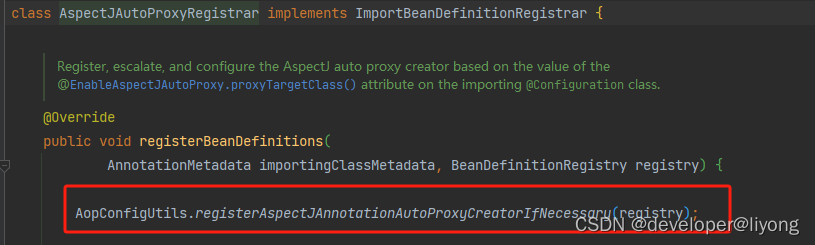
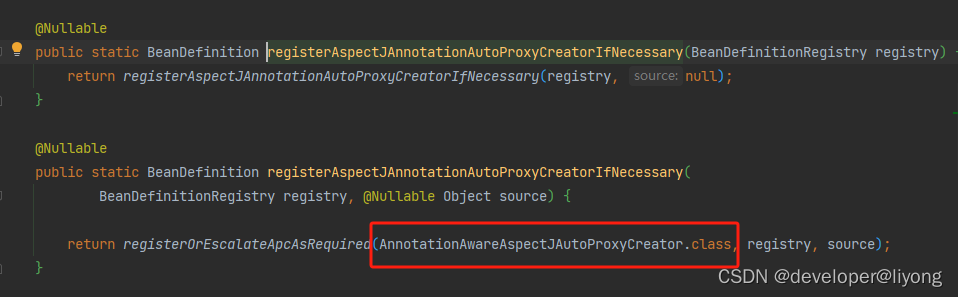
3 AnnotationAwareAspectJAutoProxyCreator @EnableAspectJAutoProxy 这是基于注解的形式来实现AOP我们只需要注解就能够成功的对我们们关心的地方进行拦截。
before,after 与 Around 的执行顺序
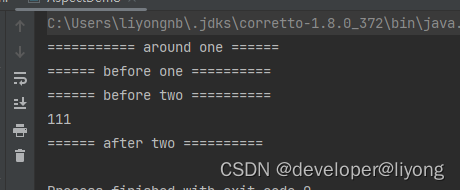
1 在同一个Aspect里面Around优先于before
2 如果不在同一个Aspect里面,则是通过Order来控制的
@Aspect
public class AspectOne implements Ordered {@Pointcut("execution(public * *(..))")private void anyPublicOperation() {}@Before("anyPublicOperation()")public void beforeAnyPublicMethod() {System.out.println("====== before one ==========");}@Around("anyPublicOperation()")public Object aroundAnyPublicMethod(ProceedingJoinPoint joinPoint) throws Throwable{System.out.println("=========== around one ====== ");// 主动调用return joinPoint.proceed();}@Overridepublic int getOrder() {return 1;}
}
@Aspect
public class AspectTwo implements Ordered {@Pointcut("execution(public * *(..))")private void anyPublicOperation() {}@Before("anyPublicOperation()")public void beforeAnyPublicMethod() {System.out.println("====== before two ==========");}@After("anyPublicOperation()")public void afterAnyPublicMethod(){System.out.println("====== after two ==========");}@Overridepublic int getOrder() {return 2;}
}
@Configuration // 标注以后会有增强提升
@EnableAspectJAutoProxy // 激活自动代理
public class AspectDemo {public static void main(String[] args) {AnnotationConfigApplicationContext context = new AnnotationConfigApplicationContext();context.register(AspectOne.class, AspectTwo.class, AspectDemo.class);context.refresh();AspectDemo bean = context.getBean(AspectDemo.class);bean.execute();context.close();}public void execute() {System.out.println(111);}
}
可以看到同一个aspect里面Around会先执行,然后就是数字越低越优先执行:
三种After 的关系
1 AfterReturning
2 AfterThrowing
3 After
@Aspect
public class AfterConfig {@Pointcut("execution(public * *(..))")private void anyPublicOperation() {}@After("anyPublicOperation()")public void after(){System.out.println("====== after=========");}@AfterReturning("anyPublicOperation()")public void afterReturning(){System.out.println("====== afterReturning =========");}@AfterThrowing("anyPublicOperation()")public void afterThrowing() {System.out.println("======  afterThrowing =========");}
}
@Configuration
@EnableAspectJAutoProxy
public class AfterDemo {public static void main(String[] args) {AnnotationConfigApplicationContext context = new AnnotationConfigApplicationContext();context.register(AfterConfig.class, AfterDemo.class);context.refresh();AfterDemo bean = context.getBean(AfterDemo.class);bean.execute();}public void execute() {Random random = new Random();boolean flag = random.nextBoolean();if (flag) {throw new RuntimeException();}System.out.println("execute");}
}
可以看到我们三种After的执行顺序是先after类似于finally,然后是afterReturing,如果是有异常的话就是after和afterThrowing.通过配置的方式参考前面的配置。
这篇关于Spring-AOP基础(全在这里)的文章就介绍到这儿,希望我们推荐的文章对编程师们有所帮助!


