本文主要是介绍gan, pixel2pixel, cyclegan, srgan图像超分辨率,希望对大家解决编程问题提供一定的参考价值,需要的开发者们随着小编来一起学习吧!
文章目录
- 1.gan
- 2.DCgan
- 3.cgan
- 4.pixel2pixel(Image-to-Image Translation with Conditional Adversarial Networks)
- 5.CycleGAN
- 6.Deep learning for in vivo near-infrared imaging
- 11..Photo-Realistic Single Image Super-Resolution Using a Generative Adversarial (srgan, srresnet) (2017)
- 11.1. 一篇经典的超分论文。
- 11.2. 网络结构
- 11.3.关于训练
- 12.ESRGAN: Enhanced Super-Resolution Generative Adversarial Networks
- 13.GAN
- 14. dasr oppo
1.gan
通俗理解生成对抗网络GAN
对抗生成网络GAN系列——GAN原理及手写数字生成小案例
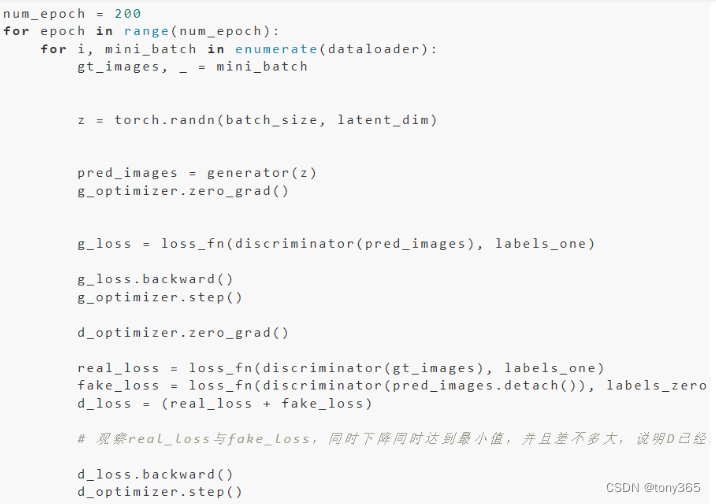
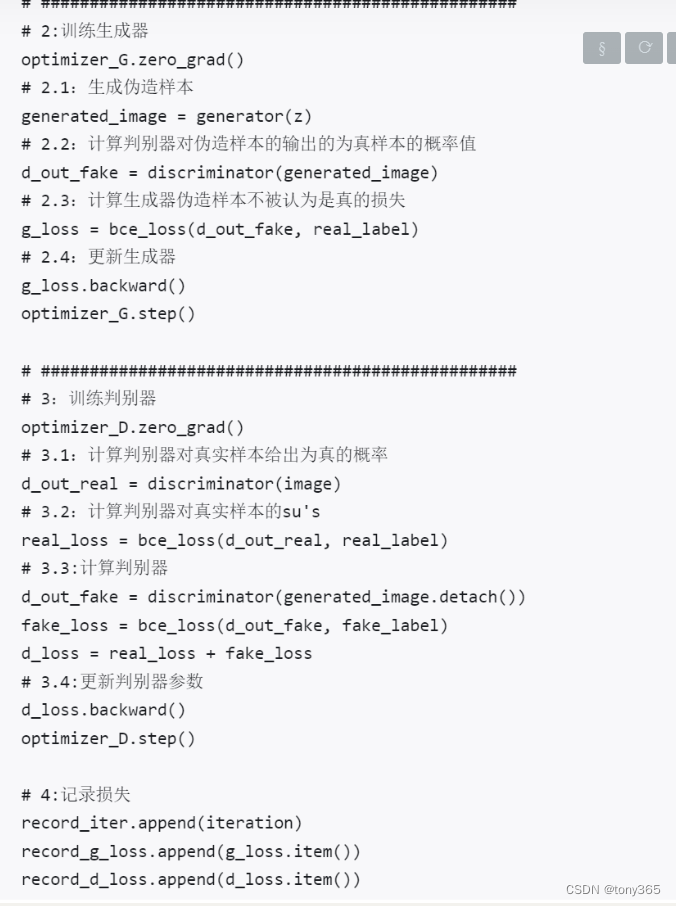
就是随机生成噪声,假如128维度,Gnet 输出 28x28的图像
Dnet输出label,1或者0 , 二分类网络。
判别器就是 输入真实图 分类为1
输入生成图 分类为0
生成器就是 希望输入生成图到判别器,分类为1.
注意这里的网络模型不能保证生成的数字到底是几,给定一个随机噪声,生成的数字可能是0-9
或者
2.DCgan
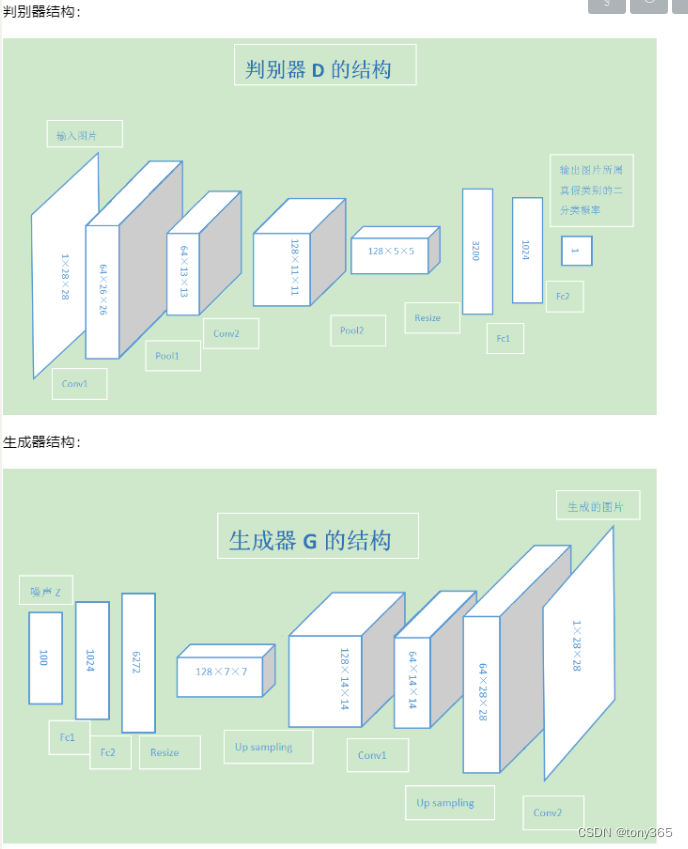
这里主要是更改了一些生成器和判别器的结构,比如用卷积替换全连接,假如batchnorm等,提升生成的效果。
后续可以使用UNet等进一步提升。
https://zhuanlan.zhihu.com/p/35983991 生成对抗网络系列(3)——cGAN及图像条件 这一系列博客写的也很好。
3.cgan
Conditional Generative Adversarial Nets,即条件生成对抗网络。
就是通过添加限制条件,来控制GAN生成数据的特征(类别),比如之前我们的随机噪声可以生成数字0-9但是我们并不能控制生成的是0还是1,还是2.
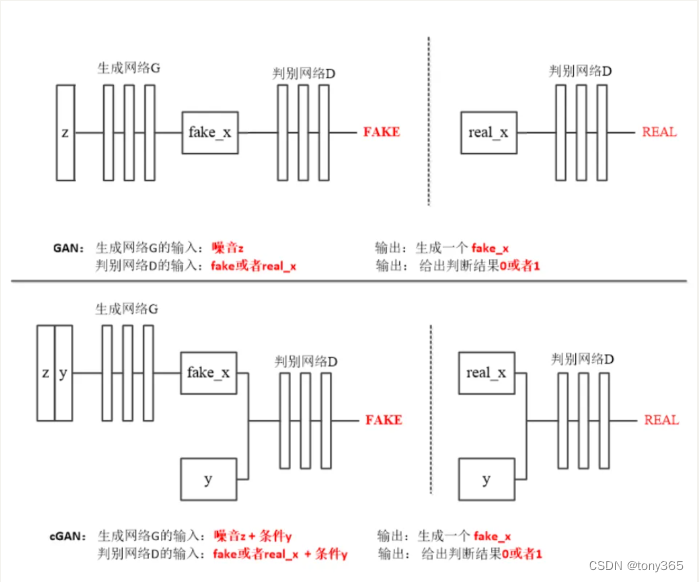
这里要把类别标签一起输入到网络。
另外损失函数没有采用二分类交叉熵,而是使用mse.
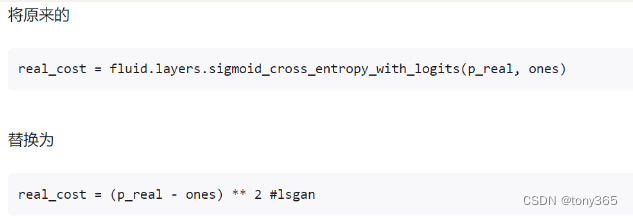
https://zhuanlan.zhihu.com/p/302720602
这里分析一下其原理:
gan之所以有效,只凭了三个损失函数:
fake(gen) 输入判别器 得到0
real 输入判别器 得到1
那么判别器学到了 什么是0,什么是1:即 生成的图像是 0,real图是1
噪声z 输入生成器,希望判别器得到 1, 即希望生成器生成的图 输入判别器时 是 1,即希望生成器生成的图,和real更接近。
CGAN 加入了类别label, label的形式可以是0-N的数字,也可以是one-hot编码, 也可是 和 噪声z同维度的一个tensor。
损失函数仍然是三个。
希望 噪声z+ 类别label 输入 生成器后 得到该label对应的图像。
4.pixel2pixel(Image-to-Image Translation with Conditional Adversarial Networks)
是cgan的一种,只不过输入的不是噪声,输入的是一些hint提示,理所应当比cgan效果好才对。
https://www.jianshu.com/p/066e2c274887
看代码很清晰:https://github.com/junyanz/pytorch-CycleGAN-and-pix2pix
pixel2pixel是一种图像转换,不是从噪声直接生成的。
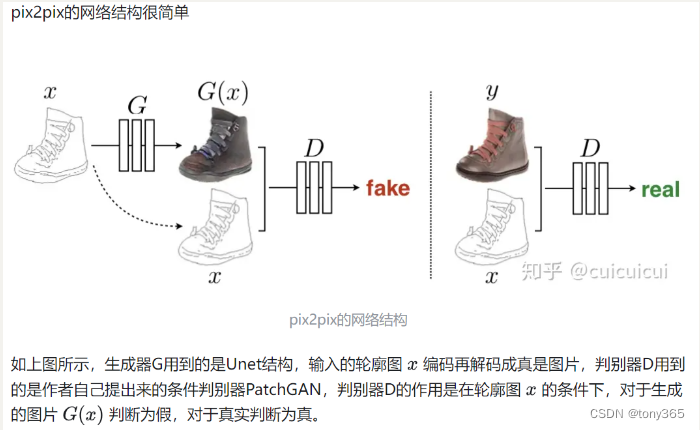
特点就是
-
不是从噪声直接生成图像,而是从某一类图像转换为零一类图像。假如从噪声图转换为无噪声图是否可以,也是可以的呀。
-
判别器的2个损失函数和之前的是类似的,就是判别真假。只是pixel2pixel中不是得到一个数字作为lable而是一个矩阵求平均,其实差异也不大。
-
那么生成器呢,除了原来的损失,再加上一个L1损失。这是理所应当的。作者实验假如不利用gan,只有L1来损失,这其实就是一个简单的图像转换网络,发现不清晰,缺少高频,再加上cgan 图像更生动清晰。 想想srgan就是gan在超分中的应用。
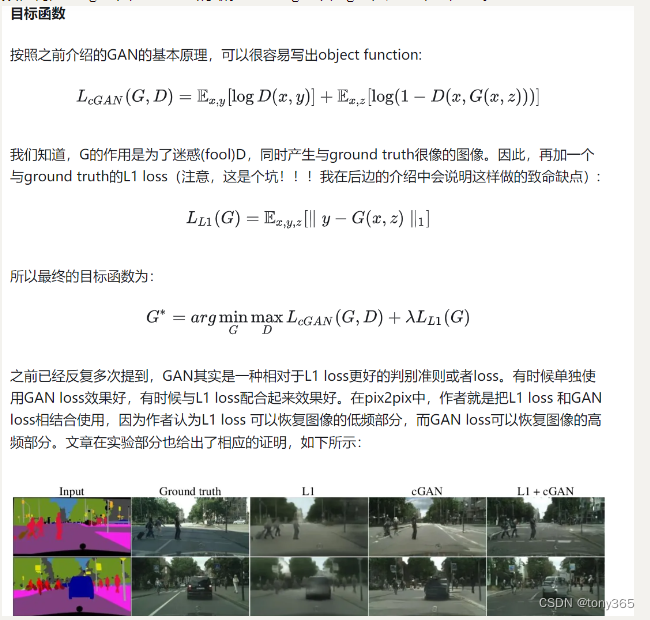
https://aistudio.baidu.com/projectdetail/1119048
5.CycleGAN
https://cloud.tencent.com/developer/article/1064970
pix2pix是用GAN解决image-to-image translation的开山之作,他的主要思路就是用成对的图像(paired image)去训练生成器和判别器,最后向训练好的生成器输入图片就可以得到目标图片(aim image)
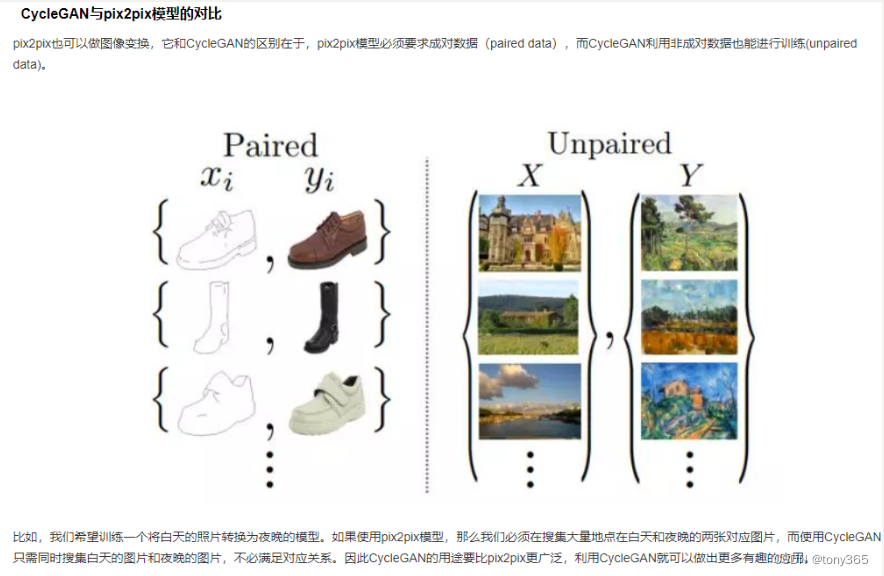
看下图
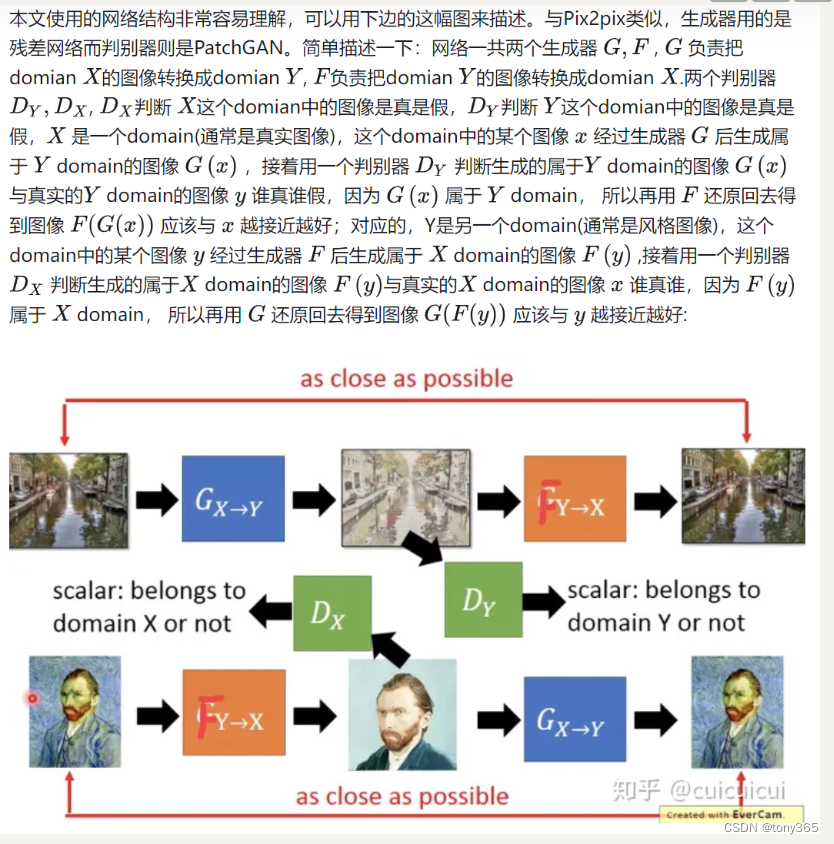
相比于pixel2pixel具体是如何改进的呢?
第一个理解:
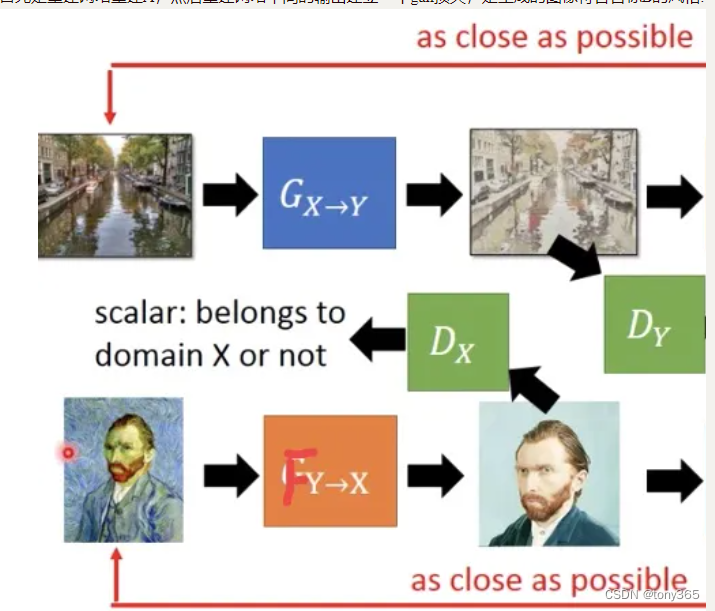
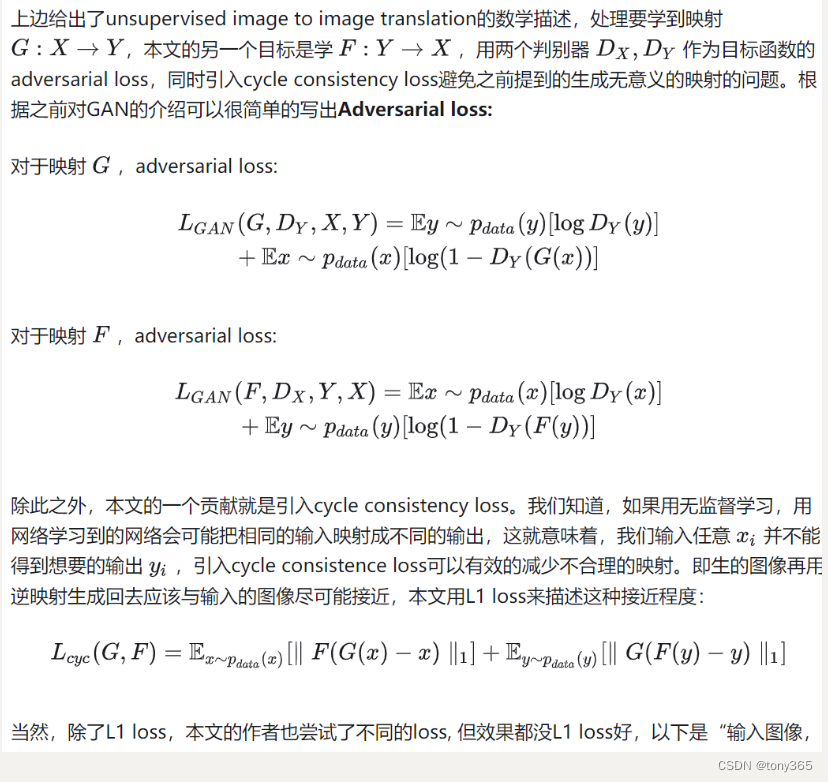
上图的左上部分如下就是1个 gan, gan生成目标B, 但是没有label条件约束,因此pixel2pixel中的L1损失就没法使用了,那么如何保持生成的图像目标图像的一致性呢? 加上右边的网络和 cycle consistency lose.
第二个理解:
首先是重建网络重建A,然后重建网络中间的输出建立一个gan损失,是生成的图像符合目标B的风格.
参考:https://zhuanlan.zhihu.com/p/38752336
6.Deep learning for in vivo near-infrared imaging
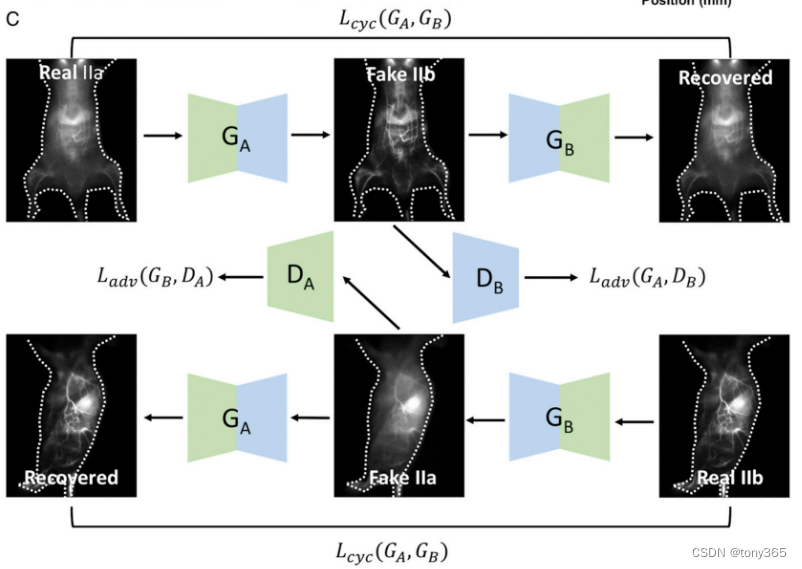
体内 红外一区 和 红外二区图像转换。
11…Photo-Realistic Single Image Super-Resolution Using a Generative Adversarial (srgan, srresnet) (2017)
11.1. 一篇经典的超分论文。
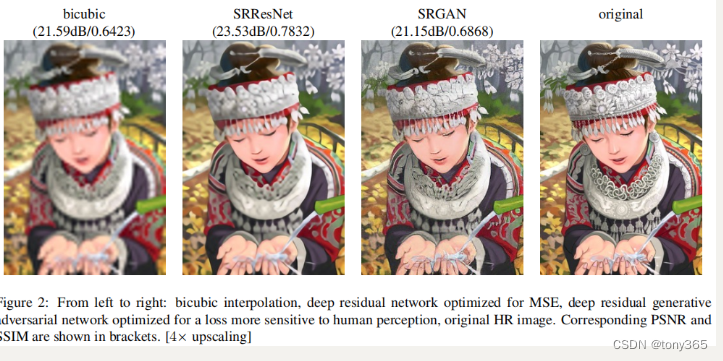
作者提出两个网络:SRResNet 和 SRGAN。 SRResNet 的图像 psnr 和 ssim都比较高,但是细节不够生动。
SRGAN的psnr,ssim没有那么高,但是细节会更丰富。
关于论文和code 可以搜到很多,毕竟是经典方法。
11.2. 网络结构
srresnet 网络结构也是 srgan的生成器部分。
srgan的生成器是 srresnet, 判别器部分是vgg 类型的网络。
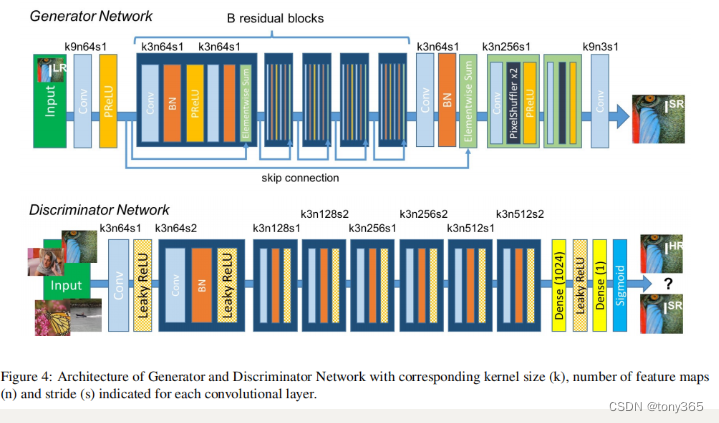
网络结构相对简单清晰
import torch
import torch.nn as nn
import mathclass _Residual_Block(nn.Module):def __init__(self):super(_Residual_Block, self).__init__()self.conv1 = nn.Conv2d(in_channels=64, out_channels=64, kernel_size=3, stride=1, padding=1, bias=False)self.in1 = nn.InstanceNorm2d(64, affine=True)self.relu = nn.LeakyReLU(0.2, inplace=True)self.conv2 = nn.Conv2d(in_channels=64, out_channels=64, kernel_size=3, stride=1, padding=1, bias=False)self.in2 = nn.InstanceNorm2d(64, affine=True)def forward(self, x):identity_data = xoutput = self.relu(self.in1(self.conv1(x)))output = self.in2(self.conv2(output))output = torch.add(output,identity_data)return output class _NetG(nn.Module):def __init__(self):super(_NetG, self).__init__()self.conv_input = nn.Conv2d(in_channels=3, out_channels=64, kernel_size=9, stride=1, padding=4, bias=False)self.relu = nn.LeakyReLU(0.2, inplace=True)self.residual = self.make_layer(_Residual_Block, 16)self.conv_mid = nn.Conv2d(in_channels=64, out_channels=64, kernel_size=3, stride=1, padding=1, bias=False)self.bn_mid = nn.InstanceNorm2d(64, affine=True)self.upscale4x = nn.Sequential(nn.Conv2d(in_channels=64, out_channels=256, kernel_size=3, stride=1, padding=1, bias=False),nn.PixelShuffle(2),nn.LeakyReLU(0.2, inplace=True),nn.Conv2d(in_channels=64, out_channels=256, kernel_size=3, stride=1, padding=1, bias=False),nn.PixelShuffle(2),nn.LeakyReLU(0.2, inplace=True),)self.conv_output = nn.Conv2d(in_channels=64, out_channels=3, kernel_size=9, stride=1, padding=4, bias=False)for m in self.modules():if isinstance(m, nn.Conv2d):n = m.kernel_size[0] * m.kernel_size[1] * m.out_channelsm.weight.data.normal_(0, math.sqrt(2. / n))if m.bias is not None:m.bias.data.zero_()def make_layer(self, block, num_of_layer):layers = []for _ in range(num_of_layer):layers.append(block())return nn.Sequential(*layers)def forward(self, x):out = self.relu(self.conv_input(x))residual = outout = self.residual(out)out = self.bn_mid(self.conv_mid(out))out = torch.add(out,residual)out = self.upscale4x(out)out = self.conv_output(out)return outclass _NetD(nn.Module):def __init__(self):super(_NetD, self).__init__()self.features = nn.Sequential(# input is (3) x 96 x 96nn.Conv2d(in_channels=3, out_channels=64, kernel_size=3, stride=1, padding=1, bias=False),nn.LeakyReLU(0.2, inplace=True),# state size. (64) x 96 x 96nn.Conv2d(in_channels=64, out_channels=64, kernel_size=4, stride=2, padding=1, bias=False),            nn.BatchNorm2d(64),nn.LeakyReLU(0.2, inplace=True),# state size. (64) x 96 x 96nn.Conv2d(in_channels=64, out_channels=128, kernel_size=3, stride=1, padding=1, bias=False),            nn.BatchNorm2d(128),nn.LeakyReLU(0.2, inplace=True),# state size. (64) x 48 x 48nn.Conv2d(in_channels=128, out_channels=128, kernel_size=4, stride=2, padding=1, bias=False),nn.BatchNorm2d(128),nn.LeakyReLU(0.2, inplace=True),# state size. (128) x 48 x 48nn.Conv2d(in_channels=128, out_channels=256, kernel_size=3, stride=1, padding=1, bias=False),nn.BatchNorm2d(256),nn.LeakyReLU(0.2, inplace=True),# state size. (256) x 24 x 24nn.Conv2d(in_channels=256, out_channels=256, kernel_size=4, stride=2, padding=1, bias=False),nn.BatchNorm2d(256),nn.LeakyReLU(0.2, inplace=True),# state size. (256) x 12 x 12nn.Conv2d(in_channels=256, out_channels=512, kernel_size=3, stride=1, padding=1, bias=False),            nn.BatchNorm2d(512),nn.LeakyReLU(0.2, inplace=True),# state size. (512) x 12 x 12nn.Conv2d(in_channels=512, out_channels=512, kernel_size=4, stride=2, padding=1, bias=False),            nn.BatchNorm2d(512),nn.LeakyReLU(0.2, inplace=True),)self.LeakyReLU = nn.LeakyReLU(0.2, inplace=True)self.fc1 = nn.Linear(512 * 6 * 6, 1024)self.fc2 = nn.Linear(1024, 1)self.sigmoid = nn.Sigmoid()for m in self.modules():if isinstance(m, nn.Conv2d):m.weight.data.normal_(0.0, 0.02)elif isinstance(m, nn.BatchNorm2d):m.weight.data.normal_(1.0, 0.02)m.bias.data.fill_(0)def forward(self, input):out = self.features(input)# state size. (512) x 6 x 6out = out.view(out.size(0), -1)# state size. (512 x 6 x 6)out = self.fc1(out)# state size. (1024)out = self.LeakyReLU(out)out = self.fc2(out)out = self.sigmoid(out)return out.view(-1, 1).squeeze(1)
11.3.关于训练
- srresnet 的损失函数就是

训练的代码也比较常规。
- srgan的损失函数是有三部分组成
除了上面的pixel-wise MSE loss, 还有 VGG-f loss(feature map的MSE loss),VGG-f将图片输入到直接训练好的模型VGG的特定层的feature map, 这个VGG的weight是不训练的,相当于一个特征提取器,区别于判别器的vgg网络:
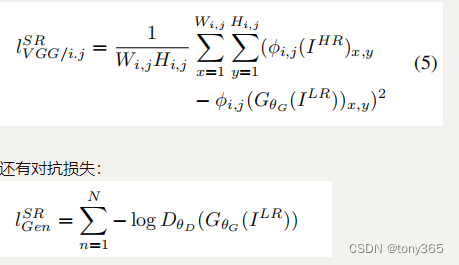
对抗损失 训练判别器的时候有一个,训练生成器的时候有2个。
三个损失函数
第一步训练判别器
# Transfer in-memory data to CUDA devices to speed up traininggt = batch_data["gt"].to(device=srgan_config.device, non_blocking=True)lr = batch_data["lr"].to(device=srgan_config.device, non_blocking=True)# Set the real sample label to 1, and the false sample label to 0batch_size, _, height, width = gt.shapereal_label = torch.full([batch_size, 1], 1.0, dtype=gt.dtype, device=srgan_config.device)fake_label = torch.full([batch_size, 1], 0.0, dtype=gt.dtype, device=srgan_config.device)# Start training the discriminator model# During discriminator model training, enable discriminator model backpropagationfor d_parameters in d_model.parameters():d_parameters.requires_grad = True# Initialize the discriminator model gradientsd_model.zero_grad(set_to_none=True)# Calculate the classification score of the discriminator model for real samples(计算 gt 的分数)gt_output = d_model(gt)d_loss_gt = adversarial_criterion(gt_output, real_label)# Call the gradient scaling function in the mixed precision API to# back-propagate the gradient information of the fake samplesd_loss_gt.backward(retain_graph=True)# Calculate the classification score of the discriminator model for fake samples(计算 生成的sr 的分数)# Use the generator model to generate fake samplessr = g_model(lr)sr_output = d_model(sr.detach().clone())d_loss_sr = adversarial_criterion(sr_output, fake_label)# Call the gradient scaling function in the mixed precision API to# back-propagate the gradient information of the fake samplesd_loss_sr.backward()# Calculate the total discriminator loss valued_loss = d_loss_gt + d_loss_sr# Improve the discriminator model's ability to classify real and fake samplesd_optimizer.step()# Finish training the discriminator model
然后固定判别器
# Start training the generator model# During generator training, turn off discriminator backpropagationfor d_parameters in d_model.parameters():d_parameters.requires_grad = False
训练生成器,利用三个损失函数
# Initialize generator model gradientsg_model.zero_grad(set_to_none=True)# Calculate the perceptual loss of the generator, mainly including pixel loss, feature loss and adversarial losspixel_loss = srgan_config.pixel_weight * pixel_criterion(sr, gt)content_loss = srgan_config.content_weight * content_criterion(sr, gt)adversarial_loss = srgan_config.adversarial_weight * adversarial_criterion(d_model(sr), real_label)# Calculate the generator total loss valueg_loss = pixel_loss + content_loss + adversarial_loss# Call the gradient scaling function in the mixed precision API to# back-propagate the gradient information of the fake samplesg_loss.backward()# Encourage the generator to generate higher quality fake samples, making it easier to fool the discriminatorg_optimizer.step()# Finish training the generator model
当然也可以先训练生成器,再训练判别器。反正两个也是交替训练的。
关于gan最常见的训练方式 查看 code 和
loss解释
12.ESRGAN: Enhanced Super-Resolution Generative Adversarial Networks
ESRGAN是对SRGAN的改进:
- 去掉BN,网络的基本单元从基本的残差单元变为Residual-in-Residual Dense Block (RRDB)
- GAN网络改进为Relativistic average GAN (RaGAN);
- 改进感知域损失函数,使用激活前的VGG特征,这个改进会提供更尖锐的边缘和更符合视觉的结果。
- 首先训练常规模型,然后再训练GAN模型。 则通过插值生成器部分可以得到不同程度的超分模型,调节平滑度和细节丰富度
1 很好的解释
13.GAN
下面两篇升级版都是对 图像退化的改进。
Designing a Practical Degradation Model for Deep Blind Image Super-Resolution (ICCV, 2021, BSRGAN)
(https://github.com/vvictoryuki/BSRGAN_implementation) 对于实际图像效果很好
Real-ESRGAN: TrainingReal-World Blind Super-Resolution with Pure Synthetic Data
Real-ESRGAN: (https://zhuanlan.zhihu.com/p/401387995)
(https://zhuanlan.zhihu.com/p/542750836)
振铃线性:https://blog.csdn.net/fengye2two/article/details/79895542
14. dasr oppo
https://blog.csdn.net/tywwwww/article/details/128036503
这篇关于gan, pixel2pixel, cyclegan, srgan图像超分辨率的文章就介绍到这儿,希望我们推荐的文章对编程师们有所帮助!


