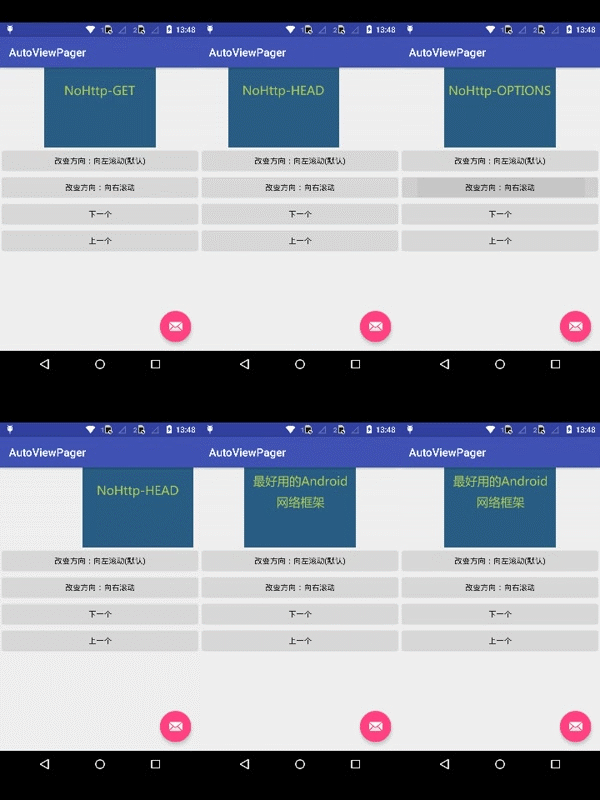
本文主要是介绍手把手教你用ViewPager自定义实现Banner轮播,希望对大家解决编程问题提供一定的参考价值,需要的开发者们随着小编来一起学习吧!
效果演示
需求分析、解决方案
轮播器最重要的几个特点就是:自动滚动、手动滑动、滚动方向、每个Item显示时间。因此我们设计提供以下几个方法供外部调用:
/*** 设置每个Item的播放时间,默认3000毫秒*/
public void setShowTime(int showTimeMillis);/*** 设置滚动方向,默认向左滚动*/
public void setDirection(Direction direction);/*** 开始自动滚动*/
public void start();/*** 停止自动滚动*/
public void stop();/*** 播放上一个*/
public void previous();/*** 播放下一个*/
public void next();
仔细看过上面方法的同学会发现,和我们的分析想比,还缺少一个手动滑动的方法,我们知道手势滑动肯定要用到onTouch等方法,所以我们想到v4包下ViewPager自带滑动效果,而且可以代码控制跳转到某个Item。因此我们自定义View继承ViewPager不就完美解决了。
我们看到上面的方法中有一个Direction类,这个类不是系统的,是达哥自定义的方向控制枚举,目前最常见的轮播方向无非就是左右轮播(上下本次先不讨论),代码如下:
public enum Direction {/*** 向左行动,播放的下一张应该是右边的*/LEFT,/*** 向右行动,播放的下一张应该是左边的*/RIGHT
}
自定义View如何实现以及原理
上面分析到需要继承ViewPager,so我们先结合上面的几个方法把完整的代码撸起来:
public class AutoPlayViewPager extends ViewPager {public AutoPlayViewPager(Context context) {super(context);}public AutoPlayViewPager(Context context, AttributeSet attrs) {super(context, attrs);}/*** 播放时间*/private int showTime = 3 * 1000;/*** 滚动方向*/private Direction direction = Direction.LEFT;/*** 设置播放时间,默认3秒** @param showTimeMillis 毫秒*/public void setShowTime(int showTimeMillis) {this.showTime = showTimeMillis;}/*** 设置滚动方向,默认向左滚动** @param direction 方向*/public void setDirection(Direction direction) {this.direction = direction;}/*** 开始*/public void start() {// TODO 待实现开始播放}/*** 停止*/public void stop() {// TODO 待实现停止播放}/*** 播放上一个*/public void previous() {// TODO 待实现播放上一个}/*** 播放下一个*/public void next() {// TODO 待实现播放下一个}public enum Direction {/*** 向左行动,播放的应该是右边的*/LEFT,/*** 向右行动,播放的应该是左边的*/RIGHT}
}
setShowTime(int showTimeMillis)方法和setDirection(Direction direction)就是记录一下某一个状态而已,现在已经简单的实现了,重点就是开始播放和停止播放。
定时轮播的原理分析和实现
前方高能,各位看官小心裤子别掉了。现在我们使用ViewPager最主要的就是自动播放了,所以我们需要一个定时器去执行任务,but这样子就得用到Handler,就有点小题大做了。这里介绍View的两个方法:
// 线程将被添加到消息队列,这个线程将会在UI线程(主线程)运行。
public boolean post(Runnable action);
// 线程将被添加到消息队列,在指定的时间之后运行,这个线程将会在UI线程(主线程)运行。
public boolean postDelayed(Runnable action, long delayMillis);
看到第二个方法犹如醍醐灌顶啊有木有,既然是所有View都有的方法,ViewPager必须有啊,这样不就可以在主线程定时发布一个任务了吗?所以我们这里写一个Runnable来做这个定时任务。
/**
* 播放器
*/
private Runnable player = new Runnable() {
@Override
public void run() {
play(direction);
}
};
这里看到有一个play(direction);的方法待我们去实现,我们暂且把这个方法先放一放,我们先来看怎么利用这个private Runnable player完成开始播放和停止播放。
实现开始播放和停止播放
开始播放时我们为了让当前显示的图片显示showTime的时间,所以我们利用postDelayed(Runnable action, long delayMillis);方法在showTime时间之后触发private Runnable player:
/**
* 开始
*/
public void start() {
postDelayed(player, showTime);
}
停止播放,我们把这个线程给取消了就行了,因此停止的方法的实现是:
/**
* 停止
*/
public void stop() {
removeCallbacks(player);
}
但是为了防止开发者不停的调用start方法造成卡死现象,我们在start中做个优化,每次star前先把之前private Runable player移除了,因此start方法完整的代码是:
/**
* 开始
*/
public void start() {
stop();
postDelayed(player, showTime);
}
核心重点:如何根据方向播放上一张和下一张
本例的核心和重点来了,现在回过头去实现刚才搁置的play(direction);方法,它要根据播放的方向来播放上一张和下一张,我们具体看代码,尤其要细细品味注释哦:
/**
* 执行播放
*
* @param direction 播放方向
*/
private synchronized void play(Direction direction) {
// 拿到ViewPager的适配器
PagerAdapter pagerAdapter = getAdapter();
if (pagerAdapter != null) {// 判空
// Item数量
int count = pagerAdapter.getCount();
// ViewPager现在显示的第几个?
int currentItem = getCurrentItem();
switch (direction) {
case LEFT:// 如是向左滚动的,currentItem+1播放下一个
currentItem++;
// 如果+到最后一个了,就到第一个
if (currentItem >= count)
currentItem = 0;
break;
case RIGHT:// 如是向右滚动的,currentItem-1播放上一个
currentItem--;
// 如果-到低一个了,就到最后一个
if (currentItem < 0)
currentItem = count - 1;
break;
}
setCurrentItem(currentItem);// 播放根据方向计算出来的position的item
}
// 这就是当可以循环播放的重点,每次播放完成后,再次开启一个定时任务
start();
}
到这里其实我们已经实现轮播啦,但是我们在使用的时候发现存在一种情况,当我们用手指刚滑完一张,紧接着第二张又出来了,不卖关子了,原因就是我们手指滑动的时候private Runnable player这个任务没有停止,所以我们在手指滑动时停止player,手指松开的时候再次开启player:
@Override
protected void onFinishInflate() {
addOnPageChangeListener(new OnPageChangeListener() {
@Override
public void onPageScrolled(int position, float positionOffset, int positionOffsetPixels) {
}
@Override
public void onPageSelected(int position) {
}
@Override
public void onPageScrollStateChanged(int state) {
if (state == SCROLL_STATE_IDLE)
start();
else if (state == SCROLL_STATE_DRAGGING)
stop();
}
});
}
有些同学可能不知道为什么不在构造方法中而要在onFinishInflate中addOnPageChangeListener,是因为这个方法会在view被加载完成后调用,所以我们在这里做一些初始化的工作比较合理。
自定义ViewPager的完整代码如下:
package com.yolanda.autoviewpager;import android.content.Context;
import android.support.v4.view.PagerAdapter;
import android.support.v4.view.ViewPager;
import android.util.AttributeSet;/*** <p>用ViewPager自定义的广告轮播器。</p>.* * @author Yolanda; */
public class AutoPlayViewPager extends ViewPager {public AutoPlayViewPager(Context context) {super(context);}public AutoPlayViewPager(Context context, AttributeSet attrs) {super(context, attrs);}/*** 播放时间*/private int showTime = 3 * 1000;/*** 滚动方向*/private Direction direction = Direction.LEFT;/*** 设置播放时间,默认3秒** @param showTimeMillis 毫秒*/public void setShowTime(int showTimeMillis) {this.showTime = showTimeMillis; // 本文后期更新,demo中此处有误。}/*** 设置滚动方向,默认向左滚动** @param direction 方向*/public void setDirection(Direction direction) {this.direction = direction;}/*** 开始*/public void start() {stop();postDelayed(player, showTime);}/*** 停止*/public void stop() {removeCallbacks(player);}/*** 播放上一个*/public void previous() {if (direction == Direction.RIGHT) {play(Direction.LEFT);} else if (direction == Direction.LEFT) {play(Direction.RIGHT);}}/*** 播放下一个*/public void next() {play(direction);}/*** 执行播放** @param direction 播放方向*/private synchronized void play(Direction direction) {PagerAdapter pagerAdapter = getAdapter();if (pagerAdapter != null) {int count = pagerAdapter.getCount();int currentItem = getCurrentItem();switch (direction) {case LEFT:currentItem++;if (currentItem > count)currentItem = 0;break;case RIGHT:currentItem--;if (currentItem < 0)currentItem = count;break;}setCurrentItem(currentItem);}start();}/*** 播放器*/private Runnable player = new Runnable() {@Overridepublic void run() {play(direction);}};public enum Direction {/*** 向左行动,播放的应该是右边的*/LEFT,/*** 向右行动,播放的应该是左边的*/RIGHT}@Overrideprotected void onFinishInflate() {super.onFinishInflate();addOnPageChangeListener(new OnPageChangeListener() {@Overridepublic void onPageScrolled(int position, float positionOffset, int positionOffsetPixels) {}@Overridepublic void onPageSelected(int position) {}@Overridepublic void onPageScrollStateChanged(int state) {if (state == SCROLL_STATE_IDLE)start();else if (state == SCROLL_STATE_DRAGGING)stop();}});}
}
考虑到这里post了一个Runnable,它持有当前Activity的实例,所以在AutoPlayViewPager所在的当前Activity销毁时可能会发生内存泄漏,我们在View销毁的时候移除Runnable:
@Override
protected void onDetachedFromWindow() {
removeCallbacks(player);
super.onDetachedFromWindow();
}
特别注意这是后来更新文章后添加的,所以下载的demo中没有移除这个Runnable,大家千万记得自己加上。
如何使用
其实我们没有对ViewPager做什么太大的干涉,所以我们使用和原生的没有什么区别。这里有几个注意的地方也写出来,免得有人踩坑。
如果使用自定ViewPager
AutoPlayViewPager autoPlayViewPage = (AutoPlayViewPager) findViewById(R.id.view_pager);
autoPlayViewPage.setAdapter(bannerAdapter);
// 以下两个方法不是必须的,因为有默认值
autoPlayViewPage.setDirection(AutoPlayViewPager.Direction.LEFT);// 设置播放方向
autoPlayViewPage.setCurrentItem(200); // 设置每个Item展示的时间
autoPlayViewPage.start(); // 开始轮播
如何优化Adapter
其实我们看到就是多调用了一个star方法,但是还不够,我们在适配器中还要做一点点小事情。为了能让轮播无限循环,所以我们在getCount中返回int的最大值:
@Override
public int getCount() {
return resIds == null ? 0 : Integer.MAX_VALUE;
}
resIds是我们的数据源。该了这个Count后,我们的instantiateItem()方法也要修改,不然会发生下标越界的异常,我们在拿到position后要做个处理:
@Override
public Object instantiateItem(ViewGroup container, int position) {
position = position % resIds.size();
Object xxoo = resIds.get(position);
...
}
这篇关于手把手教你用ViewPager自定义实现Banner轮播的文章就介绍到这儿,希望我们推荐的文章对编程师们有所帮助!


