本文主要是介绍华为配置WDS手拉手业务示例,希望对大家解决编程问题提供一定的参考价值,需要的开发者们随着小编来一起学习吧!
配置WDS手拉手业务示例
组网图形
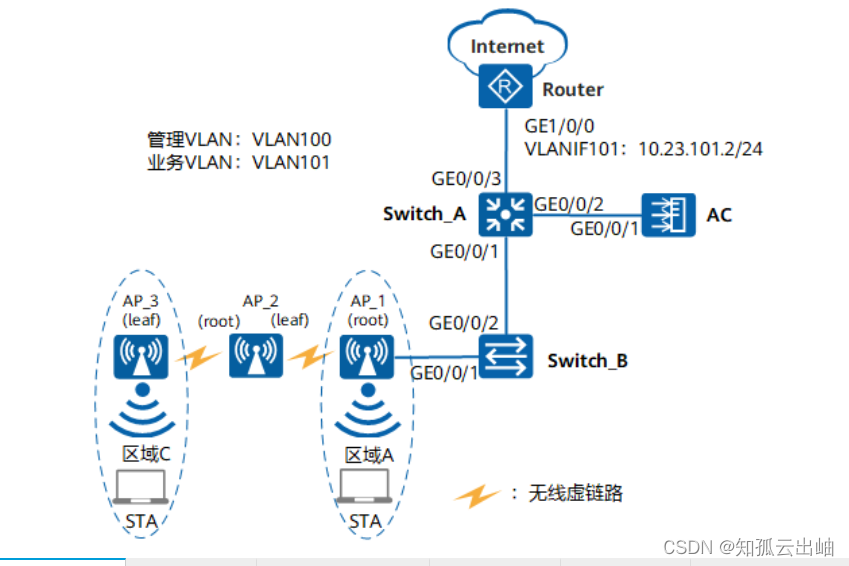
数据规划
| AP | 类型 | MAC |
|---|---|---|
| AP_1 | AP8130DN | 60de-4474-9640 |
| AP_2 | AP8130DN | dcd2-fc04-b500 |
| AP_3 | AP8130DN | dcd2-fc96-e4c0 |
配置注意事项
-
建议在与AP直连的设备接口上配置端口隔离,如果不配置端口隔离,尤其是业务数据转发方式采用直接转发时,可能会在VLAN内形成大量不必要的广播报文,导致网络阻塞,影响用户体验。
-
隧道转发模式下,管理VLAN和业务VLAN不能配置为同一VLAN,且AP和AC之间只能放通管理VLAN,不能放通业务VLAN。
- 请按照WDS网络网规设计选用合适的天线,并选用天线校准工具进行校准。
操作步骤
- 配置周边设备
# 配置接入交换机Switch_B的GE0/0/1和GE0/0/2接口加入VLAN100和VLAN101,GE0/0/1的缺省VLAN为VLAN100。
<span style="color:#333333"><span style="background-color:#dddddd"><HUAWEI> <strong id="ZH-CN_TASK_0176912378__zh-cn_task_0176912382_b1141689396190921">system-view</strong>
[HUAWEI] <strong id="ZH-CN_TASK_0176912378__zh-cn_task_0176912382_b1956857707190921">sysname Switch_B</strong>
[Switch_B] <strong id="ZH-CN_TASK_0176912378__zh-cn_task_0176912382_b402801205190921">vlan batch 100 to 101</strong>
[Switch_B] <strong id="ZH-CN_TASK_0176912378__zh-cn_task_0176912382_b611115067190921">interface gigabitEthernet 0/0/1</strong>
[Switch_B-GigabitEthernet0/0/1] <strong id="ZH-CN_TASK_0176912378__zh-cn_task_0176912382_b212116232190921">port link-type trunk</strong>
[Switch_B-GigabitEthernet0/0/1] <strong id="ZH-CN_TASK_0176912378__zh-cn_task_0176912382_b1767714945190921">port trunk pvid vlan 100</strong>
[Switch_B-GigabitEthernet0/0/1] <strong id="ZH-CN_TASK_0176912378__zh-cn_task_0176912382_b1214832445190921">port trunk allow-pass vlan 100 to 101</strong>
[Switch_B-GigabitEthernet0/0/1] <strong id="ZH-CN_TASK_0176912378__zh-cn_task_0176912382_b36947418190921">port-isolate enable</strong>
[Switch_B-GigabitEthernet0/0/1] <strong id="ZH-CN_TASK_0176912378__zh-cn_task_0176912382_b1464937259190921">quit</strong>
[Switch_B] <strong id="ZH-CN_TASK_0176912378__zh-cn_task_0176912382_b1250273224190921">interface gigabitEthernet 0/0/2</strong>
[Switch_B-GigabitEthernet0/0/2] <strong id="ZH-CN_TASK_0176912378__zh-cn_task_0176912382_b541902358190921">port link-type trunk</strong>
[Switch_B-GigabitEthernet0/0/2] <strong id="ZH-CN_TASK_0176912378__zh-cn_task_0176912382_b1749851799190921">port trunk allow-pass vlan 100 to 101</strong>
[Switch_B-GigabitEthernet0/0/2] <strong id="ZH-CN_TASK_0176912378__zh-cn_task_0176912382_b809501523190921">quit</strong></span></span>
# 配置汇聚交换机Switch_A的GE0/0/1接口加入VLAN100和VLAN101,GE0/0/2接口加入VLAN100,GE0/0/3接口加入VLAN101。
<span style="color:#333333"><span style="background-color:#dddddd"><HUAWEI> <strong id="ZH-CN_TASK_0176912378__zh-cn_task_0176912382_b511548958190921">system-view</strong>
[HUAWEI] <strong id="ZH-CN_TASK_0176912378__zh-cn_task_0176912382_b489891529190921">sysname Switch_A</strong>
[Switch_A] <strong id="ZH-CN_TASK_0176912378__zh-cn_task_0176912382_b1311387655190921">vlan batch 100 to 101</strong>
[Switch_A] <strong id="ZH-CN_TASK_0176912378__zh-cn_task_0176912382_b1243101138190921">interface gigabitEthernet 0/0/1</strong>
[Switch_A-GigabitEthernet0/0/1] <strong id="ZH-CN_TASK_0176912378__zh-cn_task_0176912382_b1931666829190921">port link-type trunk</strong>
[Switch_A-GigabitEthernet0/0/1] <strong id="ZH-CN_TASK_0176912378__zh-cn_task_0176912382_b1503245325190921">port trunk allow-pass vlan 100 to 101</strong>
[Switch_A-GigabitEthernet0/0/1] <strong id="ZH-CN_TASK_0176912378__zh-cn_task_0176912382_b289486029190921">quit</strong>
[Switch_A] <strong id="ZH-CN_TASK_0176912378__zh-cn_task_0176912382_b458500069190921">interface gigabitEthernet 0/0/2</strong>
[Switch_A-GigabitEthernet0/0/2] <strong id="ZH-CN_TASK_0176912378__zh-cn_task_0176912382_b779944513190921">port link-type trunk</strong>
[Switch_A-GigabitEthernet0/0/2] <strong id="ZH-CN_TASK_0176912378__zh-cn_task_0176912382_b85068874190921">port trunk allow-pass vlan 100</strong>
[Switch_A-GigabitEthernet0/0/2] <strong id="ZH-CN_TASK_0176912378__zh-cn_task_0176912382_b2034823831190921">quit</strong>
[Switch_A] <strong id="ZH-CN_TASK_0176912378__zh-cn_task_0176912382_b929617411190921">interface gigabitEthernet 0/0/3</strong>
[Switch_A-GigabitEthernet0/0/3] <strong id="ZH-CN_TASK_0176912378__zh-cn_task_0176912382_b766152642190921">port link-type trunk</strong>
[Switch_A-GigabitEthernet0/0/3] <strong id="ZH-CN_TASK_0176912378__zh-cn_task_0176912382_b1952032455190921">port trunk allow-pass vlan 101</strong>
[Switch_A-GigabitEthernet0/0/3] <strong id="ZH-CN_TASK_0176912378__zh-cn_task_0176912382_b204948751190921">quit</strong></span></span>
# 配置Router的接口GE1/0/0加入VLAN101,创建接口VLANIF101并配置IP地址为10.23.101.2/24。<span style="color:#333333"><span style="background-color:#dddddd"><Huawei> <strong id="ZH-CN_TASK_0176912378__zh-cn_task_0176912351_b118005268190921">system-view</strong> [Huawei] <strong id="ZH-CN_TASK_0176912378__zh-cn_task_0176912351_b1176501588190921">sysname Router</strong> [Router] <strong id="ZH-CN_TASK_0176912378__zh-cn_task_0176912351_b995805857190921">vlan batch 101</strong> [Router] <strong id="ZH-CN_TASK_0176912378__zh-cn_task_0176912351_b906637926190921">interface gigabitethernet 1/0/0</strong> [Router-GigabitEthernet1/0/0] <strong id="ZH-CN_TASK_0176912378__zh-cn_task_0176912351_b406876624190921">port link-type trunk</strong> [Router-GigabitEthernet1/0/0] <strong id="ZH-CN_TASK_0176912378__zh-cn_task_0176912351_b1226529678190921">port trunk allow-pass vlan 101</strong> [Router-GigabitEthernet1/0/0] <strong id="ZH-CN_TASK_0176912378__zh-cn_task_0176912351_b1131638750190921">quit</strong> [Router] <strong id="ZH-CN_TASK_0176912378__zh-cn_task_0176912351_b648829236190921">interface vlanif 101</strong> [Router-Vlanif101] <strong id="ZH-CN_TASK_0176912378__zh-cn_task_0176912351_b1969966747190921">ip address 10.23.101.2 24</strong> [Router-Vlanif101] <strong id="ZH-CN_TASK_0176912378__zh-cn_task_0176912351_b1246477905190921">quit</strong></span></span> - 配置AC与其它网络设备互通
# 配置AC的接口GE0/0/1,允许携带VLAN100的报文通过。
<span style="color:#333333"><span style="background-color:#dddddd"><HUAWEI> <strong id="ZH-CN_TASK_0176912378__b570291284190921">system-view</strong> [HUAWEI] <strong id="ZH-CN_TASK_0176912378__b1926118503190921">sysname AC</strong> [AC] <strong id="ZH-CN_TASK_0176912378__b96916095190921">vlan batch 100 101</strong> [AC] <strong id="ZH-CN_TASK_0176912378__b404498836190921">interface gigabitEthernet 0/0/1</strong> [AC-GigabitEthernet0/0/1] <strong id="ZH-CN_TASK_0176912378__b651322997190921">port link-type trunk</strong> [AC-GigabitEthernet0/0/1] <strong id="ZH-CN_TASK_0176912378__b2619200190921">port trunk allow-pass vlan 100</strong> [AC-GigabitEthernet0/0/1] <strong id="ZH-CN_TASK_0176912378__b987613193190921">quit</strong></span></span> - 配置DHCP服务器为STA和AP分配IP地址 DNS服务器地址请根据实际需要配置。常用配置方法如下:
- 接口地址池场景,需要在VLANIF接口视图下执行命令dhcp server dns-list ip-address &<1-8>。
- 全局地址池场景,需要在IP地址池视图下执行命令dns-list ip-address &<1-8>。
# 配置Switch_A作为DHCP服务器,通过接口地址池为STA分配IP地址。<span style="color:#333333"><span style="background-color:#dddddd">[Switch_A] <strong id="ZH-CN_TASK_0176912378__b585097426190921">dhcp enable</strong> [Switch_A] <strong id="ZH-CN_TASK_0176912378__b189439435190921">interface vlanif 101</strong> [Switch_A-Vlanif101] <strong id="ZH-CN_TASK_0176912378__b686378840190921">ip address 10.23.101.1 24</strong> [Switch_A-Vlanif101] <strong id="ZH-CN_TASK_0176912378__b1172640232190921">dhcp select interface</strong> [Switch_A-Vlanif101] <strong id="ZH-CN_TASK_0176912378__b685516536190921">dhcp server gateway-list 10.23.101.2</strong> [Switch_A-Vlanif101] <strong id="ZH-CN_TASK_0176912378__b116615007190921">quit</strong></span></span># 在AC上使能DHCP功能,并通过接口地址池为AP分配IP地址。
<span style="color:#333333"><span style="background-color:#dddddd">[AC] <strong id="ZH-CN_TASK_0176912378__b535076932190921">dhcp enable</strong> [AC] <strong id="ZH-CN_TASK_0176912378__b1294910917190921">interface vlanif 100</strong> [AC-Vlanif100] <strong id="ZH-CN_TASK_0176912378__b1403704681190921">ip address 10.23.100.1 24</strong> [AC-Vlanif100] <strong id="ZH-CN_TASK_0176912378__b1618518344190921">dhcp select interface</strong> [AC-Vlanif100] <strong id="ZH-CN_TASK_0176912378__b1710882234190921">quit</strong></span></span> - 配置AP上线
# 创建AP组“ap-group1”、“ap-group2”和“ap-group3”。
<span style="color:#333333"><span style="background-color:#dddddd">[AC] <strong id="ZH-CN_TASK_0176912378__b1083860828190921">wlan</strong>
[AC-wlan-view] <strong id="ZH-CN_TASK_0176912378__b333966974190921">ap-group name ap-group1</strong>
[AC-wlan-ap-group-ap-group1] <strong id="ZH-CN_TASK_0176912378__b2129810468190921">quit</strong>
[AC-wlan-view] <strong id="ZH-CN_TASK_0176912378__b1905879936190921">ap-group name ap-group2</strong>
[AC-wlan-ap-group-ap-group2] <strong id="ZH-CN_TASK_0176912378__b228340447190921">quit</strong>
[AC-wlan-view] <strong id="ZH-CN_TASK_0176912378__b54960352190921">ap-group name ap-group3</strong>
[AC-wlan-ap-group-ap-group3] <strong id="ZH-CN_TASK_0176912378__b1032751598190921">quit</strong></span></span>
# 创建域管理模板,在域管理模板下配置AC的国家码并在AP组下引用域管理模板。
<span style="color:#333333"><span style="background-color:#dddddd">[AC-wlan-view] <strong id="ZH-CN_TASK_0176912378__b1230094218190921">regulatory-domain-profile name default</strong>
[AC-wlan-regulate-domain-default] <strong id="ZH-CN_TASK_0176912378__b602460734190921">country-code cn</strong>
[AC-wlan-regulate-domain-default] <strong id="ZH-CN_TASK_0176912378__b1938077640190921">quit</strong>
[AC-wlan-view] <strong id="ZH-CN_TASK_0176912378__b1312519707190921">ap-group name ap-group1</strong>
[AC-wlan-ap-group-ap-group1] <strong id="ZH-CN_TASK_0176912378__b204151839190921">regulatory-domain-profile default</strong>
Warning: Modifying the country code will clear channel, power and antenna gain configurations of the radio and reset the AP. Continue?[Y/N]:<strong id="ZH-CN_TASK_0176912378__zh-cn_task_0175818418_b17491131153716">y</strong>
[AC-wlan-ap-group-ap-group1] <strong id="ZH-CN_TASK_0176912378__b594088353190921">quit</strong>
[AC-wlan-view] <strong id="ZH-CN_TASK_0176912378__b817937082190921">ap-group name ap-group2</strong>
[AC-wlan-ap-group-ap-group2] <strong id="ZH-CN_TASK_0176912378__b815776022190921">regulatory-domain-profile default</strong>
Warning: Modifying the country code will clear channel, power and antenna gain configurations of the radio and reset the AP. Continue?[Y/N]:<strong id="ZH-CN_TASK_0176912378__zh-cn_task_0175818418_b17491131153716_1">y</strong>
[AC-wlan-ap-group-ap-group2] <strong id="ZH-CN_TASK_0176912378__b1262782621190921">quit</strong>
[AC-wlan-view] <strong id="ZH-CN_TASK_0176912378__b435925290190921">ap-group name ap-group3</strong>
[AC-wlan-ap-group-ap-group3] <strong id="ZH-CN_TASK_0176912378__b436826727190921">regulatory-domain-profile default</strong>
Warning: Modifying the country code will clear channel, power and antenna gain configurations of the radio and reset the AP. Continue?[Y/N]:<strong id="ZH-CN_TASK_0176912378__zh-cn_task_0175818418_b17491131153716_2">y</strong>
[AC-wlan-ap-group-ap-group3] <strong id="ZH-CN_TASK_0176912378__b1227479814190921">quit</strong>
[AC-wlan-view] <strong id="ZH-CN_TASK_0176912378__b741675262190921">quit</strong></span></span>
# 配置AC的源接口。
<span style="color:#333333"><span style="background-color:#dddddd">[AC] <strong id="ZH-CN_TASK_0176912378__b1601735634190921">capwap source interface vlanif 100</strong></span></span># 将AP_1加入到AP组“ap-group1”,AP_2加入到AP组“ap-group2”,AP_3加入到AP组“ap-group3”。<span style="color:#333333"><span style="background-color:#dddddd">[AC] <strong id="ZH-CN_TASK_0176912378__b1374021969190921">wlan</strong> [AC-wlan-view] <strong id="ZH-CN_TASK_0176912378__b1265509873190921">ap auth-mode mac-auth</strong> [AC-wlan-view] <strong id="ZH-CN_TASK_0176912378__b706866964190921">ap-id 1 ap-mac 60de-4474-9640</strong> [AC-wlan-ap-1] <strong id="ZH-CN_TASK_0176912378__b176619692190921">ap-name AP_1</strong> [AC-wlan-ap-1] <strong id="ZH-CN_TASK_0176912378__b600538503190921">ap-group ap-group1</strong> Warning: This operation may cause AP reset. If the country code changes, it will clear channel, power and antenna gain configuration s of the radio, Whether to continue? [Y/N]:<strong id="ZH-CN_TASK_0176912378__zh-cn_task_0175818418_b1651706244190906">y</strong> [AC-wlan-ap-1] <strong id="ZH-CN_TASK_0176912378__b435831157190921">quit</strong> [AC-wlan-view] <strong id="ZH-CN_TASK_0176912378__b1734348834190921">ap-id 2 ap-mac dcd2-fc04-b500</strong> [AC-wlan-ap-2] <strong id="ZH-CN_TASK_0176912378__b1101981659190921">ap-name AP_2</strong> [AC-wlan-ap-2] <strong id="ZH-CN_TASK_0176912378__b1077418825190921">ap-group ap-group2</strong> Warning: This operation may cause AP reset. If the country code changes, it will clear channel, power and antenna gain configuration s of the radio, Whether to continue? [Y/N]:<strong id="ZH-CN_TASK_0176912378__zh-cn_task_0175818418_b1651706244190906_1">y</strong> [AC-wlan-ap-2] <strong id="ZH-CN_TASK_0176912378__b1999555100190921">quit</strong> [AC-wlan-view] <strong id="ZH-CN_TASK_0176912378__b1250311975190921">ap-id 3 ap-mac dcd2-fc96-e4c0</strong> [AC-wlan-ap-3] <strong id="ZH-CN_TASK_0176912378__b1533697021190921">ap-name AP_3</strong> [AC-wlan-ap-3] <strong id="ZH-CN_TASK_0176912378__b1508108276190921">ap-group ap-group3</strong> Warning: This operation may cause AP reset. If the country code changes, it will clear channel, power and antenna gain configuration s of the radio, Whether to continue? [Y/N]:<strong id="ZH-CN_TASK_0176912378__zh-cn_task_0175818418_b1651706244190906_2">y</strong> [AC-wlan-ap-3] <strong id="ZH-CN_TASK_0176912378__b1982018367190921">quit</strong></span></span> - 配置WDS业务参数 # 配置WDS节点使用的主要射频参数。本例中使用AP_1和AP_3的是AP8130DN的射频1,AP_2使用AP8130DN的射频0和射频1。配置AP_2的射频0工作在5GHz频段,为了减少信道干扰配置AP_2的射频0和射频1在不同的信道,射频1用于和AP_1建立WDS链路,射频0用于和AP_3建立WDS链路。“coverage distance”参数为射频覆盖距离,缺省情况下是3,单位是100m。本例中使用参数为4,用户可以根据实际情况配置该参数。
在WDS网络中,建立WDS链路的射频必须为同一信道。
<span style="color:#333333"><span style="background-color:#dddddd">[AC-wlan-view] <strong id="ZH-CN_TASK_0176912378__b973163930190921">ap-id 2</strong>
[AC-wlan-ap-2] <strong id="ZH-CN_TASK_0176912378__b1881699822190921">radio 0</strong>
[AC-wlan-radio-2/0] <strong id="ZH-CN_TASK_0176912378__b594094206190921">frequency 5g</strong>
Warning: Modifying the frequency band will delete the channel, power, and antenn
a gain configurations of the current radio on the AP and reboot the AP. Continue
?[Y/N]:<strong id="ZH-CN_TASK_0176912378__b1855572944920">y</strong>
[AC-wlan-radio-2/0] <strong id="ZH-CN_TASK_0176912378__b1918124164190921">quit</strong>
[AC-wlan-ap-2] <strong id="ZH-CN_TASK_0176912378__b2038603550190921">quit</strong>
[AC-wlan-view] <strong id="ZH-CN_TASK_0176912378__b1099814393190921">ap-id 1</strong>
[AC-wlan-ap-1] <strong id="ZH-CN_TASK_0176912378__b1669668313190921">radio 1</strong>
[AC-wlan-radio-1/1] <strong id="ZH-CN_TASK_0176912378__b1295367688190921">channel 40mhz-plus 157</strong>
Warning: This action may cause service interruption. Continue?[Y/N]<strong id="ZH-CN_TASK_0176912378__zh-cn_task_0175818418_b1384307436190906">y</strong>
[AC-wlan-radio-1/1] <strong id="ZH-CN_TASK_0176912378__b1221378632190921">coverage distance 4</strong>
[AC-wlan-radio-1/1] <strong id="ZH-CN_TASK_0176912378__b1620252618190921">quit</strong>
[AC-wlan-ap-1] <strong id="ZH-CN_TASK_0176912378__b990496967190921">quit</strong>
[AC-wlan-view] <strong id="ZH-CN_TASK_0176912378__b1896739578190921">ap-id 2</strong>
[AC-wlan-ap-2] <strong id="ZH-CN_TASK_0176912378__b2050334401190921">radio 0</strong>
[AC-wlan-radio-2/0] <strong id="ZH-CN_TASK_0176912378__b1449906778190921">channel 40mhz-plus 149</strong>
Warning: This action may cause service interruption. Continue?[Y/N]<strong id="ZH-CN_TASK_0176912378__zh-cn_task_0175818418_b1384307436190906_1">y</strong>
[AC-wlan-radio-2/0] <strong id="ZH-CN_TASK_0176912378__b1331953824190921">coverage distance 4</strong>
[AC-wlan-radio-2/0] <strong id="ZH-CN_TASK_0176912378__b713880646190921">quit</strong>
[AC-wlan-ap-2] <strong id="ZH-CN_TASK_0176912378__b1137368453190921">radio 1</strong>
[AC-wlan-radio-2/1] <strong id="ZH-CN_TASK_0176912378__b823627637190921">channel 40mhz-plus 157</strong>
Warning: This action may cause service interruption. Continue?[Y/N]<strong id="ZH-CN_TASK_0176912378__zh-cn_task_0175818418_b1384307436190906_2">y</strong>
[AC-wlan-radio-2/1] <strong id="ZH-CN_TASK_0176912378__b1762660870190921">coverage distance 4</strong>
[AC-wlan-radio-2/1] <strong id="ZH-CN_TASK_0176912378__b1281892212190921">quit</strong>
[AC-wlan-ap-2] <strong id="ZH-CN_TASK_0176912378__b1863079157190921">quit</strong>
[AC-wlan-view] <strong id="ZH-CN_TASK_0176912378__b1502886139190921">ap-id 3</strong>
[AC-wlan-ap-3] <strong id="ZH-CN_TASK_0176912378__b604612192190921">radio 1</strong>
[AC-wlan-radio-3/1] <strong id="ZH-CN_TASK_0176912378__b298941086190921">channel 40mhz-plus 149</strong>
Warning: This action may cause service interruption. Continue?[Y/N]<strong id="ZH-CN_TASK_0176912378__zh-cn_task_0175818418_b1384307436190906_3">y</strong>
[AC-wlan-radio-3/1] <strong id="ZH-CN_TASK_0176912378__b1153657628190921">coverage distance 4</strong>
[AC-wlan-radio-3/1] <strong id="ZH-CN_TASK_0176912378__b1519769423190921">quit</strong>
[AC-wlan-ap-3] <strong id="ZH-CN_TASK_0176912378__b1134031871190921">quit</strong></span></span>
# 配置WDS链路使用的安全模板“wds-security”,“wds-security”的安全策略为WPA2+PSK+AES。
<span style="color:#333333"><span style="background-color:#dddddd">[AC-wlan-view] <strong id="ZH-CN_TASK_0176912378__b403659190190921">security-profile name wds-security</strong>
[AC-wlan-sec-prof-wds-security] <strong id="ZH-CN_TASK_0176912378__b680615166190921">security wpa2 psk pass-phrase a1234567 aes</strong>
[AC-wlan-sec-prof-wds-security] <strong id="ZH-CN_TASK_0176912378__b1709946791190921">quit</strong></span></span>
# 配置WDS白名单。配置AP_1绑定的WDS白名单“wds-list1”,仅允许AP_2接入。配置AP_2绑定的WDS白名单“wds-list2”,仅允许AP_3接入。
<span style="color:#333333"><span style="background-color:#dddddd">[AC-wlan-view] <strong id="ZH-CN_TASK_0176912378__b36601203190921">wds-whitelist-profile name wds-list1</strong>
[AC-wlan-wds-whitelist-wds-list1] <strong id="ZH-CN_TASK_0176912378__b1735750903190921">peer-ap mac dcd2-fc04-b500</strong>
[AC-wlan-wds-whitelist-wds-list1] <strong id="ZH-CN_TASK_0176912378__b916949979190921">quit</strong>
[AC-wlan-view] <strong id="ZH-CN_TASK_0176912378__b685098719190921">wds-whitelist-profile name wds-list2</strong>
[AC-wlan-wds-whitelist-wds-list2] <strong id="ZH-CN_TASK_0176912378__b1881723973190921">peer-ap mac dcd2-fc96-e4c0</strong>
[AC-wlan-wds-whitelist-wds-list2] <strong id="ZH-CN_TASK_0176912378__b1433362236190921">quit</strong></span></span>
# 配置WDS模板“wds-root”。网桥标识为“wlan-wds”,网桥模式为“root”,引用安全模板“wds-security”,以tagged形式允许无线业务VLAN101通过。
<span style="color:#333333"><span style="background-color:#dddddd">[AC-wlan-view] <strong id="ZH-CN_TASK_0176912378__b1038160682190921">wds-profile name wds-root</strong>
[AC-wlan-wds-prof-wds-root] <strong id="ZH-CN_TASK_0176912378__b1316032594190921">wds-name wlan-wds</strong>
[AC-wlan-wds-prof-wds-root] <strong id="ZH-CN_TASK_0176912378__b447826258190921">wds-mode root</strong>
[AC-wlan-wds-prof-wds-root] <strong id="ZH-CN_TASK_0176912378__b2069070593190921">security-profile wds-security</strong>
[AC-wlan-wds-prof-wds-root] <strong id="ZH-CN_TASK_0176912378__b146100745190921">vlan tagged 101</strong>
[AC-wlan-wds-prof-wds-root] <strong id="ZH-CN_TASK_0176912378__b1070862885190921">quit</strong></span></span>
# 配置WDS模板“wds-leaf”。网桥标识为“wlan-wds”,网桥模式为“leaf”,引用安全模板“wds-security”,以tagged形式允许无线业务VLAN101通过。
<span style="color:#333333"><span style="background-color:#dddddd">[AC-wlan-view] <strong id="ZH-CN_TASK_0176912378__b1978990317190921">wds-profile name wds-leaf</strong>
[AC-wlan-wds-prof-wds-leaf] <strong id="ZH-CN_TASK_0176912378__b209671589190921">wds-name wlan-wds</strong>
[AC-wlan-wds-prof-wds-leaf] <strong id="ZH-CN_TASK_0176912378__b1205789701190921">wds-mode leaf</strong>
[AC-wlan-wds-prof-wds-leaf] <strong id="ZH-CN_TASK_0176912378__b1124331768190921">security-profile wds-security</strong>
[AC-wlan-wds-prof-wds-leaf] <strong id="ZH-CN_TASK_0176912378__b1747517715190921">vlan tagged 101</strong>
[AC-wlan-wds-prof-wds-leaf] <strong id="ZH-CN_TASK_0176912378__b180610353190921">quit</strong></span></span>
# 配置AP组“ap-group1”的射频1引用WDS白名单“wds-list1”。配置AP组“ap-group2”的射频0引用WDS白名单“wds-list2”。
<span style="color:#333333"><span style="background-color:#dddddd">[AC-wlan-view] <strong id="ZH-CN_TASK_0176912378__b61345628190921">ap-group name ap-group1</strong> [AC-wlan-ap-group-ap-group1] <strong id="ZH-CN_TASK_0176912378__b21897143190921">radio 1</strong> [AC-wlan-group-radio-ap-group1/1] <strong id="ZH-CN_TASK_0176912378__b1700089180190921">wds-whitelist-profile wds-list1</strong> [AC-wlan-group-radio-ap-group1/1] <strong id="ZH-CN_TASK_0176912378__b1318962636190921">quit</strong> [AC-wlan-ap-group-ap-group1] <strong id="ZH-CN_TASK_0176912378__b7517099190921">quit</strong> [AC-wlan-view] <strong id="ZH-CN_TASK_0176912378__b25484107190921">ap-group name ap-group2</strong> [AC-wlan-ap-group-ap-group2] <strong id="ZH-CN_TASK_0176912378__b1891047689190921">radio 0</strong> [AC-wlan-group-radio-ap-group2/0] <strong id="ZH-CN_TASK_0176912378__b715150691190921">wds-whitelist-profile wds-list2</strong> [AC-wlan-group-radio-ap-group2/0] <strong id="ZH-CN_TASK_0176912378__b2099109151190921">quit</strong> [AC-wlan-ap-group-ap-group2] <strong id="ZH-CN_TASK_0176912378__b781464261190921">quit</strong></span></span> - 在AP组引用相关模板,使WDS业务生效
# 配置AP组“ap-group1”,引用WDS模板“wds-root”。
<span style="color:#333333"><span style="background-color:#dddddd">[AC-wlan-view] <strong id="ZH-CN_TASK_0176912378__b1602084839190921">ap-group name ap-group1</strong>
[AC-wlan-ap-group-ap-group1] <strong id="ZH-CN_TASK_0176912378__b2053795237190921">wds-profile wds-root radio 1</strong>
Warning: This action may cause service interruption. Continue?[Y/N]<strong id="ZH-CN_TASK_0176912378__b1345959752190921">y</strong>
[AC-wlan-ap-group-ap-group1] <strong id="ZH-CN_TASK_0176912378__b153560152190921">quit</strong></span></span>
# 配置AP组“ap-group2”,引用WDS模板“wds-root”和“wds-leaf”。
<span style="color:#333333"><span style="background-color:#dddddd">[AC-wlan-view] <strong id="ZH-CN_TASK_0176912378__b435889682190921">ap-group name ap-group2</strong>
[AC-wlan-ap-group-ap-group2] <strong id="ZH-CN_TASK_0176912378__b1308033525190921">wds-profile wds-leaf radio 1</strong>
Warning: This action may cause service interruption. Continue?[Y/N]<strong id="ZH-CN_TASK_0176912378__b1195614921190921">y</strong>
[AC-wlan-ap-group-ap-group2] <strong id="ZH-CN_TASK_0176912378__b1295779174190921">wds-profile wds-root radio 0</strong>
Warning: This action may cause service interruption. Continue?[Y/N]<strong id="ZH-CN_TASK_0176912378__b1778551390190921">y</strong>
[AC-wlan-ap-group-ap-group2] <strong id="ZH-CN_TASK_0176912378__b174749758190921">quit</strong></span></span>
# 配置AP组“ap-group3”,引用WDS模板“wds-leaf”。
<span style="color:#333333"><span style="background-color:#dddddd">[AC-wlan-view] <strong id="ZH-CN_TASK_0176912378__b299621465190921">ap-group name ap-group3</strong> [AC-wlan-ap-group-ap-group3] <strong id="ZH-CN_TASK_0176912378__b1283922214190921">wds-profile wds-leaf radio 1</strong> Warning: This action may cause service interruption. Continue?[Y/N]<strong id="ZH-CN_TASK_0176912378__b10513943190921">y</strong> [AC-wlan-ap-group-ap-group3] <strong id="ZH-CN_TASK_0176912378__b618593862190921">quit</strong></span></span> - 配置WLAN业务参数 # 创建名为“wlan-net”的安全模板,并配置安全策略。
举例中以配置WPA-WPA2+PSK+AES的安全策略为例,密码为“a1234567”,实际配置中请根据实际情况,配置符合实际要求的安全策略。
<span style="color:#333333"><span style="background-color:#dddddd">[AC-wlan-view] <strong id="ZH-CN_TASK_0176912378__zh-cn_task_0176912351_b1991067776190921">security-profile name wlan-net</strong>
[AC-wlan-sec-prof-wlan-net] <strong id="ZH-CN_TASK_0176912378__zh-cn_task_0176912351_b851752672190921">security wpa-wpa2 psk pass-phrase a1234567 aes</strong>
[AC-wlan-sec-prof-wlan-net] <strong id="ZH-CN_TASK_0176912378__zh-cn_task_0176912351_b337241812190921">quit</strong></span></span>
# 创建名为“wlan-net”的SSID模板,并配置SSID名称为“wlan-net”。<span style="color:#333333"><span style="background-color:#dddddd">[AC-wlan-view] <strong id="ZH-CN_TASK_0176912378__zh-cn_task_0176912351_b69022931190921">ssid-profile name wlan-net</strong> [AC-wlan-ssid-prof-wlan-net] <strong id="ZH-CN_TASK_0176912378__zh-cn_task_0176912351_b36723145190921">ssid wlan-net</strong> [AC-wlan-ssid-prof-wlan-net] <strong id="ZH-CN_TASK_0176912378__zh-cn_task_0176912351_b1738903244190921">quit</strong></span></span># 创建名为“wlan-net”的VAP模板,配置业务数据转发模式、业务VLAN,并且引用安全模板和SSID模板。<span style="color:#333333"><span style="background-color:#dddddd">[AC-wlan-view] <strong id="ZH-CN_TASK_0176912378__b325802584190921">vap-profile name wlan-net</strong> [AC-wlan-vap-prof-wlan-net] <strong id="ZH-CN_TASK_0176912378__b977737230190921">forward-mode direct-forward</strong> [AC-wlan-vap-prof-wlan-net] <strong id="ZH-CN_TASK_0176912378__b1495141052190921">service-vlan vlan-id 101</strong> [AC-wlan-vap-prof-wlan-net] <strong id="ZH-CN_TASK_0176912378__b694670004190921">security-profile wlan-net</strong> [AC-wlan-vap-prof-wlan-net] <strong id="ZH-CN_TASK_0176912378__b411554548190921">ssid-profile wlan-net</strong> [AC-wlan-vap-prof-wlan-net] <strong id="ZH-CN_TASK_0176912378__b1808978522190921">quit</strong></span></span># 配置AP组引用VAP模板,本例中AP_1和AP_3使用射频1作为WDS回传频段,射频0作为无线业务覆盖射频。AP_1和AP_3上射频0都使用VAP模板“wlan-net”的配置。<span style="color:#333333"><span style="background-color:#dddddd">[AC-wlan-view] <strong id="ZH-CN_TASK_0176912378__b908252767190921">ap-group name ap-group1</strong> [AC-wlan-ap-group-ap-group1] <strong id="ZH-CN_TASK_0176912378__b1382046263190921">vap-profile wlan-net wlan 1 radio 0</strong> [AC-wlan-ap-group-ap-group1] <strong id="ZH-CN_TASK_0176912378__b1809376582190921">quit</strong> [AC-wlan-view] <strong id="ZH-CN_TASK_0176912378__b65311999190921">ap-group name ap-group3</strong> [AC-wlan-ap-group-ap-group3] <strong id="ZH-CN_TASK_0176912378__b102213109190921">vap-profile wlan-net wlan 3 radio 0</strong> [AC-wlan-ap-group-ap-group3] <strong id="ZH-CN_TASK_0176912378__b340378414190921">quit</strong></span></span> - 配置AP 2.4G射频的信道和功率
举例中AP射频的信道和功率仅为示例,实际配置中请根据AP的国家码和网规结果进行配置。
# 关闭AP射频的信道和功率自动调优功能。<span style="color:#333333"><span style="background-color:#dddddd">[AC-wlan-view] <strong id="ZH-CN_TASK_0176912378__b1952682364190921">ap-id 1</strong> [AC-wlan-ap-1] <strong id="ZH-CN_TASK_0176912378__b1706775230190921">radio 0</strong> [AC-wlan-radio-1/0] <strong id="ZH-CN_TASK_0176912378__b1242645581190921">calibrate auto-channel-select disable</strong> [AC-wlan-radio-1/0] <strong id="ZH-CN_TASK_0176912378__b1300815155190921">calibrate auto-txpower-select disable</strong> [AC-wlan-radio-1/0] <strong id="ZH-CN_TASK_0176912378__b665627777190921">quit</strong> [AC-wlan-ap-1] <strong id="ZH-CN_TASK_0176912378__b1937134891190921">radio 1</strong> [AC-wlan-radio-1/1] <strong id="ZH-CN_TASK_0176912378__b964854892190921">calibrate auto-channel-select disable</strong> [AC-wlan-radio-1/1] <strong id="ZH-CN_TASK_0176912378__b1162033439190921">calibrate auto-txpower-select disable</strong> [AC-wlan-radio-1/1] <strong id="ZH-CN_TASK_0176912378__b165350850190921">quit</strong> [AC-wlan-ap-1]<strong id="ZH-CN_TASK_0176912378__b621637696190921">quit</strong> [AC-wlan-view] <strong id="ZH-CN_TASK_0176912378__b1234068911190921">ap-id 2</strong> [AC-wlan-ap-2] <strong id="ZH-CN_TASK_0176912378__b229842564190921">radio 0</strong> [AC-wlan-radio-2/0] <strong id="ZH-CN_TASK_0176912378__b1342934364190921">calibrate auto-channel-select disable</strong> [AC-wlan-radio-2/0] <strong id="ZH-CN_TASK_0176912378__b1711548828190921">calibrate auto-txpower-select disable</strong> [AC-wlan-radio-2/0] <strong id="ZH-CN_TASK_0176912378__b1360369703190921">quit</strong> [AC-wlan-ap-2] <strong id="ZH-CN_TASK_0176912378__b1588443530190921">radio 1</strong> [AC-wlan-radio-2/1] <strong id="ZH-CN_TASK_0176912378__b588981595190921">calibrate auto-channel-select disable</strong> [AC-wlan-radio-2/1] <strong id="ZH-CN_TASK_0176912378__b1840220766190921">calibrate auto-txpower-select disable</strong> [AC-wlan-radio-2/1] <strong id="ZH-CN_TASK_0176912378__b1725333130190921">quit</strong> [AC-wlan-ap-2]<strong id="ZH-CN_TASK_0176912378__b1261464425190921">quit</strong> [AC-wlan-view] <strong id="ZH-CN_TASK_0176912378__b622120274190921">ap-id 3</strong> [AC-wlan-ap-3] <strong id="ZH-CN_TASK_0176912378__b171438672190921">radio 0</strong> [AC-wlan-radio-3/0] <strong id="ZH-CN_TASK_0176912378__b2132985172190921">calibrate auto-channel-select disable</strong> [AC-wlan-radio-3/0] <strong id="ZH-CN_TASK_0176912378__b271202200190921">calibrate auto-txpower-select disable</strong> [AC-wlan-radio-3/0] <strong id="ZH-CN_TASK_0176912378__b1526864825190921">quit</strong> [AC-wlan-ap-3] <strong id="ZH-CN_TASK_0176912378__b91027589190921">radio 1</strong> [AC-wlan-radio-3/1] <strong id="ZH-CN_TASK_0176912378__b1535412287190921">calibrate auto-channel-select disable</strong> [AC-wlan-radio-3/1] <strong id="ZH-CN_TASK_0176912378__b1762757286190921">calibrate auto-txpower-select disable</strong> [AC-wlan-radio-3/1] <strong id="ZH-CN_TASK_0176912378__b85195689190921">quit</strong> [AC-wlan-ap-3]<strong id="ZH-CN_TASK_0176912378__b78324845190921">quit</strong></span></span># 配置AP射频0的信道和功率。<span style="color:#333333"><span style="background-color:#dddddd">[AC-wlan-view] <strong id="ZH-CN_TASK_0176912378__b586443666190921">ap-id 1</strong> [AC-wlan-ap-1] <strong id="ZH-CN_TASK_0176912378__b423411733190921">radio 0</strong> [AC-wlan-radio-1/0] <strong id="ZH-CN_TASK_0176912378__b2007086283190921">channel 20mhz 6</strong> Warning: This action may cause service interruption. Continue?[Y/N]y [AC-wlan-radio-1/0] <strong id="ZH-CN_TASK_0176912378__b1030138178190921">eirp 127</strong> [AC-wlan-radio-1/0] <strong id="ZH-CN_TASK_0176912378__b1917905811190921">quit</strong> [AC-wlan-ap-1]<strong id="ZH-CN_TASK_0176912378__b559165017190921">quit</strong></span></span> - 验证WDS业务配置结果
完成配置后,执行命令display ap all,查看WDS各节点是否成功上线,当“State”字段显示为“nor”,则表示AP已成功上线。
<span style="color:#333333"><span style="background-color:#dddddd">[AC-wlan-view] <strong id="ZH-CN_TASK_0176912378__b1107332355190921">display ap all</strong> Total AP information: nor : normal [3] Extra information: P : insufficient power supply -------------------------------------------------------------------------------------------------- ID MAC Name Group IP Type State STA Uptime ExtraInfo -------------------------------------------------------------------------------------------------- 1 60de-4474-9640 AP_1 ap-group1 10.23.100.254 AP8130DN <strong id="ZH-CN_TASK_0176912378__b58094169190921">nor</strong> 0 20M:16S - 2 dcd2-fc04-b500 AP_2 ap-group2 10.23.100.253 AP8130DN <strong id="ZH-CN_TASK_0176912378__b2093037571190921">nor</strong> 0 17S - 3 dcd2-fc96-e4c0 AP_3 ap-group3 10.23.100.252 AP8130DN <strong id="ZH-CN_TASK_0176912378__b1074348771190921">nor</strong> 0 3M:55S - -------------------------------------------------------------------------------------------------- Total: 3 </span></span>执行命令display wlan wds link all,查看WDS链路相关信息。
<span style="color:#333333"><span style="background-color:#dddddd">[AC-wlan-view] <strong id="ZH-CN_TASK_0176912378__b1520620916190921">display wlan wds link all</strong> Rf : radio ID Dis : coverage distance(100m) Ch : channel Per : drop percent(%) TSNR : total SNR(dB) P- : peer WDS : WDS mode Re : retry ratio(%) RSSI : RSSI(dBm) MaxR : max RSSI(dBm) ------------------------------------------------------------------------------------------------- APName P-APName Rf Dis Ch WDS P-Status RSSI MaxR Per Re TS NR SNR(Ch0~3:dB) ------------------------------------------------------------------------------------------------- AP_1 AP_2 1 4 157 root normal -39 -30 0 5 55 42/57/-/- AP_2 AP_3 0 4 149 root normal -56 -40 0 9 59 45/40/60/- AP_2 AP_1 1 4 157 leaf normal -32 -30 0 15 58 41/36/60/- AP_3 AP_2 1 4 149 leaf normal -33 -32 0 7 59 51/59/-/- --------------------------------------------------------------------------------------------------- Total: 4</span></span>WLAN业务配置会自动下发给AP,配置完成后,通过执行命令display vap ssid wlan-net查看如下信息,当“Status”项显示为“ON”时,表示AP对应的射频上的VAP已创建成功。
<span style="color:#333333"><span style="background-color:#dddddd">[AC-wlan-view] <strong id="ZH-CN_TASK_0176912378__b287801376190921">display vap ssid wlan-net</strong> WID : WLAN ID -------------------------------------------------------------------------------- AP ID AP name RfID WID BSSID Status Auth type STA SSID -------------------------------------------------------------------------------- 1 AP_1 0 1 60DE-4474-9640 <strong id="ZH-CN_TASK_0176912378__b32085512190921">ON</strong> WPA/WPA2-PSK 0 wlan-net 3 AP_3 0 3 DCD2-FC96-E4C0 <strong id="ZH-CN_TASK_0176912378__b1358396375190921">ON</strong> WPA/WPA2-PSK 0 wlan-net ------------------------------------------------------------------------------- Total: 2</span></span>STA搜索到名为“wlan-net”的无线网络,输入密码“a1234567”并正常关联后,在AC上执行display station ssid wlan-net命令,可以查看到用户已经接入到无线网络“wlan-net”中。
<span style="color:#333333"><span style="background-color:#dddddd">[AC-wlan-view] <strong id="ZH-CN_TASK_0176912378__b277077308190921">display station ssid wlan-net</strong>
Rf/WLAN: Radio ID/WLAN ID
Rx/Tx: link receive rate/link transmit rate(Mbps)
---------------------------------------------------------------------------------
STA MAC         AP ID Ap name   Rf/WLAN  Band  Type  Rx/Tx      RSSI  VLAN  IP address
---------------------------------------------------------------------------------
e019-1dc7-1e08  1     AP_1      0/1      2.4G  11n   3/34       -68   101   10.23.101.254
---------------------------------------------------------------------------------
Total: 1 2.4G: 1 5G: 0</span></span>
配置文件
-
<span style="color:#333333"><span style="background-color:#dddddd"># sysname Switch_A #vlan batch 100 to 101 # dhcp enable # interface Vlanif101ip address 10.23.101.1 255.255.255.0dhcp select interface # interface GigabitEthernet0/0/1port link-type trunkport trunk allow-pass vlan 100 to 101 # interface GigabitEthernet0/0/2port link-type trunkport trunk allow-pass vlan 100 # interface GigabitEthernet0/0/3port link-type trunkport trunk allow-pass vlan 101 # return</span></span> -
<span style="color:#333333"><span style="background-color:#dddddd"># sysname Switch_B #vlan batch 100 to 101 # interface GigabitEthernet0/0/1port link-type trunkport trunk pvid vlan 100port trunk allow-pass vlan 100 to 101port-isolate enable group 1 # interface GigabitEthernet0/0/2port link-type trunkport trunk allow-pass vlan 100 to 101 # return</span></span> -
<span style="color:#333333"><span style="background-color:#dddddd"># sysname Router # vlan batch 101 # interface Vlanif101ip address 10.23.101.2 255.255.255.0 # interface GigabitEthernet1/0/0port link-type trunkport trunk allow-pass vlan 101 # return </span></span> -
<span style="color:#333333"><span style="background-color:#dddddd">#sysname AC
#vlan batch 100 to 101
#
dhcp enable
#
interface Vlanif100ip address 10.23.100.1 255.255.255.0dhcp select interface
#
interface GigabitEthernet0/0/1port link-type trunkport trunk allow-pass vlan 100
#
capwap source interface vlanif100
#
wlansecurity-profile name wlan-netsecurity wpa-wpa2 psk pass-phrase %^%#m"tz0f>~7.[`^6RWdzwCy16hJj/Mc!,}s`X*B]}A%^%# aessecurity-profile name wds-securitysecurity wpa2 psk pass-phrase %^%#n}5+DgC3wLB.hJ34j5;*QMv<8"9#{Bq@ghBI3L9K%^%# aesssid-profile name wlan-netssid wlan-netvap-profile name wlan-netservice-vlan vlan-id 101ssid-profile wlan-netsecurity-profile wlan-netwds-whitelist-profile name wds-list1peer-ap mac dcd2-fc04-b500wds-whitelist-profile name wds-list2peer-ap mac dcd2-fc96-e4c0wds-profile name wds-leafsecurity-profile wds-securityvlan tagged 101wds-name wlan-wdswds-profile name wds-rootsecurity-profile wds-securityvlan tagged 101wds-name wlan-wdswds-mode rootregulatory-domain-profile name defaultap-group name ap-group1radio 0vap-profile wlan-net wlan 3radio 1wds-profile wds-rootwds-whitelist-profile wds-list1ap-group name ap-group2radio 0wds-profile wds-rootwds-whitelist-profile wds-list2radio 1wds-profile wds-leafap-group name ap-group3radio 0vap-profile wlan-net wlan 1radio 1wds-profile wds-leafap-id 1 type-id 39 ap-mac 60de-4474-9640 ap-sn 210235554710CB000042ap-name AP_1ap-group ap-group1radio 0channel 20mhz 6eirp 127calibrate auto-channel-select disable    calibrate auto-txpower-select disableradio 1channel 40mhz-plus 157coverage distance 4calibrate auto-channel-select disable    calibrate auto-txpower-select disableap-id 2 type-id 39 ap-mac dcd2-fc04-b500 ap-sn 210235555310CC000094ap-name AP_2ap-group ap-group2radio 0frequency 5gchannel 40mhz-plus 149eirp 127coverage distance 4 calibrate auto-channel-select disable    calibrate auto-txpower-select disableradio 1channel 40mhz-plus 157eirp 127coverage distance 4 calibrate auto-channel-select disable    calibrate auto-txpower-select disableap-id 3 type-id 39 ap-mac dcd2-fc96-e4c0 ap-sn 210235557610DB000046ap-name AP_3ap-group ap-group3radio 0channel 20mhz 11eirp 127calibrate auto-channel-select disable    calibrate auto-txpower-select disableradio 1channel 40mhz-plus 149coverage distance 4 calibrate auto-channel-select disable    calibrate auto-txpower-select disable
#
return</span></span>
这篇关于华为配置WDS手拉手业务示例的文章就介绍到这儿,希望我们推荐的文章对编程师们有所帮助!


