本文主要是介绍Android手绘签名---Android拓展篇,希望对大家解决编程问题提供一定的参考价值,需要的开发者们随着小编来一起学习吧!
文 | Promise Sun
一、手绘签名
最近,项目有个需求是用户在APP上签合同时,需要手绘签名。简单写了一个demo,之后产品又通知改需求了,不用手绘实现的方式了,demo写了却用不上……分享给有需要的朋友吧!
二、功能效果图
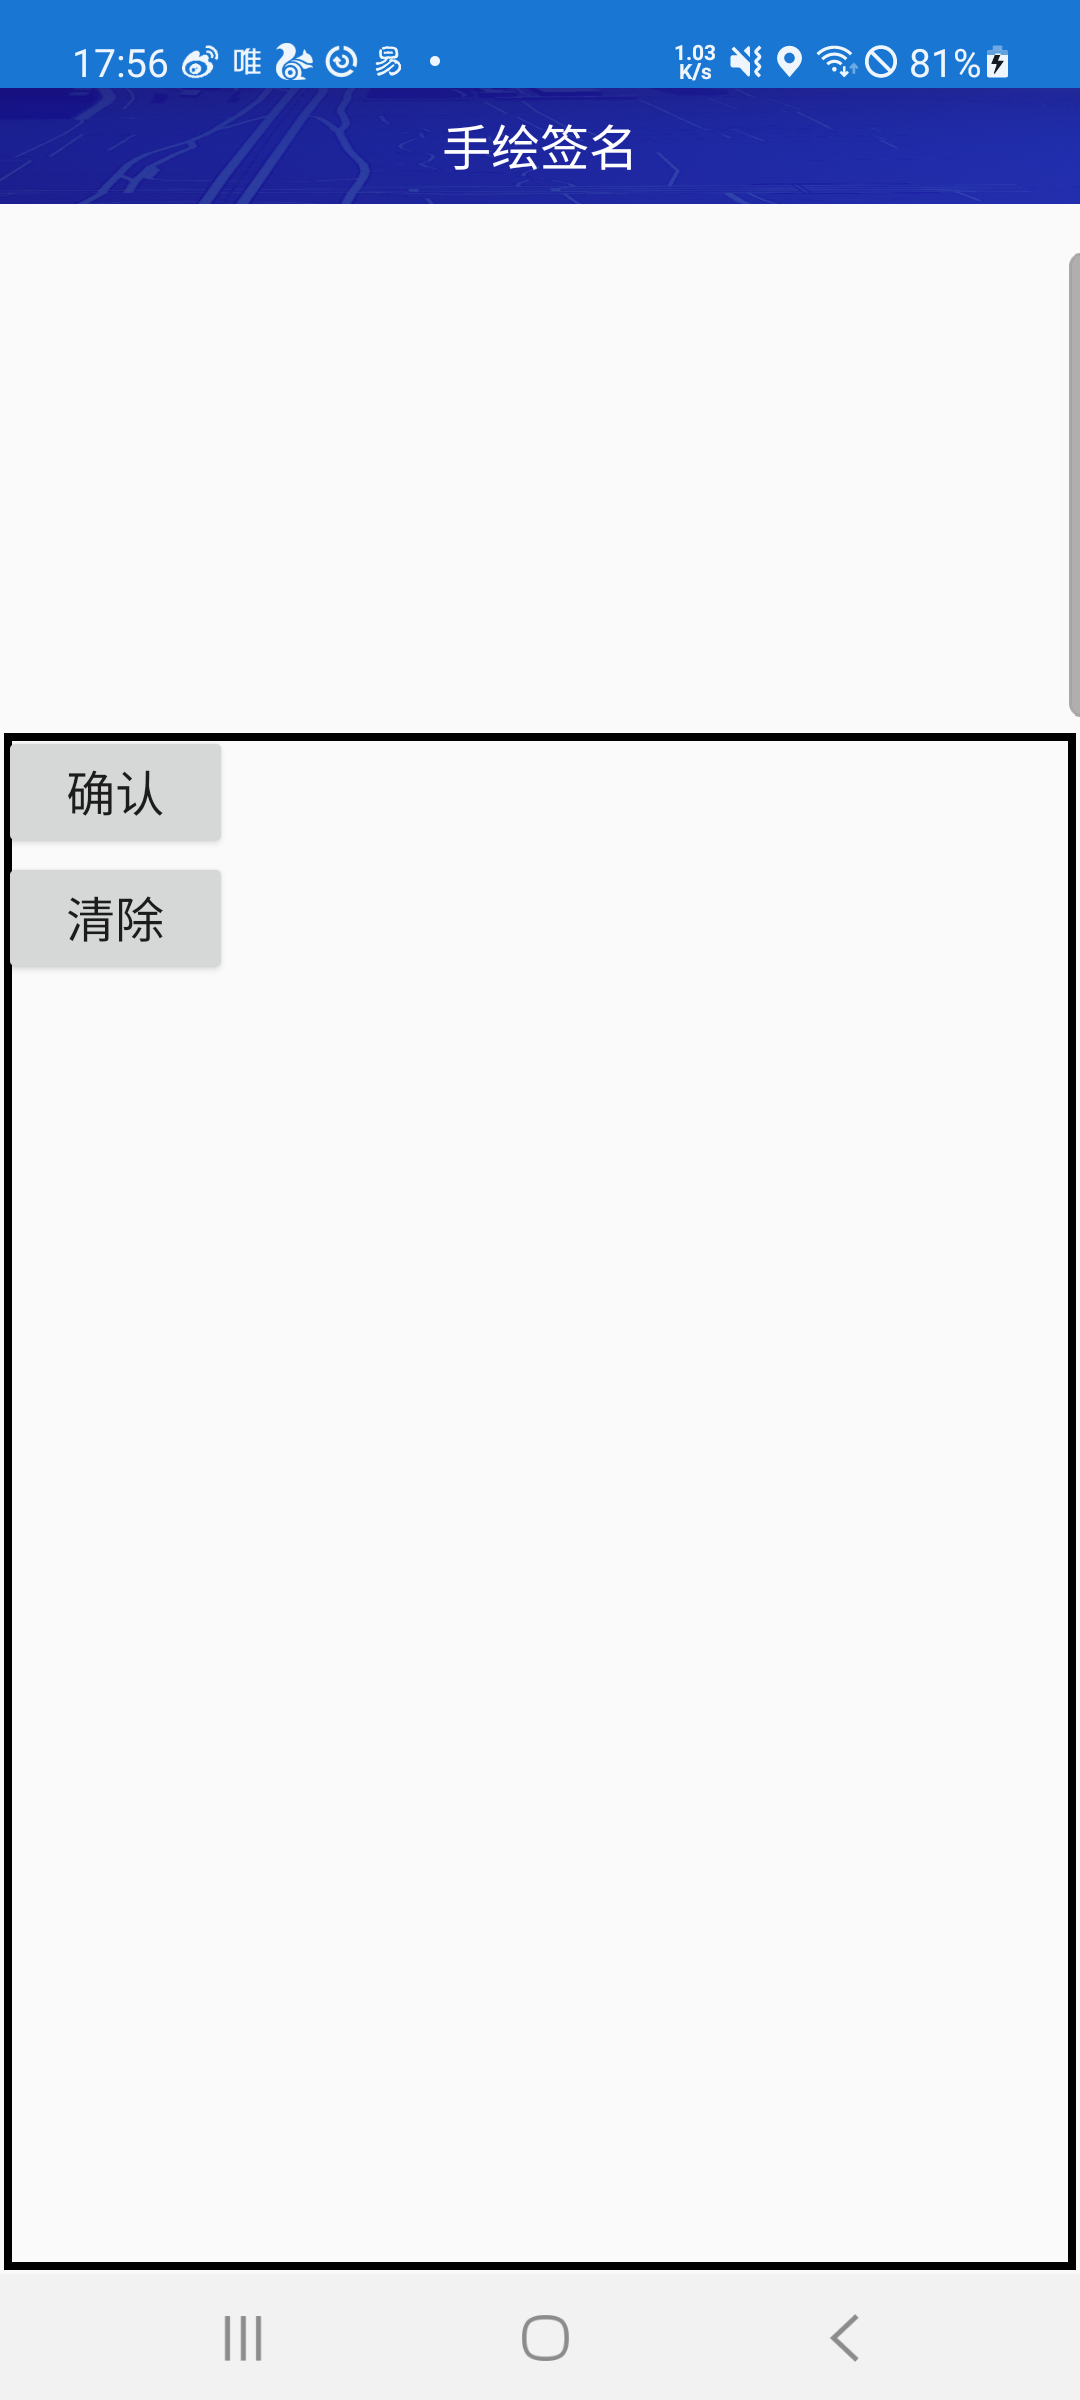
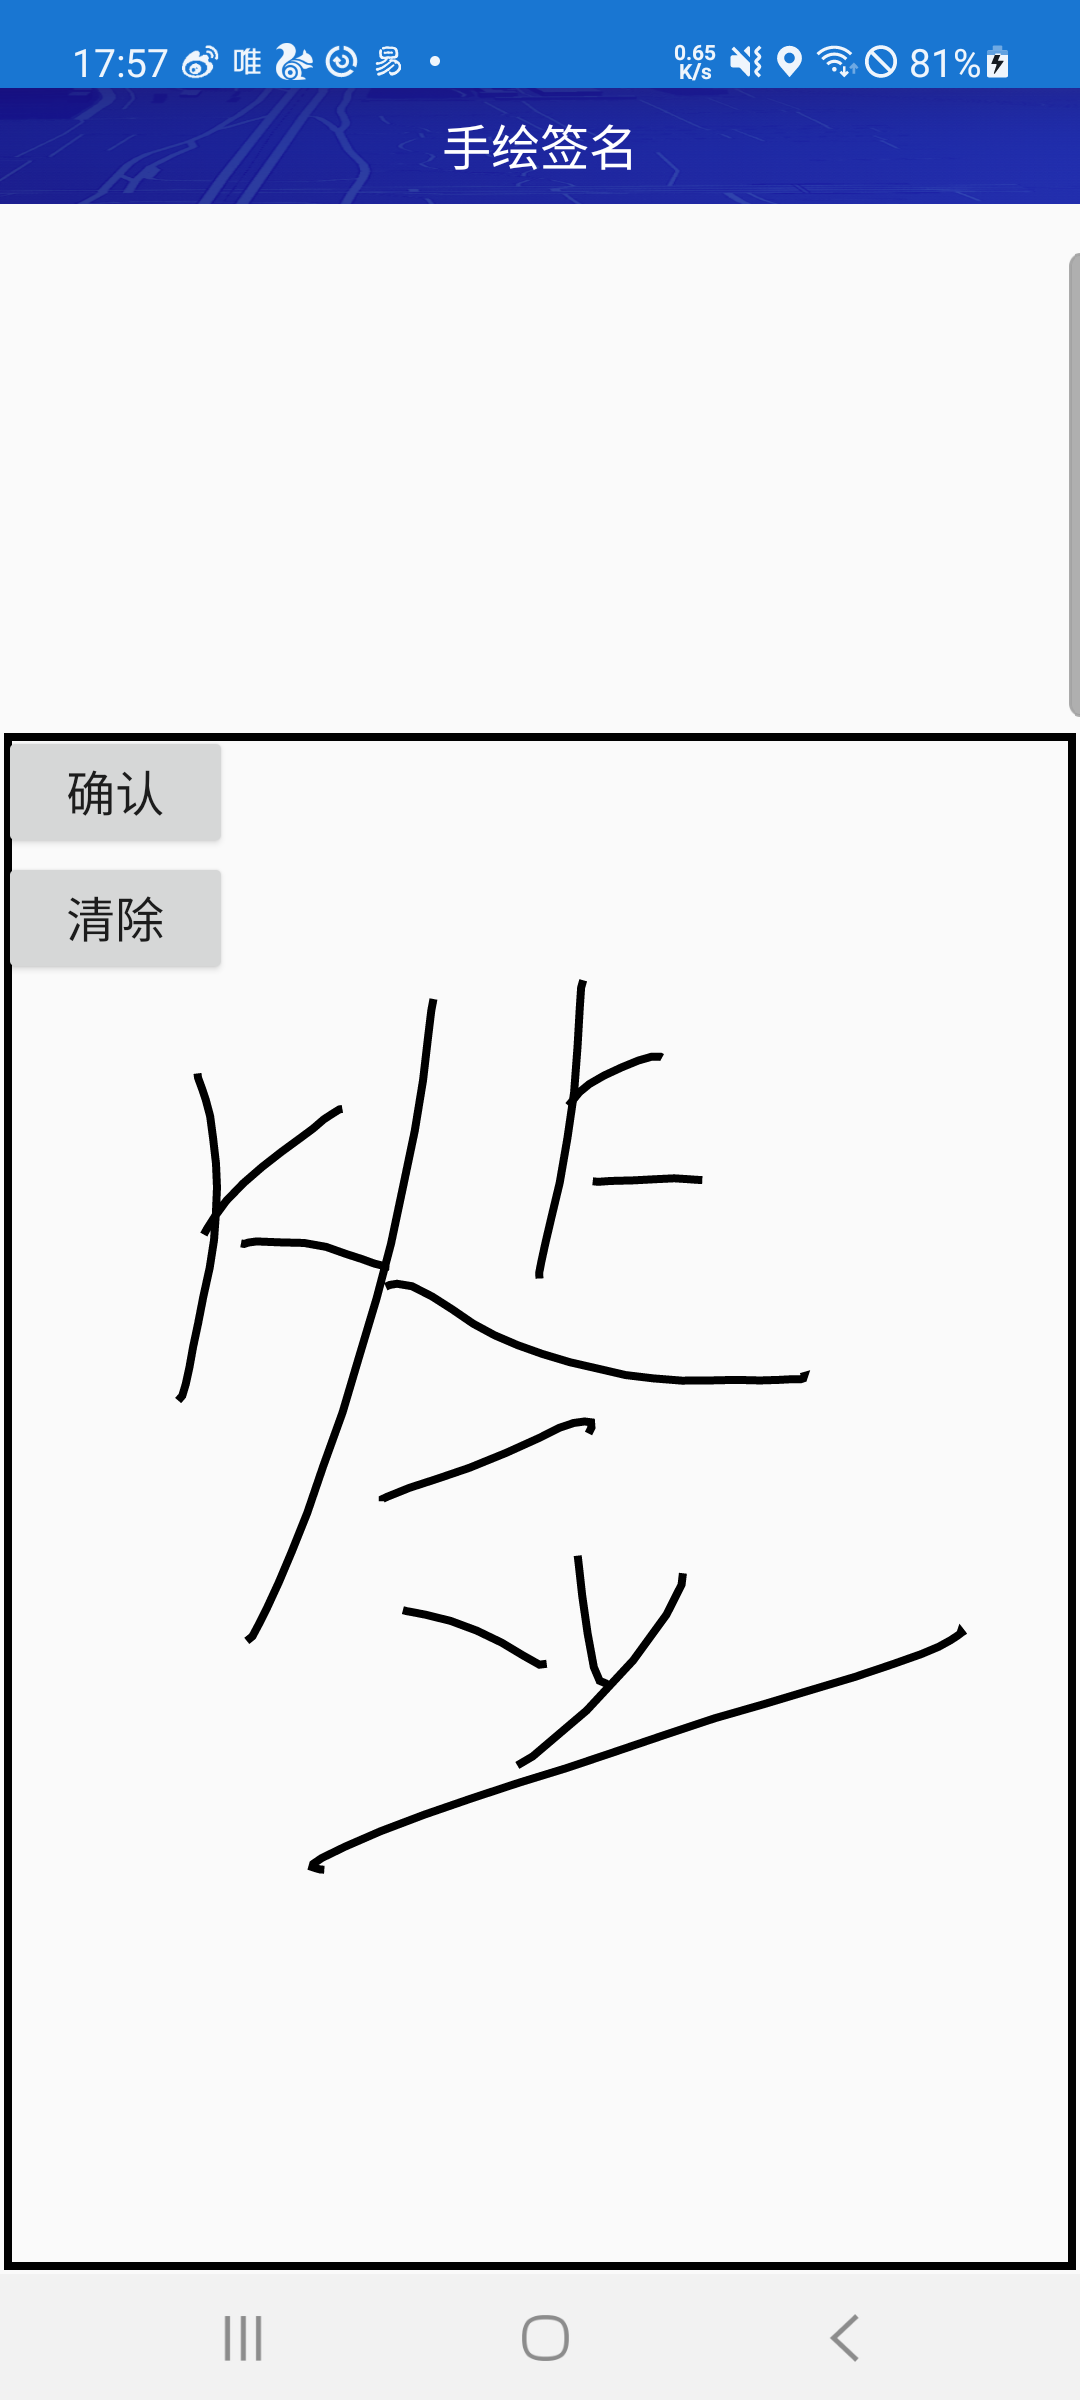
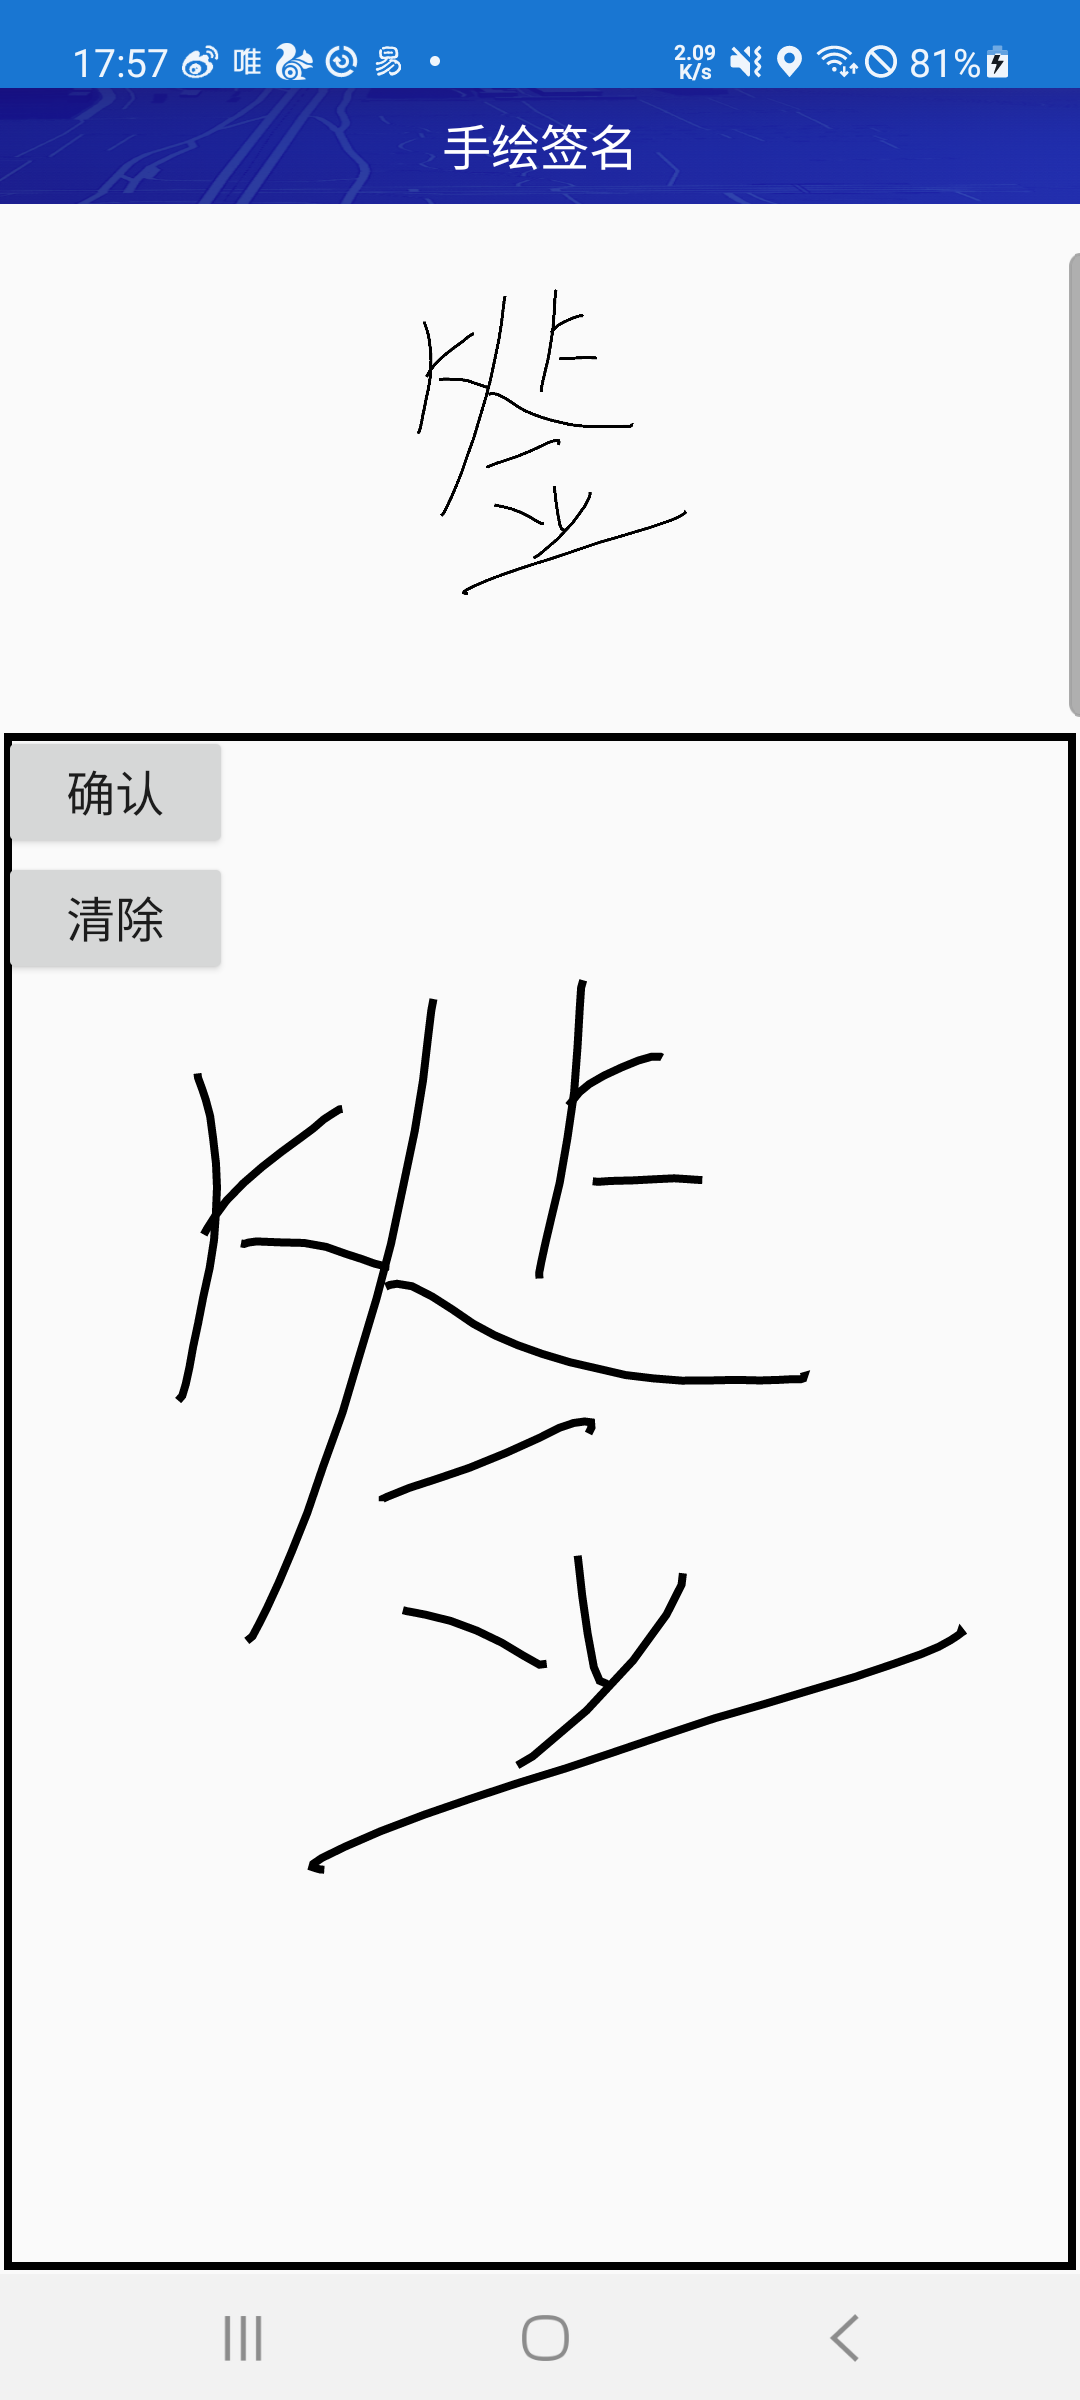
三、实现手绘签名
1.首先自定义一个 SignatureView
(注:挺简单的,不作具体分析了,大家直接看代码和相应注释吧。)
import android.content.Context;
import android.graphics.*;
import android.util.AttributeSet;
import android.view.MotionEvent;
import android.view.View;import androidx.annotation.Nullable;/*** 手绘签名View:实现一个自定义view,可以绘制出轨迹*/
public class SignatureView  extends View implements View.OnTouchListener{private Bitmap bitmap=null;//用户保存签名的Bitmapprivate Path path;private Rect boundary;private Canvas myCanvas;//用户保存签名的Canvasprivate boolean isdraw;private int bound,stroke;private int width,height;//动态设置边框和画笔粗细,方便调用自定义viewpublic float getBound() {return bound;}public void setBound(int bound) {this.bound = bound;}public void setStroke(int stroke) {this.stroke = stroke;}public float getStroke() {return stroke;}public SignatureView(Context context) {super(context);init();}public SignatureView(Context context, @Nullable AttributeSet attrs) {super(context, attrs);init();}public SignatureView(Context context, @Nullable AttributeSet attrs, int defStyleAttr) {super(context, attrs, defStyleAttr);init();}public SignatureView(Context context, @Nullable AttributeSet attrs, int defStyleAttr, int defStyleRes) {super(context, attrs, defStyleAttr, defStyleRes);init();}@Overrideprotected void onMeasure(int widthMeasureSpec, int heightMeasureSpec) {super.onMeasure(widthMeasureSpec, heightMeasureSpec);}//设置边界和bitmap的大小,注意:onLayout中一定可以获取到getWidth()和getHeight()@Overrideprotected void onLayout(boolean changed, int left, int top, int right, int bottom) {super.onLayout(changed, left, top, right, bottom);width=getWidth();height=getHeight();bitmap = Bitmap.createBitmap(width-bound, height-bound, Bitmap.Config.ARGB_8888);myCanvas =new Canvas(bitmap);boundary=new Rect(bound,bound,width-bound,height-bound);}private void init() {path=new Path();isdraw=false;stroke=8;bound=8;setOnTouchListener(this);}//把之前的path和边框画出来@Overrideprotected void onDraw(Canvas canvas) {super.onDraw(canvas);Paint paint=new Paint();paint.setStyle(Paint.Style.STROKE);paint.setColor(Color.BLACK);paint.setAntiAlias(true);paint.setStrokeWidth(stroke);canvas.drawPath(path,paint);myCanvas.drawPath(path,paint);canvas.drawRect(boundary,paint);}@Overridepublic boolean onTouch(View v, MotionEvent event) {isdraw=true;switch (event.getAction()){case MotionEvent.ACTION_DOWN:path.moveTo(event.getX(),event.getY());invalidate();break;case MotionEvent.ACTION_MOVE:path.lineTo(event.getX(),event.getY());invalidate();break;}return true;}public Bitmap getBitmap(){//返回bitmapif(!isdraw)return null;return bitmap;}public void clear(){//清空画布path.reset();bitmap = Bitmap.createBitmap(width-bound, height-bound, Bitmap.Config.ARGB_8888);myCanvas =new Canvas(bitmap);invalidate();}
}
2.具体实现,先写个activity_signature.xml布局
(注:布局仅供大家参考。重要的只有SignatureView的引用,引用时,找到自定义SignatureView所在项目的位置即可。)
<?xml version="1.0" encoding="utf-8"?>
<LinearLayoutxmlns:android="http://schemas.android.com/apk/res/android"xmlns:app="http://schemas.android.com/apk/res-auto"android:layout_width="match_parent"android:layout_height="match_parent"android:orientation="vertical"><androidx.appcompat.widget.Toolbarandroid:id="@+id/toolbar"android:layout_width="match_parent"android:layout_height="@dimen/dp_44"android:background="@drawable/qiang_bg"android:minHeight="@dimen/dp_44"app:layout_collapseMode="pin"app:title=""><TextViewandroid:id="@+id/tvTitle"android:layout_width="wrap_content"android:layout_height="wrap_content"android:layout_gravity="center"android:singleLine="true"android:text="手绘签名"android:textColor="@android:color/white"android:textSize="@dimen/sp_18" /></androidx.appcompat.widget.Toolbar><ImageViewandroid:id="@+id/img"android:layout_width="match_parent"android:layout_height="200dp" /><RelativeLayoutandroid:layout_width="match_parent"android:layout_height="match_parent"><com.sun.SignatureViewandroid:id="@+id/view_sign"android:layout_width="match_parent"android:layout_height="match_parent"/><Buttonandroid:id="@+id/btn_ok"android:layout_width="wrap_content"android:layout_height="wrap_content"android:text="确认"android:textSize="@dimen/sp_18"/><Buttonandroid:id="@+id/btn_clear"android:layout_width="wrap_content"android:layout_height="wrap_content"android:layout_below="@id/btn_ok"android:text="清除"android:textSize="@dimen/sp_18"/></RelativeLayout>
</LinearLayout>
3.在Activity中的实现,写个SignatureActivity类
1)先初始化布局
(注:使用的是Butterknife,大家可以自己findViewById。)
@BindView(R.id.view_sign)SignatureView view_sign;@BindView(R.id.img)ImageView imageView;@BindView(R.id.btn_ok)Button btn_ok;@BindView(R.id.btn_clear)Button btn_clear;
2)在Activity的onCreate()中实现功能
btn_ok.setOnClickListener(v -> {//绘制到画板显示imageView.setImageBitmap(view_sign.getBitmap());//保存成图片,根据实际需求,决定是否调用此方法savebitmap();});btn_clear.setOnClickListener(v -> {view_sign.clear();imageView.setImageBitmap(null);});
3)savebitmap()方法写在Activity中即可。
//将bitmap保存到本地public void savebitmap() {Bitmap bitmap=view_sign.getBitmap();//Android Q 10为每个应用程序提供了一个独立的在外部存储设备的存储沙箱,没有其他应用可以直接访问您应用的沙盒文件File f = this.getExternalFilesDir(Environment.DIRECTORY_PICTURES);File file=new File(f.getPath()+"/test.png");//创建文件,要保存png,这里后缀就是png,要保存jpg,后缀就用jpgtry {//文件输出流FileOutputStream fileOutputStream=new FileOutputStream(file);//压缩图片,如果要保存png,就用Bitmap.CompressFormat.PNG,要保存jpg就用Bitmap.CompressFormat.JPEG,质量是100%,表示不压缩bitmap.compress(Bitmap.CompressFormat.PNG,100,fileOutputStream);//写入,这里会卡顿,因为图片较大fileOutputStream.flush();//记得要关闭写入流fileOutputStream.close();//成功的提示,写入成功后,请在对应目录中找保存的图片Log.e("写入成功!目录:",f.getPath()+"/test.png");} catch (FileNotFoundException e) {e.printStackTrace();//失败的提示ToastUtil.showToast(e.getMessage());} catch (IOException e) {e.printStackTrace();//失败的提示ToastUtil.showToast(e.getMessage());}}
4)SignatureActivity类全部代码
(注:因继承了自定义的XBaseActivity,以下代码仅供参考,不必理会已经注释掉的代码)
import android.graphics.Bitmap;
import android.os.Environment;
import android.util.Log;
import android.widget.Button;
import android.widget.ImageView;import java.io.File;
import java.io.FileNotFoundException;
import java.io.FileOutputStream;
import java.io.IOException;import butterknife.BindView;public class SignatureActivity extends XBaseActivity {@BindView(R.id.view_sign)SignatureView view_sign;@BindView(R.id.img)ImageView imageView;@BindView(R.id.btn_ok)Button btn_ok;@BindView(R.id.btn_clear)Button btn_clear;@Overrideprotected XBasePresenter createPresenter() {return null;}@Overrideprotected int getLayoutId() {return R.layout.activity_signature;}@Overrideprotected void initView() {//       注意, 开发时用完一个Bitmap后,需要马上recycle()来保证尽快释放期资源。这里并没有处理, isRecycled()  //判断位图内存是否已释放btn_ok.setOnClickListener(v -> {//绘制到画板显示imageView.setImageBitmap(view_sign.getBitmap());//保存成图片,根据实际需求,决定是否调用此方法savebitmap();});btn_clear.setOnClickListener(v -> {view_sign.clear();imageView.setImageBitmap(null);});}@Overrideprotected void initData() { }//将bitmap保存到本地public void savebitmap() {//因为xml用的是背景,所以这里也是获得背景
//        Bitmap bitmap=((BitmapDrawable)(imageView.getBackground())).getBitmap();Bitmap bitmap = view_sign.getBitmap();//创建文件,安卓低版本的方式
//        File file=new File(Environment.getExternalStorageDirectory() +"/test.png");//Android Q  10为每个应用程序提供了一个独立的在外部存储设备的存储沙箱,没有其他应用可以直接访问您应用的沙盒文件File f = this.getExternalFilesDir(Environment.DIRECTORY_PICTURES);File file = new File(f.getPath() + "/test.png");//创建文件,要保存png,这里后缀就是png,要保存jpg,后缀就用jpg
//        file.getParentFile().mkdirs();try {//文件输出流FileOutputStream fileOutputStream = new FileOutputStream(file);//压缩图片,如果要保存png,就用Bitmap.CompressFormat.PNG,要保存jpg就用Bitmap.CompressFormat.JPEG,质量是100%,表示不压缩bitmap.compress(Bitmap.CompressFormat.PNG, 100, fileOutputStream);//写入,这里会卡顿,因为图片较大fileOutputStream.flush();//记得要关闭写入流fileOutputStream.close();//成功的提示,写入成功后,请在对应目录中找保存的图片Log.e("写入成功!目录", f.getPath() + "/test.png");} catch (FileNotFoundException e) {e.printStackTrace();//失败的提示ToastUtil.showToast(e.getMessage());Log.e("失败====", e.getMessage());} catch (IOException e) {e.printStackTrace();//失败的提示ToastUtil.showToast(e.getMessage());Log.e("失败2222====", e.getMessage());}}
}
这篇关于Android手绘签名---Android拓展篇的文章就介绍到这儿,希望我们推荐的文章对编程师们有所帮助!


