本文主要是介绍二,从源代码开始编译安装iperf3,希望对大家解决编程问题提供一定的参考价值,需要的开发者们随着小编来一起学习吧!
本文目录
- Linux系统中编译安装基本知识简介
- 第一步,执行configure
- 第二步,执行make
- 第三步,make install
- 其它功能说明
Linux系统中编译安装基本知识简介
从前一文章"一,下载iPerf3最新源代码"我们已经知道如何通过git的方式将代码下载(clone)到本地,本文将在这个基础上讲一下如何从源代码开始配置,编译与安装iperf3。
正如我们所知道的,通常Linux系统里,从源代码的方式得到一个可用的能在系统里直接执行的程序,通常需要分成三步走:configure(配置)、make(编译)和make install(安装)。
- configure是个shell脚本
用来检测安装平台的目标特征,然后生成对应的Makefile,以及生成系统相关的编译选项(比如是不是支持cpu_affinity等等)宏。执行configure通常不需要带配置参数,当然有需要时也可以带的,具体可以通过 ./configure --help 察看详细的说明。 - make
make 是Linux 里的一个编译用的程序,通过Makefile 里面定义的规则自动化的调用 gcc 、ld 以及运行某些需要的程序对目标源代码进行编译。 - make install
将上一步编译生成的程序安装到系统里,通常默认安装到是/usr/local/bin/目录下
iperf3的编译与安装也是这三个步骤,接下来一起来看一下这三步,iperf3在系统里是怎么变化的
第一步,执行configure
进入源代码目录/home/xxx/iperf3/iperf目录后,我们直接输入./configure命令,则可以看到开始一步步检查当前系统的目标特征,生成makefile和相应的编译选项。
iperf3默认是动态链接的,所以如果想要一个静态链接的,拷贝过去就可用的二进制程序,那么需要输入:
- 静态链接:
./configure --enable-static-bin
- 动态链接:
xxx@xxx-pc:~/iperf3$ cd iperf/
xxx@xxx-pc:~/iperf3/iperf$ ./configure
checking for a BSD-compatible install... /usr/bin/install -c
checking whether build environment is sane... yes
checking for a race-free mkdir -p... /usr/bin/mkdir -p
checking for gawk... no
checking for mawk... mawk
checking whether make sets $(MAKE)... yes
checking whether make supports nested variables... yes
checking whether make supports nested variables... (cached) yes
checking build system type... x86_64-pc-linux-gnu
checking host system type... x86_64-pc-linux-gnu
checking how to print strings... printf
checking whether make supports the include directive... yes (GNU style)
checking for gcc... gcc
checking whether the C compiler works... yes
checking for C compiler default output file name... a.out
checking for suffix of executables...
checking whether we are cross compiling... no
checking for suffix of object files... o
checking whether the compiler supports GNU C... yes
checking whether gcc accepts -g... yes
checking for gcc option to enable C11 features... none needed
checking whether gcc understands -c and -o together... yes
checking dependency style of gcc... gcc3
checking for a sed that does not truncate output... /usr/bin/sed
checking for grep that handles long lines and -e... /usr/bin/grep
checking for egrep... /usr/bin/grep -E
checking for fgrep... /usr/bin/grep -F
checking for ld used by gcc... /usr/bin/ld
checking if the linker (/usr/bin/ld) is GNU ld... yes
checking for BSD- or MS-compatible name lister (nm)... /usr/bin/nm -B
checking the name lister (/usr/bin/nm -B) interface... BSD nm
checking whether ln -s works... yes
checking the maximum length of command line arguments... 1572864
checking how to convert x86_64-pc-linux-gnu file names to x86_64-pc-linux-gnu format... func_convert_file_noop
checking how to convert x86_64-pc-linux-gnu file names to toolchain format... func_convert_file_noop
checking for /usr/bin/ld option to reload object files... -r
checking for file... file
checking for objdump... objdump
checking how to recognize dependent libraries... pass_all
checking for dlltool... no
checking how to associate runtime and link libraries... printf %s\n
checking for ar... ar
checking for archiver @FILE support... @
checking for strip... strip
checking for ranlib... ranlib
checking command to parse /usr/bin/nm -B output from gcc object... ok
checking for sysroot... no
checking for a working dd... /usr/bin/dd
checking how to truncate binary pipes... /usr/bin/dd bs=4096 count=1
checking for mt... mt
checking if mt is a manifest tool... no
checking for stdio.h... yes
checking for stdlib.h... yes
checking for string.h... yes
checking for inttypes.h... yes
checking for stdint.h... yes
checking for strings.h... yes
checking for sys/stat.h... yes
checking for sys/types.h... yes
checking for unistd.h... yes
checking for dlfcn.h... yes
checking for objdir... .libs
checking if gcc supports -fno-rtti -fno-exceptions... no
checking for gcc option to produce PIC... -fPIC -DPIC
checking if gcc PIC flag -fPIC -DPIC works... yes
checking if gcc static flag -static works... yes
checking if gcc supports -c -o file.o... yes
checking if gcc supports -c -o file.o... (cached) yes
checking whether the gcc linker (/usr/bin/ld -m elf_x86_64) supports shared libraries... yes
checking whether -lc should be explicitly linked in... no
checking dynamic linker characteristics... GNU/Linux ld.so
checking how to hardcode library paths into programs... immediate
checking whether stripping libraries is possible... yes
checking if libtool supports shared libraries... yes
checking whether to build shared libraries... yes
checking whether to build static libraries... yes
checking whether to enable maintainer-specific portions of Makefiles... no
checking for gcc... (cached) gcc
checking whether the compiler supports GNU C... (cached) yes
checking whether gcc accepts -g... (cached) yes
checking for gcc option to enable C11 features... (cached) none needed
checking whether gcc understands -c and -o together... (cached) yes
checking dependency style of gcc... (cached) gcc3
checking for ranlib... (cached) ranlib
checking whether ln -s works... yes
checking for library containing floor... -lm
checking for library containing socket... none required
checking for library containing inet_ntop... none required
checking for an ANSI C-conforming const... yes
checking for poll.h... yes
checking for linux/tcp.h... yes
checking for sys/socket.h... yes
checking for netinet/sctp.h... no
checking for endian.h... yes
checking for pkg-config... pkg-config
checking for openssl/ssl.h in /usr/local/ssl... no
checking for openssl/ssl.h in /usr/lib/ssl... no
checking for openssl/ssl.h in /usr/ssl... no
checking for openssl/ssl.h in /usr/pkg... no
checking for openssl/ssl.h in /usr/local... no
checking for openssl/ssl.h in /usr... no
checking whether compiling and linking against OpenSSL works... no
checking TCP_CONGESTION socket option... yes
checking TCP_USER_TIMEOUT socket option... yes
checking IPv6 flowlabel support... yes
checking for cpuset_setaffinity... no
checking for sched_setaffinity... yes
checking for SetProcessAffinityMask... no
checking for daemon... yes
checking for sendfile... yes
checking for getline... yes
checking SO_MAX_PACING_RATE socket option... yes
checking SO_BINDTODEVICE socket option... yes
checking IP_MTU_DISCOVER socket option... yes
checking IP_DONTFRAG socket option... no
checking IP_DONTFRAGMENT socket option... no
checking any kind of DF socket option... yes
checking for struct tcp_info.tcpi_snd_wnd... yes
checking for library containing clock_gettime... none required
checking for clock_gettime... yes
checking that generated files are newer than configure... done
configure: creating ./config.status
config.status: creating Makefile
config.status: creating src/Makefile
config.status: creating src/version.h
config.status: creating examples/Makefile
config.status: creating iperf3.spec
config.status: creating src/iperf_config.h
config.status: executing depfiles commands
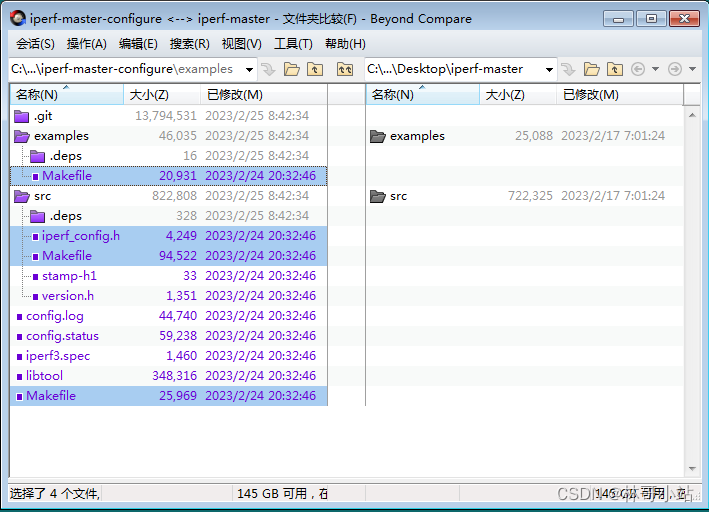
config.status: executing libtool commands最后我们可以看到,configure完成后,生成了如下新文件,主要有makefile文件和根据当前系统特性生成的iperf_config.h里定义的各种编译宏选项。
第二步,执行make
同上一步,在进入源代码目录/home/xxx/iperf3/iperf目录后,运行make命令后,我们可以看到系统不停的打印出编译过程中的各种过程与结果,到最后完成编译过程。
xxx@xxx-pc:~/iperf3/iperf$ make
Making all in src
make[1]: 进入目录“/home/xxx/iperf3/iperf/src”
make  all-am
make[2]: 进入目录“/home/xxx/iperf3/iperf/src”CC       iperf3-main.oCC       cjson.loCC       iperf_api.loCC       iperf_error.loCC       iperf_auth.loCC       iperf_client_api.loCC       iperf_locale.loCC       iperf_server_api.loCC       iperf_tcp.loCC       iperf_udp.loCC       iperf_sctp.loCC       iperf_util.loCC       iperf_time.loCC       dscp.loCC       net.loCC       tcp_info.loCC       timer.loCC       units.loCCLD     libiperf.laCCLD     iperf3CC       t_timer-t_timer.oCCLD     t_timerCC       t_units-t_units.oCCLD     t_unitsCC       t_uuid-t_uuid.oCCLD     t_uuidCC       t_api-t_api.oCCLD     t_apiCC       t_auth-t_auth.oCCLD     t_auth
make[2]: 离开目录“/home/xxx/iperf3/iperf/src”
make[1]: 离开目录“/home/xxx/iperf3/iperf/src”
Making all in examples
make[1]: 进入目录“/home/xxx/iperf3/iperf/examples”CC       mic-mic.oCCLD     micCC       mis-mis.oCCLD     mis
make[1]: 离开目录“/home/xxx/iperf3/iperf/examples”
make[1]: 进入目录“/home/xxx/iperf3/iperf”
make[1]: 对“all-am”无需做任何事。
make[1]: 离开目录“/home/xxx/iperf3/iperf”
然后我们可以看到,编译完成的结果,除了在src目录下生成各种.o文件和.lo文件外,最终生在一个带x可执行属性的iperf3文件。
xxx@xxx-pc:~/iperf3/iperf/src$ ls -l | grep iperf3
-rwxrwxr-x 1 xxx xxx   6247  2月 25 08:43 iperf3
-rw-rw-r-- 1 xxx xxx  19486  2月 24 20:32 iperf3.1
-rw-rw-r-- 1 xxx xxx  40552  2月 25 08:43 iperf3-main.o
第三步,make install
在第二步,我们已经通过make生成了目标可执行程序和对应的一堆可执行程序要依赖的库文件,接下来,我们就要把程序安装到系统里(将目标程序,帮忙文件,使用手册,所有的配置文件和依赖的库文件拷贝到linux系统对应的目录下)。
xxx@xxx-pc:~/iperf3/iperf$ sudo make install
Making install in src
make[1]: 进入目录“/home/xxx/iperf3/iperf/src”
make[2]: 进入目录“/home/xxx/iperf3/iperf/src”/usr/bin/mkdir -p '/usr/local/lib'/bin/bash ../libtool   --mode=install /usr/bin/install -c   libiperf.la '/usr/local/lib'
libtool: install: /usr/bin/install -c .libs/libiperf.so.0.0.0 /usr/local/lib/libiperf.so.0.0.0
libtool: install: (cd /usr/local/lib && { ln -s -f libiperf.so.0.0.0 libiperf.so.0 || { rm -f libiperf.so.0 && ln -s libiperf.so.0.0.0 libiperf.so.0; }; })
libtool: install: (cd /usr/local/lib && { ln -s -f libiperf.so.0.0.0 libiperf.so || { rm -f libiperf.so && ln -s libiperf.so.0.0.0 libiperf.so; }; })
libtool: install: /usr/bin/install -c .libs/libiperf.lai /usr/local/lib/libiperf.la
libtool: install: /usr/bin/install -c .libs/libiperf.a /usr/local/lib/libiperf.a
libtool: install: chmod 644 /usr/local/lib/libiperf.a
libtool: install: ranlib /usr/local/lib/libiperf.a
libtool: finish: PATH="/usr/local/sbin:/usr/local/bin:/usr/sbin:/usr/bin:/sbin:/bin:/snap/bin:/sbin" ldconfig -n /usr/local/lib
----------------------------------------------------------------------
Libraries have been installed in:/usr/local/libIf you ever happen to want to link against installed libraries
in a given directory, LIBDIR, you must either use libtool, and
specify the full pathname of the library, or use the '-LLIBDIR'
flag during linking and do at least one of the following:- add LIBDIR to the 'LD_LIBRARY_PATH' environment variableduring execution- add LIBDIR to the 'LD_RUN_PATH' environment variableduring linking- use the '-Wl,-rpath -Wl,LIBDIR' linker flag- have your system administrator add LIBDIR to '/etc/ld.so.conf'See any operating system documentation about shared libraries for
more information, such as the ld(1) and ld.so(8) manual pages.
----------------------------------------------------------------------/usr/bin/mkdir -p '/usr/local/bin'/bin/bash ../libtool   --mode=install /usr/bin/install -c iperf3 '/usr/local/bin'
libtool: install: /usr/bin/install -c .libs/iperf3 /usr/local/bin/iperf3/usr/bin/mkdir -p '/usr/local/include'/usr/bin/install -c -m 644 iperf_api.h '/usr/local/include'/usr/bin/mkdir -p '/usr/local/share/man/man1'/usr/bin/install -c -m 644 iperf3.1 '/usr/local/share/man/man1'/usr/bin/mkdir -p '/usr/local/share/man/man3'/usr/bin/install -c -m 644 libiperf.3 '/usr/local/share/man/man3'
make[2]: 离开目录“/home/xxx/iperf3/iperf/src”
make[1]: 离开目录“/home/xxx/iperf3/iperf/src”
Making install in examples
make[1]: 进入目录“/home/xxx/iperf3/iperf/examples”
make[2]: 进入目录“/home/xxx/iperf3/iperf/examples”
make[2]: 对“install-exec-am”无需做任何事。
make[2]: 对“install-data-am”无需做任何事。
make[2]: 离开目录“/home/xxx/iperf3/iperf/examples”
make[1]: 离开目录“/home/xxx/iperf3/iperf/examples”
make[1]: 进入目录“/home/xxx/iperf3/iperf”
make[2]: 进入目录“/home/xxx/iperf3/iperf”
make[2]: 对“install-exec-am”无需做任何事。
make[2]: 对“install-data-am”无需做任何事。
make[2]: 离开目录“/home/xxx/iperf3/iperf”
make[1]: 离开目录“/home/xxx/iperf3/iperf”
完成安装后,我们可以通过以下命令查看iperf3被安装到了/usr/local/bin目录下,我们执行iperf3 -v可以看到iperf 3.9版本已经被成功安装并可以执行使用了。
wangsheng@wangsheng-pc:~/iperf3/iperf$ whereis iperf3
iperf3: /usr/local/bin/iperf3
wangsheng@wangsheng-pc:~/iperf3/iperf$ iperf3 -v
iperf 3.9 (cJSON 1.7.13)
Linux wangsheng-pc 5.15.0-58-generic #64-Ubuntu SMP Thu Jan 5 11:43:13 UTC 2023 x86_64
Optional features available: CPU affinity setting, IPv6 flow label, SCTP, TCP congestion algorithm setting, sendfile / zerocopy, socket pacing, authentication
其它功能说明
卸载iperf3,运行sudo make uninstall后,我们可以通过whereis iperf3看到iperf3已经被从系统里移除。
xxx@xxx-pc:~/iperf3/iperf$ sudo make uninstall
Making uninstall in src
make[1]: 进入目录“/home/xxx/iperf3/iperf/src”( cd '/usr/local/bin' && rm -f iperf3 )( cd '/usr/local/include' && rm -f iperf_api.h )/bin/bash ../libtool   --mode=uninstall rm -f '/usr/local/lib/libiperf.la'
libtool: uninstall: rm -f /usr/local/lib/libiperf.la /usr/local/lib/libiperf.so.0.0.0 /usr/local/lib/libiperf.so.0 /usr/local/lib/libiperf.so /usr/local/lib/libiperf.a( cd '/usr/local/share/man/man1' && rm -f iperf3.1 )( cd '/usr/local/share/man/man3' && rm -f libiperf.3 )
make[1]: 离开目录“/home/xxx/iperf3/iperf/src”
Making uninstall in examples
make[1]: 进入目录“/home/xxx/iperf3/iperf/examples”
make[1]: 对“uninstall”无需做任何事。
make[1]: 离开目录“/home/xxx/iperf3/iperf/examples”
make[1]: 进入目录“/home/xxx/iperf3/iperf”
make[1]: 对“uninstall-am”无需做任何事。
make[1]: 离开目录“/home/xxx/iperf3/iperf”
xxx@xxx-pc:~/iperf3/iperf$ whereis iperf3
iperf3:
xxx@xxx-pc:~/iperf3/iperf$
这篇关于二,从源代码开始编译安装iperf3的文章就介绍到这儿,希望我们推荐的文章对编程师们有所帮助!


