本文主要是介绍58 - 综合案例 - 智慧商城-10 - 商品详情页,希望对大家解决编程问题提供一定的参考价值,需要的开发者们随着小编来一起学习吧!
一. 商品详情 - 静态布局 & 渲染
目标:实现商品详情静态结构,封装接口,完成商品详情页渲染
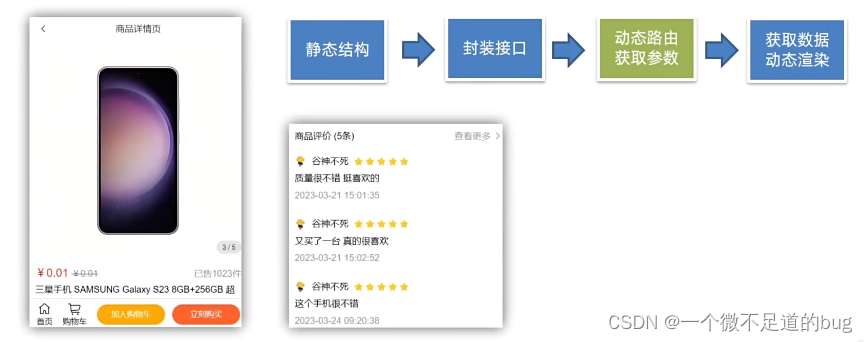
1. 商品详情静态结构
views / prodetail / index.vue
<template><div class="prodetail"><van-nav-bar fixed title="商品详情页" left-arrow @click-left="$router.go(-1)" /><van-swipe :autoplay="3000" @change="onChange"><van-swipe-item v-for="(image, index) in images" :key="index"><img :src="image" /></van-swipe-item><template #indicator><div class="custom-indicator">{{ current + 1 }} / {{ images.length }}</div></template></van-swipe><!-- 商品说明 --><div class="info"><div class="title"><div class="price"><span class="now">¥0.01</span><span class="oldprice">¥6699.00</span></div><div class="sellcount">已售1001件</div></div><div class="msg text-ellipsis-2">三星手机 SAMSUNG Galaxy S23 8GB+256GB 超视觉夜拍系统 超清夜景 悠雾紫 5G手机 游戏拍照旗舰机s23</div><div class="service"><div class="left-words"><span><van-icon name="passed" />七天无理由退货</span><span><van-icon name="passed" />48小时发货</span></div><div class="right-icon"><van-icon name="arrow" /></div></div></div><!-- 商品评价 --><div class="comment"><div class="comment-title"><div class="left">商品评价 (5条)</div><div class="right">查看更多 <van-icon name="arrow" /> </div></div><div class="comment-list"><div class="comment-item" v-for="item in 3" :key="item"><div class="top"><img src="http://cba.itlike.com/public/uploads/10001/20230321/a0db9adb2e666a65bc8dd133fbed7834.png" alt=""><div class="name">神雕大侠</div><van-rate :size="16" :value="5" color="#ffd21e" void-icon="star" void-color="#eee"/></div><div class="content">质量很不错 挺喜欢的</div><div class="time">2023-03-21 15:01:35</div></div></div></div><!-- 商品描述 --><div class="desc"><img src="https://uimgproxy.suning.cn/uimg1/sop/commodity/kHgx21fZMWwqirkMhawkAw.jpg" alt=""><img src="https://uimgproxy.suning.cn/uimg1/sop/commodity/0rRMmncfF0kGjuK5cvLolg.jpg" alt=""><img src="https://uimgproxy.suning.cn/uimg1/sop/commodity/2P04A4Jn0HKxbKYSHc17kw.jpg" alt=""><img src="https://uimgproxy.suning.cn/uimg1/sop/commodity/MT4k-mPd0veQXWPPO5yTIw.jpg" alt=""></div><!-- 底部 --><div class="footer"><div @click="$router.push('/')" class="icon-home"><van-icon name="wap-home-o" /><span>首页</span></div><div @click="$router.push('/cart')"  class="icon-cart"><van-icon name="shopping-cart-o" /><span>购物车</span></div><div class="btn-add">加入购物车</div><div class="btn-buy">立刻购买</div></div></div>
</template><script>
export default {name: 'ProDetail',data () {return {images: ['https://img01.yzcdn.cn/vant/apple-1.jpg','https://img01.yzcdn.cn/vant/apple-2.jpg'],current: 0}},methods: {onChange (index) {this.current = index}}
}
</script><style lang="less" scoped>
.prodetail {padding-top: 46px;::v-deep .van-icon-arrow-left {color: #333;}img {display: block;width: 100%;}.custom-indicator {position: absolute;right: 10px;bottom: 10px;padding: 5px 10px;font-size: 12px;background: rgba(0, 0, 0, 0.1);border-radius: 15px;}.desc {width: 100%;overflow: scroll;::v-deep img {display: block;width: 100%!important;}}.info {padding: 10px;}.title {display: flex;justify-content: space-between;.now {color: #fa2209;font-size: 20px;}.oldprice {color: #959595;font-size: 16px;text-decoration: line-through;margin-left: 5px;}.sellcount {color: #959595;font-size: 16px;position: relative;top: 4px;}}.msg {font-size: 16px;line-height: 24px;margin-top: 5px;}.service {display: flex;justify-content: space-between;line-height: 40px;margin-top: 10px;font-size: 16px;background-color: #fafafa;.left-words {span {margin-right: 10px;}.van-icon {margin-right: 4px;color: #fa2209;}}}.comment {padding: 10px;}.comment-title {display: flex;justify-content: space-between;.right {color: #959595;}}.comment-item {font-size: 16px;line-height: 30px;.top {height: 30px;display: flex;align-items: center;margin-top: 20px;img {width: 20px;height: 20px;}.name {margin: 0 10px;}}.time {color: #999;}}.footer {position: fixed;left: 0;bottom: 0;width: 100%;height: 55px;background-color: #fff;border-top: 1px solid #ccc;display: flex;justify-content: space-evenly;align-items: center;.icon-home, .icon-cart {display: flex;flex-direction: column;align-items: center;justify-content: center;font-size: 14px;.van-icon {font-size: 24px;}}.btn-add,.btn-buy {height: 36px;line-height: 36px;width: 120px;border-radius: 18px;background-color: #ffa900;text-align: center;color: #fff;font-size: 14px;}.btn-buy {background-color: #fe5630;}}
}.tips {padding: 10px;
}
</style>
2. 封装请求接口
api / product.js
import request from '@/utils/request'// 获取搜索商品列表的数据
...// 获取商品详情数据
export const getProDetail = (goodsId) => {return request.get('/goods/detail', {params: {goodsId}})
}
3. 页面调用请求 渲染数据
views / prodetail / index.vue
<template><van-swipe-item v-for="(image, index) in images" :key="index"><!-- 动态渲染轮播图 --><img :src="image.external_url" /></van-swipe-item><!-- 动态获取商品信息--><div class="title"><div class="price"><!-- 动态商品信息--><span class="now">¥{{ detail.goods_price_min }}</span><span class="oldprice">¥{{ detail.goods_price_max }}</span></div><div class="sellcount">已售{{ detail.goods_sales }}件</div></div><div class="msg text-ellipsis-2">{{ detail.goods_name }}</div><!-- 动态渲染详情图 --><div class="desc" v-html="detail.content"></div></template><script>
import { getProDetail } from '@/api/product'
export default {name: 'ProDetail',data () {return {images: [],current: 0,detail: {}}},computed: {goodsId () {// 获取路由参数return this.$route.params.id}},created () {// 进入页面就发送请求this.getDatail()},methods: {onChange (index) {this.current = index},async getDatail () {// 调用接口请求数据const { data: { detail } } = await getProDetail(this.goodsId)this.detail = detailthis.images = detail.goods_imagesconsole.log(this.images)}}
}
</script>
4. 代码示例
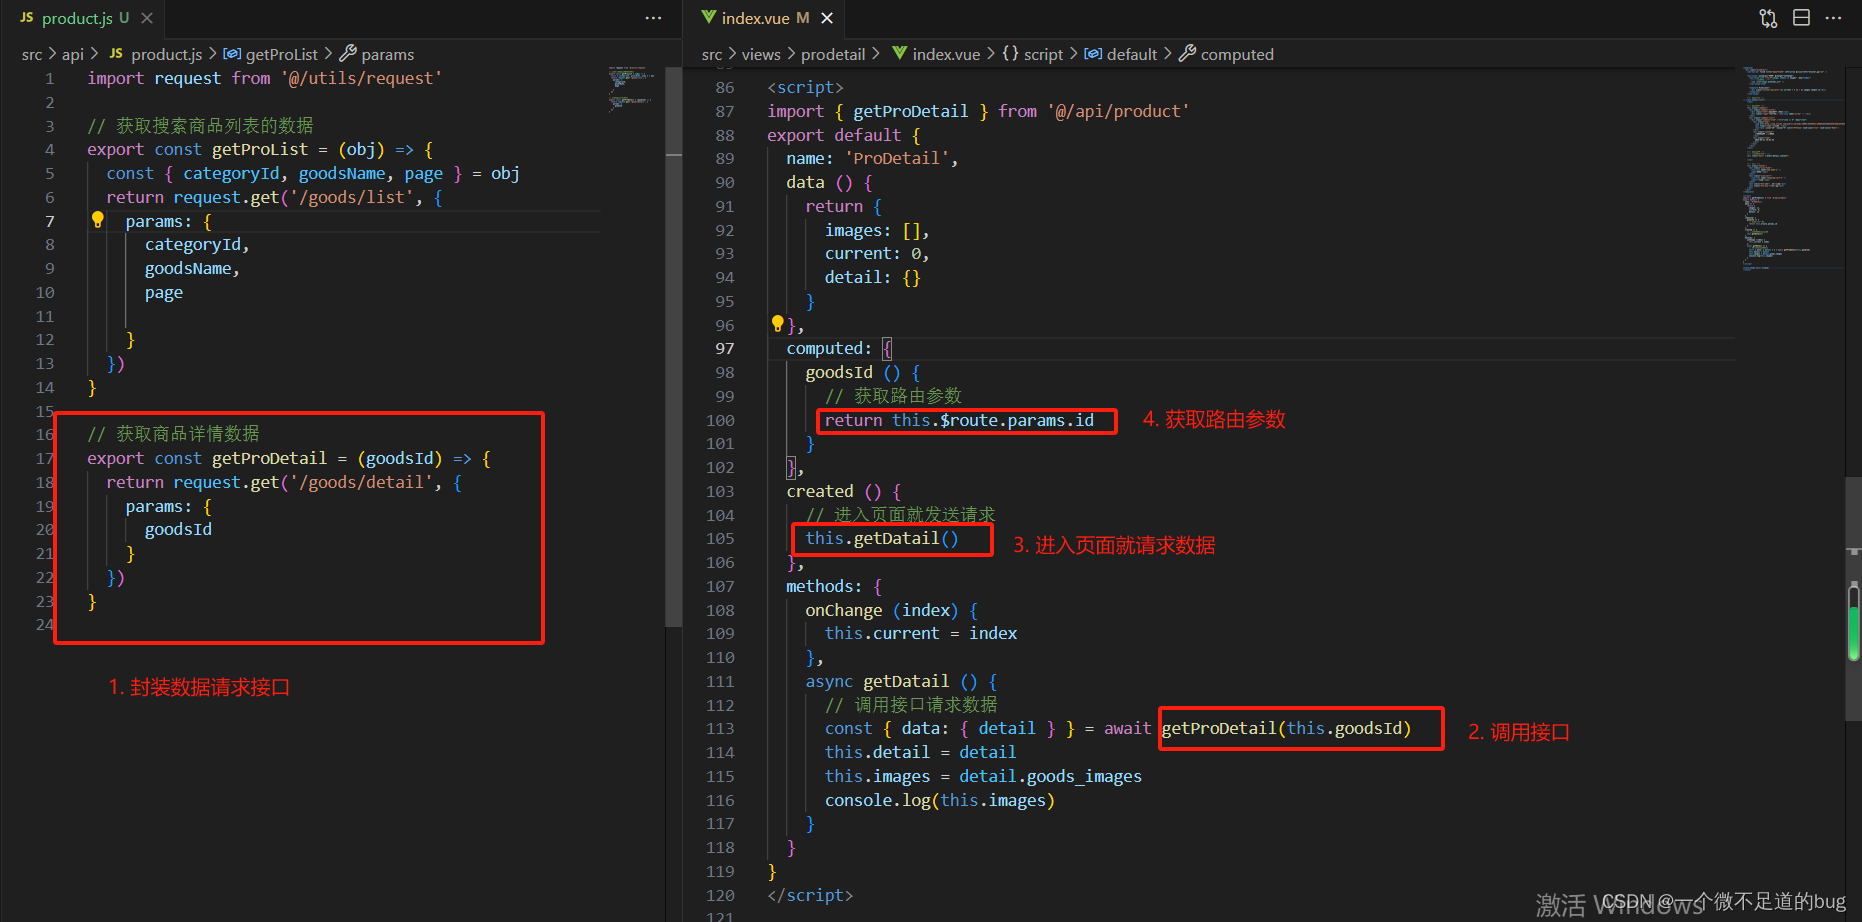
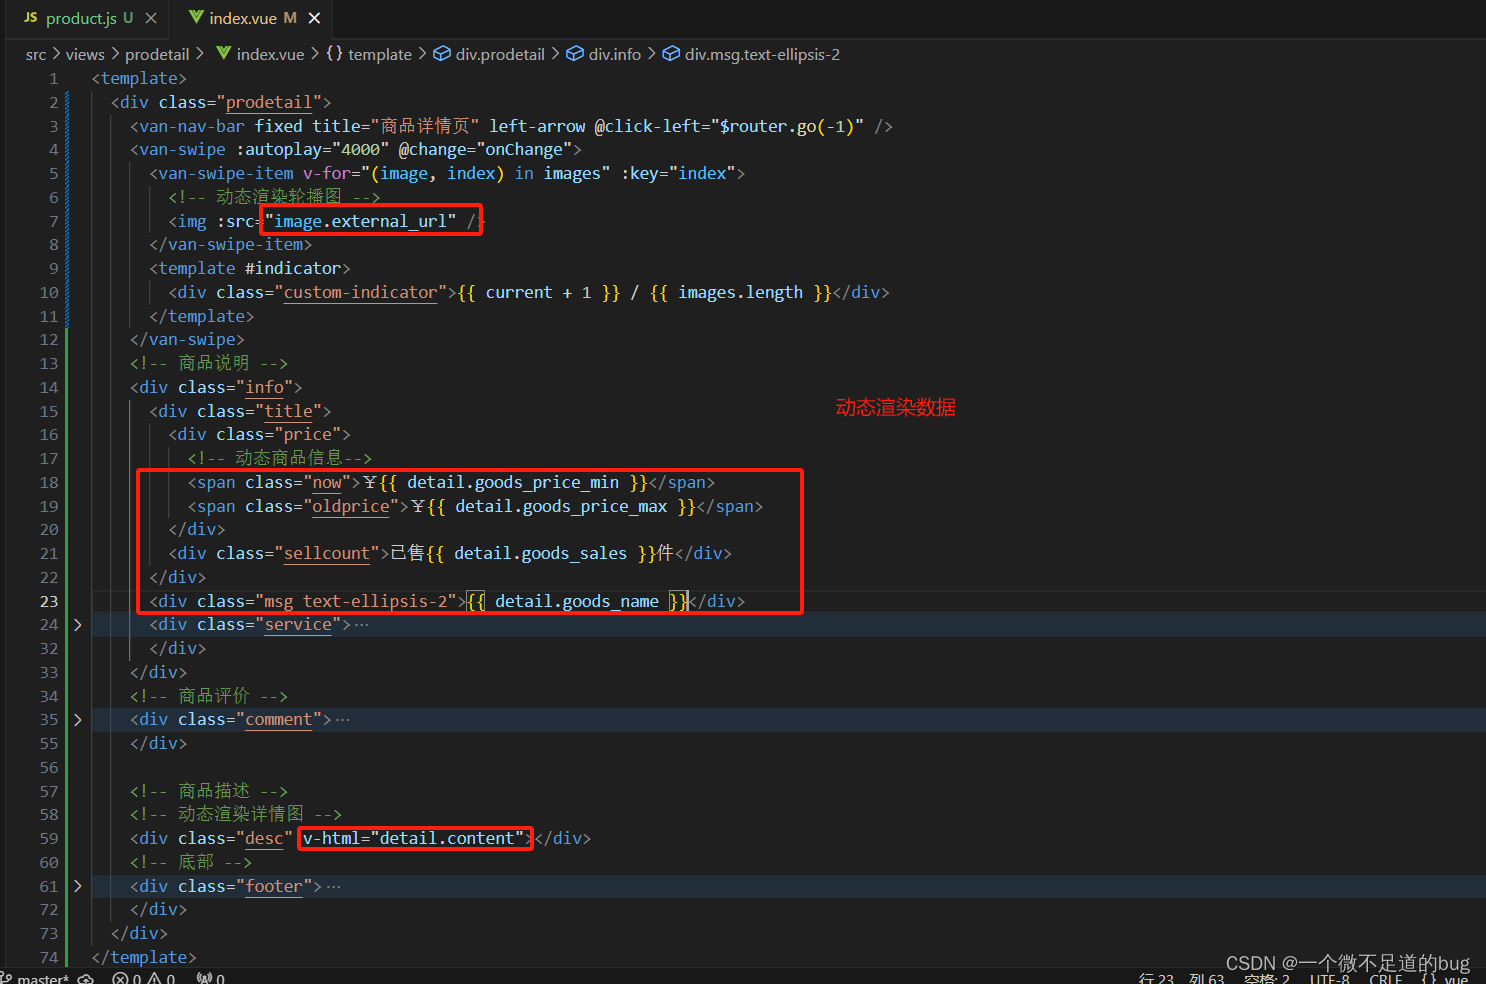
二. 商品详情-评论渲染
1. 封装请求接口
api / product.js
// 获取商品评价
export const getProComments = (goodsId, limit) => {return request.get('/comment/listRows', {params: {goodsId,limit}})
}
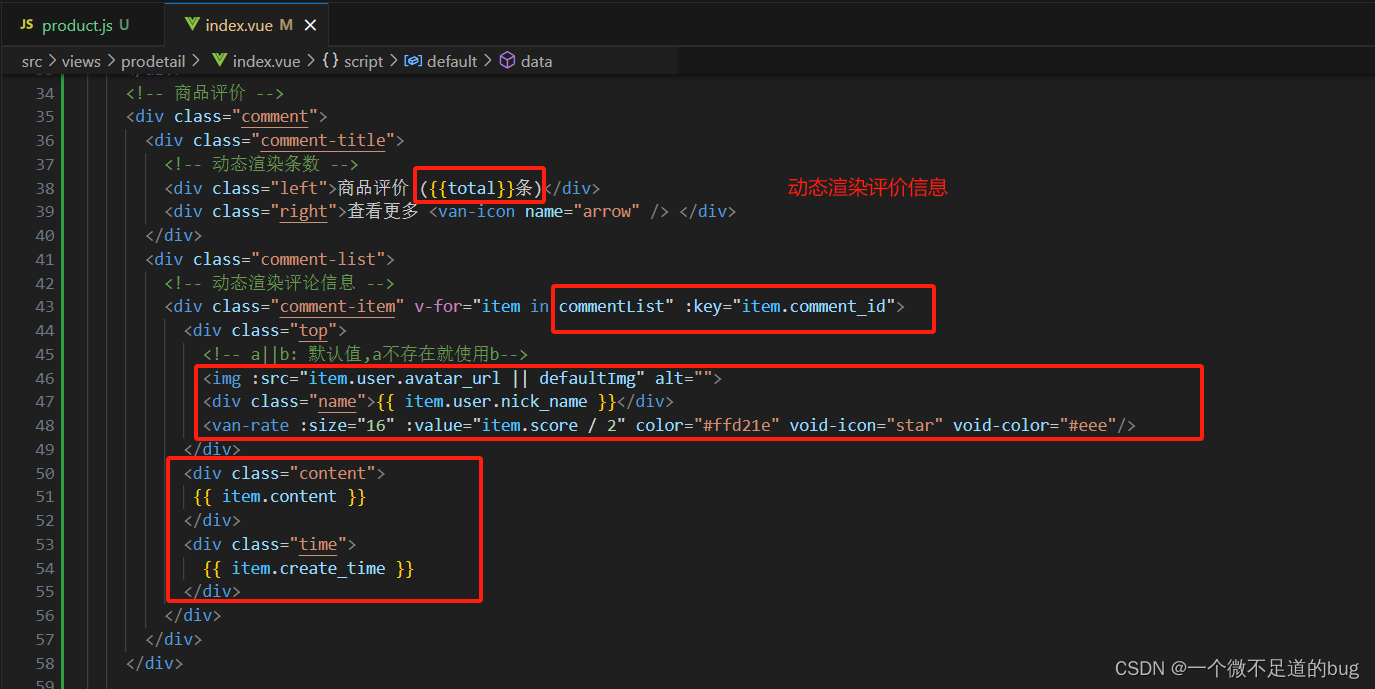
2. 页面调用方法 渲染数据
views / prodetail / index.vue
 <template>
<!-- 商品评价 --><div class="comment"><div class="comment-title"><!-- 动态渲染条数 --><div class="left">商品评价 ({{total}}条)</div><div class="right">查看更多 <van-icon name="arrow" /> </div></div><div class="comment-list"><!-- 动态渲染评论信息 --><div class="comment-item" v-for="item in commentList" :key="item.comment_id"><div class="top"><!-- a||b: 默认值,a不存在就使用b--><img :src="item.user.avatar_url || defaultImg" alt=""><div class="name">{{ item.user.nick_name }}</div><van-rate :size="16" :value="item.score / 2" color="#ffd21e" void-icon="star" void-color="#eee"/></div><div class="content">{{ item.content }}</div><div class="time">{{ item.create_time }}</div></div></div></div>
</template><script>
import { getProDetail, getProComments } from '@/api/product'
import defaultImg from '@/assets/1.png'
export default {name: 'ProDetail',data () {return {...total: 0, // 评价总数commentList: [], // 评价列表defaultImg: defaultImg // 默认头像}},computed: {// 获取路由参数...},created () {// 进入页面就发送请求...this.getComments()},methods: {//轮播...// 获取商品详情...// 获取评价async getComments () {// 调用接口请求数据const { data: { list, total } } = await getProComments(this.goodsId, 3)this.commentList = listthis.total = total}}
}
</script>
3. 代码示例
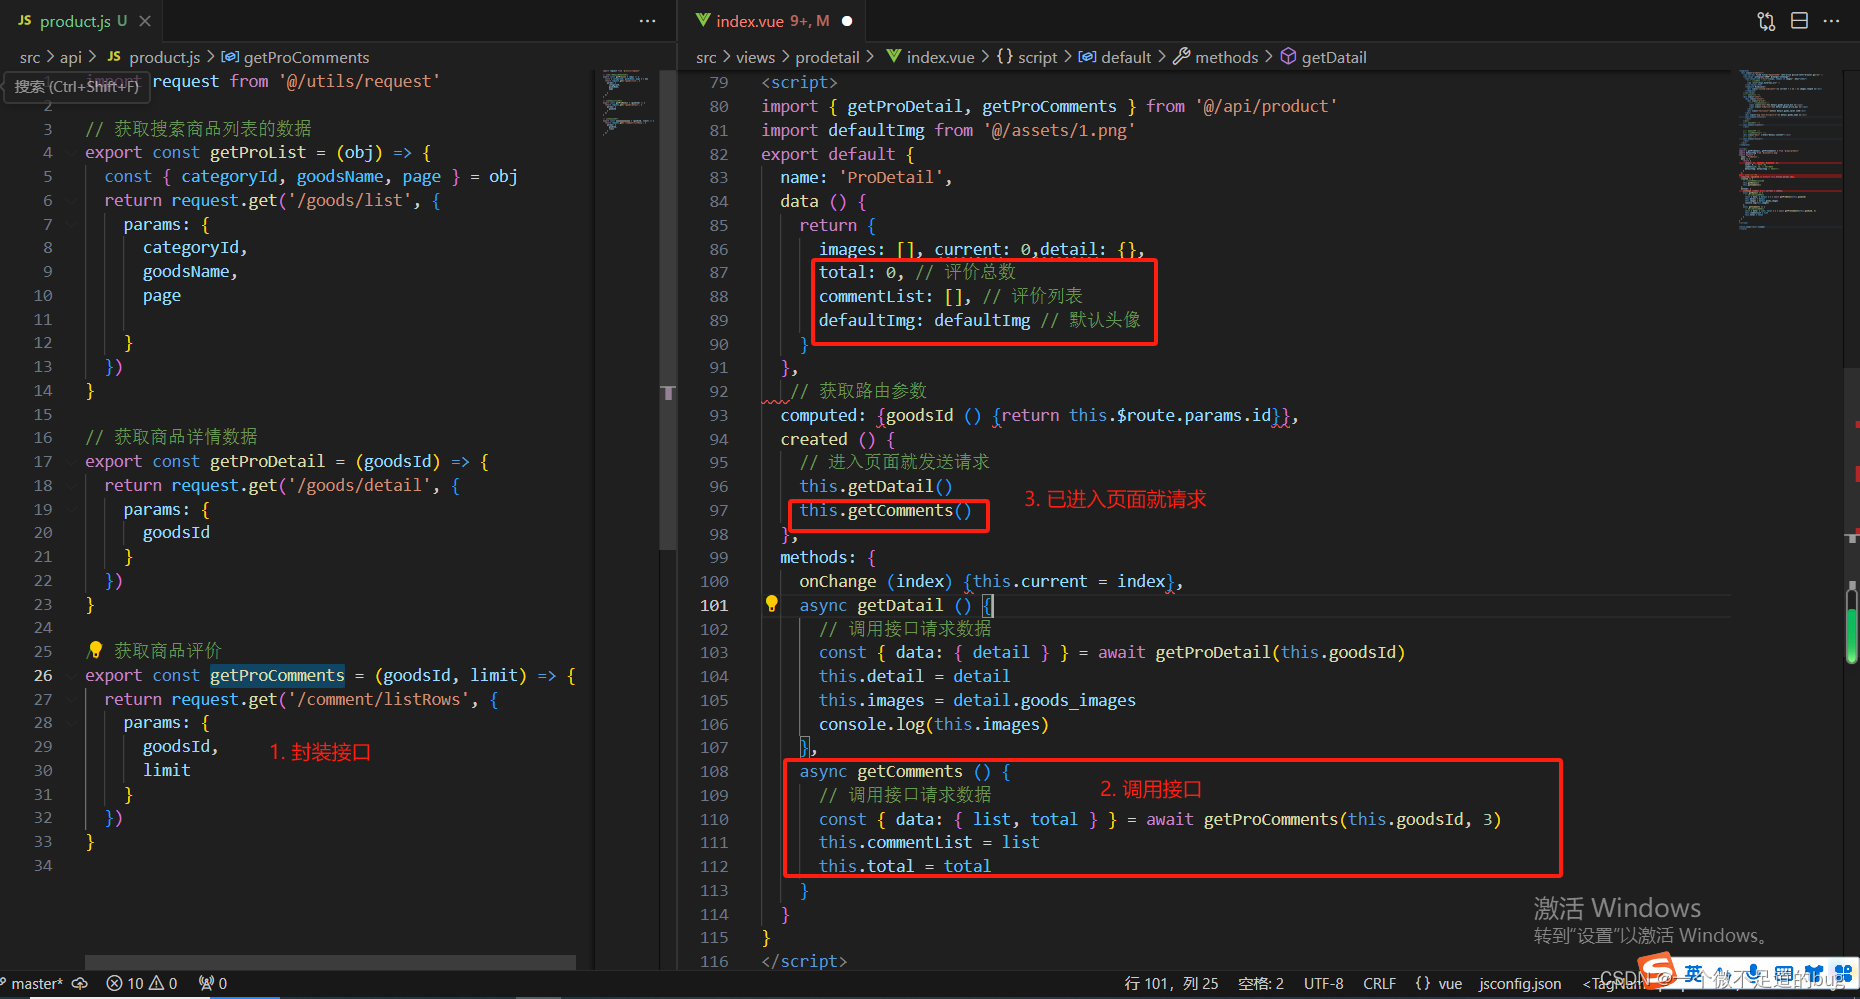
三. 加入购物车 - 唤起弹层
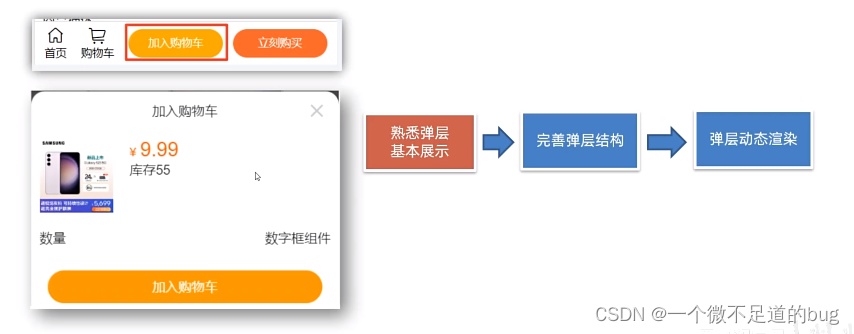
1. 按需导入组件
utils / vant-ui.js
// 按需导入
import Vue from 'vue'
import {ActionSheet} from 'vant'Vue.use(ActionSheet)
2. 注册点击事件,点击唤起弹窗
views / prodetail / index.vue
<template>
<!-- 底部 --><div class="footer">...<!-- 3. 点击后唤起弹层 --><div class="btn-add" @click="addFn">加入购物车</div><div class="btn-buy" @click="buyFn">立刻购买</div></div><!-- 1. 加入购物车的弹层 --><van-action-sheet v-model="showPannel" :title="mode==='cart'? '加入购物车' : '立刻购买'"><div class="content">内容</div></van-action-sheet>
</template><script>
import { getProDetail, getProComments } from '@/api/product'
import defaultImg from '@/assets/1.png'
export default {name: 'ProDetail',data () {return {...// 2.定义数据showPannel: false, // 控制弹层的显示隐藏mode: 'cart' // 标记弹起状态}},// 获取路由参数...},methods: {...addFn () {this.mode = 'cart'this.showPannel = true},buyFn () {this.mode = 'buyNow'this.showPannel = true}}
}
</script>
3. 完善弹层结构
views / prodetail / index.vue
<!-- 替换 上面的弹层组件-->
<van-action-sheet v-model="showPannel" :title="mode === 'cart' ? '加入购物车' : '立刻购买'"><div class="product"><div class="product-title"><div class="left"><img src="http://cba.itlike.com/public/uploads/10001/20230321/8f505c6c437fc3d4b4310b57b1567544.jpg" alt=""></div><div class="right"><div class="price"><span>¥</span><span class="nowprice">9.99</span></div><div class="count"><span>库存</span><span>55</span></div></div></div><div class="num-box"><span>数量</span>数字框占位</div><div class="showbtn" v-if="true"><div class="btn" v-if="true">加入购物车</div><div class="btn now" v-else>立刻购买</div></div><div class="btn-none" v-else>该商品已抢完</div></div>
</van-action-sheet>
// 弹层组件的样式
.product {.product-title {display: flex;.left {img {width: 90px;height: 90px;}margin: 10px;}.right {flex: 1;padding: 10px;.price {font-size: 14px;color: #fe560a;.nowprice {font-size: 24px;margin: 0 5px;}}}}.num-box {display: flex;justify-content: space-between;padding: 10px;align-items: center;}.btn, .btn-none {height: 40px;line-height: 40px;margin: 20px;border-radius: 20px;text-align: center;color: rgb(255, 255, 255);background-color: rgb(255, 148, 2);}.btn.now {background-color: #fe5630;}.btn-none {background-color: #cccccc;}
}4. 动态渲染弹层
views / prodetail / index.vue
 <van-action-sheet v-model="showPannel" :title="mode === 'cart' ? '加入购物车' : '立刻购买'"><div class="product"><div class="product-title"><div class="left"><img :src="detail.goods_image" alt=""></div><div class="right"><div class="price"><span>¥</span><span class="nowprice">{{ detail.goods_price_min }}</span></div><div class="count"><span>库存</span><span>{{ detail.stock_total }}</span></div></div></div><div class="num-box"><span>数量</span>数字框占位</div><!-- 有库存才显示提交按钮  --><div class="showbtn" v-if="detail.stock_total > 0"><div class="btn" v-if="mode==='cart'">加入购物车</div><div class="btn now" v-else>立刻购买</div></div><div class="btn-none" v-else>该商品已抢完</div></div>
</van-action-sheet>
四. 数字框基本封装
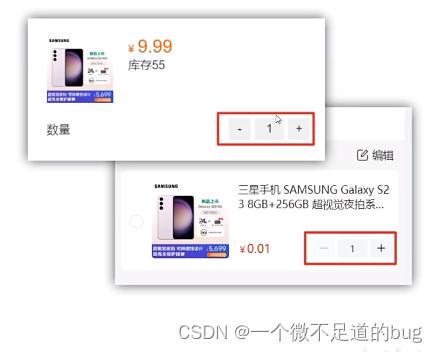
目标:封装弹层中的数字框组件
分析:组件名 CountBox
(1). 静态结构,左中右三部分
(2).数字框的数字,应该是外部传递进来的(父传子)
(3).点击 + - 号,可以修改数字(子传父)
(4).使用 v-model 实现封装(:value 和 @input 的简写)
(5).数字不能减到小于 1
1. 新建数字框组件
components / CountBox.vue
<template>
<div class="count-box"><button class="minus">-</button><input :value="1" class="inp" type="text"><button class="add">+</button>
</div></template><script>
export default {}
</script><style lang="less" scoped>
.count-box{width:110px;display:flex;.add, .minus{width:30px;height:30px;outline:none;border:none;background-color:#efefef;}.inp{width:40px;height:30px;outline:none;border:none;margin:0 5px;background-color:#efefef;text-align: center;}}
</style>
2. 详情页使用数字组件
views / prodetail / index.vue
 <div class="num-box"><span>数量</span><!--使用数字组件--><CountBox></CountBox>
</div>-------------------------------------------------<script>
// 1. 导入数字组件
import CountBox from '@/components/CountBox.vue'
export default {name: 'ProDetail',// 2. 注册components: { CountBox },
}
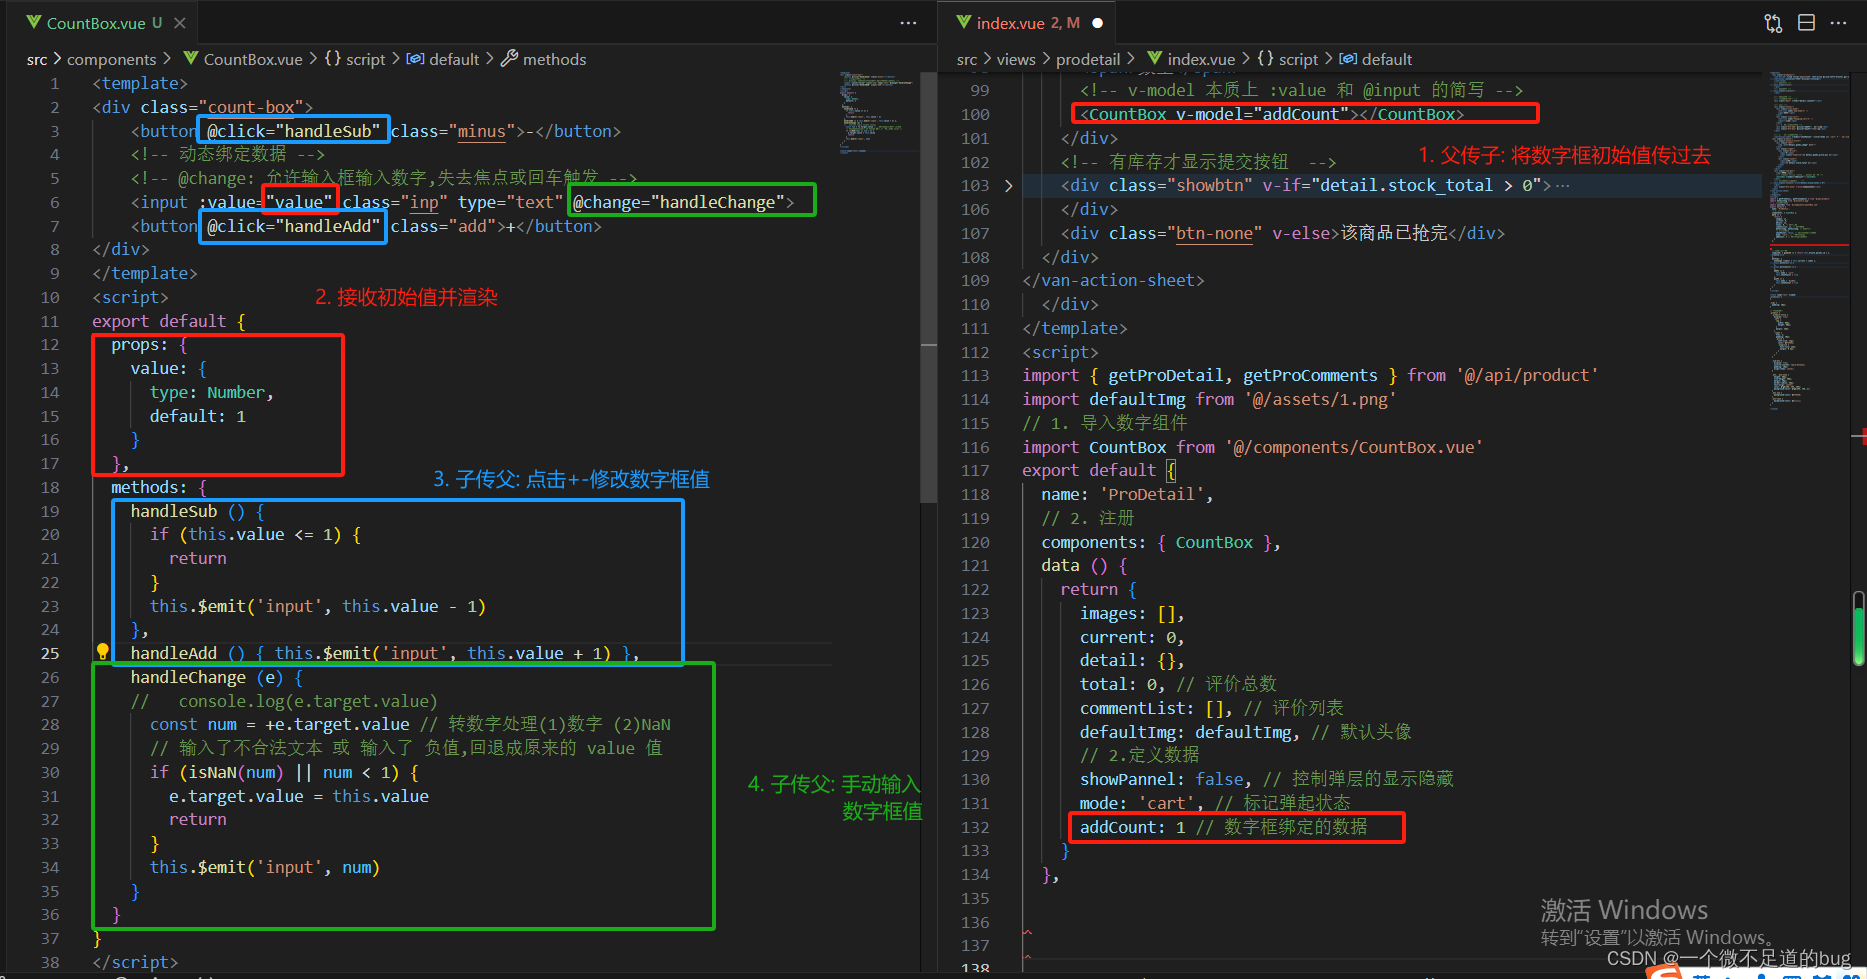
3.定义数字框数字传递给子组件(父传子)
views / prodetail / index.vue
<!--父组件传递数据给子组件--><!-- v-model 本质上 :value 和 @input 的简写 -->
<CountBox v-model="addCount"></CountBox>--------------------------------------<script>
data () {return {addCount: 1 // 数字框绑定的数据}}
</script>
components / CountBox.vue
<!--子组件接收数据--><!-- 动态绑定数据 --><input :value="value" class="inp" type="text">---------------------------<script>
export default {// 接收父组件数据props: {value: {type: Number,default: 1}}}
</script>
4. 数字框点击 + - 修改数字(子传父)
components / CountBox.vue
<template>
<div class="count-box"><!--注册点击事件--><button @click="handleSub" class="minus">-</button><!-- 动态绑定数据 --><input :value="value" class="inp" type="text"><button @click="handleAdd" class="add">+</button>
</div></template><script>
export default {props: {value: {type: Number,default: 1}},methods: {handleSub () {if (this.value <= 1) {return}this.$emit('input', this.value - 1)},handleAdd () {this.$emit('input', this.value + 1)}}}
</script>
5. 数字框手动输入值(子传父)
components / CountBox.vue
<!-- @change: 允许输入框输入数字,失去焦点或回车触发 -->
<input :value="value" class="inp" type="text" @change="handleChange">-------------------<script>methods: {...    handleChange (e) {//   console.log(e.target.value)const num = +e.target.value // 转数字处理(1)数字 (2)NaN// 输入了不合法文本 或 输入了 负值,回退成原来的 value 值if (isNaN(num) || num < 1) {e.target.value = this.valuereturn}this.$emit('input', num)}}}
</script>
6. 代码示例
五. 加入购物车-判断token登录提示
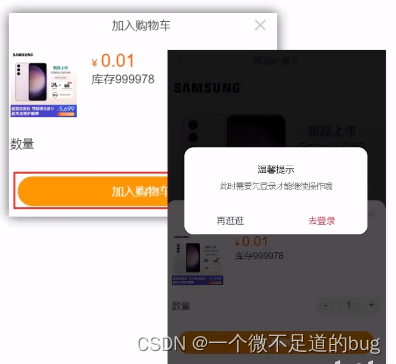
目标:给未登录的用户,添加登录提示
说明:加入购物车,是一个 登录后的用户 才能进行的操作
所以需要进行鉴权判断,判断用户 token 是否存在
(1). 若存在:继续加入购物车操作
(2). 不存在:提示 用户未登录,引导到登录页,登录完回跳
1. 导入组件
utils / vant-ui.js
// 按需导入
import Vue from 'vue'
import {Dialog} from 'vant'Vue.use(Dialog)
2. 详情页增加token验证
views / prodetail / index.vue
<!--注册点击事件-->
<div class="btn" v-if="mode==='cart'" @click="addCart">加入购物车</div><script>methods: {addCart () {// 判断 token是否存在// 1. 如果token不存在, 弹确认框// 2. 如果token存在, 继续请求操作if (!this.$store.getters.token) {// 弹确认框this.$dialog.confirm({title: '温馨提示',message: '此时需要先登录才能继续操作哦',confirmButtonText: '去登录',cancelButtonText: '在逛逛'}).then(() => {// 如果希望, 跳转到登录 => 登录后能回跳回来,需要在跳转去携带参数(当前的路径地址)// this.$route.fullPath(会包含查询参数)// replace: 跳转路由,会将上一个replace路由替换成本次replace路由this.$router.replace({path: '/login',// 额外携带参数query: {backUrl: this.$route.fullPath}})}).catch(() => {})return}console.log('正常请求')}}</script>
3. 登录页做回跳判断
views / login / index.vue
// 登录async login () {...this.$toast('登陆成功')// 进行判断,看地址栏有无回跳地址// 1. 如果有 => 说明是其他页面,拦截到登录来的,需要回跳// 2. 如果没有 => 正常渠首页const url = this.$route.query.backUrl || '/'this.$router.replace(url)}4. 代码示例

六. 加入购物车-封装接口进行请求
目标:封装接口,进行加入购物车的请求
(1). api/cart.js 中封装接口
(2).页面中调用接口
(3).遇到问题:接口需要传递 token
(4).解决问题:请求拦截器统一携带 token
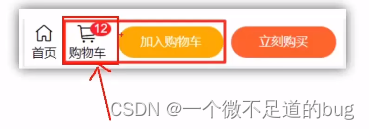
(5).小图定制
1. 封装接口
api / cart.js
import request from '@/utils/request'// 加入购物车
// goodsId => 商品id iphone8
// goodsSkuId => 商品规格id 红色的iphone 粉色的iphone
export const addCart = (goodsId, goodsNum, goodsSkuId) => {return request.post('/cart/add', {goodsId,goodsNum,goodsSkuId})
}
2. 页面中调用接口
views / prodetail / index.vue
<script>
import { addCart } from '@/api/cart'data () {return {...cartTotal: 0 // 购物车角标}},async addCart () {// 判断 token是否存在// 1. 如果token不存在, 弹确认框// 2. 如果token存在, 继续请求操作//if (!this.$store.getters.token) {// 弹确认框//  this.$dialog.confirm({//   title: '温馨提示',//    message: '此时需要先登录才能继续操作哦',//    confirmButtonText: '去登录',//    cancelButtonText: '在逛逛'//  })//  .then(() => {// 如果希望, 跳转到登录 => 登录后能回跳回来,需要在跳转去携带参数(当前的路径地址)// this.$route.fullPath(会包含查询参数)// replace: 跳转路由,会将上一个replace路由替换成本次replace路由//   this.$router.replace({//     path: '/login',//      // 额外携带参数//     query: {//       backUrl: this.$route.fullPath//     }//     })//   }).catch(() => {})//  return// }// console.log('正常请求')const { data } = await addCart(this.goodsId, this.addCount, this.detail.skuList[0].goods_sku_id)this.cartTotal = data.cartTotalthis.$toast('加入购物车成功')this.showPannel = false // 关闭弹层console.log(this.cartTotal)}}
</script>
3. 请求拦截器增加token
utils / request.js
import store from '@/store/index'// 添加请求拦截器
//instance.interceptors.request.use(function (config) {// 在发送请求之前做些什么// 开启loading,禁止背景点击(节流处理,防止多次无效点击)// Toast.loading({//  message: '加载中...',// forbidClick: true, // 禁止背景点击// loadingType: 'spinner', // 配置loading图标// duration: 0 // loading不会自动消失
//  })// 只要有token,就在请求时携带,便于请求需要授权的接口const token = store.getters.tokenif (token) {// 添加请求头config.headers['Access-Token'] = tokenconfig.headers.platform = 'H5'}//  return config
//}, function (error) {// 对请求错误做些什么
//  return Promise.reject(error)
//})
4. 页面中准备小图标
views / prodetail / index.vue
<!--底部-->
div class="icon-cart"><span v-if="cartTotal > 0" class="num">{{ cartTotal }}</span><van-icon name="shopping-cart-o" /><span>购物车</span>
</div>
5. 定制小图标样式
.footer .icon-cart {position: relative;padding: 0 6px;.num {z-index: 999;position: absolute;top: -2px;right: 0;min-width: 16px;padding: 0 4px;color: #fff;text-align: center;background-color: #ee0a24;border-radius: 50%;}
}
这篇关于58 - 综合案例 - 智慧商城-10 - 商品详情页的文章就介绍到这儿,希望我们推荐的文章对编程师们有所帮助!


