本文主要是介绍ubuntu22.04@laptop OpenCV Get Started: 005_rotate_and_translate_image,希望对大家解决编程问题提供一定的参考价值,需要的开发者们随着小编来一起学习吧!
ubuntu22.04@laptop OpenCV Get Started: 005_rotate_and_translate_image
- 1. 源由
- 2. translate/rotate应用Demo
- 3 translate_image
- 3.1 C++应用Demo
- 3.2 Python应用Demo
- 3.3 平移图像过程
- 4. rotate_image
- 4.1 C++应用Demo
- 4.2 Python应用Demo
- 4.3 旋转图像过程
- 5. 总结
- 6. 参考资料
1. 源由
图像的平移和旋转是图像编辑中最基本的操作之一。两者都属于广义仿射变换的范畴。
因此,在研究更复杂的变换之前,首先学习使用OpenCV中提供的函数旋转和平移图像。
2. translate/rotate应用Demo
005_rotate_and_translate_image是OpenCV平移和旋转的示例程序。
确认OpenCV安装路径:
$ find /home/daniel/ -name "OpenCVConfig.cmake"
/home/daniel/OpenCV/installation/opencv-4.9.0/lib/cmake/opencv4/
/home/daniel/OpenCV/opencv/build/OpenCVConfig.cmake
/home/daniel/OpenCV/opencv/build/unix-install/OpenCVConfig.cmake$ export OpenCV_DIR=/home/daniel/OpenCV/installation/opencv-4.9.0/lib/cmake/opencv4/
3 translate_image
3.1 C++应用Demo
C++应用Demo工程结构:
005_rotate_and_translate_image/CPP$ tree .
.
└── translate_image├── CMakeLists.txt├── image.jpg└── translate_image.cpp2 directories, 6 files
C++应用Demo工程编译执行:
$ cd translate_image
$ mkdir build
$ cd build
$ cmake ..
$ cmake --build . --config Release
$ cd ..
$ ./build/translate_image
3.2 Python应用Demo
Python应用Demo工程结构:
005_rotate_and_translate_image/Python$ tree .
.
├── image.jpg
├── image_translation.py
├── requirements.txt
└── rotate_image.py0 directories, 4 files
Python应用Demo工程执行:
$ workoncv-4.9.0
$ python image_translation.py
3.3 平移图像过程
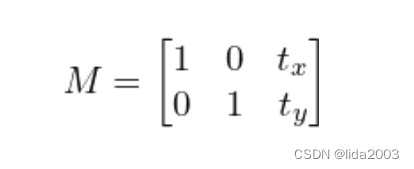
引入平移矩阵对图像进行移动:
- t x t_x tx: X方向,正数向右移动;反之向左移动。
- t y t_y ty: Y方向,正数向下移动;反之向上移动。

C++:
// get tx and ty values for translation
float tx = float(width) / 4;
float ty = float(height) / 4;
// create the translation matrix using tx and ty
float warp_values[] = { 1.0, 0.0, tx, 0.0, 1.0, ty };
Mat translation_matrix = Mat(2, 3, CV_32F, warp_values);// we will save the resulting image in translated_image matrix
Mat translated_image;
// apply affine transformation to the original image using translation matrix
warpAffine(image, translated_image, translation_matrix, image.size());
Python:
# get tx and ty values for translation
tx, ty = width / 4, height / 4 # you divide by value of your choice
# create the translation matrix using tx and ty, it is a NumPy array
translation_matrix = np.array([[1, 0, tx],[0, 1, ty]
], dtype=np.float32)# apply the translation to the image
translated_image = cv2.warpAffine(src=image, M=translation_matrix, dsize=(width, height)
)
4. rotate_image
4.1 C++应用Demo
C++应用Demo工程结构:
005_rotate_and_translate_image/CPP$ tree .
.
└── rotate_image├── CMakeLists.txt├── image.jpg└── rotate_image.cpp2 directories, 6 files
C++应用Demo工程编译执行:
$ cd rotate_image
$ mkdir build
$ cd build
$ cmake ..
$ cmake --build . --config Release
$ cd ..
$ ./build/rotate_image
4.2 Python应用Demo
Python应用Demo工程结构:
005_rotate_and_translate_image/Python$ tree .
.
├── image.jpg
├── image_translation.py
├── requirements.txt
└── rotate_image.py0 directories, 4 files
Python应用Demo工程执行:
$ workoncv-4.9.0
$ python rotate_image.py
4.3 旋转图像过程
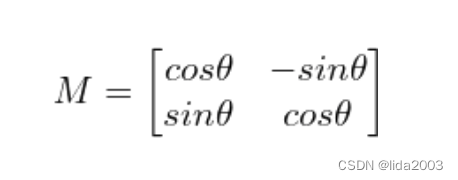
沿旋转中心点进行角度旋转,采用线性代数矩阵运算:
- 旋转中心点:采用了图片的重心
- 旋转角度:示例为45度

C++:
double angle = 45;// get the center coordinates of the image to create the 2D rotation matrix
Point2f center((image.cols - 1) / 2.0, (image.rows - 1) / 2.0);
// create the rotation matrix using the image center
Mat rotation_matix = getRotationMatrix2D(center, angle, 1.0);// we will save the resulting image in rotated_image matrix
Mat rotated_image;
// apply affine transformation to the original image using the 2D rotaiton matrix
warpAffine(image, rotated_image, rotation_matix, image.size());
Python:
# dividing height and width by 2 to get the center of the image
height, width = image.shape[:2]
center = (width/2, height/2)# the above center is the center of rotation axis
# using cv2.getRotationMatrix2D() to get the rotation matrix
rotate_matrix = cv2.getRotationMatrix2D(center=center, angle=45, scale=1)# rotate the image using cv2.warpAffine
rotated_image = cv2.warpAffine(src=image, M=rotate_matrix, dsize=(width, height))
5. 总结
通过对NumPy二维数组操作,对图像进行旋转和移动。
- getRotationMatrix2D(center, angle, scale)
- center: 旋转中心点
- angle: 旋转角度
- scale: 缩放尺寸
- warpAffine(src, M, dsize[, dst[, flags[, borderMode[, borderValue]]]])
- src: 源图像数组
- M: 转换矩阵
- dsize: 输出图像尺寸
- dst: 输出图像
- flags: 插值方法, INTER_LINEAR or INTER_NEAREST
- borderMode: 像素外推方法
- borderValue: 在恒定边界的情况下使用的值,默认值为0
6. 参考资料
【1】ubuntu22.04@laptop OpenCV Get Started
【2】ubuntu22.04@laptop OpenCV安装
【3】ubuntu22.04@laptop OpenCV定制化安装
这篇关于ubuntu22.04@laptop OpenCV Get Started: 005_rotate_and_translate_image的文章就介绍到这儿,希望我们推荐的文章对编程师们有所帮助!


