本文主要是介绍mysql的主从复制高可用性解决方案MHA,希望对大家解决编程问题提供一定的参考价值,需要的开发者们随着小编来一起学习吧!
文章目录
- 环境规划
- 管理节点准备工作
- MySQL主从搭建
- MySQL主从服务器上都授权
- 管理节点配置文件
- 检测,启动 mha
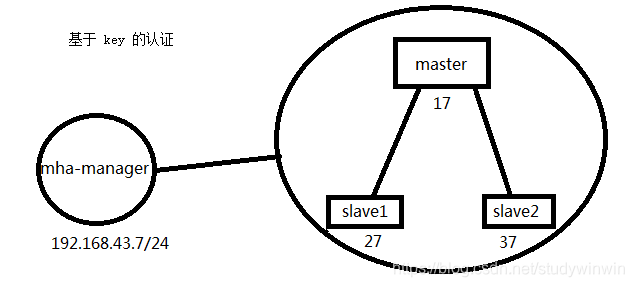
环境规划

管理节点准备工作
安装软件包
mha-manager
yum --enablerepo=epel install mariadb-server mha4mysql-manager-0.56-0.el6.noarch.rpm mha4mysql-node-0.56-0.el6.noarch.rpm -y
基于key的认证
mha-manager
ssh-copy-id 127.0.0.1
scp -r ~/.ssh/ 192.168.43.17:/root/
scp -r ~/.ssh/ 192.168.43.27:/root/
scp -r ~/.ssh/ 192.168.43.37:/root/
MySQL主从搭建
master
yum install mha4mysql-node-0.56-0.el6.noarch.rpm mariadb-server -yvim /etc/my.cnf
[mysqld]
server_id=17
log_bin
skip_name_resolvesystemctl start mariadb
mysql
MariaDB [(none)]> grant replication slave on *.* to repluser@'192.168.43.%' identified by 'centos';
MariaDB [(none)]> grant all on *.* to mhauser@'192.168.43.%' identified by 'centos';
slave1
yum install mha4mysql-node-0.56-0.el6.noarch.rpm mariadb-server -yvim /etc/my.cnf
[mysqld]
server_id=27
log_bin
read_only
skip_name_resolve
relay_log_purge=0 //中继日志不清理systemctl start mariadb
mysql
mysql> CHANGE MASTER TOMASTER_HOST='192.168.43.17',MASTER_USER='repluser',MASTER_PASSWORD='centos',MASTER_PORT=3306,MASTER_LOG_FILE='mariadb-bin.000001',MASTER_LOG_POS=245;
mysql> start slave;
slave2
yum install mha4mysql-node-0.56-0.el6.noarch.rpm mariadb-server -yvim /etc/my.cnf
server_id=37
log_bin
read_only
skip_name_resolve
relay_log_purge=0 //中继日志不清理systemctl start mariadbmysql
mysql> CHANGE MASTER TOMASTER_HOST='192.168.43.17',MASTER_USER='repluser',MASTER_PASSWORD='centos',MASTER_PORT=3306,MASTER_LOG_FILE='mariadb-bin.000001',MASTER_LOG_POS=245;
mysql> start slave
MySQL主从服务器上都授权
master
MariaDB [(none)]> grant all on *.* to mhauser@'192.168.43.%' identified by 'centos';
MariaDB [(none)]> flush privileges;
管理节点配置文件
mha-manager
mkdir /etc/mha/vim /etc/mha/app1.cnf
[server default]
user=mhauser
password=centos
manager_workdir=/data/mastermha/app1/
manager_log=/data/mastermha/app1/manager.log
remote_workdir=/data/mastermha/app1/
ssh_user=root
repl_user=repluser
repl_password=centos
ping_interval=1
[server1]
hostname=192.168.43.17
candidate_master=1
[server2]
hostname=192.168.43.27
[server3]
hostname=192.168.43.37
candidate_master=1
检测,启动 mha
mha-manager
masterha_check_ssh --conf=/etc/mha/app1.cnf
masterha_check_repl --conf=/etc/mha/app1.cnf
masterha_manager --conf=/etc/mha/app1.cnf
这篇关于mysql的主从复制高可用性解决方案MHA的文章就介绍到这儿,希望我们推荐的文章对编程师们有所帮助!


