本文主要是介绍mongodb-elasticsearch-rive源码解析,希望对大家解决编程问题提供一定的参考价值,需要的开发者们随着小编来一起学习吧!
MongoDBRiverPlugin
MongoDBRiverPlugin类是插件注册类,它继承自AbstractPlugin,其功能是
1. 在RiverModule中注册一个MongoDBRiver
2. 在RestModule中注册一个RestMongoDBRiverAction
package org.elasticsearch.plugin.river.mongodb;
import org.elasticsearch.plugins.AbstractPlugin;
import org.elasticsearch.rest.RestModule;
import org.elasticsearch.rest.action.mongodb.RestMongoDBRiverAction;
import org.elasticsearch.river.RiversModule;
import org.elasticsearch.river.mongodb.MongoDBRiver;
import org.elasticsearch.river.mongodb.MongoDBRiverModule;
/**
* @author flaper87 (Flavio Percoco Premoli)
* @author aparo (Alberto Paro)
* @author kryptt (Rodolfo Hansen)
*/
public class MongoDBRiverPlugin extends AbstractPlugin {
@Override
public String name() {
return MongoDBRiver.NAME;
}
@Override
public String description() {
return MongoDBRiver.DESCRIPTION;
}
/**
* Register the MongoDB river to Elasticsearch node
*
* @param module
*/
public void onModule(RiversModule module) {
module.registerRiver(MongoDBRiver.TYPE, MongoDBRiverModule.class);
}
/**
* Register the REST move to Elasticsearch node
*
* @param module
*/
public void onModule(RestModule module) {
module.addRestAction(RestMongoDBRiverAction.class);
}
}
MongoDBRiver
首先看river部分 org.elasticsearch.river.mongodb.MongoDBRiver是核心类,构造函数中都是都是elasticsearch 的配置信息和服务
| 参数类型 | 参数名称 | 含义 | 取值 |
| RiverName | riverName | 名称 | |
| RiverSettings | settings | 设置信息 | |
| String | riverIndexName | 索引名 | |
| Client | client | 客户端 | |
| ScriptService | scriptService | 脚本服务 | |
| MongoDBRiverDefinition | definition | 解析后的定义 | MongoDBRiverDefinition.parseSettings(riverName.name(),riverIndexName, settings, scriptService); |
还有一个参数stream表示操作流,用来存储需要放在mongo oplog中的数据队列
BlockingQueue<QueueEntry> stream =
definition.getThrottleSize() == -1 ?
new LinkedTransferQueue<QueueEntry>()
: new ArrayBlockingQueue<QueueEntry>(definition.getThrottleSize());
可以看到,如果definition中设定的阈值大小没有设定的话,使用一个链表数据结构作为队列,否则使用一个数组队列。不过两种情况使用的数据结构都是多线程使用的数据结构BlockingQueue阻塞队列。阻塞队列是用在“生产者-消费者”模式的主要数据结构,其作用是如果队列空,则消费者阻塞;如果队列满,则生产者阻塞。而且队列支持多个生产者和消费者线程。其中QueueEntry定义如下,其中Operation是一个枚举,包含了各种mongodb操作:INSERT,UPDATE, DELETE, DROP_COLLECTION, DROP_DATABASE, COMMAND, UNKNOWN;
protected static class QueueEntry {
private final DBObject data;
private final Operation operation;
private final Timestamp<?> oplogTimestamp;
private final String collection;
public QueueEntry(DBObject data, String collection) {
this(null, Operation.INSERT, data, collection);
}
public QueueEntry(Timestamp<?> oplogTimestamp, Operation oplogOperation, DBObject data, String collection) {
this.data = data;
this.operation = oplogOperation;
this.oplogTimestamp = oplogTimestamp;
this.collection = collection;
}
public boolean isOplogEntry() {
return oplogTimestamp != null;
}
public boolean isAttachment() {
return (data instanceof GridFSDBFile);
}
public DBObject getData() {
return data;
}
public Operation getOperation() {
return operation;
}
public Timestamp<?> getOplogTimestamp() {
return oplogTimestamp;
}
public String getCollection() {
return collection;
}
}
}最后MongoDBRiver构造函数里面还有一个全局参数SharedContext context,这个参数包含了这个队列的引用,并且包含了整体运行状态的一个上下文状态:UNKNOWN, START_FAILED, RUNNING, STOPPED, IMPORT_FAILED,INITIAL_IMPORT_FAILED, SCRIPT_IMPORT_FAILED, RIVER_STALE;
this.context = new SharedContext(stream, Status.STOPPED);* 首先是各种状态的检查:
1、 用client获取elastic的状态,转成Status
client.prepareGet("_river", "mongodb-river", "_riverstatus").get()
XContentMapValues.extractValue("mongodb.status")
3、 如果没有问题,则使用方法设定river为启动状态:
MongoDBRiverHelper.setRiverStatus(client, riverName.getName(), Status.RUNNING);
context.setStatus(Status.RUNNING);
4、如果不存在索引则建立之
// Create the index if it does not exist
client.admin().indices().prepareCreate(definition.getIndexName()).get();
5、 如果是GridFS要做一些额外的索引工作
client.admin().indices().preparePutMapping(definition.getIndexName()).setType(definition.getTypeName()).setSource(getGridFSMapping()).get();如果是mongos,就启动多个OpLog处理线程,否则使用一个线程,创建方式如下:
EsExecutors.daemonThreadFactory(settings.globalSettings(), "mongodb_river_slurper").newThread(new Slurper(definition.getMongoServers(), definition, context, client));
EsExecutors.daemonThreadFactory(settings.globalSettings(),"mongodb_river_indexer").newThread(new Indexer(this, definition, context, client, scriptService));EsExecutors.daemonThreadFactory(settings.globalSettings(), "mongodb_river_status").newThread(new StatusChecker(this, definition, context));
* 所以代码的核心就是三个线程:
收割 new Slurper(definition.getMongoServers(), definition, context,client)
索引处理 new Indexer(this, definition, context, client, scriptService)
状态检查 new StatusChecker(this, definition, context)
可以看到共同的参数都是:一个definition包含所有的配置,context包含了操作队列和状态
Slurper收割线程
其逻辑是:
1、 如果driver的状态是Running,则查找OpLog的信息并放入stream队列中
2、 如果无法获取oplogCollection队列,则退出线程failed to assign oplogCollection orslurpedCollection
3、 增量处理是按照上次注入时间点为查询条件的
cursor = oplogCursor(startTimestamp);
if (cursor == null) {cursor = processFullOplog();
}
查询条件是
filter.put(MongoDBRiver.OPLOG_TIMESTAMP,new BasicDBObject(QueryOperators.GTE, time));ts > time4、获得数据库指针之后,处理每一个OpLog的数据
while (cursor.hasNext()) {DBObject item = cursor.next();startTimestamp = processOplogEntry(item, startTimestamp);
}
处理这些数据最后就是调用 addToStream 或 addInsertToStream 加入stream中
初始化导入
上面的过程只适合于从当前时间开始的数据,如果需要把原来的数据导入的话,还需要做一个initialimport
当程序配置满足一下条件的时候,才会在第一次运行该线程的时候进行初始化导入:
SkipInitialImport == false
InitialTimestamp == null // initial timestamp 为空
MongoDBRiver.getIndexCount(client, definition) == 0 // 没有index过
MongoDBRiver.getLastTimestamp(client, definition) == null;
Get the latest timestamp for a given namespace.
满足这些条件之后才会进行数据的初始化导入:初始化导入会查看一下设置,如果是ImportAllCollections,则检查每一个collection并注入否则,找出设定的collection并注入
核心代码是这样的:if (!definition.isSkipInitialImport()) {if (!riverHasIndexedFromOplog() && definition.getInitialTimestamp() == null) {if (!isIndexEmpty()) {MongoDBRiverHelper.setRiverStatus(client, definition.getRiverName(), Status.INITIAL_IMPORT_FAILED);break;}if (definition.isImportAllCollections()) {for (String name : slurpedDb.getCollectionNames()) {DBCollection collection = slurpedDb.getCollection(name);startTimestamp = doInitialImport(collection);}} else {DBCollection collection = slurpedDb.getCollection(definition.getMongoCollection());startTimestamp = doInitialImport(collection);}}} else {logger.info("Skip initial import from collection {}", definition.getMongoCollection());}Indexer线程
其逻辑是:
1、如果driver的状态是Running,则从stream队列中获取信息并放入Index中
在构造函数初始化的时候会做一些MongoDBRiverBulkProcessor的创建 build:
SimpleEntry<String, String> entry = new SimpleEntry<String, String>(index, type);if (!processors.containsKey(entry)) {processors.put(new SimpleEntry<String, String>(index, type), new MongoDBRiverBulkProcessor.Builder(river, definition, client,index, type).build());}return processors.get(entry);
然后在业务逻辑中读取entry,并processBlockingQueue processBlockingQueue就是根据不同的业务的内容做不同的处理,就是对不同的操作用相关的es api加以处理。
// 1. Attempt to fill as much of the bulk request as possibleQueueEntry entry = context.getStream().take();lastTimestamp = processBlockingQueue(entry);while ((entry = context.getStream().poll(definition.getBulk().getFlushInterval().millis(), MILLISECONDS)) != null) {lastTimestamp = processBlockingQueue(entry);}// 2. Update the timestampif (lastTimestamp != null) {MongoDBRiver.setLastTimestamp(definition, lastTimestamp,getBulkProcessor(definition.getIndexName(), definition.getTypeName()).getBulkProcessor());}StatusChecker
状态检查就是更具用户的命令进行开/关
就是检查elastic中的最新状态【用户设定的状态】:MongoDBRiverHelper.getRiverStatus(client, riverName);
如果状态和当前状态不一致,就进行driver的start或stop
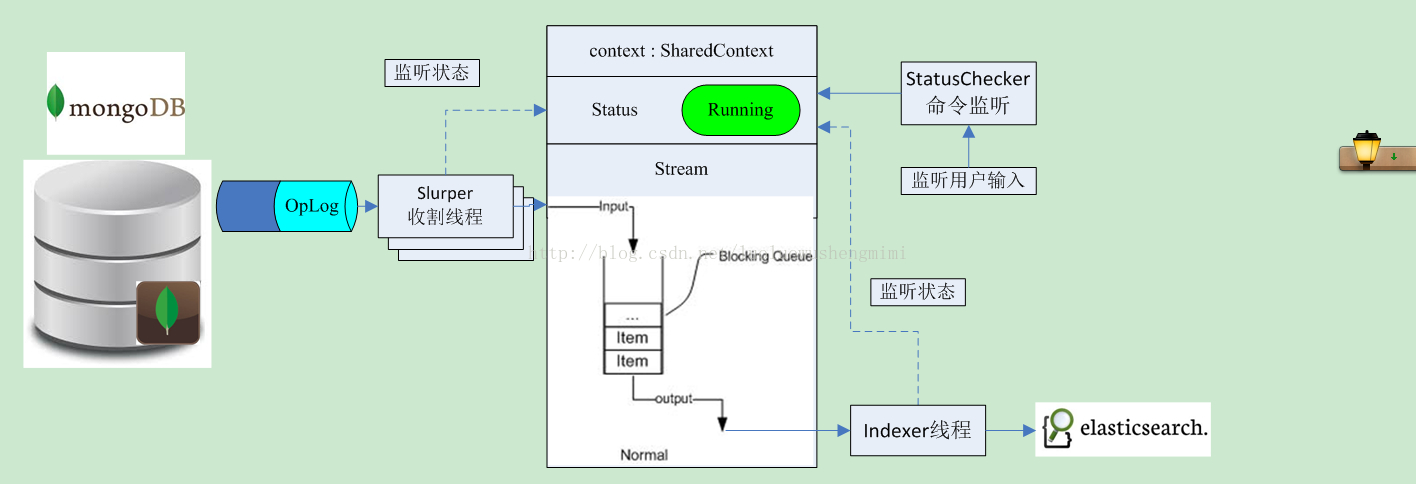
用一个流程图来解释这几个线程之间的关系就是这样的:
RestModule
注册这个模块的作用是在原来es支持的rest api基础上,增加针对mongodb的新的api类型,具体实现可以参考一下这篇文章,这里不再赘述了:
http://elasticsearchserverbook.com/creating-custom-elasticsearch-rest-action/
参考文档:
https://github.com/richardwilly98/elasticsearch-river-mongodb
http://elasticsearchserverbook.com/creating-custom-elasticsearch-rest-action/
http://blog.csdn.net/vernonzheng/article/details/8247564
http://www.cnblogs.com/jackyuj/archive/2010/11/24/1886553.html
这篇关于mongodb-elasticsearch-rive源码解析的文章就介绍到这儿,希望我们推荐的文章对编程师们有所帮助!


