本文主要是介绍动态扩缩容下的全局流水号设计,希望对大家解决编程问题提供一定的参考价值,需要的开发者们随着小编来一起学习吧!
关于全局流水号,业内用的比较多的就是雪花算法,一直没理解在动态扩缩容下其中的workId和
datacenterId如何设置,查到了几个方法:reidis中取,待后期实践下。
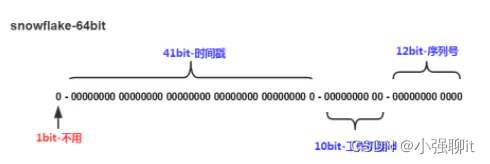
先简单的介绍一下雪花算法,雪花算法生成的Id由:1bit 不用 + 41bit时间戳+10bit工作机器id+12bit序列号,如下图:

不用:1bit,因为最高位是符号位,0表示正,1表示负,所以这里固定为0
时间戳:41bit,服务上线的时间毫秒级的时间戳(为当前时间-服务第一次上线时间),这里为(2^41-1)/1000/60/60/24/365 = 49.7年
工作机器id:10bit,表示工作机器id,用于处理分布式部署id不重复问题,可支持2^10 = 1024个节点
序列号:12bit,用于离散同一机器同一毫秒级别生成多条Id时,可允许同一毫秒生成2^12 = 4096个Id,则一秒就可生成4096*1000 = 400w个Id
说明:上面总体是64位,具体位数可自行配置,如想运行更久,需要增加时间戳位数;如想支持更多节点,可增加工作机器id位数;如想支持更高并发,增加序列号位数
公司使用的 k8s 容器化部署服务应用,所以需要支持动态增加节点,并且每次部署的机器不一定一样时,就会有问题。参考了 雪花算法snowflake生成Id重复问题 其中的思想:
在redis中存储一个当前workerId的最大值
每次生成workerId时,从redis中获取到当前workerId最大值,并+1作为当前workerId,并存入redis
如果workerId为1023,自增为1024,则重置0,作为当前workerId,并存入redis
然后优化成以下逻辑:
定义一个 redis 作为缓存 key,然后服务每次初始化的时候都 incr 这个 key。
上面得到的 incr 的结果然后与 1024 取模。取模可以优化为:result & 0x000003FF
所以最后的代码为下面:
首先我们先定义雪花算法生成分布式 ID 类:
SnowflakeIdWorker.java
public class SnowflakeIdWorker {/** 开始时间截 (建议用服务第一次上线的时间,到毫秒级的时间戳) */private final long twepoch = 687888001020L;/** 机器id所占的位数 */private final long workerIdBits = 10L;/** 支持的最大机器id,结果是1023 (这个移位算法可以很快的计算出几位二进制数所能表示的最大十进制数) */private final long maxWorkerId = -1L ^ (-1L << workerIdBits);/** 序列在id中占的位数 */private final long sequenceBits = 12L;/** 机器ID向左移12位 */private final long workerIdShift = sequenceBits;/** 时间截向左移22位(10+12) */private final long timestampLeftShift = sequenceBits + workerIdBits;/** 生成序列的掩码,这里为4095 (0b111111111111=0xfff=4095)* <<为左移,每左移动1位,则扩大1倍* */private final long sequenceMask = -1L ^ (-1L << sequenceBits);/** 工作机器ID(0~1024) */private long workerId;/** 毫秒内序列(0~4095) */private long sequence = 0L;/** 上次生成ID的时间截 */private long lastTimestamp = -1L;//==============================Constructors=====================================/*** 构造函数* @param workerId 工作ID (0~1023)*/public SnowflakeIdWorker(long workerId) {if (workerId > maxWorkerId || workerId < 0) {throw new IllegalArgumentException(String.format("workerId can't be greater than %d or less than 0", maxWorkerId));}this.workerId = workerId;}// ==============================Methods==========================================/*** 获得下一个ID (该方法是线程安全的)* @return SnowflakeId*/public synchronized long nextId() {long timestamp = timeGen();//如果当前时间小于上一次ID生成的时间戳,说明系统时钟回退过这个时候应当抛出异常if (timestamp < lastTimestamp) {throw new RuntimeException(String.format("Clock moved backwards. Refusing to generate id for %d milliseconds", lastTimestamp - timestamp));}//如果是同一时间生成的,则进行毫秒内序列if (lastTimestamp == timestamp) {//如果毫秒相同,则从0递增生成序列号sequence = (sequence + 1) & sequenceMask;//毫秒内序列溢出if (sequence == 0) {//阻塞到下一个毫秒,获得新的时间戳timestamp = tilNextMillis(lastTimestamp);}}//时间戳改变,毫秒内序列重置else {sequence = 0L;}//上次生成ID的时间截lastTimestamp = timestamp;//移位并通过或运算拼到一起组成64位的IDreturn ((timestamp - twepoch) << timestampLeftShift) //| (workerId << workerIdShift) //| sequence;}/*** 阻塞到下一个毫秒,直到获得新的时间戳* @param lastTimestamp 上次生成ID的时间截* @return 当前时间戳*/protected long tilNextMillis(long lastTimestamp) {long timestamp = timeGen();while (timestamp <= lastTimestamp) {timestamp = timeGen();}return timestamp;}/*** 返回以毫秒为单位的当前时间,从1970-01-01 08:00:00算起* @return 当前时间(毫秒)*/protected long timeGen() {return System.currentTimeMillis();}public static void main(String[] args) {SnowflakeIdWorker snowflakeIdWorker = new SnowflakeIdWorker(1);Set<Long> params = new HashSet<>();for (int i = 0; i < 3000_0000; i++) {params.add(snowflakeIdWorker.nextId());}System.out.println(params.size());}}
接着定义一个 ID 生成的接口以及实现类。
public interface IdManager {String getId();}下面是实现类@Slf4j
@Service("idManager")
public class IdManagerImpl implements IdManager {@Resource(name = "stringRedisTemplate")private StringRedisTemplate stringRedisTemplate;private SnowflakeIdWorker snowflakeIdWorker;@PostConstructpublic void init() {String cacheKey = KeyUtils.getKey("order", "snowflake", "workerId", "incr");Long increment = stringRedisTemplate.opsForValue().increment(cacheKey);long workerId = increment & 0x000003FF;log.info("IdManagerImpl.init snowflake worker id is {}", workerId);snowflakeIdWorker = new SnowflakeIdWorker(workerId);}@Overridepublic String getId() {long nextId = snowflakeIdWorker.nextId();return Long.toString(nextId);}
}
在服务每次上线的时候就会把之前的 incr 值加 1。然后与 1024 取模,最后 workerId 就会一直在 [0 ~ 1023] 范围内进行动态取值。
原文链接:https://blog.csdn.net/u012410733/article/details/121882691
还有的做法是依赖配置中心的数据,因为无论是扩缩容至少都要注册到注册中心上,那拿到注册中心上的ip和端口号来动态生成workId和datacenterId
import com.alibaba.cloud.nacos.NacosDiscoveryProperties;
import com.alibaba.cloud.nacos.NacosServiceManager;
import com.alibaba.nacos.api.exception.NacosException;
import com.alibaba.nacos.api.naming.NamingService;
import com.alibaba.nacos.api.naming.listener.AbstractEventListener;
import com.alibaba.nacos.api.naming.listener.Event;
import com.alibaba.nacos.api.naming.listener.NamingEvent;
import com.alibaba.nacos.api.naming.pojo.Instance;
import org.slf4j.Logger;
import org.slf4j.LoggerFactory;
import org.springframework.beans.factory.annotation.Autowired;
import org.springframework.stereotype.Component;import javax.annotation.PostConstruct;
import java.text.DecimalFormat;
import java.util.Comparator;
import java.util.List;
import java.util.stream.Collectors;/*** SnowflakeId + Nacos*/
@Component
public class SnowflakeIdGenerator {protected final Logger logger = LoggerFactory.getLogger(this.getClass());@Autowiredprivate NacosServiceManager nacosServiceManager;@Autowiredprivate NacosDiscoveryProperties nacosDiscoveryProperties;private static SnowflakeIdWorker snowflakeIdWorker;private static int nodeId;@PostConstructpublic void run() throws Exception {init();}/*** 获取雪花Id** @return*/public static long nextId() {return snowflakeIdWorker.nextId();}/*** 获取当前节点Id** @return*/public static int nodeId() {return nodeId;}/*** 获取当前服务所有节点 + 增加服务监听** @throws NacosException*/private void init() throws NacosException {NamingService namingService = nacosServiceManager.getNamingService(nacosDiscoveryProperties.getNacosProperties());namingService.subscribe(nacosDiscoveryProperties.getService(), new AbstractEventListener() {@Overridepublic void onEvent(Event event) {if (-1 == nacosDiscoveryProperties.getPort()) {return;}nodeId = calcNodeId(((NamingEvent) event).getInstances());if (nodeId > 1024) {throw new IllegalArgumentException("Worker & Datacenter Id calc results exceed 1024");}long workerId = nodeId % 31;long datacenterId = (long) Math.floor((float) nodeId / 31);logger.info("nodeId:" + nodeId + " workerId:" + workerId + " datacenterId:" + datacenterId);snowflakeIdWorker = new SnowflakeIdWorker(workerId, datacenterId);}});}/*** 用ip+port计算服务列表的索引** @param instanceList* @return*/private int calcNodeId(List<Instance> instanceList) {List<Long> ipPosrList = instanceList.stream().map(x -> dealIpPort(x.getIp(), x.getPort())).sorted(Comparator.naturalOrder()).collect(Collectors.toList());return ipPosrList.indexOf(dealIpPort(nacosDiscoveryProperties.getIp(), nacosDiscoveryProperties.getPort()));}/*** ip补0 + 端口号** @param ip* @param port* @return*/private static Long dealIpPort(String ip, int port) {String[] ips = ip.split("\\.");StringBuilder sbr = new StringBuilder();for (int i = 0; i < ips.length; i++) {sbr.append(new DecimalFormat("000").format(Integer.parseInt(ips[i])));}return Long.parseLong(sbr.toString() + port);}}
代码在https://gitee.com/JiaXiaohei/snowflake-nacos
还有一种方法是这样获取的
@Configuration
public class SnowFlakeIdConfig {@Beanpublic SnowFlakeIdUtil propertyConfigurer() {return new SnowFlakeIdUtil(getWorkId(), getDataCenterId(), 10);}/*** workId使用IP生成* @return workId*/private static Long getWorkId() {try {String hostAddress = Inet4Address.getLocalHost().getHostAddress();int[] ints = StringUtils.toCodePoints(hostAddress);int sums = 0;for (int b : ints) {sums = sums + b;}return (long) (sums % 32);}catch (UnknownHostException e) {// 失败就随机return RandomUtils.nextLong(0, 31);}}/*** dataCenterId使用hostName生成* @return dataCenterId*/private static Long getDataCenterId() {try {String hostName = SystemUtils.getHostName();int[] ints = StringUtils.toCodePoints(hostName);int sums = 0;for (int i: ints) {sums = sums + i;}return (long) (sums % 32);}catch (Exception e) {// 失败就随机return RandomUtils.nextLong(0, 31);}}}
有参考:雪花算法(snowflake)容器化部署支持动态增加节点_k8s雪花id重复-CSDN博客
用Nacos分配Snowflake的Worker ID_nacos workid-CSDN博客 雪花算法的原理和实现Java-CSDN博客
Leaf——美团点评分布式ID生成系统 - 美团技术团队 (meituan.com)
java 雪花算法 动态生成workId与dataCenterId - 胡子就不刮 - 博客园 (cnblogs.com)
这篇关于动态扩缩容下的全局流水号设计的文章就介绍到这儿,希望我们推荐的文章对编程师们有所帮助!


