本文主要是介绍Kaptcha验证码(springboot后端加vue前端简单实列),希望对大家解决编程问题提供一定的参考价值,需要的开发者们随着小编来一起学习吧!
搭建编写环境
搭建前端环境(vue)
使用cmd创建一个基本的vue项目,并用idea打开

搭建后端环境(springboot)
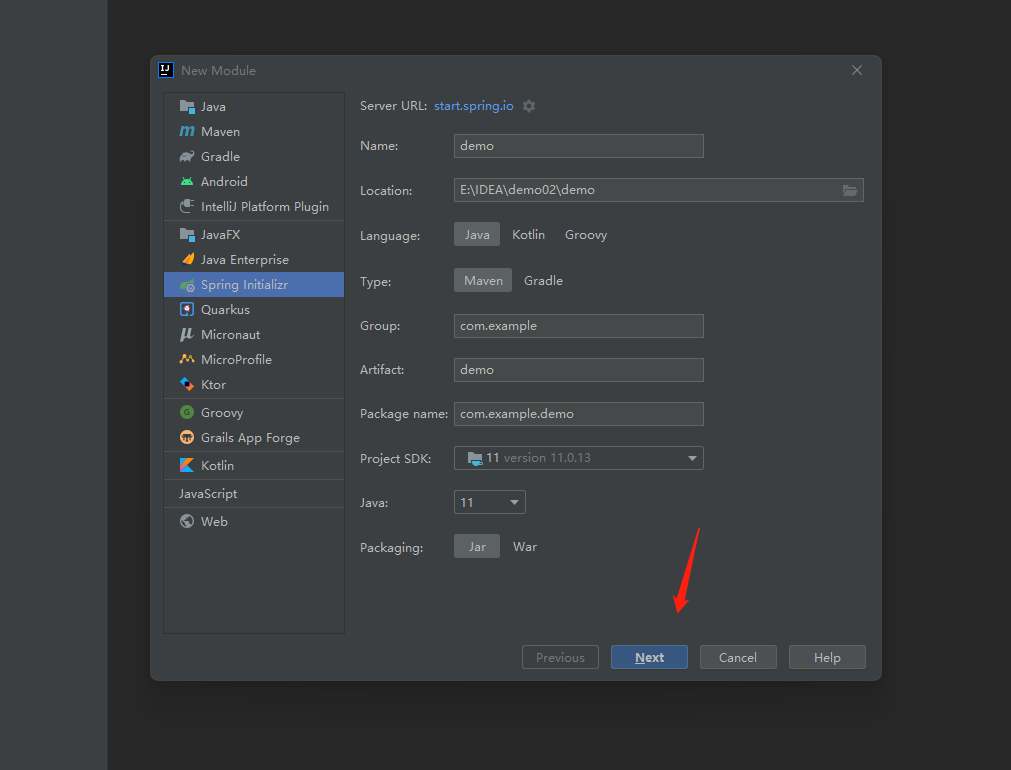
在根目录创建一个Module

选择spring,并下一步。

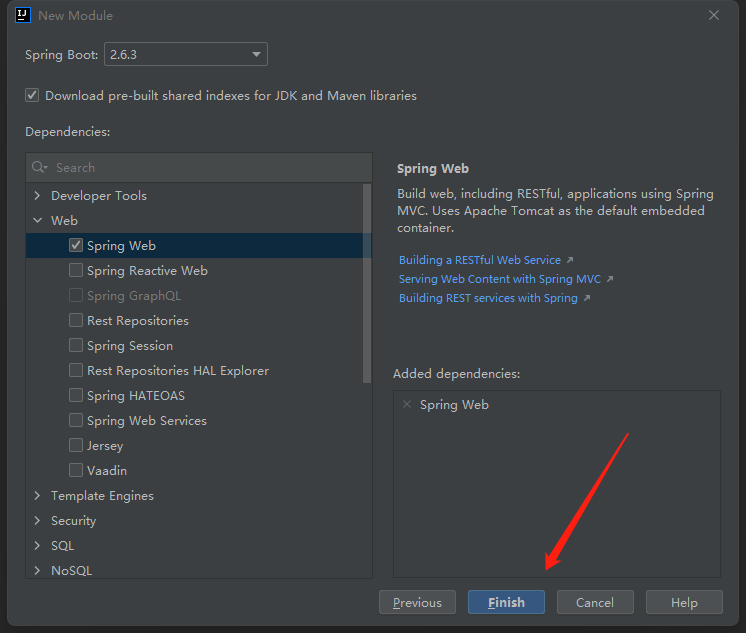
勾选Web下的Spring Web。并下一步。

这样你的后端环境就搭建完成了。

代码编写
后端
第一步:导入kaptcha依赖
<!-- 验证码 依赖--><dependency><groupId>com.github.axet</groupId><artifactId>kaptcha</artifactId><version>0.0.9</version></dependency>

第二步:配置KaptchaConfig(验证码图像的一些配置信息)

package com.example.demo.kaptcha;import com.google.code.kaptcha.impl.DefaultKaptcha;
import com.google.code.kaptcha.util.Config;
import org.springframework.context.annotation.Bean;
import org.springframework.stereotype.Component;import java.util.Properties;@Component
public class KaptchaConfig {@Beanpublic DefaultKaptcha getDefaultKaptcha() {com.google.code.kaptcha.impl.DefaultKaptcha defaultKaptcha = new com.google.code.kaptcha.impl.DefaultKaptcha();Properties properties = new Properties();// 图片边框properties.setProperty("kaptcha.border", "no");// 边框颜色properties.setProperty("kaptcha.border.color", "black");//边框厚度properties.setProperty("kaptcha.border.thickness", "1");// 图片宽properties.setProperty("kaptcha.image.width", "200");// 图片高properties.setProperty("kaptcha.image.height", "50");//图片实现类properties.setProperty("kaptcha.producer.impl", "com.google.code.kaptcha.impl.DefaultKaptcha");//文本实现类properties.setProperty("kaptcha.textproducer.impl", "com.google.code.kaptcha.text.impl.DefaultTextCreator");//文本集合,验证码值从此集合中获取properties.setProperty("kaptcha.textproducer.char.string", "01234567890qwertyuiopasdfghjklzxcvbnm");//验证码长度properties.setProperty("kaptcha.textproducer.char.length", "4");//字体properties.setProperty("kaptcha.textproducer.font.names", "宋体");//字体颜色properties.setProperty("kaptcha.textproducer.font.color", "black");//文字间隔properties.setProperty("kaptcha.textproducer.char.space", "5");//干扰实现类properties.setProperty("kaptcha.noise.impl", "com.google.code.kaptcha.impl.DefaultNoise");//干扰颜色properties.setProperty("kaptcha.noise.color", "blue");//干扰图片样式properties.setProperty("kaptcha.obscurificator.impl", "com.google.code.kaptcha.impl.WaterRipple");//背景实现类properties.setProperty("kaptcha.background.impl", "com.google.code.kaptcha.impl.DefaultBackground");//背景颜色渐变,结束颜色properties.setProperty("kaptcha.background.clear.to", "white");//文字渲染器properties.setProperty("kaptcha.word.impl", "com.google.code.kaptcha.text.impl.DefaultWordRenderer");Config config = new Config(properties);defaultKaptcha.setConfig(config);return defaultKaptcha;}
}
第三步:生成验证码图像的CaptchaController

package com.example.demo.kaptcha;import com.google.code.kaptcha.Constants;
import com.google.code.kaptcha.Producer;
import org.slf4j.Logger;
import org.slf4j.LoggerFactory;
import org.springframework.beans.factory.annotation.Autowired;
import org.springframework.stereotype.Controller;
import org.springframework.web.bind.annotation.RequestMapping;
import org.springframework.web.servlet.ModelAndView;import javax.imageio.ImageIO;
import javax.servlet.ServletOutputStream;
import javax.servlet.http.HttpServletRequest;
import javax.servlet.http.HttpServletResponse;
import javax.servlet.http.HttpSession;
import java.awt.image.BufferedImage;
@Controller
public class CaptchaController {@Autowiredprivate Producer captchaProducer;@Autowiredprivate static Logger logger = LoggerFactory.getLogger(CaptchaController.class);@RequestMapping("getimg")public ModelAndView getKaptchaImage(HttpServletRequest request, HttpServletResponse response) throws Exception {HttpSession session = request.getSession();String code = (String)session.getAttribute(Constants.KAPTCHA_SESSION_KEY);logger.debug("******************验证码是: " + code + "******************");response.setDateHeader("Expires", 0);// 设置标准的HTTP/1.1无缓存头信息response.setHeader("Cache-Control", "no-store, no-cache, must-revalidate");// 设置IE扩展的HTTP/1.1无缓存头(使用addHeader)response.addHeader("Cache-Control", "post-check=0, pre-check=0");// 设置标准HTTP/1.0无缓存报头response.setHeader("Pragma", "no-cache");// 返回一个jpegresponse.setContentType("image/jpeg");// 为图像创建文本String capText = captchaProducer.createText();// 将文本存储在会话中session.setAttribute(Constants.KAPTCHA_SESSION_KEY, capText);// 用文本创建图像BufferedImage bi = captchaProducer.createImage(capText);ServletOutputStream out = response.getOutputStream();// 导出数据ImageIO.write(bi, "jpg", out);try {out.flush();} finally {out.close();}return null;}
}
上面代码看不懂的,去学学IO流!
第四步:后台登录Controller

package com.example.demo.kaptcha;import com.google.code.kaptcha.Constants;
import org.springframework.web.bind.annotation.GetMapping;
import org.springframework.web.bind.annotation.RequestParam;
import org.springframework.web.bind.annotation.RestController;import javax.servlet.http.HttpServletRequest;@RestControllerpublic class login {@GetMapping("login")public boolean login(HttpServletRequest request, @RequestParam("code") String code) {String sessionCode = (String) request.getSession().getAttribute(Constants.KAPTCHA_SESSION_KEY);if (code.equals(sessionCode)) {
//            验证正常返回truereturn true;} else {
//            验证失败返回falsereturn false;}}
}
第五步:跨域配置webconfig
在demo下创建一个config包添加一个webconfig文件

package com.example.demo.config;import org.springframework.context.annotation.Bean;
import org.springframework.context.annotation.Configuration;
import org.springframework.web.cors.CorsConfiguration;
import org.springframework.web.cors.UrlBasedCorsConfigurationSource;
import org.springframework.web.filter.CorsFilter;@Configuration
public class webconfig {private CorsConfiguration buildConfig() {CorsConfiguration corsConfiguration = new CorsConfiguration();corsConfiguration.addAllowedOriginPattern("*"); // 1允许任何域名使用corsConfiguration.addAllowedHeader("*"); // 2允许任何头corsConfiguration.addAllowedMethod("*"); // 3允许任何方法(post、get等)corsConfiguration.setAllowCredentials(true);//支持安全证书。跨域携带cookie需要配置这个corsConfiguration.setMaxAge(3600L);//预检请求的有效期,单位为秒。设置maxage,可以避免每次都发出预检请求return corsConfiguration;}@Beanpublic CorsFilter corsFilter() {UrlBasedCorsConfigurationSource source = new UrlBasedCorsConfigurationSource();source.registerCorsConfiguration("/**", buildConfig()); // 4return new CorsFilter(source);}
第六步:测试
运行项目:


1、获得图片
在浏览器中输入:http://localhost:8080/getimg

2、验证校验码
在浏览器中输入:http://localhost:8080/login?code=m83v

假如错误

前端
第一步:创建一个network包。并编写封装

import axios from 'axios'
// 运行跨域携带cookie
axios.defaults.withCredentials = true
export function kaptcha(config) {let newVar = axios.create({baseURL: 'http://localhost:8080',timeout:5000});return newVar(config);
}
第二步,编写页面
我就在vue原有的helloworld.vue的页面上改,删除里面原有的div。

<template><div><h1>图像验证码</h1><img src="http://localhost:8080/getimg" id="images" @click="replace"><br><input size="20" placeholder="请输入验证码" id="input" /><br><button @click="click">验证</button><br><a>判断结果:{{this.$data.message}}</a></div></template><script>
import {kaptcha} from "@/network/kaptcha";export default {name: 'HelloWorld',data(){return{data:'',message:''}},methods:{replace(){document.getElementById("images").src="http://localhost:8080/getimg";},click(){this.$data.data=document.getElementById("input").value;kaptcha({url:'login',params:{code:this.$data.data},}).then(res=>{this.$data.message=res.data}).catch(err=>{this.$data.message=err.data})}}
}
</script><style scoped></style>
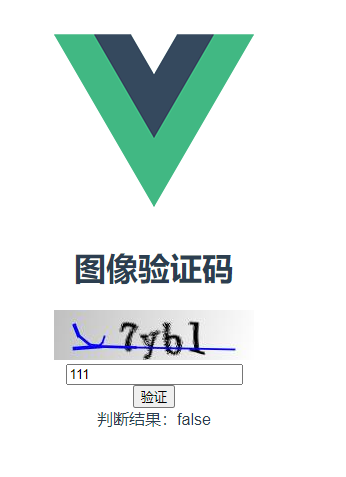
第三步,测试
正确返回true
[外链图片转存失败,源站可能有防盗链机制,建议将图片保存下来直接上传(img-XslpgDpc-1644230852718)(C:\Users\xinji\AppData\Roaming\Typora\typora-user-images\image-20220207184548616.png)]
错误返回false

本片注意,跨域问题!!!
这篇关于Kaptcha验证码(springboot后端加vue前端简单实列)的文章就介绍到这儿,希望我们推荐的文章对编程师们有所帮助!


