本文主要是介绍图片热区功能,希望对大家解决编程问题提供一定的参考价值,需要的开发者们随着小编来一起学习吧!
一、需求描述及效果图
1.需求描述:
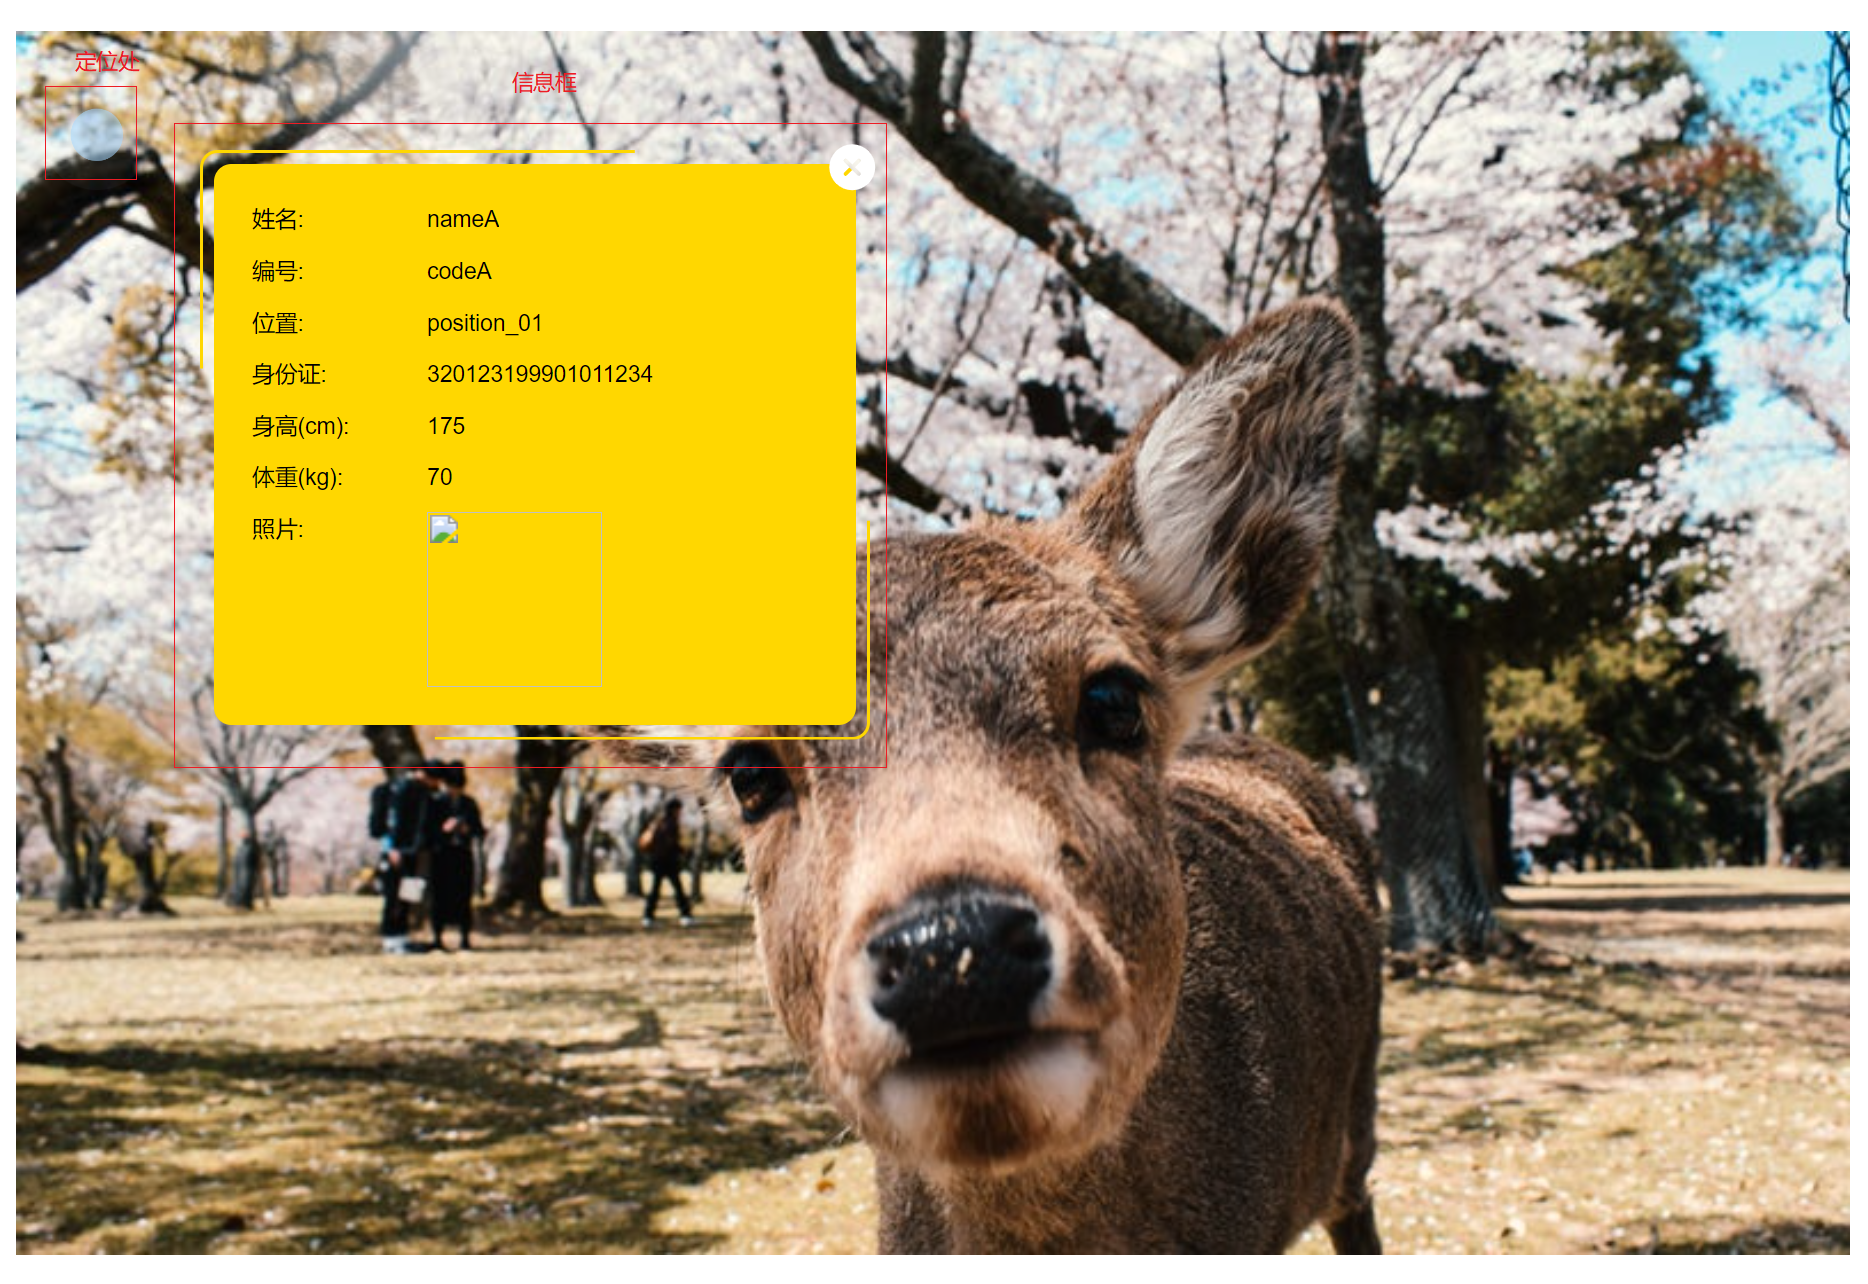
根据后端返回的坐标及人员信息,在图片上的相应位置添加图片热区功能,点击可展示出对应的人员信息。
图片可进行缩放
2.示例:
(定位是随便写的,仅做示例)
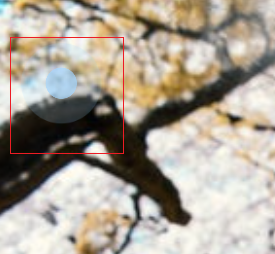
鼠标悬浮到坐标位置上会出现水波纹的效果,点击定位处出现信息框来描述定位位置的信息。
二、思路
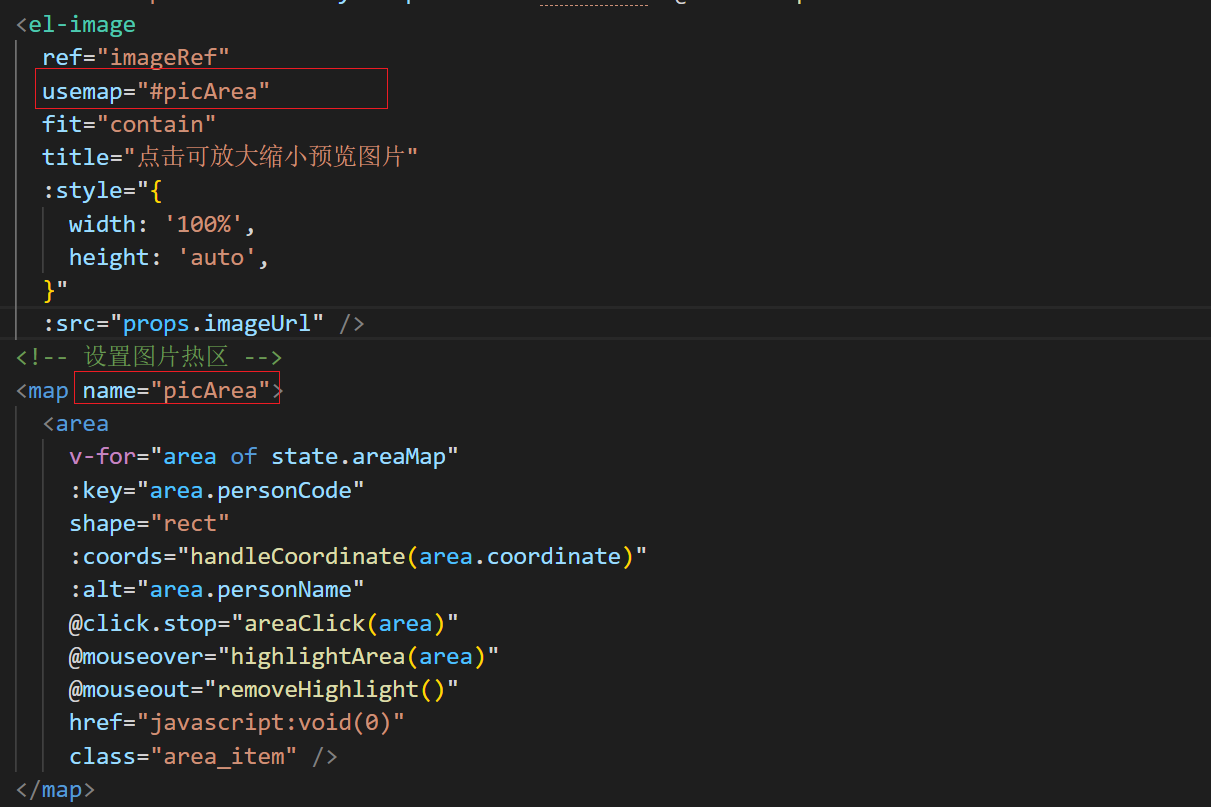
1.使用
官网地址:
https://developer.mozilla.org/en-US/docs/Web/HTML/Element/area
代码示例:
2.数据结构
{"code": 0,"data": {"picture": "base64字符串","personnel": [{"id": 1,"personCode": "code_9527","personName": "nameA","personCard": "320123199901011234","personPhone": "13777777777","personPosition": "position01","personTail": 175,"personWeight": 70,"registerCamera": "Y","imgPath": "/home/picData/test_9527.jpg","coordinate": {"x": 10,"y": 20,"width": 100,"height": 100}},{"id": 2,"personCode": "code_10000","personName": "nameB","personCard": "320123199901022234","personPhone": "13777777777","personPosition": "position01","personTail": 190,"personWeight": 120,"registerCamera": "Y","imgPath": "/home/picData/test_10000.jpg","coordinate": {"x": 10,"y": 20,"width": 100,"height": 100}}]},"message": "请求成功!","time": 0
}
- props.imageUrl是父组件传递过来的图片地址,上面数据结构中的picture
- state.areaMap是人员信息数组,上面数据结构中的personnel
- 数据结构中的coordinate是坐标信息,x和y是热区左上角的坐标;因为热区是矩形的,需要知道左上角和右下角的坐标,需根据热区的宽高来计算出右下角的坐标(热区形状根据需求来定,不唯一)
3.计算坐标
3.1 图片原始尺寸和渲染尺寸
需要获取到图片的原始固定尺寸和渲染的尺寸,从而计算出宽高的比例来正确定位
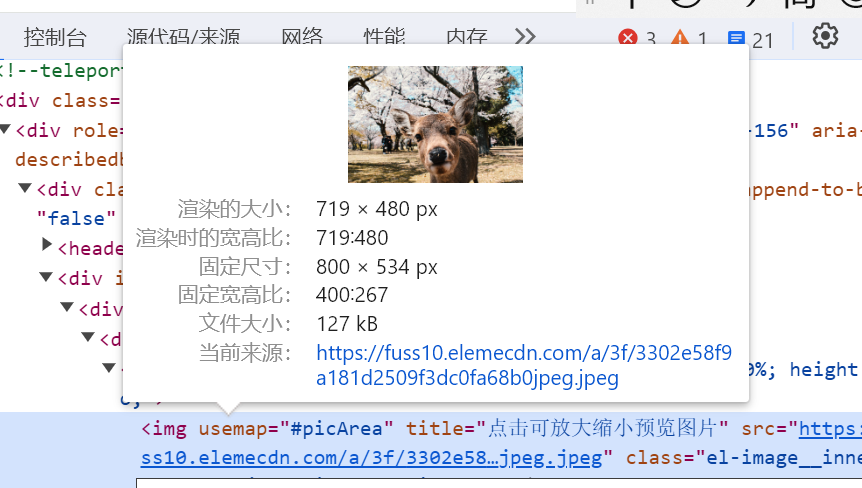
- 图片原始尺寸:
// 图片原始尺寸
const naturalWidth = ref(0);
const naturalHeight = ref(0);
// 获取el-image组件实例的根DOM元素,也就是<img>元素,从而获取到图片的原始宽高
const imgEl = imageRef.value?.$el.querySelector('img');if (imgEl) {naturalHeight.value = imgEl.naturalHeight;naturalWidth.value = imgEl.naturalWidth;}
获取el-image组件实例的根DOM元素,元素,从而获取到图片的原始宽高
const imgEl = imageRef.value?.$el.querySelector('img');
注意:确保在组件已正确渲染并挂载到DOM树上之后再尝试获取img元素,以避免在组件尚未准备好时获取null值
- 图片渲染尺寸:
const renderWidth = imageRef.value?.$el.clientWidth;const renderHeight = imageRef.value?.$el.clientHeight;
3.2 根据缩放比例重新计算坐标
根据图片的原始尺寸和渲染尺寸计算出缩放比
// 计算比例const ratioWidth = renderWidth / naturalWidth.value;const ratioHeight = renderHeight / naturalHeight.value;
根据缩放比重新计算热区
const imageRef = ref<any>(null);
const naturalWidth = ref(0);
const naturalHeight = ref(0);// 计算图片缩放比例
function ratioPic() {// 获取图片的原始尺寸const imgEl = imageRef.value?.$el.querySelector('img');console.log('imgEl', imageRef.value, imgEl.value)if (imgEl) {naturalHeight.value = imgEl.naturalHeight;naturalWidth.value = imgEl.naturalWidth;}// 图片渲染大小const renderWidth = imageRef.value?.$el.clientWidth;const renderHeight = imageRef.value?.$el.clientHeight;// 计算宽高缩放比例const ratioWidth = renderWidth / naturalWidth.value;const ratioHeight = renderHeight / naturalHeight.value;// 重新计算热区state.areaMap = [];state.initAreaMap.map((item) => {const obj = {...item,coordinate: {...item.coordinate,width: Math.round(item.coordinate.width * ratioWidth),height: Math.round(item.coordinate.height * ratioHeight),x: Math.round(item.coordinate.x * ratioWidth),y: Math.round(item.coordinate.y * ratioHeight),},};state.areaMap.push(obj);});
}
initAreaMap 存放的时候从接口获取的图片热区坐标数据
areaMap 存放经过缩放比计算后的图片热区新坐标(计算时注意要置空)
3.3 监听窗口尺寸变化,实时调整热区
onMounted(async () => {// 添加窗口尺寸变化的监听以实时调整热区window.addEventListener('resize', handleResize);
});onUnmounted(() => {window.removeEventListener('resize', handleResize);
});// 监听屏幕变化重新计算图片热区宽高
function handleResize() {// 在这里获取图片当前的实际尺寸,并重新计算热区坐标ratioPic();
}
3.4 处理矩形坐标: 左上角 ,右下角
function handleCoordinate(coordinate: Coordinate) {const x2 = coordinate.x + coordinate.width;const y2 = coordinate.y + coordinate.height;return `${coordinate.x},${coordinate.y},${x2},${y2}`;
}
因为后端返回的坐标数据是图片热区的左上角坐标和宽高,在使用时需计算出右下角坐标
矩形热区需要坐标:(左上角x,y 右下角x,y)
coords=“x1, y1, x2, y2”
以上,浏览器自带的缩放功能可正确渲染出热区; 如果需要对图片进行放大和缩小功能,对热区坐标的处理请看下面第4点【图片缩放功能】
4.图片缩放功能
Element Plus的组件可通过 previewSrcList 开启预览大图功能可对图片进行放大缩小
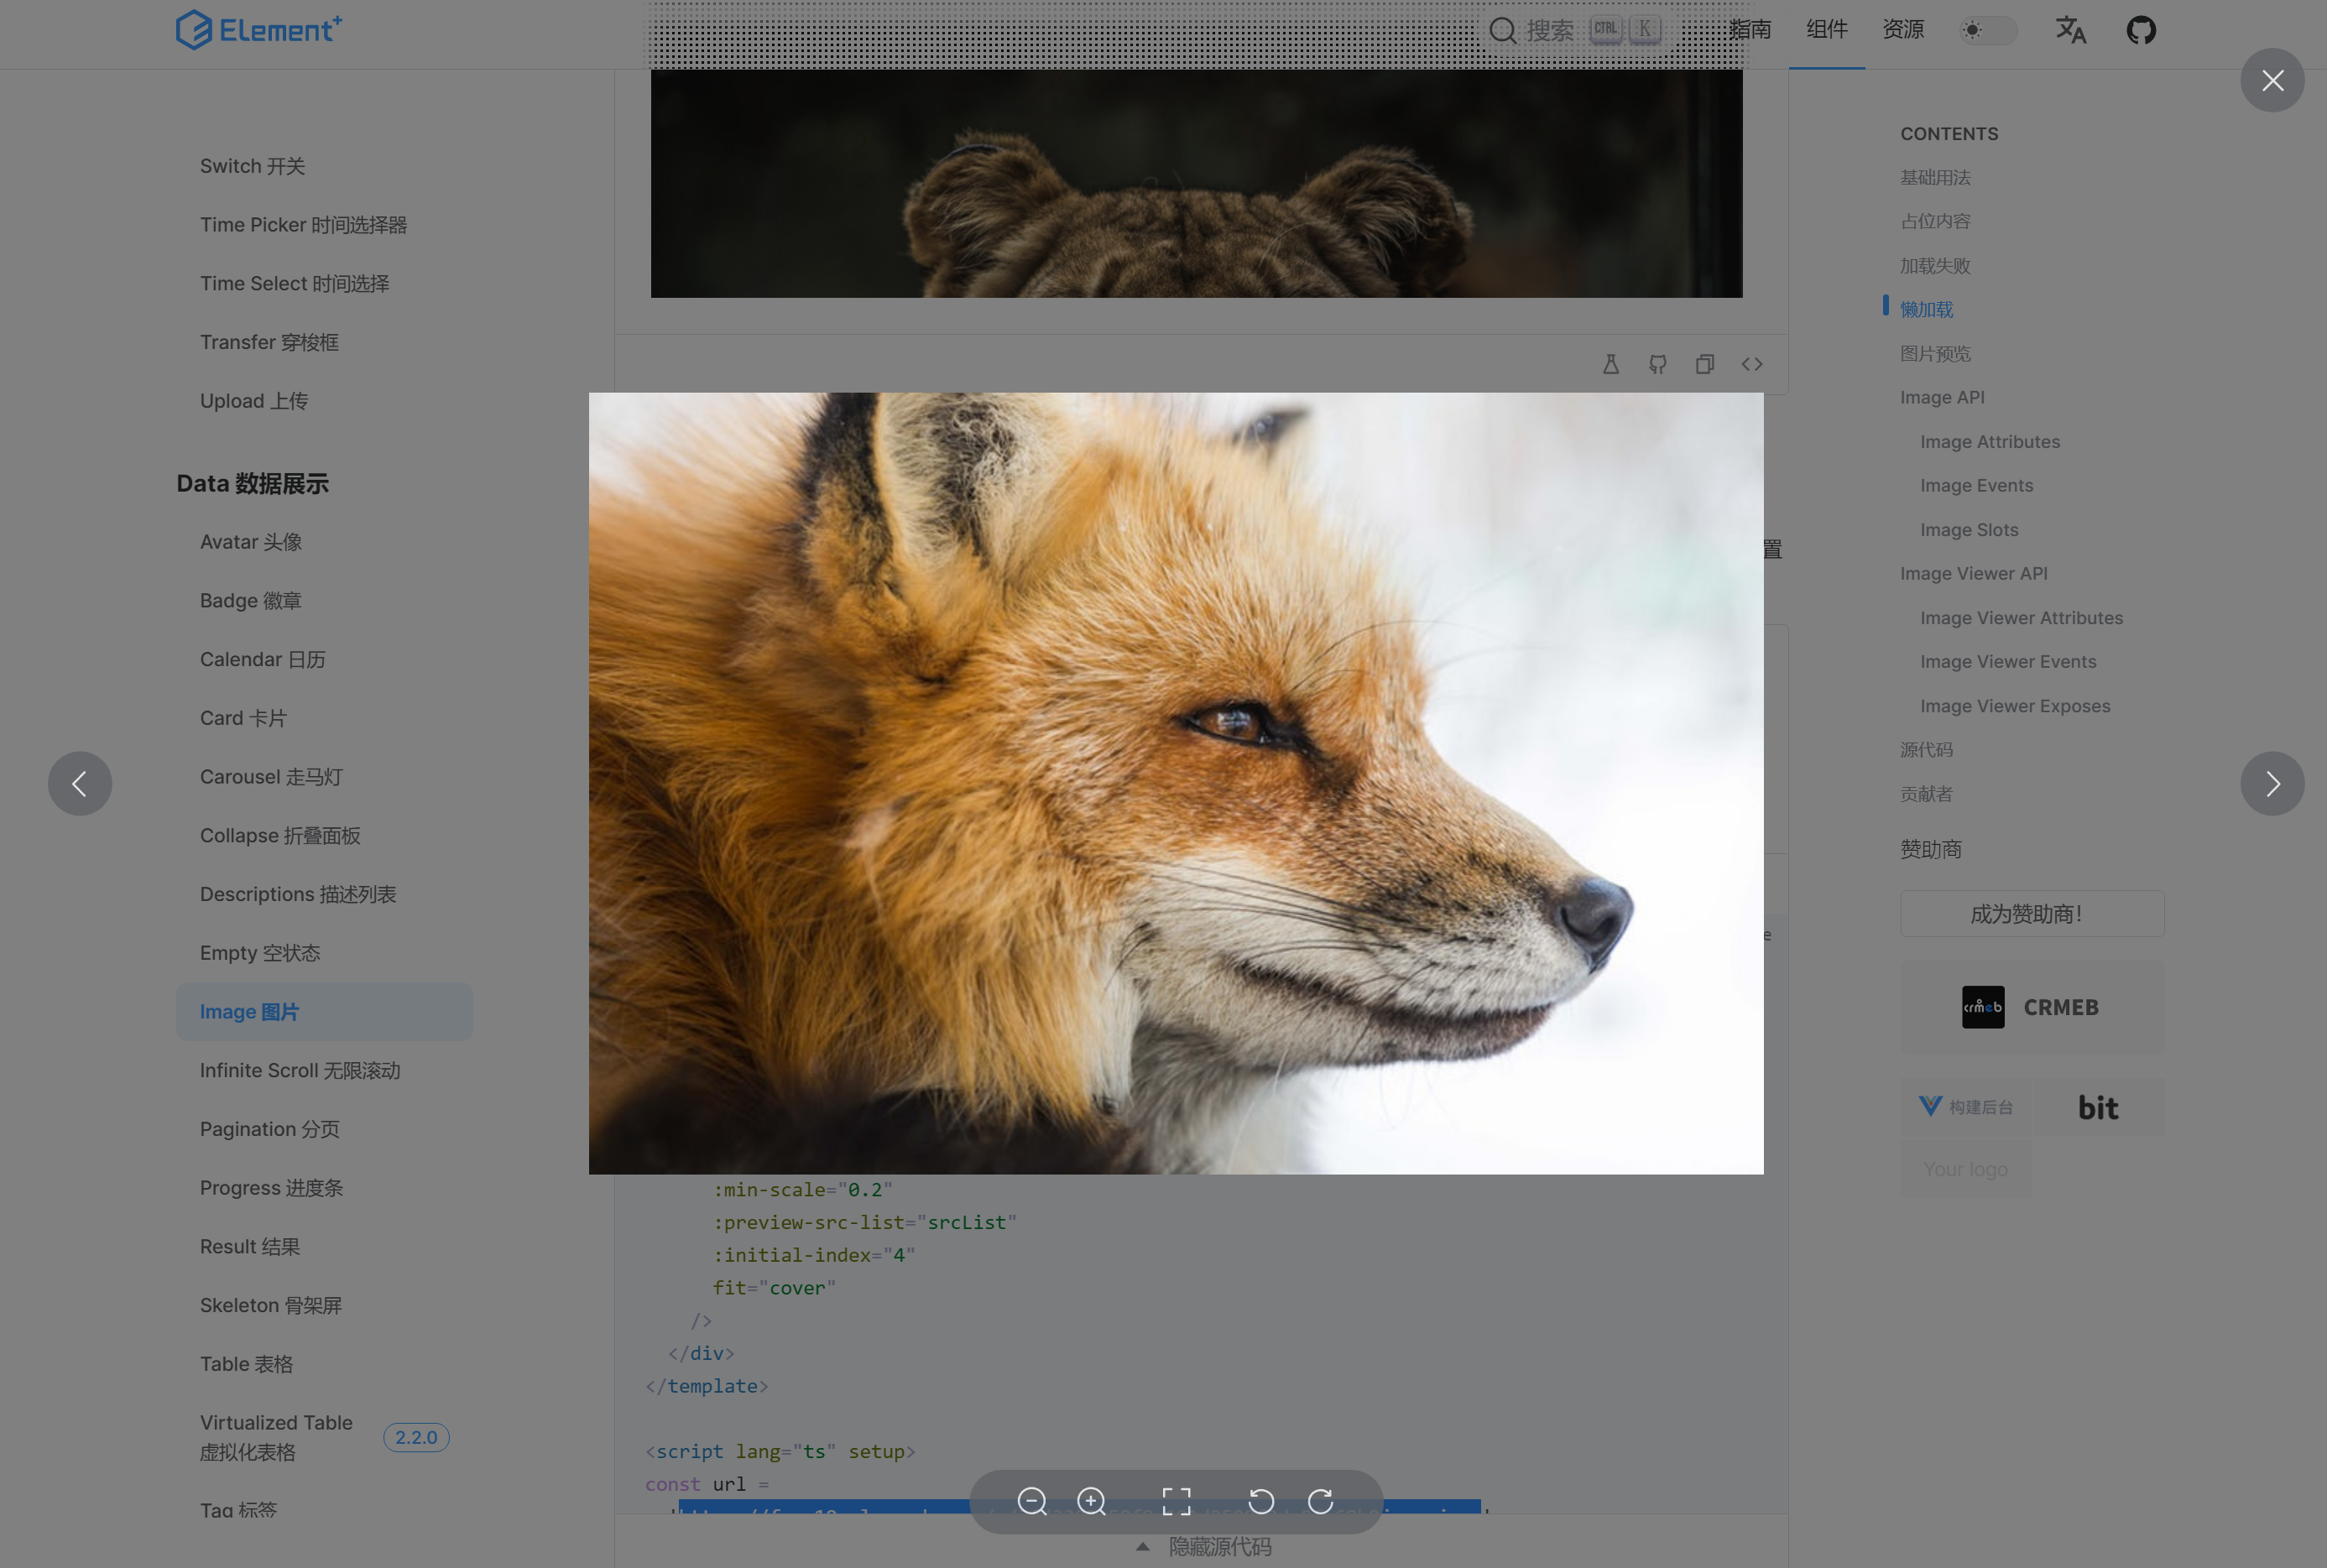 但是这个功能并没有提供方法进行其他操作,所以根据需求我放弃使用previewSrcList,重写了一个图片预览缩放功能。

4.1 遮罩层及图片缩放组件
通过对scaleVisible的控制来打开/关闭遮罩层和图片预览
是图片缩放组件的内容,将图片地址及人员信息传递过去

样式设置:
注意层级关系
// 遮罩层样式
.mask {// 相对于浏览器窗口进行定位,全屏遮住position: fixed; top: 0;left: 0;width: 100%;height: 100%;background-color: #808080;opacity: 0.5;z-index: 8888;
}
// 遮罩层上的关闭按钮
.mask_close {position: fixed;right: 40px;top: 40px;width: 50px;height: 50px;cursor: pointer;z-index: 10000;
}
// 图片缩放组件
.pic_scale {position: fixed;top: 0;left: 0;width: 100%;height: 100%;z-index: 9999;display: flex;justify-content: center;align-items: center;
}
4.2 缩放工具栏
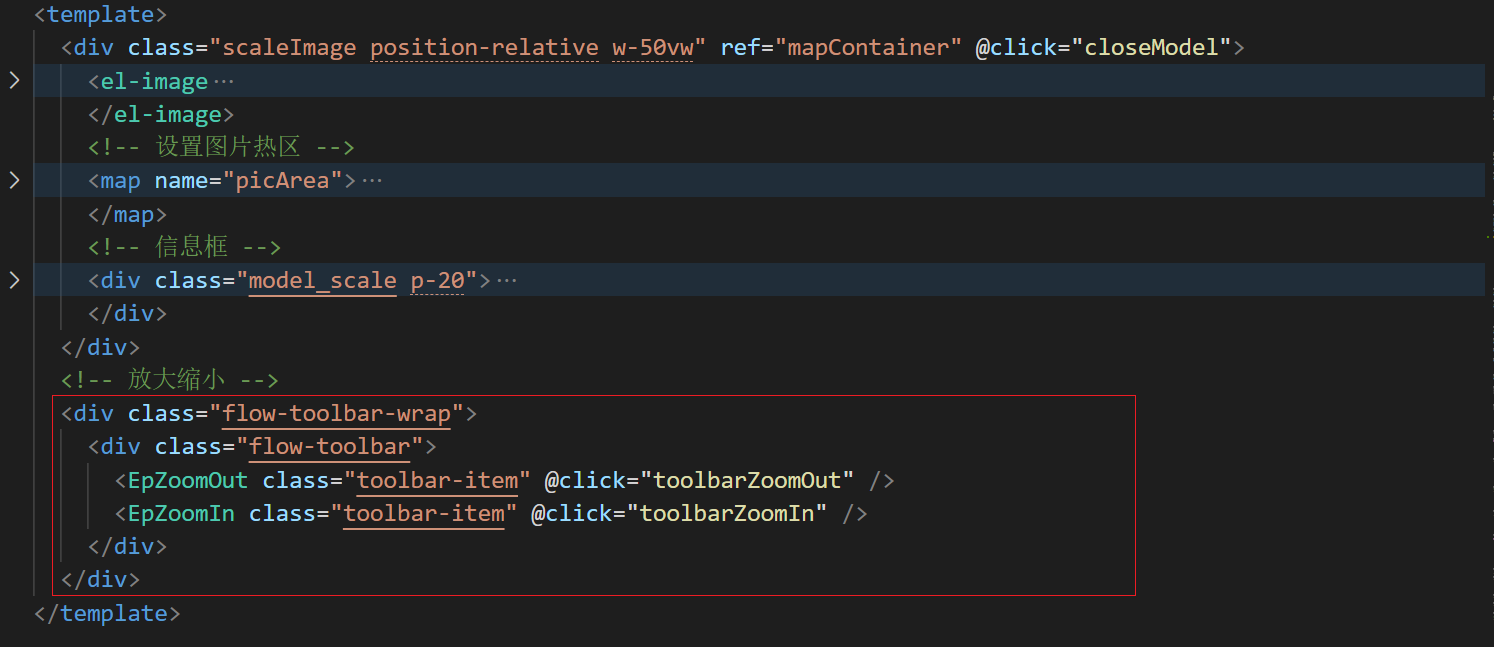
.flow-toolbar-wrap {position: absolute;bottom: 30px;width: 100%;display: flex;align-items: center;justify-content: center;.flow-toolbar {display: flex;align-items: center;justify-content: center;gap: 10px;height: 40px;box-shadow: var(--el-box-shadow-light);background-color: #66686b;opacity: 0.8;border-radius: 20px;padding: 0 25px;z-index: 1;.toolbar-item {user-select: none;color: #fff;font-size: 20px;cursor: pointer;}}
}
4.4 计算缩放比
const state = reactive({areaMap: [] as PicInfo[],initAreaMap: [] as PicInfo[],scale: 1, // 图片缩放比例originWidth: 0,originHeight: 0,
});// 放大操作
function toolbarZoomIn() {state.scale = Number((state.scale + 0.1).toFixed(1));applyZoom();
}
// 缩小操作
function toolbarZoomOut() {if (state.scale === 0.7) return;state.scale = Number((state.scale - 0.1).toFixed(1));applyZoom();
}
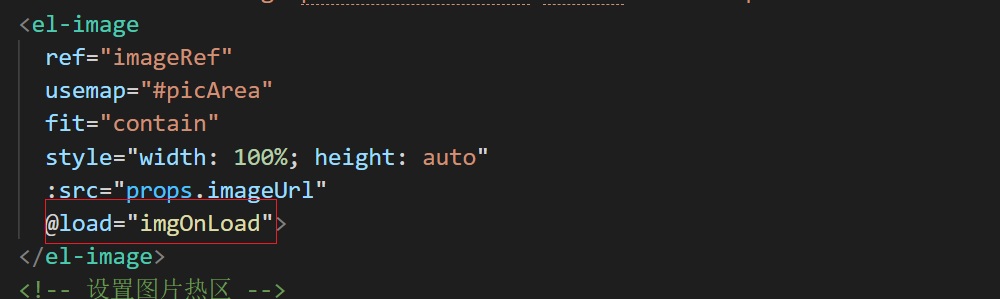
// 1.图片加载完成之后再去计算宽高,避免网络请求被延迟或阻塞导致尺寸无法获取。
function imgOnLoad() {ratioPic();state.originWidth = imageRef.value?.$el.clientWidth;state.originHeight = imageRef.value?.$el.clientHeight;
}
// 计算经过缩放后的宽高
function applyZoom() {// 2.整体放大图片外层盒子和图片const divEl = document.querySelector('.scaleImage') as HTMLElement;divEl.style.transform = `scale(${state.scale})`;divEl.style.width = `${state.originWidth * state.scale}px`;divEl.style.height = `${state.originHeight * state.scale}px`;// 3.重新计算热区,同前面的3.2的操作ratioPic();
}
注意点:
- 要在图片加载完成之后再去计算宽高,避免网络请求被延迟或阻塞导致尺寸无法获取
- 放大/缩小时要整体放大/缩小外层盒子和图片
4.5鼠标滚动缩放
onMounted(async () => {// 添加鼠标滚动缩放const mapEl = document.querySelector('.scaleImage') as HTMLElement;mapEl.addEventListener('mousewheel', (e) => {if (e instanceof WheelEvent) {e.preventDefault(); // 阻止默认的滚轮行为,如页面滚动const delta = Math.sign(e.deltaY);// 根据滚动方向和步长调整缩放比例if (delta > 0) {toolbarZoomIn();} else {toolbarZoomOut();}}});
});
5.添加热区样式及信息框样式
5.1 热区样式
设置鼠标悬浮到热区范围内时的样式:两个圈的水波纹效果
样式:
:deep(.areaHighlight) {/* 设置高亮区域的背景颜色和透明度等样式 */pointer-events: none; /* 防止覆盖原始交互 */width: 50px;height: 50px;position: relative;
}:deep(.areaHighlight)::before,
:deep(.areaHighlight)::after {position: absolute;content: '';width: 100%;height: 0;padding-bottom: 100%; /* 设置为宽度的百分比,实现宽高比为1:1 */top: 0;left: 0;background: #a5d7ff;border-radius: 50%;animation: animLoader 2s linear infinite;
}:deep(.areaHighlight)::after {animation-delay: 1s;opacity: 0.1;
}
// 水波纹动画
@keyframes animLoader {0% {transform: scale(0);opacity: 1;}100% {transform: scale(1);opacity: 0;}
}
利用鼠标的移入和移出事件来添加样式

// 热区高亮
function highlightArea(area: any) {const overlay = document.createElement('div');overlay.style.position = 'absolute';// 根据area.shape和area.coords计算并设置overlay的位置和尺寸overlay.id = `overlay-${area.personCode}`;overlay.style.left = `${area.coordinate.x}px`;overlay.style.top = `${area.coordinate.y}px`;overlay.style.width = `${area.coordinate.width}px`;overlay.style.height = `${area.coordinate.height}px`;overlay.classList.add('areaHighlight');mapContainer.value?.appendChild(overlay);
}
// 移除高亮
function removeHighlight() {const overlayDiv = document.querySelectorAll('.areaHighlight');overlayDiv.forEach((item) => {mapContainer.value?.removeChild(item);});
}
5.2 信息框动画效果
.model_scale {display: none;position: absolute;width: 35%;min-width: 300px;max-width: 350px;border-radius: 10px;z-index: 2;color: #fff;border: 2px solid gold;border-radius: 10px;background: #ffd700;transition: all 0.3s;
}
// 边框动画
.model_scale::before {content: '';position: absolute;top: -10px;left: -10px;right: -10px;bottom: -10px;border: 2px solid #ffd700;border-radius: 10px;animation: borderAni 3s infinite linear;
}.model_scale::after {content: '';position: absolute;top: -10px;left: -10px;right: -10px;bottom: -10px;border: 2px solid #ffd700;border-radius: 10px;animation: borderAni 3s infinite linear;
}@keyframes borderAni {0%,100% {clip-path: inset(0 0 98% 0);}25% {clip-path: inset(0 98% 0 0);}50% {clip-path: inset(98% 0 0 0);}75% {clip-path: inset(0 0 0 98%);}
}.model_scale::after {animation: borderAni 3s infinite -1.5s linear;
}
.model_close {position: absolute;top: -15px;right: -15px;width: 30px;height: 30px;cursor: pointer;z-index: 3;
}
.model_content {color: #000;font-size: 13px;
}
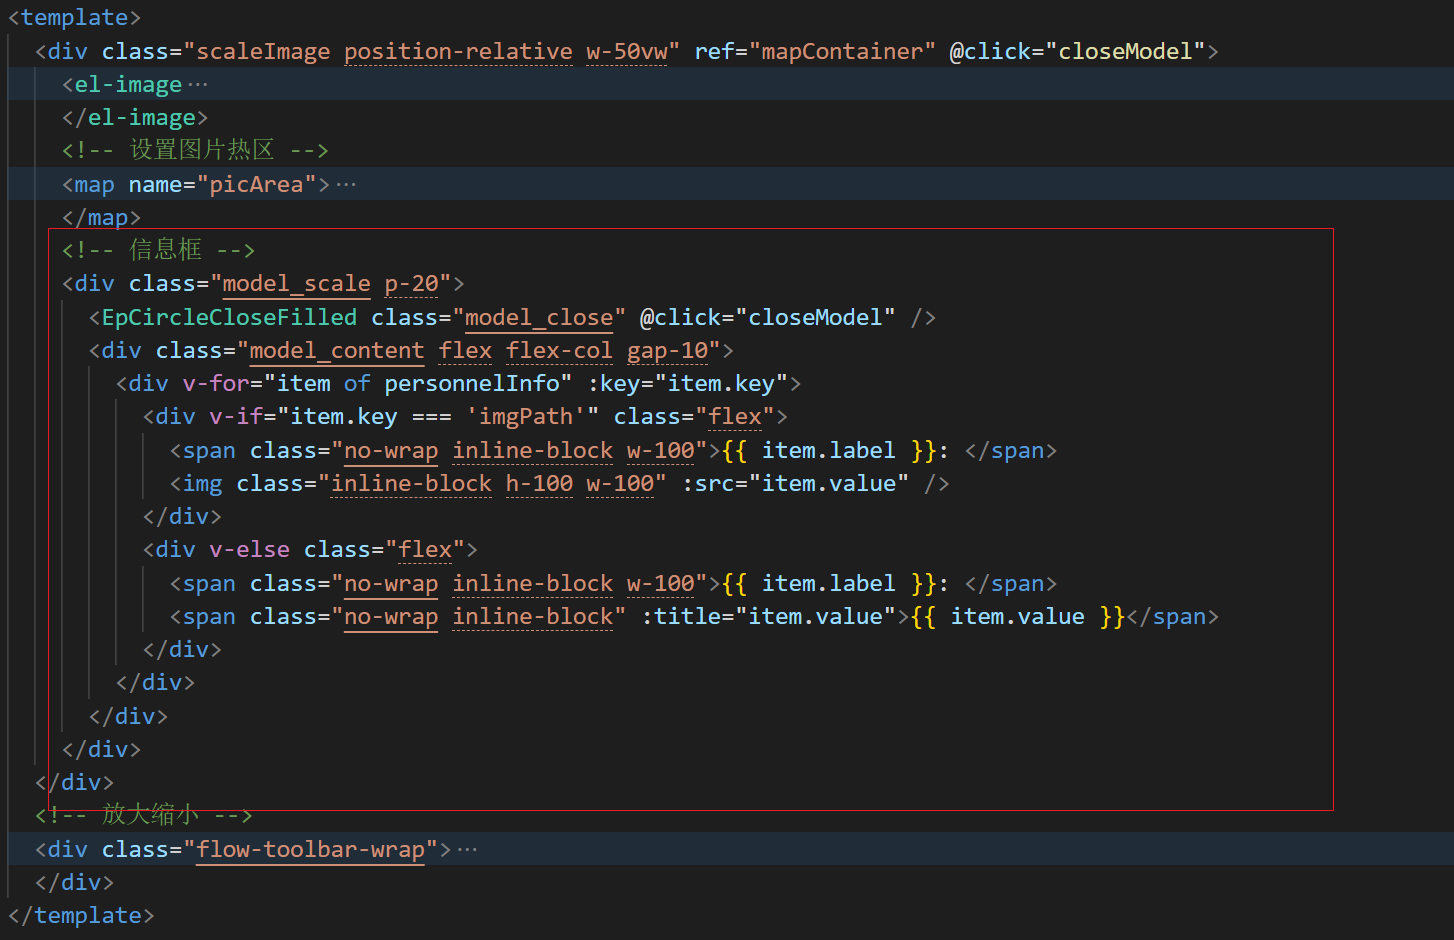
// 点击热区
function areaClick(area: any) {// 获取要展示的信息personnelInfo.forEach((item: InfoList) => {item.value = area[item.key] ?? '';});// 打开信息框,定位const modelEl = document.querySelector('.model_scale') as HTMLElement;modelEl.style.display = 'block';modelEl.style.left = area.coordinate.x + 100 + 'px';modelEl.style.top = area.coordinate.y + 50 + 'px';
}// 关闭信息框
function closeModel() {const modelEl = document.querySelector('.model_scale') as HTMLElement;modelEl.style.display = 'none';
}
三、遇到的问题
1.无法正确获取图片到宽高时,值为0
问题描述: 在浏览器中,通过JavaScript获取图片(元素)的宽高属性时,在某些情况下可能会获取不到正确的值或者得到0
- 异步加载:浏览器加载网页时,HTML文档结构优先于外部资源(如图片、样式表和脚本)。当JavaScript代码执行时,如果图片尚未完全加载完成,则其naturalWidth或clientWidth等尺寸属性可能还未被浏览器填充,因此返回值为0。
- 事件监听不足:为了确保能够获取到图片的真实尺寸,应当在图片加载完成后触发一个事件处理函数,比如使用onload事件来确保图片已经加载完毕。
- 调试器影响:虽然不常见,但在极少数情况下,打开浏览器调试器并刷新页面可能导致渲染过程中的细微差别,这可能是由于强制重新布局(relayout)或重绘(repaint)引起的。如果你是在DOMContentLoaded或load事件触发之前就尝试获取图片尺寸,并且同时打开了调试器,那可能由于网络请求被延迟或阻塞导致尺寸无法获取。
- 缓存问题:有时候,特别是开发环境下,浏览器缓存可能导致实际图片未被重新加载,因此onload事件没有触发,尺寸信息也就无法更新。
此处我是遇到了第三个问题:打开调试器时无法正确获取图片宽高。
解决方法:确保在图片加载完成后才去读取其尺寸属性,或者是使用Promise或者async/await方式来等待图片加载完成。
使用load方法
在图片加载完成之后再去操作
// 图片加载完成之后再去计算宽高,避免网络请求被延迟或阻塞导致尺寸无法获取。
function imgOnLoad() {ratioPic();state.originWidth = imageRef.value?.$el.clientWidth;state.originHeight = imageRef.value?.$el.clientHeight;
}
2.图片在缩放时,外层div无法和图片一样大导致信息框等样式产生定位错误
如果在缩放时只控制图片的放大和缩小,缩放到一定程度时图片外层的div无法和图片的DOM元素一样大,且基于外层div进行定位的元素定位会产生误差
解决方法:
1.计算图片元素和外层div缩放产生的误差值,在计算坐标时加上误差值
2.缩放时直接对外层div进行缩放,需让图片和外层div保持一样的宽高
这里我选择了第二种方式
function applyZoom() {/*   const imgEl = imageRef.value?.$el.querySelector('img');imgEl.style.transform = `scale(${state.scale})`;imgEl.style.width = `${state.originWidth * state.scale}px`;imgEl.style.height = `${state.originHeight * state.scale}px`; */// 整体放大图片外层盒子和图片const divEl = document.querySelector('.scaleImage') as HTMLElement;divEl.style.transform = `scale(${state.scale})`;divEl.style.width = `${state.originWidth * state.scale}px`;divEl.style.height = `${state.originHeight * state.scale}px`;ratioPic();
}
这篇关于图片热区功能的文章就介绍到这儿,希望我们推荐的文章对编程师们有所帮助!


