本文主要是介绍iOS10 注册极光推送,希望对大家解决编程问题提供一定的参考价值,需要的开发者们随着小编来一起学习吧!
首先, 在极光的开发者服务里注册应用获取appKey, 在apple Developer配置推送证书...等等等这些废话就不说了.
兼容iOS10的是极光2.1.9版本的sdk.
1. 导入SDK
2. 导入SDK依赖的系统框架
CFNetwork.framework
CoreFoundation.framework
CoreTelephony.framework
SystemConfiguration.framework
CoreGraphics.framework
Foundation.framework
UIKit.framework
Security.framework
Xcode7需要的是libz.tbd ; Xcode7以下版本是libz.dylib
Adsupport.framework (获取IDFA需要;如果不使用IDFA,请不要添加)
UserNotifications.framework(Xcode8及以上)
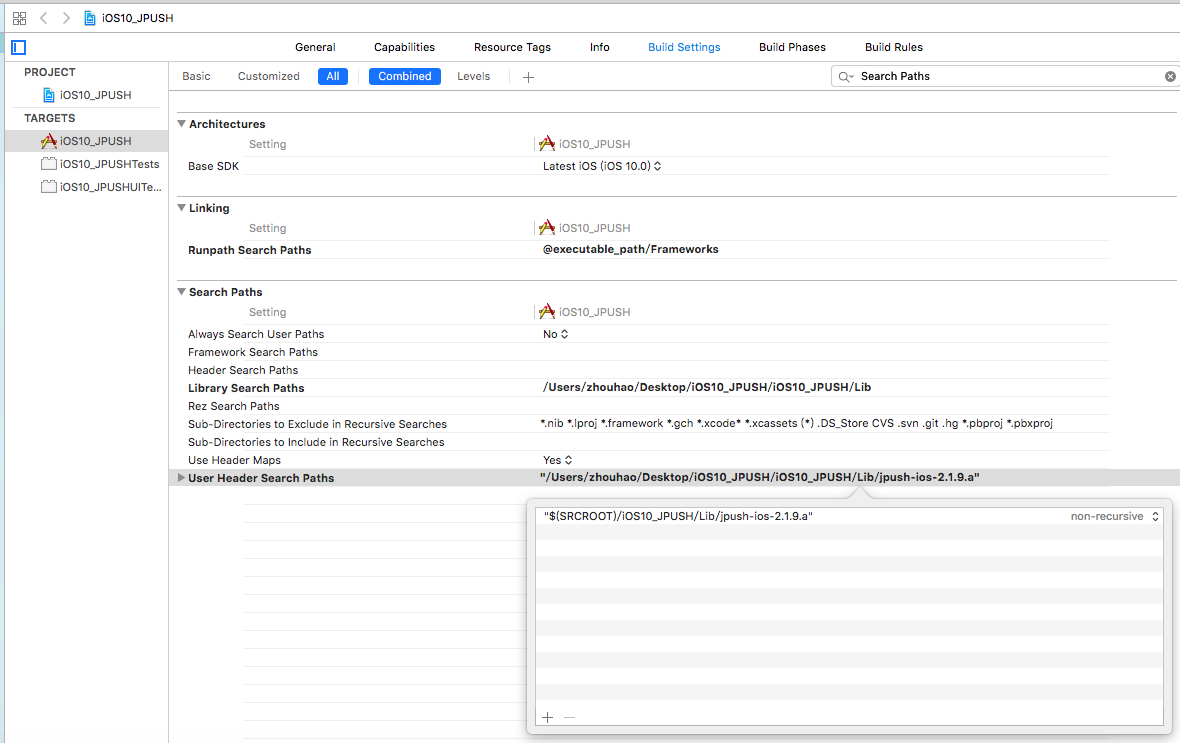
3. 设置Build Setting中, Search Paths的User Header Search Paths

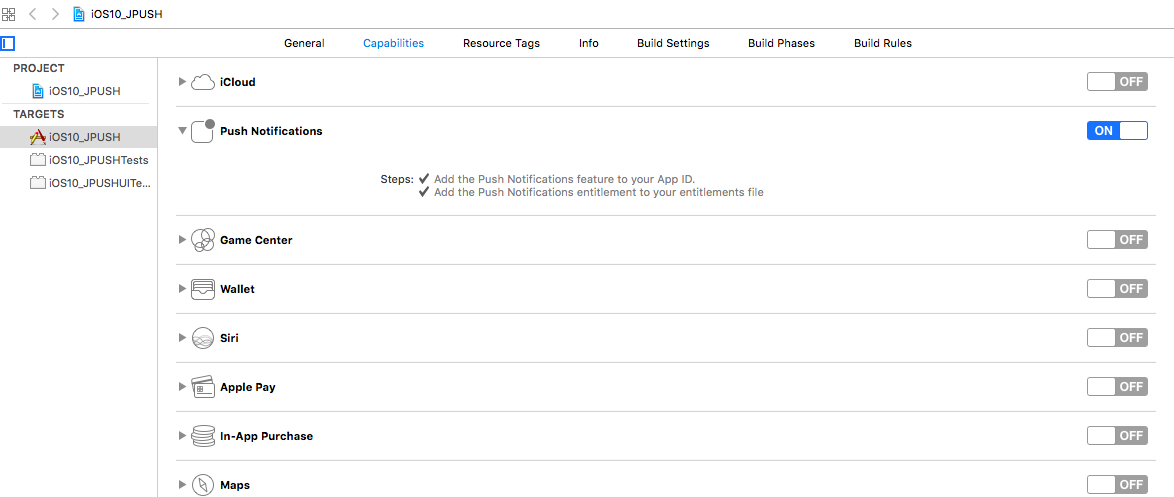
4. 如果用的是Xcode8及以上环境开发需要开启Application Target的Capabilities->Push Notifications选项
这两个一定要都是对号 , 这个选项不开启在iOS10后不会注册成功
添加这个选项会在项目中多这样一个文件
5. 不要忘记Xcode7以上需要支持http传输方式
下面是需要写的代码部分:
6. 在AppDelegate.m中, 引入头文件
- // 极光推送
- #import "JPUSHService.h"
- #import <AdSupport/AdSupport.h>
- #ifdef NSFoundationVersionNumber_iOS_9_x_Max
- #import <UserNotifications/UserNotifications.h> // 这里是iOS10需要用到的框架
- #endif
- static NSString * const JPUSHAPPKEY = @"xxxxxxxxxxxxxxxxx"; // 极光appKey
- static NSString * const channel = @"Publish channel"; // 固定的
- #ifdef DEBUG // 开发
- static BOOL const isProduction = FALSE; // 极光FALSE为开发环境
- #else // 生产
- static BOOL const isProduction = TRUE; // 极光TRUE为生产环境
- #endif
8. 这里是AppDelegate.m中的代码, 分了几大块, 全部粘到下面, 直接复制可用(只需要下面这些代码就可以实现通知)
- //
- // AppDelegate.m
- // iOS10_JPUSH
- //
- // Created by 周昊 on 16/9/18.
- // Copyright © 2016年 周昊. All rights reserved.
- //
- #import "AppDelegate.h"
- // 极光推送
- #import "JPUSHService.h"
- #import <AdSupport/AdSupport.h>
- #ifdef NSFoundationVersionNumber_iOS_9_x_Max
- #import <UserNotifications/UserNotifications.h> // 这里是iOS10需要用到的框架
- #endif
- static NSString * const JPUSHAPPKEY = @"xxxxxxxxxxxxxxxxx"; // 极光appKey
- static NSString * const channel = @"Publish channel"; // 固定的
- #ifdef DEBUG // 开发
- static BOOL const isProduction = FALSE; // 极光FALSE为开发环境
- #else // 生产
- static BOOL const isProduction = TRUE; // 极光TRUE为生产环境
- #endif
- @interface AppDelegate ()<JPUSHRegisterDelegate> // 最新版的sdk需要实现这个代理方法
- @end
- @implementation AppDelegate
- - (BOOL)application:(UIApplication *)application didFinishLaunchingWithOptions:(NSDictionary *)launchOptions {
- // 注册apns通知
- if ([[UIDevice currentDevice].systemVersion floatValue] >= 10.0) // iOS10
- {
- #ifdef NSFoundationVersionNumber_iOS_9_x_Max
- JPUSHRegisterEntity * entity = [[JPUSHRegisterEntity alloc] init];
- entity.types = UNAuthorizationOptionAlert|UNAuthorizationOptionBadge | UNAuthorizationOptionSound;
- [JPUSHService registerForRemoteNotificationConfig:entity delegate:self];
- #endif
- }
- else if ([[UIDevice currentDevice].systemVersion floatValue] >= 8.0) // iOS8, iOS9
- {
- //可以添加自定义categories
- [JPUSHService registerForRemoteNotificationTypes:(UIUserNotificationTypeBadge | UIUserNotificationTypeSound | UIUserNotificationTypeAlert) categories:nil];
- }
- else // iOS7
- {
- //categories 必须为nil
- [JPUSHService registerForRemoteNotificationTypes:(UIRemoteNotificationTypeBadge | UIRemoteNotificationTypeSound | UIRemoteNotificationTypeAlert) categories:nil];
- }
- /*
- * launchingOption 启动参数.
- * appKey 一个JPush 应用必须的,唯一的标识.
- * channel 发布渠道. 可选.
- * isProduction 是否生产环境. 如果为开发状态,设置为 NO; 如果为生产状态,应改为 YES.
- * advertisingIdentifier 广告标识符(IDFA) 如果不需要使用IDFA,传nil.
- * 此接口必须在 App 启动时调用, 否则 JPush SDK 将无法正常工作.
- */
- // 广告标识符
- NSString *advertisingId = [[[ASIdentifierManager sharedManager] advertisingIdentifier] UUIDString];
- // 如不需要使用IDFA,advertisingIdentifier 可为nil
- // 注册极光推送
- [JPUSHService setupWithOption:launchOptions appKey:JPUSHAPPKEY channel:channel apsForProduction:isProduction advertisingIdentifier:advertisingId];
- //2.1.9版本新增获取registration id block接口。
- [JPUSHService registrationIDCompletionHandler:^(int resCode, NSString *registrationID) {
- if(resCode == 0)
- {
- // iOS10获取registrationID放到这里了, 可以存到缓存里, 用来标识用户单独发送推送
- NSLog(@"registrationID获取成功:%@",registrationID);
- [[NSUserDefaults standardUserDefaults] setObject:registrationID forKey:@"registrationID"];
- [[NSUserDefaults standardUserDefaults] synchronize];
- }
- else
- {
- NSLog(@"registrationID获取失败,code:%d",resCode);
- }
- }];
- return YES;
- }
- // ---------------------------------------------------------------------------------
- - (void)applicationWillResignActive:(UIApplication *)application {
- }
- - (void)applicationDidEnterBackground:(UIApplication *)application {
- [[UIApplication sharedApplication] setApplicationIconBadgeNumber:0];
- }
- - (void)applicationWillEnterForeground:(UIApplication *)application {
- [application setApplicationIconBadgeNumber:0];
- [application cancelAllLocalNotifications];
- }
- - (void)applicationDidBecomeActive:(UIApplication *)application {
- }
- - (void)applicationWillTerminate:(UIApplication *)application {
- }
- // ---------------------------------------------------------------------------------
- #pragma mark - 注册推送回调获取 DeviceToken
- #pragma mark -- 成功
- - (void)application:(UIApplication *)application didRegisterForRemoteNotificationsWithDeviceToken:(NSData *)deviceToken
- {
- // 注册成功
- // 极光: Required - 注册 DeviceToken
- [JPUSHService registerDeviceToken:deviceToken];
- }
- #pragma mark -- 失败
- - (void)application:(UIApplication *)application didFailToRegisterForRemoteNotificationsWithError:(NSError *)error
- {
- // 注册失败
- NSLog(@"did Fail To Register For Remote Notifications With Error: %@", error);
- }
- // ---------------------------------------------------------------------------------
- // 这部分是官方demo里面给的, 也没实现什么功能, 放着以备不时之需
- #if __IPHONE_OS_VERSION_MAX_ALLOWED > __IPHONE_7_1
- - (void)application:(UIApplication *)application didRegisterUserNotificationSettings:(UIUserNotificationSettings *)notificationSettings
- {
- }
- // Called when your app has been activated by the user selecting an action from
- // a local notification.
- // A nil action identifier indicates the default action.
- // You should call the completion handler as soon as you've finished handling
- // the action.
- - (void)application:(UIApplication *)application handleActionWithIdentifier:(NSString *)identifier forLocalNotification:(UILocalNotification *)notification completionHandler:(void (^)())completionHandler
- {
- }
- // Called when your app has been activated by the user selecting an action from
- // a remote notification.
- // A nil action identifier indicates the default action.
- // You should call the completion handler as soon as you've finished handling
- // the action.
- - (void)application:(UIApplication *)application handleActionWithIdentifier:(NSString *)identifier forRemoteNotification:(NSDictionary *)userInfo completionHandler:(void (^)())completionHandler
- {
- }
- #endif
- // ---------------------------------------------------------------------------------
- - (void)application:(UIApplication *)application didReceiveLocalNotification:(UILocalNotification *)notification
- {
- [JPUSHService showLocalNotificationAtFront:notification identifierKey:nil];
- }
- // ---------------------------------------------------------------------------------
- #pragma mark - iOS7: 收到推送消息调用
- - (void)application:(UIApplication *)application didReceiveRemoteNotification:(NSDictionary *)userInfo fetchCompletionHandler:(void (^)(UIBackgroundFetchResult))completionHandler {
- // iOS7之后调用这个
- [JPUSHService handleRemoteNotification:userInfo];
- NSLog(@"iOS7及以上系统,收到通知");
- if ([[UIDevice currentDevice].systemVersion floatValue] < 10.0 || application.applicationState > 0)
- {
- // 程序在前台或通过点击推送进来的会弹这个alert
- NSString *message = [NSString stringWithFormat:@"iOS7-8-9收到的推送%@", [userInfo[@"aps"] objectForKey:@"alert"]];
- UIAlertView *alert = [[UIAlertView alloc] initWithTitle:@"提示" message:message delegate:self cancelButtonTitle:@"确定" otherButtonTitles:nil, nil nil];
- [alert show];
- }
- completionHandler(UIBackgroundFetchResultNewData);
- }
- // ---------------------------------------------------------------------------------
- #pragma mark - iOS10: 收到推送消息调用(iOS10是通过Delegate实现的回调)
- #pragma mark- JPUSHRegisterDelegate
- #ifdef NSFoundationVersionNumber_iOS_9_x_Max
- // 当程序在前台时, 收到推送弹出的通知
- - (void)jpushNotificationCenter:(UNUserNotificationCenter *)center willPresentNotification:(UNNotification *)notification withCompletionHandler:(void (^)(NSInteger))completionHandler {
- NSDictionary * userInfo = notification.request.content.userInfo;
- if([notification.request.trigger isKindOfClass:[UNPushNotificationTrigger class]])
- {
- [JPUSHService handleRemoteNotification:userInfo];
- NSString *message = [NSString stringWithFormat:@"will%@", [userInfo[@"aps"] objectForKey:@"alert"]];
- NSLog(@"iOS10程序在前台时收到的推送: %@", message);
- UIAlertView *alert = [[UIAlertView alloc] initWithTitle:@"提示" message:message delegate:self cancelButtonTitle:@"确定" otherButtonTitles:nil, nil nil];
- [alert show];
- }
- completionHandler(UNNotificationPresentationOptionBadge|UNNotificationPresentationOptionSound|UNNotificationPresentationOptionAlert); // 需要执行这个方法,选择是否提醒用户,有Badge、Sound、Alert三种类型可以设置
- }
- // 程序关闭后, 通过点击推送弹出的通知
- - (void)jpushNotificationCenter:(UNUserNotificationCenter *)center didReceiveNotificationResponse:(UNNotificationResponse *)response withCompletionHandler:(void (^)())completionHandler {
- NSDictionary * userInfo = response.notification.request.content.userInfo;
- if([response.notification.request.trigger isKindOfClass:[UNPushNotificationTrigger class]])
- {
- [JPUSHService handleRemoteNotification:userInfo];
- NSString *message = [NSString stringWithFormat:@"did%@", [userInfo[@"aps"] objectForKey:@"alert"]];
- NSLog(@"iOS10程序关闭后通过点击推送进入程序弹出的通知: %@", message);
- UIAlertView *alert = [[UIAlertView alloc] initWithTitle:@"提示" message:message delegate:self cancelButtonTitle:@"确定" otherButtonTitles:nil, nil nil];
- [alert show];
- }
- completionHandler(); // 系统要求执行这个方法
- }
- #endif
- @end
这篇关于iOS10 注册极光推送的文章就介绍到这儿,希望我们推荐的文章对编程师们有所帮助!


