本文主要是介绍Swift UIAlertController使用,希望对大家解决编程问题提供一定的参考价值,需要的开发者们随着小编来一起学习吧!
1. 简单的应用(同时按钮响应Handler使用闭包函数)
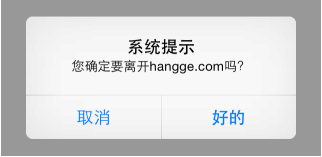
import UIKitclass ViewController: UIViewController {override func viewDidLoad() {super.viewDidLoad()}override func viewDidAppear(_ animated: Bool){super.viewDidAppear(animated)let alertController = UIAlertController(title: "系统提示",message: "您确定要离开hangge.com吗?", preferredStyle: .alert)let cancelAction = UIAlertAction(title: "取消", style: .cancel, handler: nil)let okAction = UIAlertAction(title: "好的", style: .default, handler: {action inprint("点击了确定")})alertController.addAction(cancelAction)alertController.addAction(okAction)self.present(alertController, animated: true, completion: nil)}override func didReceiveMemoryWarning() {super.didReceiveMemoryWarning()}
}
2. 除了弹出,还可以使用从底部向上滑出的样式
(注意:如果上拉菜单中有“取消”按钮的话,那么它永远都会出现在菜单的底部,不管添加的次序)

let alertController = UIAlertController(title: "保存或删除数据", message: "删除数据将不可恢复",preferredStyle: .actionSheet)
let cancelAction = UIAlertAction(title: "取消", style: .cancel, handler: nil)
let deleteAction = UIAlertAction(title: "删除", style: .destructive, handler: nil)
let archiveAction = UIAlertAction(title: "保存", style: .default, handler: nil)
alertController.addAction(cancelAction)
alertController.addAction(deleteAction)
alertController.addAction(archiveAction)
self.present(alertController, animated: true, completion: nil)
3.按钮使用“告警”样式(文字颜色变红,用来来警示用户)
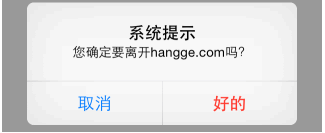
let okAction = UIAlertAction(title: "好的", style: .destructive, handler: nil)4.添加任意数量文本输入框(比如可以用来实现个登陆框)

import UIKitclass ViewController: UIViewController {override func viewDidLoad() {super.viewDidLoad()}override func viewDidAppear(_ animated: Bool){super.viewDidAppear(animated)let alertController = UIAlertController(title: "系统登录",message: "请输入用户名和密码", preferredStyle: .alert)alertController.addTextField {(textField: UITextField!) -> Void intextField.placeholder = "用户名"}alertController.addTextField {(textField: UITextField!) -> Void intextField.placeholder = "密码"textField.isSecureTextEntry = true}let cancelAction = UIAlertAction(title: "取消", style: .cancel, handler: nil)let okAction = UIAlertAction(title: "好的", style: .default, handler: {action in//也可以用下标的形式获取textField let login = alertController.textFields![0]let login = alertController.textFields!.first!let password = alertController.textFields!.last!print("用户名:\(login.text) 密码:\(password.text)")})alertController.addAction(cancelAction)alertController.addAction(okAction)self.present(alertController, animated: true, completion: nil)}override func didReceiveMemoryWarning() {super.didReceiveMemoryWarning()}
}
5.使用代码移除提示框
self.presentedViewController?.dismiss(animated: false, completion: nil)6.提示框弹出后,过段时间自动移除
let alertController = UIAlertController(title: "保存成功!",message: nil, preferredStyle: .alert)
//显示提示框
self.present(alertController, animated: true, completion: nil)
//两秒钟后自动消失
DispatchQueue.main.asyncAfter(deadline: DispatchTime.now() + 2) {self.presentedViewController?.dismiss(animated: false, completion: nil)
}
附:扩展 UIAlertController 方便使用
1.从上面的样例可以发现,每次要弹出提示框都要创建一个 UIAlertController
2.然后添加 action按钮
3.最后再通过对应的视图控制器present 出来
4.我们可以对UIAlertController 进行个扩展,把这些操作做个封装,方便使用。
1.UIAlertController扩展(UIAlertExtension.swift)
这里增加两种提示框效果:普通消息提示框、确认提示框,并且每个提示框都可以指定显示的VC(不指定则为根VC)
import UIKitextension UIAlertController {//在指定视图控制器上弹出普通消息提示框static func showAlert(message: String, in viewController: UIViewController) {let alert = UIAlertController(title: nil, message: message, preferredStyle: .alert)alert.addAction(UIAlertAction(title: "确定", style: .cancel))viewController.present(alert, animated: true)}//在根视图控制器上弹出普通消息提示框static func showAlert(message: String) {if let vc = UIApplication.shared.keyWindow?.rootViewController {showAlert(message: message, in: vc)}}//在指定视图控制器上弹出确认框static func showConfirm(message: String, in viewController: UIViewController,confirm: ((UIAlertAction)->Void)?) {let alert = UIAlertController(title: nil, message: message, preferredStyle: .alert)alert.addAction(UIAlertAction(title: "取消", style: .cancel))alert.addAction(UIAlertAction(title: "确定", style: .default, handler: confirm))viewController.present(alert, animated: true)}//在根视图控制器上弹出确认框static func showConfirm(message: String, confirm: ((UIAlertAction)->Void)?) {if let vc = UIApplication.shared.keyWindow?.rootViewController {showConfirm(message: message, in: vc, confirm: confirm)}}
}
2.使用样例
下面分别调用两种提示框:

//弹出普通消息提示框
UIAlertController.showAlert(message: "保存成功!")//弹出确认选择提示框
UIAlertController.showConfirm(message: "是否提交?") { (_) inprint("点击了确认按钮!")
}
这篇关于Swift UIAlertController使用的文章就介绍到这儿,希望我们推荐的文章对编程师们有所帮助!


