本文主要是介绍深入浅出 diffusion(2):pytorch 实现 diffusion 加噪过程,希望对大家解决编程问题提供一定的参考价值,需要的开发者们随着小编来一起学习吧!
我在上篇博客深入浅出 diffusion(1):白话 diffusion 原理(无公式)中介绍了 diffusion 的一些基本原理,其中谈到了 diffusion 的加噪过程,本文用pytorch 实现下到底是怎么加噪的。
import torch
import math
import numpy as np
from PIL import Image
import requests
import matplotlib.pyplot as plot
import cv2def linear_beta_schedule(timesteps):"""linear schedule, proposed in original ddpm paper"""scale = 1000 / timestepsbeta_start = scale * 0.0001beta_end = scale * 0.02return torch.linspace(beta_start, beta_end, timesteps, dtype = torch.float64)def cosine_beta_schedule(timesteps, s = 0.008):"""cosine scheduleas proposed in https://openreview.net/forum?id=-NEXDKk8gZ"""steps = timesteps + 1t = torch.linspace(0, timesteps, steps, dtype = torch.float64) / timestepsalphas_cumprod = torch.cos((t + s) / (1 + s) * math.pi * 0.5) ** 2alphas_cumprod = alphas_cumprod / alphas_cumprod[0]betas = 1 - (alphas_cumprod[1:] / alphas_cumprod[:-1])return torch.clip(betas, 0, 0.999)# 时间步(timestep)定义为1000
timesteps = 1000# 定义Beta Schedule, 选择线性版本,同DDPM原文一致,当然也可以换成cosine_beta_schedule
betas = linear_beta_schedule(timesteps=timesteps)# 根据beta定义alpha
alphas = 1. - betas
alphas_cumprod = torch.cumprod(alphas, axis=0)
sqrt_recip_alphas = torch.sqrt(1.0 / alphas)# 计算前向过程 diffusion q(x_t | x_{t-1}) 中所需的
sqrt_alphas_cumprod = torch.sqrt(alphas_cumprod)
sqrt_one_minus_alphas_cumprod = torch.sqrt(1. - alphas_cumprod)def extract(a, t, x_shape):batch_size = t.shape[0]out = a.gather(-1, t.cpu())return out.reshape(batch_size, *((1,) * (len(x_shape) - 1))).to(t.device)# 前向加噪过程: forward diffusion process
def q_sample(x_start, t, noise=None):if noise is None:noise = torch.randn_like(x_start)cv2.imwrite('noise.png', noise.numpy()*255)sqrt_alphas_cumprod_t = extract(sqrt_alphas_cumprod, t, x_start.shape)sqrt_one_minus_alphas_cumprod_t = extract(sqrt_one_minus_alphas_cumprod, t, x_start.shape)print('sqrt_alphas_cumprod_t :', sqrt_alphas_cumprod_t)print('sqrt_one_minus_alphas_cumprod_t :', sqrt_one_minus_alphas_cumprod_t)return sqrt_alphas_cumprod_t * x_start + sqrt_one_minus_alphas_cumprod_t * noise# 图像后处理
def get_noisy_image(x_start, t):# add noisex_noisy = q_sample(x_start, t=t)# turn back into PIL imagenoisy_image = x_noisy.squeeze().numpy()return noisy_image...# 展示图像, t=0, 50, 100, 500的效果
x_start = cv2.imread('img.png') / 255.0
x_start = torch.tensor(x_start, dtype=torch.float)
cv2.imwrite('img_0.png', get_noisy_image(x_start, torch.tensor([0])) * 255.0)
cv2.imwrite('img_50.png', get_noisy_image(x_start, torch.tensor([50])) * 255.0)
cv2.imwrite('img_100.png', get_noisy_image(x_start, torch.tensor([100])) * 255.0)
cv2.imwrite('img_500.png', get_noisy_image(x_start, torch.tensor([500])) * 255.0)
cv2.imwrite('img_999.png', get_noisy_image(x_start, torch.tensor([999])) * 255.0)sqrt_alphas_cumprod_t : tensor([[[0.9999]]], dtype=torch.float64)
sqrt_one_minus_alphas_cumprod_t : tensor([[[0.0100]]], dtype=torch.float64)
sqrt_alphas_cumprod_t : tensor([[[0.9849]]], dtype=torch.float64)
sqrt_one_minus_alphas_cumprod_t : tensor([[[0.1733]]], dtype=torch.float64)
sqrt_alphas_cumprod_t : tensor([[[0.9461]]], dtype=torch.float64)
sqrt_one_minus_alphas_cumprod_t : tensor([[[0.3238]]], dtype=torch.float64)
sqrt_alphas_cumprod_t : tensor([[[0.2789]]], dtype=torch.float64)
sqrt_one_minus_alphas_cumprod_t : tensor([[[0.9603]]], dtype=torch.float64)
sqrt_alphas_cumprod_t : tensor([[[0.0064]]], dtype=torch.float64)
sqrt_one_minus_alphas_cumprod_t : tensor([[[1.0000]]], dtype=torch.float64)
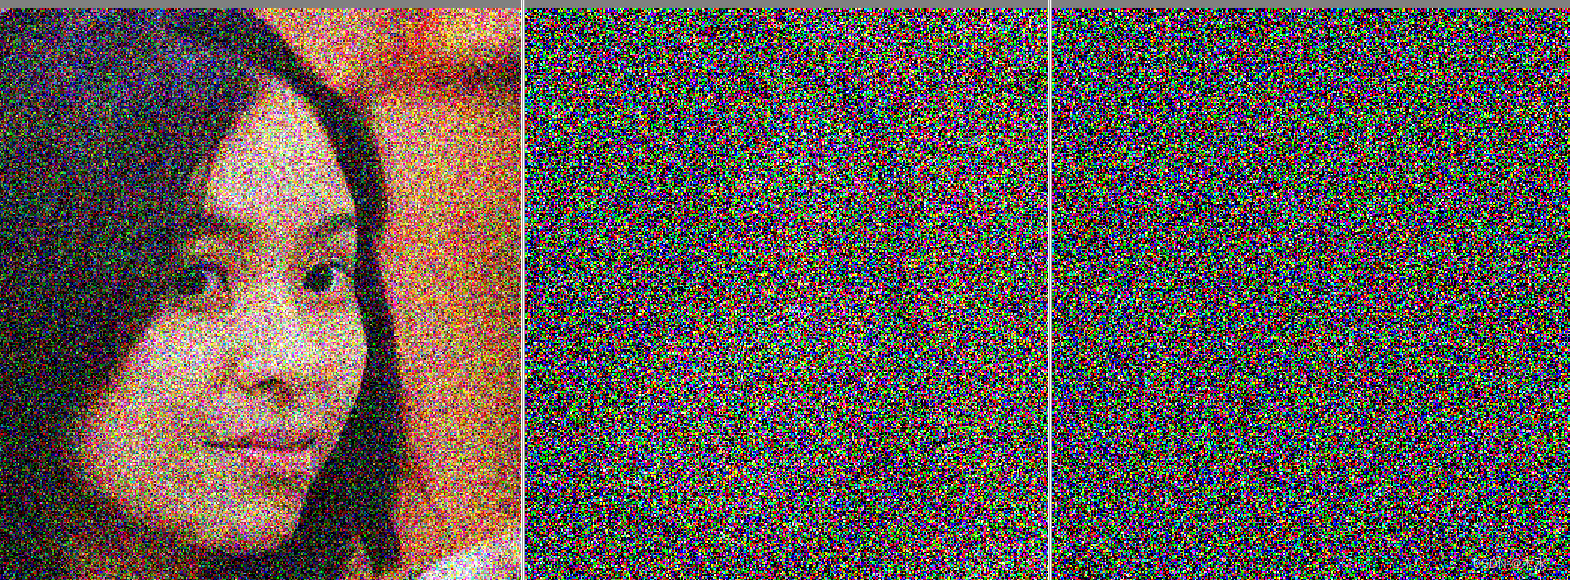
以下分别为原图,t = 0, 50, 100, 500, 999 的结果。

可见,随着 t 的加大,原图对应的比例系数减小,噪声的强度系数加大,t = 500的时候,隐约可见人脸轮廓,t = 999 的时候,人脸彻底淹没在噪声里面了。
这篇关于深入浅出 diffusion(2):pytorch 实现 diffusion 加噪过程的文章就介绍到这儿,希望我们推荐的文章对编程师们有所帮助!


