本文主要是介绍HPA自动扩缩容,希望对大家解决编程问题提供一定的参考价值,需要的开发者们随着小编来一起学习吧!
HPA是什么???
Horizontal Pod Autoscaling: k8s自带的模块,pod的水平自动伸缩,对象是pod。
pod占用cpu比率达到一定的阈值,将会触发伸缩机制。
replication controller 副本控制器
deployment controller 节点控制器
hpa控制副本的数量以及控制部署pod
1、hpa基于kube-controll-manager服务,周期性的检测pod的cpu使用率,默认30秒
2、hpa和replication controller,deployment controller ,都属于k8s的资源。通过跟踪分析副本控制器和deployment的pod的负载均衡变化,针对性的调整pod的副本数。
阀值: 正常情况下,pod的副本数,以及达到阀值之后,pod的扩容最大数量
3、metrics-server 部署到集群当中,对外提供度量的数据。
hpa部署
在所有节点上传metrics-server.tar包
#导入为镜像
docker load -i metrics-server.tar#在master上传components.yaml
kubectl apply -f components.yaml
HPA的规则:
1、定义pod的时候必须要有资源限制,否则HPA无法进行监控。
2、扩容是即时的,只要超过阀值会立刻扩容,不是立刻扩容到最大副本数。他会在最小值和最大信波动。如果扩容的数量满足了需求,不会在扩容
3、缩容是缓慢的。如果业务的峰值较高,回收的策略太积极的话,可能会产生业务的崩溃。缩容的速度是比较慢的。周期性的获取数据,缩容的机制问题。
你是怎么对pod的副本数进行伸缩???
副本数扩缩容有两种方式:
1、手动方式,修改控制器的副本数
方法一
kubectl scale deployment centos-test --replicas=3
方法二
apply -f
方法三
kubectl edit deployments.apps centos-test
2、自动扩缩容
hpa: hpa的监控是cpu
声明式
kubectl autoscale deployment centos-test --cpu-percent=50 --max=10 --min=1陈述式
apiVersion: autoscaling/v1
kind: HorizontalPodAutoscaler
metadata:name: hpa-centos7
spec:scaleTargetRef:apiVersion: apps/v1kind: Deploymentname: centos-testminReplicas: 1maxReplicas: 5targetCPUUtilizationPercentage: 50#超过50%就扩展
资源限制:
pod的资源限制
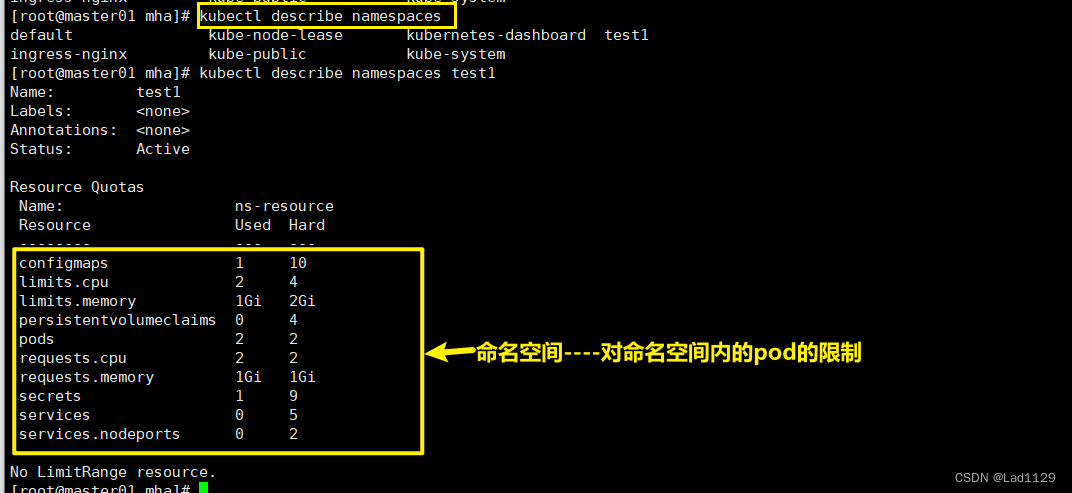
命名空间资源限制
lucky-cloud项目-----部署在test1的命名空间,如果lucky-coloud不做限制,或者命名空间不做限制,他依然会占满所有集群资源。
k8s部署pod的最大数量:10000个
busybox: 就是最小化的centos 4M
对pod资源的限制
apiVersion: apps/v1
kind: Deployment
metadata:name: centos-testnamespace: test2labels:test: centos
spec:replicas: 1selector:matchLabels:test: centostemplate:metadata:labels:test: centosspec:containers:- name: centos1image: centos:7command: ["/bin/bash","-c","yum -y install epel-release.noarch; yum -y install stress;sleep 3600"]resources:limits:cpu: "1"memory: 512Mi
---
apiVersion: v1
kind: LimitRange
#表示使用limitrange来进行资源控制
metadata:name: test2-limitnamespace: test2
spec:limits:- default:memory: 512Micpu: "1"defaultRequest:memory: 256Micpu: "0.5"type: Container
#default: 相当于limit
#defaultRequest: 相当于request
#type: Container pod pvc(很少有)
限制pod副本数
apiVersion: apps/v1
kind: Deployment
metadata:name: centos-test2namespace: test1labels:test: centos2
spec:replicas: 10selector:matchLabels:test: centos2template:metadata:labels:test: centos2spec:containers:- name: centos1image: centos:7command: ["/bin/bash","-c","yum -y install epel-release.noarch; yum -y install stress;sleep 3600"]resources:limits:cpu: "1"memory: 512Mi
---
apiVersion: autoscaling/v1
kind: HorizontalPodAutoscaler
metadata:name: hpa-centos7
spec:scaleTargetRef:apiVersion: apps/v1kind: Deploymentname: centos-test2minReplicas: 1maxReplicas: 5targetCPUUtilizationPercentage: 50---
apiVersion: v1
kind: ResourceQuota
metadata:name: ns-resourcenamespace: test1
spec:hard:pods: "2"
最开始副本为1,运行后deployment是1/1
限制数为2,副本数为3,运行后deployment是2/3
限制数为8,副本数为3, 运行后deployment是2/3
限制数为8,副本数为4, 运行后deployment是4/4
命名空间资源限制
apiVersion: apps/v1
kind: Deployment
metadata:name: centos-test2namespace: test1labels:test: centos2
spec:replicas: 10selector:matchLabels:test: centos2template:metadata:labels:test: centos2spec:containers:- name: centos1image: centos:7command: ["/bin/bash","-c","yum -y install epel-release.noarch; yum -y install stress;sleep 3600"]resources:limits:cpu: "1"memory: 512Mi
---
apiVersion: autoscaling/v1
kind: HorizontalPodAutoscaler
metadata:name: hpa-centos7
spec:scaleTargetRef:apiVersion: apps/v1kind: Deploymentname: centos-test2minReplicas: 1maxReplicas: 5targetCPUUtilizationPercentage: 50---
apiVersion: v1
kind: ResourceQuota
metadata:name: ns-resourcenamespace: test1
spec:hard:pods: "2"requests.cpu: "2"requests.memory: 1Gilimits.cpu: "4"limits.memory: 2Giconfigmaps: "10"
#在当前命名空间能创建最大的configmap的数量 10个persistentvolumeclaims: "4"
#当前命名空间只能使用4个pvcsecrets: "9"
#创建加密的secrets,只能9个services: "5"
##创建service只能5个services.nodeports: "2"
#nodeport类型的svc只能两个

总结
HPA自动扩缩容 命名空间
第一种:
ResourceQuota 可以对命名空间进行资源限制。
第二种
limitRange:直接声明在命名空间当中创建的pod,容器的资源限制,这是一种统一限制,所有的pod都受这个条件制约。
pod资源限制 一般是我们创建的时候声明好的,必加选项。
pod资源限制
resources:
limit
对命名空间资源限制,对命令空间使用cpu和内存一定会做限制(cpu、内存),防止整个集群的资源被一个服务或者一个命名空间占用。
命名空间资源限制 ResourceQuota
核心:防止整个集群的资源被一个服务或者一个命名空间占用。
命名空间统一资源限制 LimitRange
HPA:自动伸缩。 nodeName固难在一个pod,观察,扩容之后,阀值是否会下降。
这篇关于HPA自动扩缩容的文章就介绍到这儿,希望我们推荐的文章对编程师们有所帮助!


