本文主要是介绍代码门禁(Gated Check-in),希望对大家解决编程问题提供一定的参考价值,需要的开发者们随着小编来一起学习吧!
软件质量保障:普及测试技术
标准 CI 构建是在代码合并后检查已提交 代码 的功能完整性,这种方法会导致代码出现测试用例执行失败甚至编译失败而无法部署的情况(即代码合并到master后编译失败导致没有可用版本部署)。
代码门禁则是在代码合并之前就验证代码来保护主干分支的完整性。通过这种方式,可以保护主分支代码避免因合码导致的构建中断,以确保 master 分支代码始终是可部署的,并且不会因明显的错误而影响到你正在并行开发的同事工作。
项目准备
创建一个测试项目,为 .NET Core 应用程序定义两个构建,其源代码托管在 GitHub 上:
-
标准 CI 构建 - 构建、测试和发布
-
代码门禁 (GC) 构建 - 构建和测试
我们不想在每次提交代码或创建PR时就生成 应用包,而是想先执行一些步骤,以确保代码的完整性不受影响。
下面的代码包含通用的构建部分:
-
还原 NuGet 包
-
编译代码
-
运行单元测试
-
安装报告生成器(用于代码覆盖率的生成)
-
创建报告
-
生成代码覆盖率
pool:vmImage: 'ubuntu-latest'variables:buildConfiguration: 'Release'steps:- task: DotNetCoreCLI@2displayName: Restore nuget packagesinputs:command: restoreprojects: '**/*.csproj'workingDirectory: $(Build.SourcesDirectory)- task: DotNetCoreCLI@2displayName: Buildinputs:command: buildprojects: '$(Build.SourcesDirectory)/gated-checkin/GatedCheckin.sln'arguments: '--configuration $(buildConfiguration)'# You just added coverlet.collector to use 'XPlat Code Coverage'- task: DotNetCoreCLI@2displayName: Testinputs:command: testprojects: '**/*Tests/*.csproj'arguments: '--configuration $(buildConfiguration) --collect:"XPlat Code Coverage" -- RunConfiguration.DisableAppDomain=true'workingDirectory: $(Build.SourcesDirectory)- task: DotNetCoreCLI@2inputs:command: customcustom: toolarguments: install --tool-path . dotnet-reportgenerator-globaltooldisplayName: Install ReportGenerator tool- script: ./reportgenerator -reports:$(Agent.TempDirectory)/**/coverage.cobertura.xml -targetdir:$(Build.SourcesDirectory)/coverlet/reports -reporttypes:"Cobertura"displayName: Create reports- task: PublishCodeCoverageResults@1displayName: 'Publish code coverage'inputs:codeCoverageTool: CoberturasummaryFileLocation: $(Build.SourcesDirectory)/coverlet/reports/Cobertura.xml
标准 CI 构建
仅当在 master 分支上完成提交时,Azure DevOps 才应运行标准 CI 构建。为了实现这一点,需要排除来自非主分支的PR。
trigger:branches:include:- masterpaths:include:- gated-checkin/*exclude:- gated-checkin/azure-pipelines-gc.ymlpr: none
代码门禁 (GC) 构建
Azure DevOps 应该在非主分支的每次提交以及当我们为主分支创建拉取请求时执行GC 构建。
trigger:branches:include:- '*'exclude:- masterpr:branches:include:- masterpaths:include:- gated-checkin/*exclude:- gated-checkin/azure-pipelines.yml
1. 配置分支保护规则
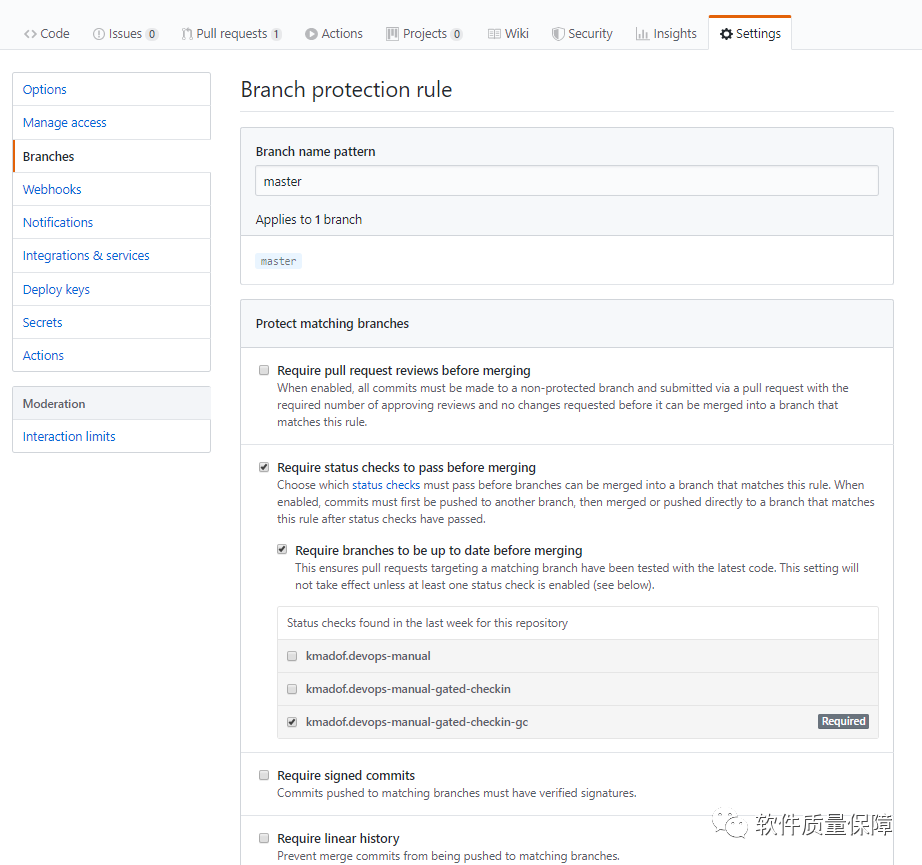
一旦我们有了构建定义,我们应该在 GitHub 上添加分支保护规则。设置流程如下:Settings-> Branches->Add rule 然后检查:
-
合并前需要通过状态检查
-
合并前要求分支是最新的
-
选择 GC build, kmadof.devops-manual-gated-checkin-gc
该配置可以保护 master 分支并免受构建中断,确保我们的分支在将其合并到 master 之前是最新的。

2. GC 构建在 GitHub 上运行
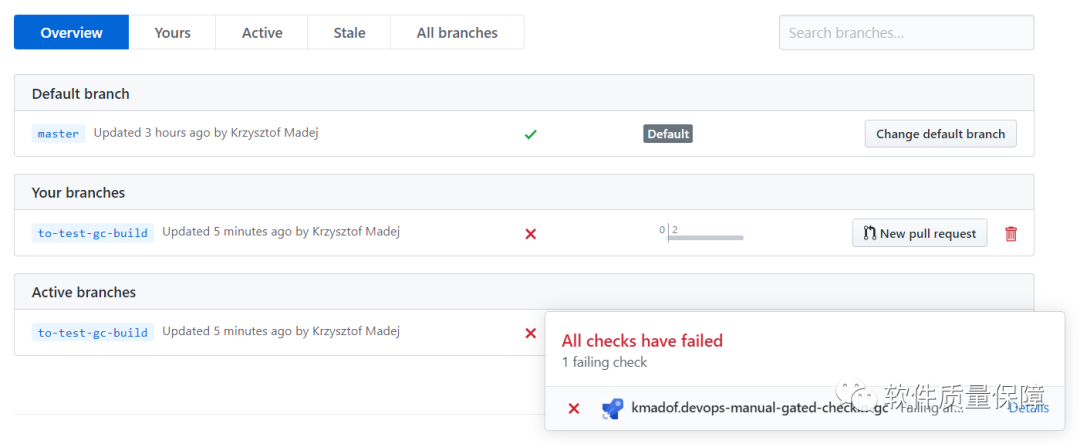
使用此配置,GitHub 在分支页面上显示构建信息:

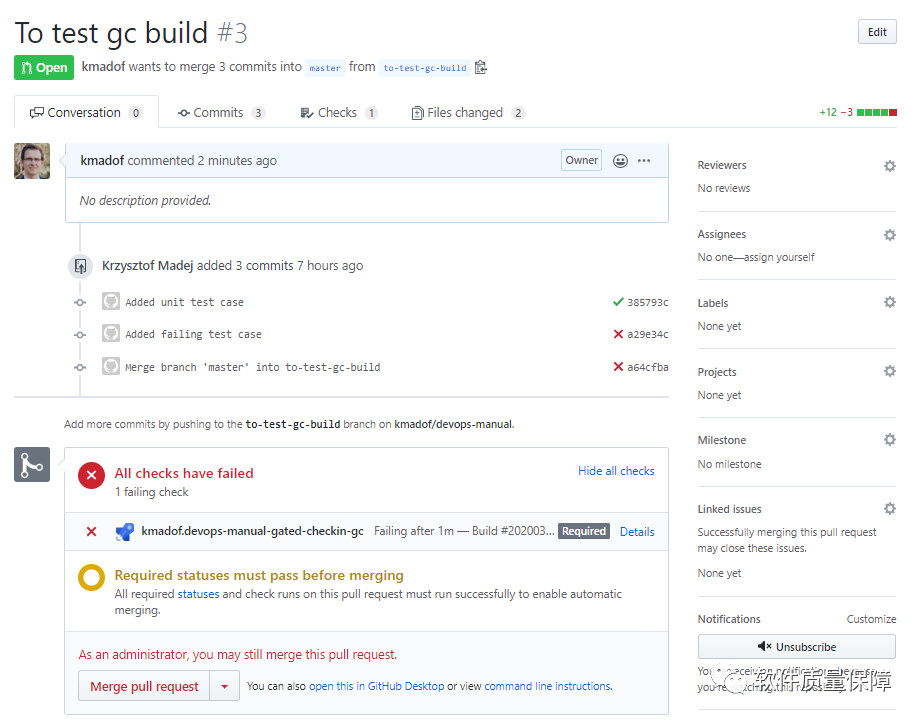
如果构建失败,我们将无法合并到主分支(除非你是管理员)。

总结
代码门禁是测试左移的非常重要的实践,可以更早地发现代码缺陷。当然,文中所使用的门禁内容比较简单,我们可以将门禁作为一个 Package,向里面塞入各种需要check项,例如编译/打包通过、单测/接口测试100%通过、代码覆盖率达到xx%、静态代码安全扫描等。
往期推荐
接口间参数传递的一种解决方案
经验分享|测试工程师转型测试开发历程
浅谈Mock平台的设计思路
接口自动化测试框架设计思路
接口自动化测试框架实践1:接口测试概述
我在阿里做测开
这篇关于代码门禁(Gated Check-in)的文章就介绍到这儿,希望我们推荐的文章对编程师们有所帮助!


