本文主要是介绍思科防火墙IPsec配置-主模式方式,希望对大家解决编程问题提供一定的参考价值,需要的开发者们随着小编来一起学习吧!

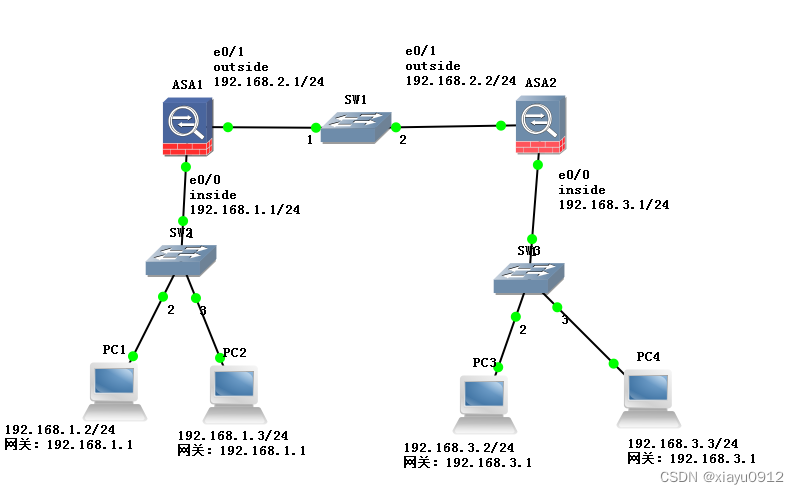
网络拓扑如上图所示,为方便记忆从左到右顺时针方向的网段的分别为192.168.1.0, 2.0, 3.0。
配置目标:两台思科防火墙之间建立IPsec VPN,使得左边192.168.1.0网段能够访问右边192.168.3.0网段。
基本信息:该环境使用GNS3模拟软件,防火墙软件版本为8.0(2),更新的版本配置差不太多,只是有些命令需要选择ikev1或ikev2,选择ikev1即可。防火墙的e0/1作为outside口,ip地址为192.168.2.1和192.168.2.2。e0/0作为inside口,ip地址为192.168.1.1和192.168.3.1。配置完成后ipsec连接不会自动触发,需要数据请求通过隧道才会触发,比如在192.168.1.2上ping 192.168.3.2,就会触发ipsec连接。
ASA1防火墙配置:
基本配置:
配置主机名:
hostname ASA1
配置接口和IP地址:
int e0/0
nameif inside
ip address 192.168.1.1 255.255.255.0
no shut
int e0/1
nameif outside
ip address 192.168.2.1 255.255.255.0
no shut
配置从192.168.1.0到192.168.3.0的数据包不做地址转换,该网络拓扑比较简单,可以不配置,但是真实环境比较复杂,一般都需要配置,故这里也配置上。
access-list no-nat extended permit ip 192.168.1.0 255.255.255.0 192.168.3.0 255.255.255.0
nat (inside) 0 access-list no-nat
下面配置控制连接的参数,配置后,收到连接或发出连接请求时会根据策略号由低到高的匹配对端的策略
设置1号策略,策略号可以随便填,敲入后进入二层命令行
crypto isakmp policy 1
设置预共享密码(不是密钥),密码需要与对端一致,具体密码在通道命令里设置
authentication pre-share
设置控制连接加密方法为3des,需要与对端一致
encryption 3des
设置控制连接数据包完整性校验方法为sha,需要与对端一致
hash sha
设置密钥生成的长度,需要与对端一致,一般号码越高,越长
group 2
设置密钥更新周期,建议与对端一致
lifetime 28800
下面配置数据连接的参数:
使用隧道(esp)方式,建议使用esp. 加密方式为3des,数据完整性校验方式为sha
crypto ipsec transform-set trans1 esp-3des esp-sha-hmac
配置NAT-T特性,这个特性使得防火墙outside的IP地址,如果在网络中有被转换为其他地址,则双方也能通讯,建议配置。如果outside的IP地址被网络中的设备NAT后没有配置这个选项,则IPSEC不能建立。这个命令后面会加一个数字表示多少秒,该数字表示周期性发送类似于心跳包的数据包,保持网络中网络设备的NAT会话不会被删除。
crypto isakmp nat-traversal 30
配置IPSEC通道
主模式的通道名为对端的IP地址
tunnel-group 192.168.2.2 type ipsec-l2l
配置IPSEC密码和断线检测,配置20秒超时后重传,重传3次判断为断线
tunnel-group 192.168.2.2 ipsec-attributes
配置连接密码为123456,需与对端一致
pre-shared-key 123456
isakmp keepalive threshold 20 retry 3
配置哪些数据包需要转发到IPSEC通道,该配置需要设置一个ACL,然后后面配置绑定这个ACL
access-list goIntoTunnel extended permit ip 192.168.1.0 255.255.255.0 192.168.3.0 255.255.255.0
配置cryto map。 cryto map是一个列表,该列表记录哪些数据包需要建立IPsec, 将前面配置的一些分散的信息绑定到一起形成一个ipsec连接的完整信息,这个列表有序号,序号可以随意填,匹配IPSEC参数的时候按照序号从低到高的顺序进行匹配。
设置10号入口,匹配ACL名为goIntoTunnel(该ACL已在之前设置好),需要与对端为192.168.2.2的地址建立IPSEC连接,数据参数为trans1(该参数已在之前设置)
crypto map mymap 10 match address goIntoTunnel
crypto map mymap 10 set peer 192.168.2.2
crypto map mymap 10 set transform-set trans1
将crypto map 绑定到outside, 并设置ISAKMP(Internet Security Association and Key Management Protocol)为enable。 ISAKMP就是建立IPsec连接时需要使用的框架,包含一系列的规则
crypto map mymap interface outside
crypto isakmp enable outside
设置允许IPSEC的数据包进入防火墙
sysopt connection permit-vpn
设置192.168.3.0的数据包通过outside接口进行发送
route outside 192.168.3.0 255.255.255.0 192.168.2.2 1
防火墙ASA1的配置设置完毕。
ASA2的配置和ASA1一致,只是接口的IP地址,hostname和goIntoTunnel这个ACL有变化。
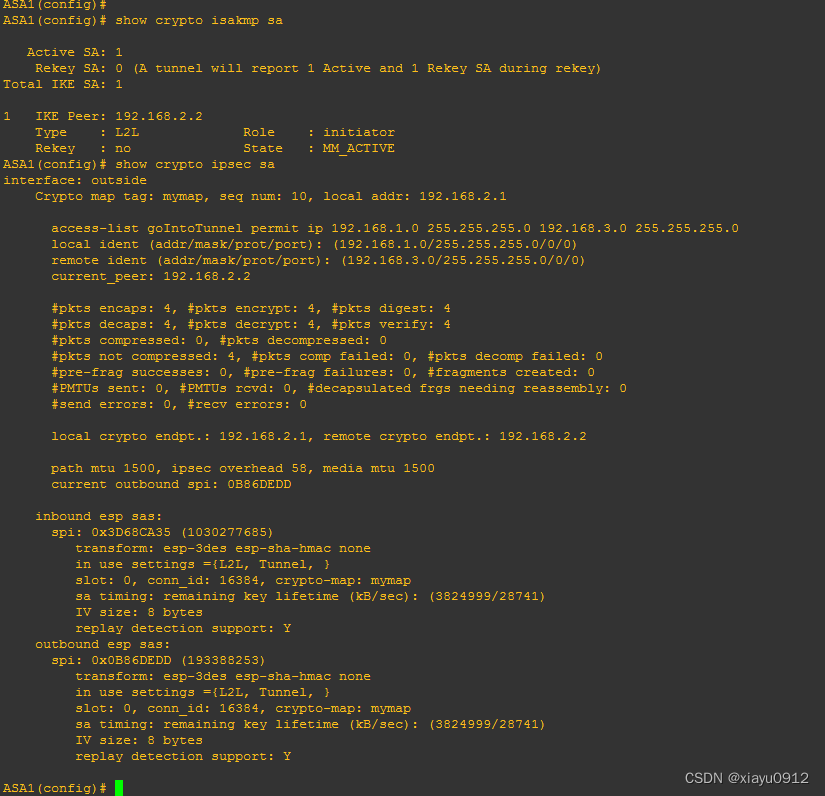
两个防火墙设置完毕后,需要从一端的PC ping另一端的pc才会触发ipsec连接。可以使用show crypto isakmp sa查看控制连接是否建立,使用show crypto isakmp sa查看数据连接是否建立。如下图所示:

两个防火墙的所有配置如下:
ASA1:
ASA1# show running-config
: Saved
:
ASA Version 8.0(2)
!
hostname ASA1
enable password 8Ry2YjIyt7RRXU24 encrypted
names
!
interface Ethernet0/0
nameif inside
security-level 100
ip address 192.168.1.1 255.255.255.0
!
interface Ethernet0/1
nameif outside
security-level 0
ip address 192.168.2.1 255.255.255.0
!
interface Ethernet0/2
shutdown
no nameif
no security-level
no ip address
!
interface Ethernet0/3
shutdown
no nameif
no security-level
no ip address
!
interface Ethernet0/4
shutdown
no nameif
no security-level
no ip address
!
interface Ethernet0/5
shutdown
no nameif
no security-level
no ip address
!
passwd 2KFQnbNIdI.2KYOU encrypted
ftp mode passive
access-list no-nat extended permit ip 192.168.1.0 255.255.255.0 192.168.3.0 255.255.255.0
access-list goIntoTunnel extended permit ip 192.168.1.0 255.255.255.0 192.168.3.0 255.255.255.0
pager lines 24
mtu outside 1500
mtu inside 1500
no failover
icmp unreachable rate-limit 1 burst-size 1
no asdm history enable
arp timeout 14400
nat (inside) 0 access-list no-nat
route outside 192.168.3.0 255.255.255.0 192.168.2.2 1
timeout xlate 3:00:00
timeout conn 1:00:00 half-closed 0:10:00 udp 0:02:00 icmp 0:00:02
timeout sunrpc 0:10:00 h323 0:05:00 h225 1:00:00 mgcp 0:05:00 mgcp-pat 0:05:00
timeout sip 0:30:00 sip_media 0:02:00 sip-invite 0:03:00 sip-disconnect 0:02:00
timeout uauth 0:05:00 absolute
dynamic-access-policy-record DfltAccessPolicy
no snmp-server location
no snmp-server contact
snmp-server enable traps snmp authentication linkup linkdown coldstart
crypto ipsec transform-set trans1 esp-3des esp-sha-hmac
crypto map mymap 10 match address goIntoTunnel
crypto map mymap 10 set peer 192.168.2.2
crypto map mymap 10 set transform-set trans1
crypto map mymap interface outside
crypto isakmp enable outside
crypto isakmp policy 1
authentication pre-share
encryption 3des
hash sha
group 2
lifetime 28800
crypto isakmp policy 65535
authentication pre-share
encryption 3des
hash sha
group 2
lifetime 86400
crypto isakmp nat-traversal 30
telnet timeout 5
ssh timeout 5
console timeout 0
threat-detection basic-threat
threat-detection statistics access-list
!
!
tunnel-group 192.168.2.2 type ipsec-l2l
tunnel-group 192.168.2.2 ipsec-attributes
pre-shared-key *
isakmp keepalive threshold 20 retry 3
prompt hostname context
Cryptochecksum:00000000000000000000000000000000
: end
ASA1#
ASA2:
ASA2(config)# show run
: Saved
:
ASA Version 8.0(2)
!
hostname ASA2
enable password 8Ry2YjIyt7RRXU24 encrypted
names
!
interface Ethernet0/0
nameif inside
security-level 100
ip address 192.168.3.1 255.255.255.0
!
interface Ethernet0/1
nameif outside
security-level 0
ip address 192.168.2.2 255.255.255.0
!
interface Ethernet0/2
shutdown
no nameif
no security-level
no ip address
!
interface Ethernet0/3
shutdown
no nameif
no security-level
no ip address
!
interface Ethernet0/4
shutdown
no nameif
no security-level
no ip address
!
interface Ethernet0/5
shutdown
no nameif
no security-level
no ip address
!
passwd 2KFQnbNIdI.2KYOU encrypted
ftp mode passive
access-list no-nat extended permit ip 192.168.3.0 255.255.255.0 192.168.1.0 255.255.255.0
access-list goIntoTunnel extended permit ip 192.168.3.0 255.255.255.0 192.168.1.0 255.255.255.0
pager lines 24
mtu outside 1500
mtu inside 1500
no failover
icmp unreachable rate-limit 1 burst-size 1
no asdm history enable
arp timeout 14400
route outside 192.168.1.0 255.255.255.0 192.168.2.1 1
timeout xlate 3:00:00
timeout conn 1:00:00 half-closed 0:10:00 udp 0:02:00 icmp 0:00:02
timeout sunrpc 0:10:00 h323 0:05:00 h225 1:00:00 mgcp 0:05:00 mgcp-pat 0:05:00
timeout sip 0:30:00 sip_media 0:02:00 sip-invite 0:03:00 sip-disconnect 0:02:00
timeout uauth 0:05:00 absolute
dynamic-access-policy-record DfltAccessPolicy
no snmp-server location
no snmp-server contact
snmp-server enable traps snmp authentication linkup linkdown coldstart
crypto ipsec transform-set trans1 esp-3des esp-sha-hmac
crypto map mymap 10 match address goIntoTunnel
crypto map mymap 10 set peer 192.168.2.1
crypto map mymap 10 set transform-set trans1
crypto map mymap interface outside
crypto isakmp enable outside
crypto isakmp policy 1
authentication pre-share
encryption 3des
hash sha
group 2
lifetime 28800
crypto isakmp policy 65535
authentication pre-share
encryption 3des
hash sha
group 2
lifetime 86400
crypto isakmp nat-traversal 30
telnet timeout 5
ssh timeout 5
console timeout 0
threat-detection basic-threat
threat-detection statistics access-list
!
!
tunnel-group 192.168.2.1 type ipsec-l2l
tunnel-group 192.168.2.1 ipsec-attributes
pre-shared-key *
isakmp keepalive threshold 20 retry 3
prompt hostname context
Cryptochecksum:00000000000000000000000000000000
: end
ASA2(config)#
这篇关于思科防火墙IPsec配置-主模式方式的文章就介绍到这儿,希望我们推荐的文章对编程师们有所帮助!


