本文主要是介绍zsh 主题 自定义_10个Zsh技巧和窍门:配置,自定义和用法,希望对大家解决编程问题提供一定的参考价值,需要的开发者们随着小编来一起学习吧!
zsh 主题 自定义
As web developers, the command line is becoming an ever more important part of our workflow. We use it to install packages from npm, to test API endpoints, to push commits to GitHub, and lots more besides.
作为Web开发人员,命令行正在成为我们工作流程中越来越重要的部分。 我们使用它来从npm安装软件包,测试API端点,将提交推送到GitHub等。
My shell of choice is zsh. It is a highly customizable Unix shell, that packs some very powerful features such as killer tab completion, clever history, remote file expansion, and much more.
我选择的外壳是zsh 。 它是一个高度可定制的Unix shell,其中包含一些非常强大的功能,例如杀手级选项卡完成,巧妙的历史记录,远程文件扩展等等 。
In this article I’ll show you how to install zsh, then offer ten tips and tricks to make you more productive when working with it.
在本文中,我将向您展示如何安装zsh,然后提供十个技巧和窍门,使您在使用它时工作效率更高。
This is a beginner-level guide which can be followed by anybody (even Windows users, thanks to Windows Subsystem for Linux). However, in light of Apple’s announcement that zsh is now the standard shell on macOS Catalina, mac users might find it especially helpful.
这是一个入门级指南,任何人(即使Windows用户,也要感谢Linux的Windows子系统)都可以遵循。 但是,鉴于苹果公司宣布zsh现在是macOS Catalina上的标准外壳 ,mac用户可能会发现它特别有用。
Let’s get started.
让我们开始吧。
安装 (Installation)
I don’t want to offer in-depth installation instructions for each operating system, rather some general guidelines instead. If you get stuck installing zsh, there is plenty of help available online.
我不想为每个操作系统提供深入的安装说明,而是提供一些常规指导。 如果您在安装zsh时遇到问题,可以在线获得大量帮助。
At the time of writing the current zsh version is 5.7.1.
在撰写本文时,当前的zsh版本是5.7.1。
苹果系统 (macOS)
Most versions of macOS ship with zsh pre-installed. You can check if this is the case and if so, which version you are running using the command: zsh --version. If the version is 4.3.9 or higher, you should be good to go (we’ll need at least this version to install Oh My Zsh later on). If not, you can follow this guide to install a more recent version of zsh using homebrew.
大多数版本的macOS都预装了zsh。 您可以使用命令zsh --version来检查是否是这种情况,以及正在运行的是哪个版本。 如果版本为4.3.9或更高版本,那么您应该可以使用(我们至少需要此版本才能安装Oh My Zsh)。 如果没有,您可以按照本指南使用自制软件安装zsh的最新版本。
Once installed, you can set zsh as the default shell using: chsh -s $(which zsh). After issuing this command, you’ll need to log out, then log back in again for the changes to take effect.
安装后,可以使用以下命令将zsh设置为默认外壳: chsh -s $(which zsh) 。 发出此命令后,您需要注销,然后重新登录以使更改生效。
If at any point you decide you don’t like zsh, you can revert to Bash using: chsh -s $(which bash).
如果您在任何时候都不喜欢zsh,可以使用chsh -s $(which bash)还原为Bash。
的Linux (Linux)
On Ubuntu-based distros, you can install zsh using: sudo apt-get install zsh. Once the installation completes, you can check the version using zsh --version, then make zsh your default shell using chsh -s $(which zsh). You’ll need to log out, then log back in for the changes to take effect.
在基于Ubuntu的发行版上,可以使用以下sudo apt-get install zsh安装zsh: sudo apt-get install zsh 。 安装完成后,可以使用zsh --version检查版本,然后使用chsh -s $(which zsh)将zsh设置为默认外壳。 您需要注销,然后重新登录以使更改生效。
As with macOS, you can revert back to Bash using: chsh -s $(which bash).
与macOS一样,您可以使用chsh -s $(which bash)恢复到Bash。
If you are running a non-Ubuntu based distro, then check out the instructions for other distros.
如果您运行的不是基于Ubuntu的发行版,请查看有关其他发行版的说明 。
视窗 (Windows)
Unfortunately, this is where things start to get a little complicated. Zsh is a Unix shell and for it to work on Windows, you’ll need to activate Windows Subsystem for Linux (WSL), an environment in Windows 10 for running Linux binaries.
不幸的是,这里的事情开始变得有些复杂。 Zsh是Unix shell,要使其在Windows上运行,您需要激活Windows子系统Linux(WSL) ,这是Windows 10中用于运行Linux二进制文件的环境。
There are various tutorials online explaining how to get up and running with zsh in Window 10s. I found these two to be up-to-date and easy to follow:
在线上有各种教程,介绍了如何在Window 10s中使用zsh进行启动和运行。 我发现这两个是最新的,易于遵循:
How to Install and Use the Linux Bash Shell on Windows 10 – follow this one first to install WSL
如何在Windows 10上安装和使用Linux Bash Shell –首先按照此步骤安装WSL
How to Use Zsh (or Another Shell) in Windows 10 – follow this one second to install zsh
如何在Windows 10中使用Zsh(或另一个Shell) –请花一秒钟的时间安装zsh
Note that it is also possible to get zsh running with Cygwin. Here are instructions for doing that.
注意,也可以使zsh与Cygwin一起运行 。 这是执行此操作的说明 。
第一次运行 (First Run)
When you first open zsh, you’ll be greeted by the following menu.
首次打开zsh时,以下菜单将为您打招呼。
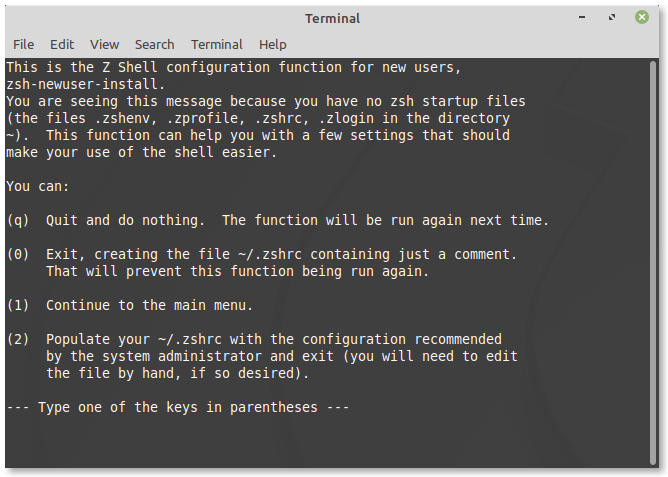
If you select (1) you’ll be taken to a menu that allows you to configure history, keybindings and a bunch of other things. However, I suggest selecting (2) which will create a configuration profile with the recommended default settings.
如果选择(1)您将进入一个菜单,该菜单可让您配置历史记录,键绑定和其他内容。 但是,我建议选择(2) ,它将使用建议的默认设置创建一个配置文件。
查找配置文件 (Locating the Configuration File)
Now let’s have a look at the file that zsh just created. Enter your home directory and open the
这篇关于zsh 主题 自定义_10个Zsh技巧和窍门:配置,自定义和用法的文章就介绍到这儿,希望我们推荐的文章对编程师们有所帮助!


