本文主要是介绍LLM漫谈(三)| 使用Chainlit和LangChain构建文档问答的LLM应用程序,希望对大家解决编程问题提供一定的参考价值,需要的开发者们随着小编来一起学习吧!
一、Chainlit介绍
Chainlit是一个开源Python包,旨在彻底改变构建和共享语言模型(LM)应用程序的方式。Chainlit可以创建用户界面(UI),类似于由OpenAI开发的ChatGPT用户界面,Chainlit可以开发类似streamlit的web界面。
1.1 Chainlit的主要特点
- 可视化中间步骤:Chainlit可以可视化大语言模型管道中的每个步骤;
- Chainlit与Python代码轻松集成,可以快速释放LM应用程序的潜力;
- 快速响应的UI开发:使用Chainlit可以利用其直观的框架来设计和实现类似于ChatGPT的迷人UI。
1.2 Chainlit装饰器功能
on_message:
与框架的装饰器,用于对来自UI的消息作出反应。每次收到新消息时,都会调用装饰函数。
on_chat_start:
Decorator对用户websocket连接事件作出反应。
1.3 概念
User Session:
user_session是一个存储用户会话数据的字典,id和env键分别保持会话id和环境变量。用户会话其他数据存储在其他key中。
Streaming:
Chainlit支持两种类型的流:
Python Streaming(https://docs.chainlit.io/concepts/streaming/python)
Langchain Streaming(https://docs.chainlit.io/concepts/streaming/langchain)
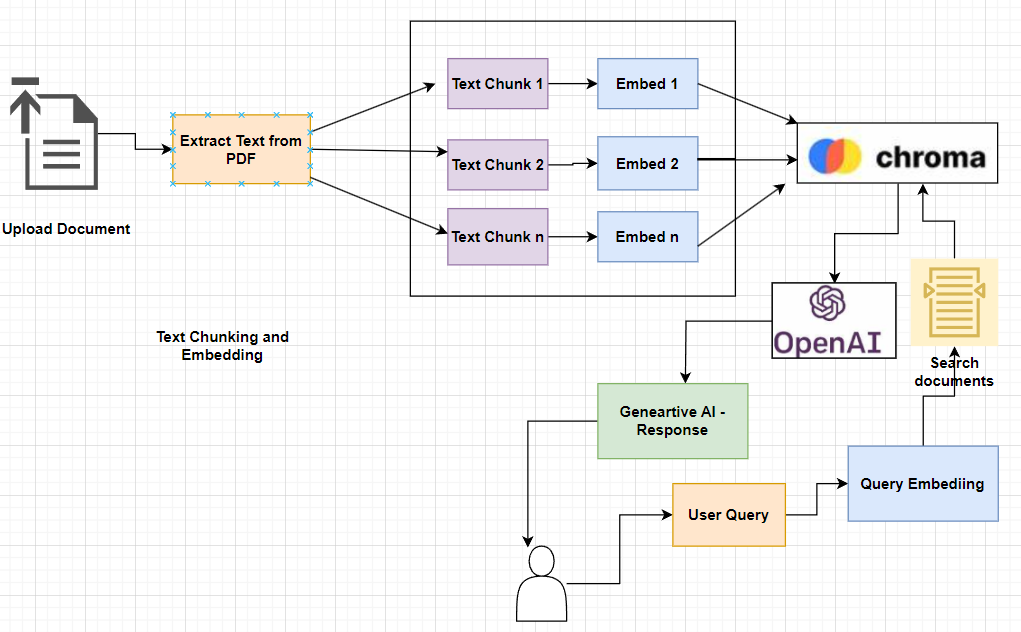
二、实施步骤
1.开始上传PDF格式文件,确保其正确提交;
2.随后,使用PyPDF2从上传的PDF文档中提取文本内容;
3.利用OpenAIEmbeddings将提取的文本内容转换为矢量化嵌入;
4.将这些矢量化嵌入保存在指定的向量库中,比如Chromadb;
5.当用户查询时,通过应用OpenAIEmbeddings将查询转换为相应的矢量嵌入,将查询的语义结构对齐到矢量化域中;
6.调用查询的矢量化嵌入有效地检索上下文相关的文档和文档上下文的相关元数据;
7.将检索到的相关文档及其附带的元数据传递给LLM,从而生成响应。
三、代码实施
3.1 安装所需的包
pip install -qU langchain openai tiktoken pyPDF2 chainlitconda install -c conda-forge chromadb
3.2 代码实施
#import required librariesfrom langchain.embeddings import OpenAIEmbeddingsfrom langchain.text_splitter import RecursiveCharacterTextSplitterfrom langchain.vectorstores import Chromafrom langchain.chains import RetrievalQAWithSourcesChainfrom langchain.chat_models import ChatOpenAIfrom langchain.prompts.chat import (ChatPromptTemplate,SystemMessagePromptTemplate,HumanMessagePromptTemplate)#import chainlit as climport PyPDF2from io import BytesIOfrom getpass import getpass#import osfrom configparser import ConfigParserenv_config = ConfigParser()# Retrieve the openai key from the environmental variablesdef read_config(parser: ConfigParser, location: str) -> None:assert parser.read(location), f"Could not read config {location}"#CONFIG_FILE = os.path.join("./env", "env.conf")read_config(env_config, CONFIG_FILE)api_key = env_config.get("openai", "api_key").strip()#os.environ["OPENAI_API_KEY"] = api_key# Chunking the texttext_splitter = RecursiveCharacterTextSplitter(chunk_size=1000,chunk_overlap=100)##system templatesystem_template = """Use the following pieces of context to answer the user's question.If you don't know the answer, just say that you don't know, don't try to make up an answer.ALWAYS return a "SOURCES" part in your answer.The "SOURCES" part should be a reference to the source of the document from which you got your answer.Begin!----------------{summaries}"""messages = [SystemMessagePromptTemplate.from_template(system_template),HumanMessagePromptTemplate.from_template("{question}"),]prompt = ChatPromptTemplate.from_messages(messages)chain_type_kwargs = {"prompt": prompt}#Decorator to react to the user websocket connection event.@cl.on_chat_startasync def init():files = None# Wait for the user to upload a PDF filewhile files is None:files = await cl.AskFileMessage(content="Please upload a PDF file to begin!",accept=["application/pdf"],).send()file = files[0]msg = cl.Message(content=f"Processing `{file.name}`...")await msg.send()# Read the PDF filepdf_stream = BytesIO(file.content)pdf = PyPDF2.PdfReader(pdf_stream)pdf_text = ""for page in pdf.pages:pdf_text += page.extract_text()# Split the text into chunkstexts = text_splitter.split_text(pdf_text)# Create metadata for each chunkmetadatas = [{"source": f"{i}-pl"} for i in range(len(texts))]# Create a Chroma vector storeembeddings = OpenAIEmbeddings(openai_api_key=os.getenv("OPENAI_API_KEY"))docsearch = await cl.make_async(Chroma.from_texts)(texts, embeddings, metadatas=metadatas)# Create a chain that uses the Chroma vector storechain = RetrievalQAWithSourcesChain.from_chain_type(ChatOpenAI(temperature=0,openai_api_key=os.environ["OPENAI_API_KEY"]),chain_type="stuff",retriever=docsearch.as_retriever(),)# Save the metadata and texts in the user sessioncl.user_session.set("metadatas", metadatas)cl.user_session.set("texts", texts)# Let the user know that the system is readymsg.content = f"`{file.name}` processed. You can now ask questions!"await msg.update()cl.user_session.set("chain", chain)# react to messages coming from the UI@cl.on_messageasync def process_response(res):chain = cl.user_session.get("chain") # type: RetrievalQAWithSourcesChaincb = cl.AsyncLangchainCallbackHandler(stream_final_answer=True, answer_prefix_tokens=["FINAL", "ANSWER"])cb.answer_reached = Trueres = await chain.acall(res, callbacks=[cb])print(f"response: {res}")answer = res["answer"]sources = res["sources"].strip()source_elements = []# Get the metadata and texts from the user sessionmetadatas = cl.user_session.get("metadatas")all_sources = [m["source"] for m in metadatas]texts = cl.user_session.get("texts")if sources:found_sources = []# Add the sources to the messagefor source in sources.split(","):source_name = source.strip().replace(".", "")# Get the index of the sourcetry:index = all_sources.index(source_name)except ValueError:continuetext = texts[index]found_sources.append(source_name)# Create the text element referenced in the messagesource_elements.append(cl.Text(content=text, name=source_name))if found_sources:answer += f"\nSources: {', '.join(found_sources)}"else:answer += "\nNo sources found"if cb.has_streamed_final_answer:cb.final_stream.elements = source_elementsawait cb.final_stream.update()else:await cl.Message(content=answer, elements=source_elements).send()
3.3 运行应用程序
chainlit run <name of the python script>3.4 Chainlit UI


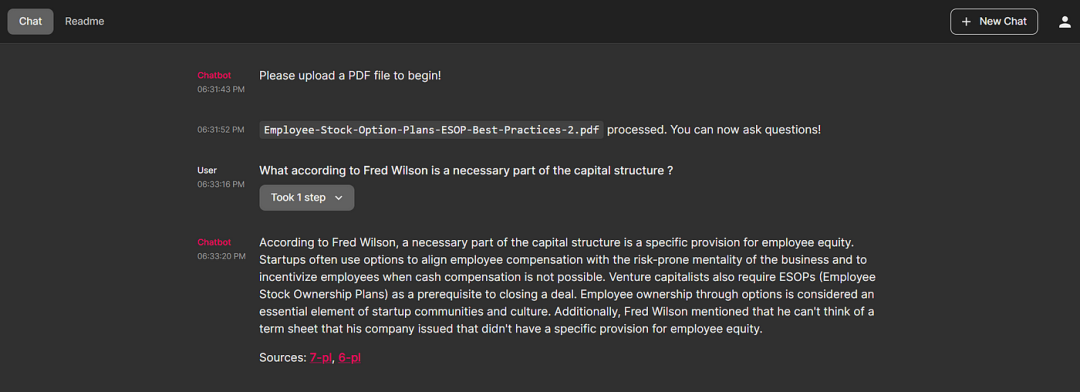
点击返回的页码,详细说明所引用的文档内容。


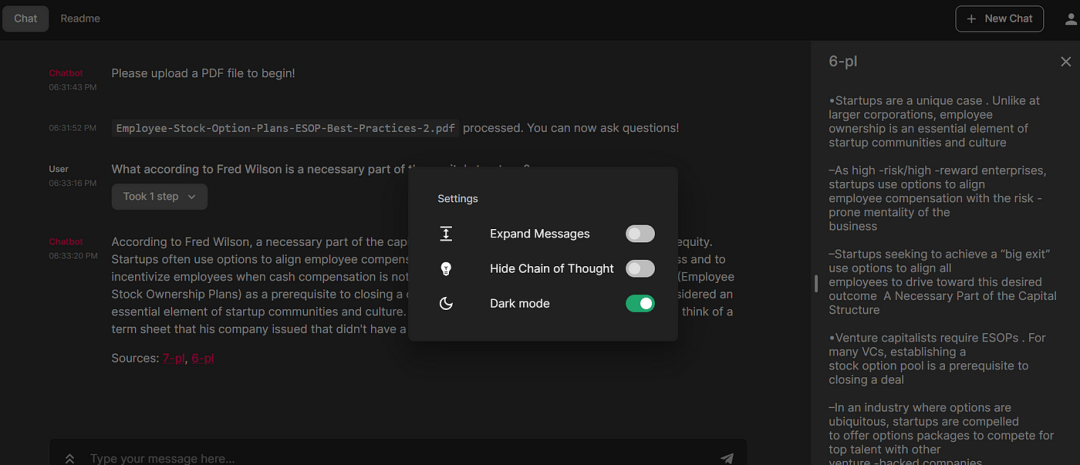
我们也可以更改设置。
参考文献:
[1] https://medium.aiplanet.com/building-llm-application-for-document-question-answering-using-chainlit-d15d10469069
这篇关于LLM漫谈(三)| 使用Chainlit和LangChain构建文档问答的LLM应用程序的文章就介绍到这儿,希望我们推荐的文章对编程师们有所帮助!


