本文主要是介绍inflate流程分析,希望对大家解决编程问题提供一定的参考价值,需要的开发者们随着小编来一起学习吧!
一.inflate的三参数重载方法else里面逻辑
我们先看到setContentView里面的inflate的调用链:
public View inflate(@LayoutRes int resource, @Nullable ViewGroup root) {return inflate(resource, root, root != null);}public View inflate(@LayoutRes int resource, @Nullable ViewGroup root, boolean attachToRoot) {final Resources res = getContext().getResources();if (DEBUG) {Log.d(TAG, "INFLATING from resource: \"" + res.getResourceName(resource) + "\" ("+ Integer.toHexString(resource) + ")");}View view = tryInflatePrecompiled(resource, res, root, attachToRoot);if (view != null) {return view;}XmlResourceParser parser = res.getLayout(resource);try {return inflate(parser, root, attachToRoot);} finally {parser.close();}}重点看三参数的方法:
public View inflate(XmlPullParser parser, @Nullable ViewGroup root, boolean attachToRoot) {synchronized (mConstructorArgs) {Trace.traceBegin(Trace.TRACE_TAG_VIEW, "inflate");final Context inflaterContext = mContext;final AttributeSet attrs = Xml.asAttributeSet(parser);Context lastContext = (Context) mConstructorArgs[0];mConstructorArgs[0] = inflaterContext;View result = root;try {advanceToRootNode(parser);final String name = parser.getName();if (DEBUG) {System.out.println("**************************");System.out.println("Creating root view: "+ name);System.out.println("**************************");}if (TAG_MERGE.equals(name)) {if (root == null || !attachToRoot) {throw new InflateException("<merge /> can be used only with a valid "+ "ViewGroup root and attachToRoot=true");}rInflate(parser, root, inflaterContext, attrs, false);} else {// Temp is the root view that was found in the xmlfinal View temp = createViewFromTag(root, name, inflaterContext, attrs);ViewGroup.LayoutParams params = null;if (root != null) {if (DEBUG) {System.out.println("Creating params from root: " +root);}// Create layout params that match root, if suppliedparams = root.generateLayoutParams(attrs);if (!attachToRoot) {// Set the layout params for temp if we are not// attaching. (If we are, we use addView, below)temp.setLayoutParams(params);}}if (DEBUG) {System.out.println("-----> start inflating children");}// Inflate all children under temp against its context.rInflateChildren(parser, temp, attrs, true);if (DEBUG) {System.out.println("-----> done inflating children");}// We are supposed to attach all the views we found (int temp)// to root. Do that now.if (root != null && attachToRoot) {root.addView(temp, params);}// Decide whether to return the root that was passed in or the// top view found in xml.if (root == null || !attachToRoot) {result = temp;}}} catch (XmlPullParserException e) {final InflateException ie = new InflateException(e.getMessage(), e);ie.setStackTrace(EMPTY_STACK_TRACE);throw ie;} catch (Exception e) {final InflateException ie = new InflateException(getParserStateDescription(inflaterContext, attrs)+ ": " + e.getMessage(), e);ie.setStackTrace(EMPTY_STACK_TRACE);throw ie;} finally {// Don't retain static reference on context.mConstructorArgs[0] = lastContext;mConstructorArgs[1] = null;Trace.traceEnd(Trace.TRACE_TAG_VIEW);}return result;}}在这个方法里面,先拿到我们xml的根布局对象,如果是merge的话,直接取merge的子view添加。我们先看一下不是merge会怎么样。
创建根布局View
先执行createViewFromTag方法,这个传入的name是根布局的name,这个方法就是创建布局的根View:
View createViewFromTag(View parent, String name, Context context, AttributeSet attrs,boolean ignoreThemeAttr) {if (name.equals("view")) {name = attrs.getAttributeValue(null, "class");}// Apply a theme wrapper, if allowed and one is specified.if (!ignoreThemeAttr) {final TypedArray ta = context.obtainStyledAttributes(attrs, ATTRS_THEME);final int themeResId = ta.getResourceId(0, 0);if (themeResId != 0) {context = new ContextThemeWrapper(context, themeResId);}ta.recycle();}try {View view = tryCreateView(parent, name, context, attrs);if (view == null) {final Object lastContext = mConstructorArgs[0];mConstructorArgs[0] = context;try {if (-1 == name.indexOf('.')) {view = onCreateView(context, parent, name, attrs);} else {view = createView(context, name, null, attrs);}} finally {mConstructorArgs[0] = lastContext;}}return view;} catch (InflateException e) {throw e;} catch (ClassNotFoundException e) {final InflateException ie = new InflateException(getParserStateDescription(context, attrs)+ ": Error inflating class " + name, e);ie.setStackTrace(EMPTY_STACK_TRACE);throw ie;} catch (Exception e) {final InflateException ie = new InflateException(getParserStateDescription(context, attrs)+ ": Error inflating class " + name, e);ie.setStackTrace(EMPTY_STACK_TRACE);throw ie;}}重点看到这段代码:
if (-1 == name.indexOf('.')) {view = onCreateView(context, parent, name, attrs);} else {view = createView(context, name, null, attrs);}这里分为两种情况了,一种是有点,一种是全路径没有点的。
全路径名称有点(自定义的view)
先看看看有点是什么情况:
public final View createView(@NonNull Context viewContext, @NonNull String name,@Nullable String prefix, @Nullable AttributeSet attrs)throws ClassNotFoundException, InflateException {Objects.requireNonNull(viewContext);Objects.requireNonNull(name);Constructor<? extends View> constructor = sConstructorMap.get(name);if (constructor != null && !verifyClassLoader(constructor)) {constructor = null;sConstructorMap.remove(name);}Class<? extends View> clazz = null;try {Trace.traceBegin(Trace.TRACE_TAG_VIEW, name);if (constructor == null) {// Class not found in the cache, see if it's real, and try to add itclazz = Class.forName(prefix != null ? (prefix + name) : name, false,mContext.getClassLoader()).asSubclass(View.class);if (mFilter != null && clazz != null) {boolean allowed = mFilter.onLoadClass(clazz);if (!allowed) {failNotAllowed(name, prefix, viewContext, attrs);}}constructor = clazz.getConstructor(mConstructorSignature);constructor.setAccessible(true);sConstructorMap.put(name, constructor);} else {// If we have a filter, apply it to cached constructorif (mFilter != null) {// Have we seen this name before?Boolean allowedState = mFilterMap.get(name);if (allowedState == null) {// New class -- remember whether it is allowedclazz = Class.forName(prefix != null ? (prefix + name) : name, false,mContext.getClassLoader()).asSubclass(View.class);boolean allowed = clazz != null && mFilter.onLoadClass(clazz);mFilterMap.put(name, allowed);if (!allowed) {failNotAllowed(name, prefix, viewContext, attrs);}} else if (allowedState.equals(Boolean.FALSE)) {failNotAllowed(name, prefix, viewContext, attrs);}}}Object lastContext = mConstructorArgs[0];mConstructorArgs[0] = viewContext;Object[] args = mConstructorArgs;args[1] = attrs;try {final View view = constructor.newInstance(args);if (view instanceof ViewStub) {// Use the same context when inflating ViewStub later.final ViewStub viewStub = (ViewStub) view;viewStub.setLayoutInflater(cloneInContext((Context) args[0]));}return view;} finally {mConstructorArgs[0] = lastContext;}}......}
可以看到有点的直接反射创建出这个view了。
全路径名称没有点(android系统的view)
再来看看没有点的情况:
public View onCreateView(@NonNull Context viewContext, @Nullable View parent,@NonNull String name, @Nullable AttributeSet attrs)throws ClassNotFoundException {return onCreateView(parent, name, attrs);}protected View onCreateView(View parent, String name, AttributeSet attrs)throws ClassNotFoundException {return onCreateView(name, attrs);}实际上LayoutInflater是一个抽象类,它的实现类是PhoneLayoutInflater:
public class PhoneLayoutInflater extends LayoutInflater {private static final String[] sClassPrefixList = {"android.widget.","android.webkit.","android.app."};/*** Instead of instantiating directly, you should retrieve an instance* through {@link Context#getSystemService}** @param context The Context in which in which to find resources and other*                application-specific things.** @see Context#getSystemService*/public PhoneLayoutInflater(Context context) {super(context);}protected PhoneLayoutInflater(LayoutInflater original, Context newContext) {super(original, newContext);}/** Override onCreateView to instantiate names that correspond to thewidgets known to the Widget factory. If we don't find a match,call through to our super class.*/@Override protected View onCreateView(String name, AttributeSet attrs) throws ClassNotFoundException {for (String prefix : sClassPrefixList) {try {View view = createView(name, prefix, attrs);if (view != null) {return view;}} catch (ClassNotFoundException e) {// In this case we want to let the base class take a crack// at it.}}return super.onCreateView(name, attrs);}public LayoutInflater cloneInContext(Context newContext) {return new PhoneLayoutInflater(this, newContext);}
}
所以在LayoutInflater里面调用的两参方法最后会执行PhoneLayoutInflater的两参方法:
@Override protected View onCreateView(String name, AttributeSet attrs) throws ClassNotFoundException {for (String prefix : sClassPrefixList) {try {View view = createView(name, prefix, attrs);if (view != null) {return view;}} catch (ClassNotFoundException e) {// In this case we want to let the base class take a crack// at it.}}return super.onCreateView(name, attrs);}这个方法先进行三个参数的处理,如果这三个参数对不上,会执行super的两参方法,再进行一个参数的处理。实际上是进行了四个参数的处理:
private static final String[] sClassPrefixList = {"android.widget.","android.webkit.","android.app."};protected View onCreateView(String name, AttributeSet attrs)throws ClassNotFoundException {return createView(name, "android.view.", attrs);}从没有点的情况来看,先把全路径给补全了,然后再和有点的情况一样,反射创建出View。
总结
其实创建xml的根布局的时候,如果是全路径名称有点的话,就是我们自己创建的view,比如:
androidx.constraintlayout.widget.ConstraintLayout这个是谷歌自定义的根布局,直接反射创建view就行。
如果在布局文件里面根布局没有点:
LinearLayout这就是android系统自带的根布局,我们无法反射创建它,所以补全全路径后再反射创建就行了。
创建根布局包裹的子View
在inflate的三参重载方法里面,我们通过:
final View temp = createViewFromTag(root, name, inflaterContext, attrs);创建出了根布局view。接下来我们执行下面代码创建子view:
rInflateChildren(parser, temp, attrs, true); void rInflate(XmlPullParser parser, View parent, Context context,AttributeSet attrs, boolean finishInflate) throws XmlPullParserException, IOException {final int depth = parser.getDepth();int type;boolean pendingRequestFocus = false;while (((type = parser.next()) != XmlPullParser.END_TAG ||parser.getDepth() > depth) && type != XmlPullParser.END_DOCUMENT) {if (type != XmlPullParser.START_TAG) {continue;}final String name = parser.getName();if (TAG_REQUEST_FOCUS.equals(name)) {pendingRequestFocus = true;consumeChildElements(parser);} else if (TAG_TAG.equals(name)) {parseViewTag(parser, parent, attrs);} else if (TAG_INCLUDE.equals(name)) {if (parser.getDepth() == 0) {throw new InflateException("<include /> cannot be the root element");}parseInclude(parser, context, parent, attrs);} else if (TAG_MERGE.equals(name)) {throw new InflateException("<merge /> must be the root element");} else {final View view = createViewFromTag(parent, name, context, attrs);final ViewGroup viewGroup = (ViewGroup) parent;final ViewGroup.LayoutParams params = viewGroup.generateLayoutParams(attrs);rInflateChildren(parser, view, attrs, true);viewGroup.addView(view, params);}}if (pendingRequestFocus) {parent.restoreDefaultFocus();}if (finishInflate) {parent.onFinishInflate();}}从这个函数我们可以看到循环解析我们的xml文件,如果是include不能定义在xml的根里面,merge又只能定义在xml的根里面。
这几种情况都除外的话,接下来又是进入和xml根view一样的解析流程了。
二.inflate函数几个参数的作用
根布局是merge
主要文件
R.layout.activity_main:
<LinearLayout xmlns:android="http://schemas.android.com/apk/res/android"xmlns:tools="http://schemas.android.com/tools"android:layout_width="match_parent"android:layout_height="match_parent"android:id="@+id/ll"tools:context=".MainActivity2"><Buttonandroid:id="@+id/button1"android:layout_width="wrap_content"android:layout_height="wrap_content"android:text="Button" /></LinearLayout>R.layout.merge_layout:
<merge xmlns:android="http://schemas.android.com/apk/res/android"android:layout_width="match_parent"android:layout_height="match_parent"><Buttonandroid:id="@+id/button1"android:layout_width="wrap_content"android:layout_height="wrap_content"android:text="Button" /></merge>我在mainActivty里面通过LayoutInflater把R.layout.merge_layout加载到R.layout.activity_main里面。
第一种方式:
//第一种LayoutInflater.from(this).inflate(R.layout.merge_layout, layout, true);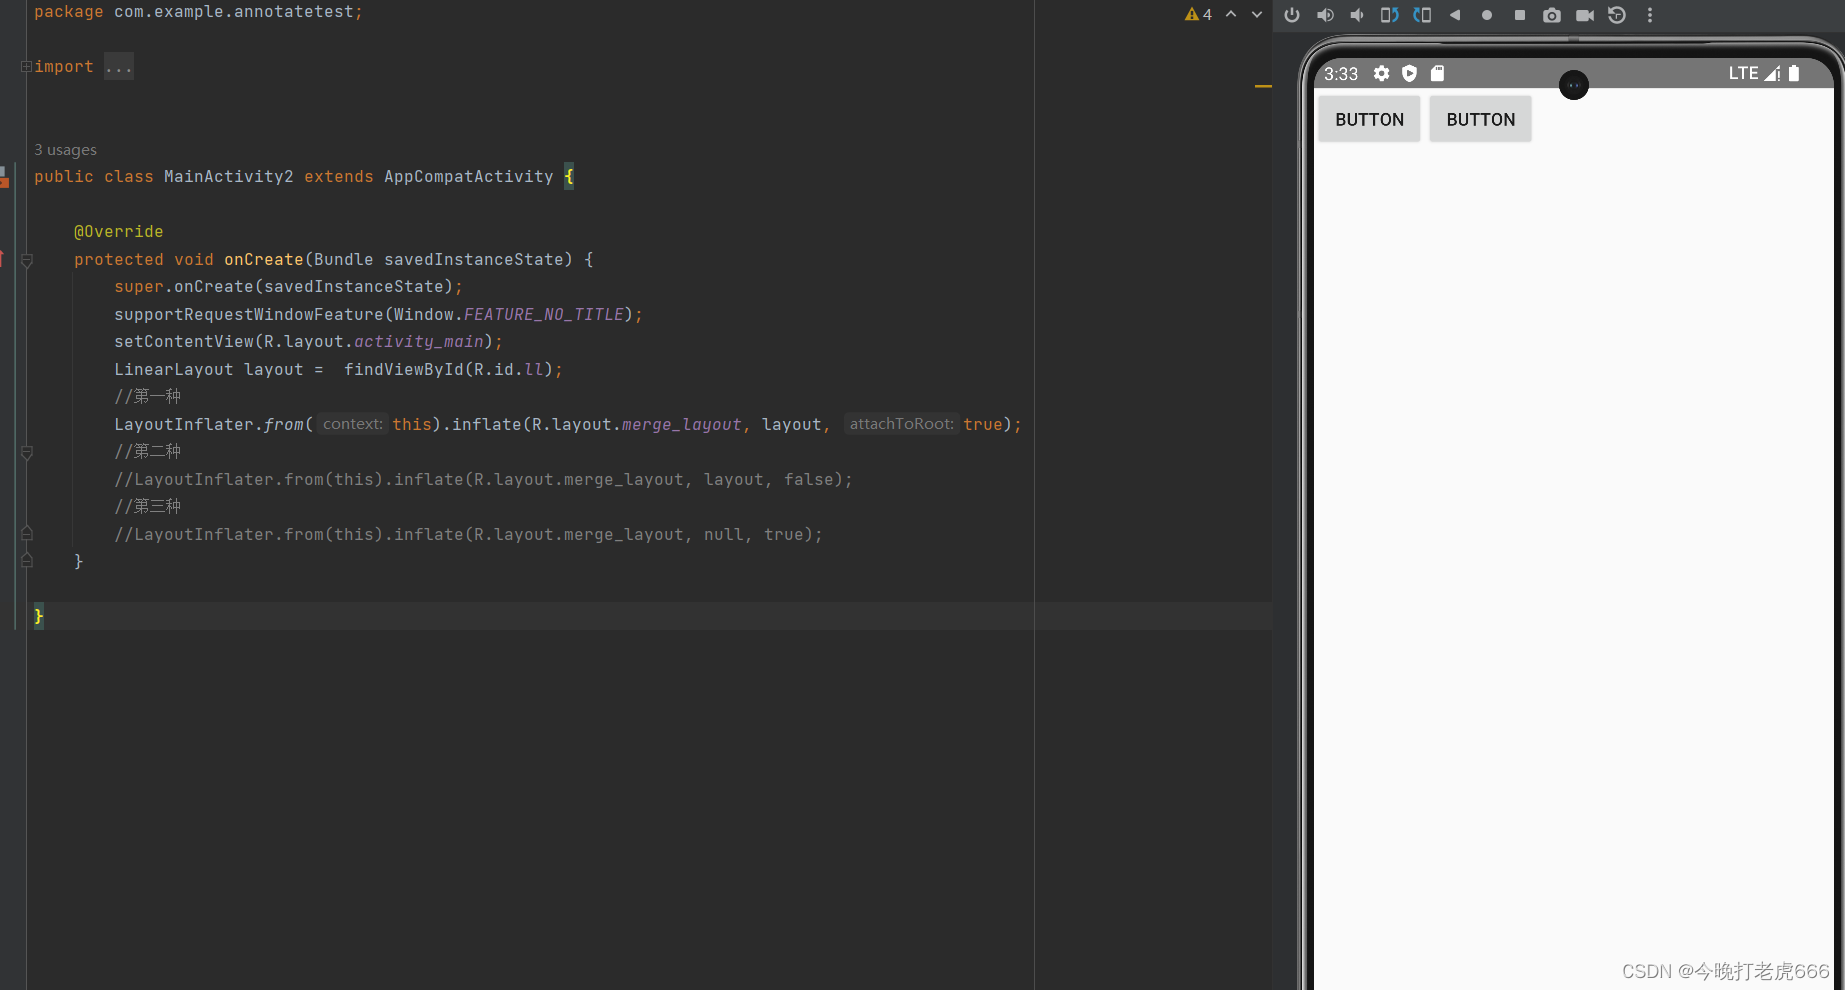
可以看到第一种方式完美加入。
第二种,第三种方式:
//第二种LayoutInflater.from(this).inflate(R.layout.merge_layout, layout, false);
//第三种LayoutInflater.from(this).inflate(R.layout.merge_layout, null, true);
第二种和第三种方式会报错,这是为什么呢?
在inflate的三参构造方法里面:
if (TAG_MERGE.equals(name)) {if (root == null || !attachToRoot) {throw new InflateException("<merge /> can be used only with a valid "+ "ViewGroup root and attachToRoot=true");}rInflate(parser, root, inflaterContext, attrs, false);}如果xml的根布局是merge的话,root为空和attachToRoot是false都会报错。
根布局不是merge
涉及到inflate的参数的几处地方分别是在下面:
if (root != null) {if (DEBUG) {System.out.println("Creating params from root: " +root);}// Create layout params that match root, if suppliedparams = root.generateLayoutParams(attrs);if (!attachToRoot) {// Set the layout params for temp if we are not// attaching. (If we are, we use addView, below)temp.setLayoutParams(params);}}if (root != null && attachToRoot) {root.addView(temp, params);}if (root == null || !attachToRoot) {result = temp;}这里的root就是我们传入的root,temp是xml的根布局。
R.layout.inflater_activity:
<LinearLayout xmlns:android="http://schemas.android.com/apk/res/android"android:layout_width="match_parent"android:layout_height="match_parent"android:id="@+id/ll"></LinearLayout>R.layout.inflater_layout:
<LinearLayout xmlns:android="http://schemas.android.com/apk/res/android"android:layout_width="200dp"android:layout_height="200dp"android:background="@color/teal_200"><Buttonandroid:layout_gravity="center"android:background="@color/cardview_dark_background"android:layout_width="wrap_content"android:layout_height="wrap_content"/></LinearLayout>第一种方式:
public class InflaterActivity extends AppCompatActivity {@Overrideprotected void onCreate(Bundle savedInstanceState) {super.onCreate(savedInstanceState);supportRequestWindowFeature(Window.FEATURE_NO_TITLE);setContentView(R.layout.inflater_activity);LinearLayout layout = findViewById(R.id.ll);//第一种方式成功添加LayoutInflater.from(this).inflate(R.layout.inflater_layout, layout, true);}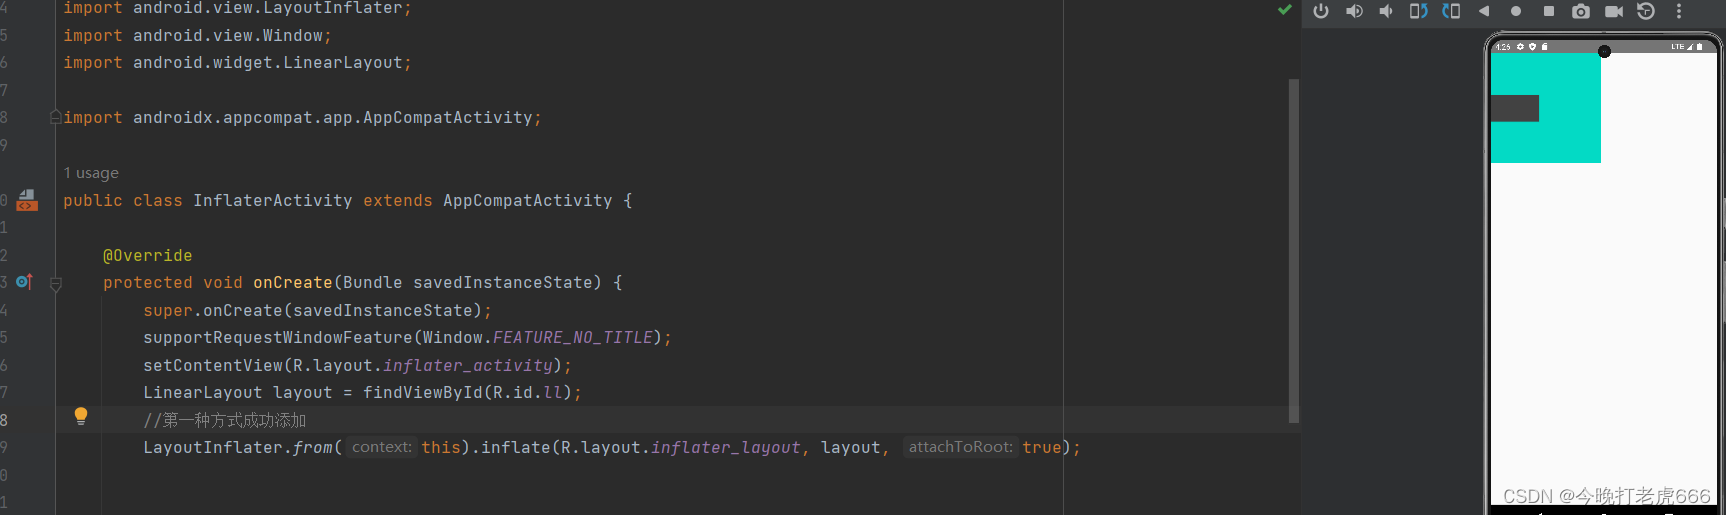 第一种方式成功添加。
第二种方式:
public class InflaterActivity extends AppCompatActivity {@Overrideprotected void onCreate(Bundle savedInstanceState) {super.onCreate(savedInstanceState);supportRequestWindowFeature(Window.FEATURE_NO_TITLE);setContentView(R.layout.inflater_activity);LinearLayout layout = findViewById(R.id.ll);//第一种方式成功添加//LayoutInflater.from(this).inflate(R.layout.inflater_layout, layout, true);//第二种方式,报错The specified child already has a parent. You must call removeView() on the child's parent first.View view = LayoutInflater.from(this).inflate(R.layout.inflater_layout, layout, true);layout.addView(view);}
}
第二种方式会报错,因为root不为空,attachToRoot为true的情况下,会执行:
if (root != null && attachToRoot) {root.addView(temp, params);}第三种方式:
public class InflaterActivity extends AppCompatActivity {@Overrideprotected void onCreate(Bundle savedInstanceState) {super.onCreate(savedInstanceState);supportRequestWindowFeature(Window.FEATURE_NO_TITLE);setContentView(R.layout.inflater_activity);LinearLayout layout = findViewById(R.id.ll);//第一种方式成功添加//LayoutInflater.from(this).inflate(R.layout.inflater_layout, layout, true);//第二种方式,报错The specified child already has a parent. You must call removeView() on the child's parent first.//View view = LayoutInflater.from(this).inflate(R.layout.inflater_layout, layout, true);//layout.addView(view);//第三种方式,布局成功//想让R.layout.inflater_layout的根节点的属性(宽高)有效,又不想让其处于某一个容器里面View view = LayoutInflater.from(this).inflate(R.layout.inflater_layout, layout, false);layout.addView(view);}
}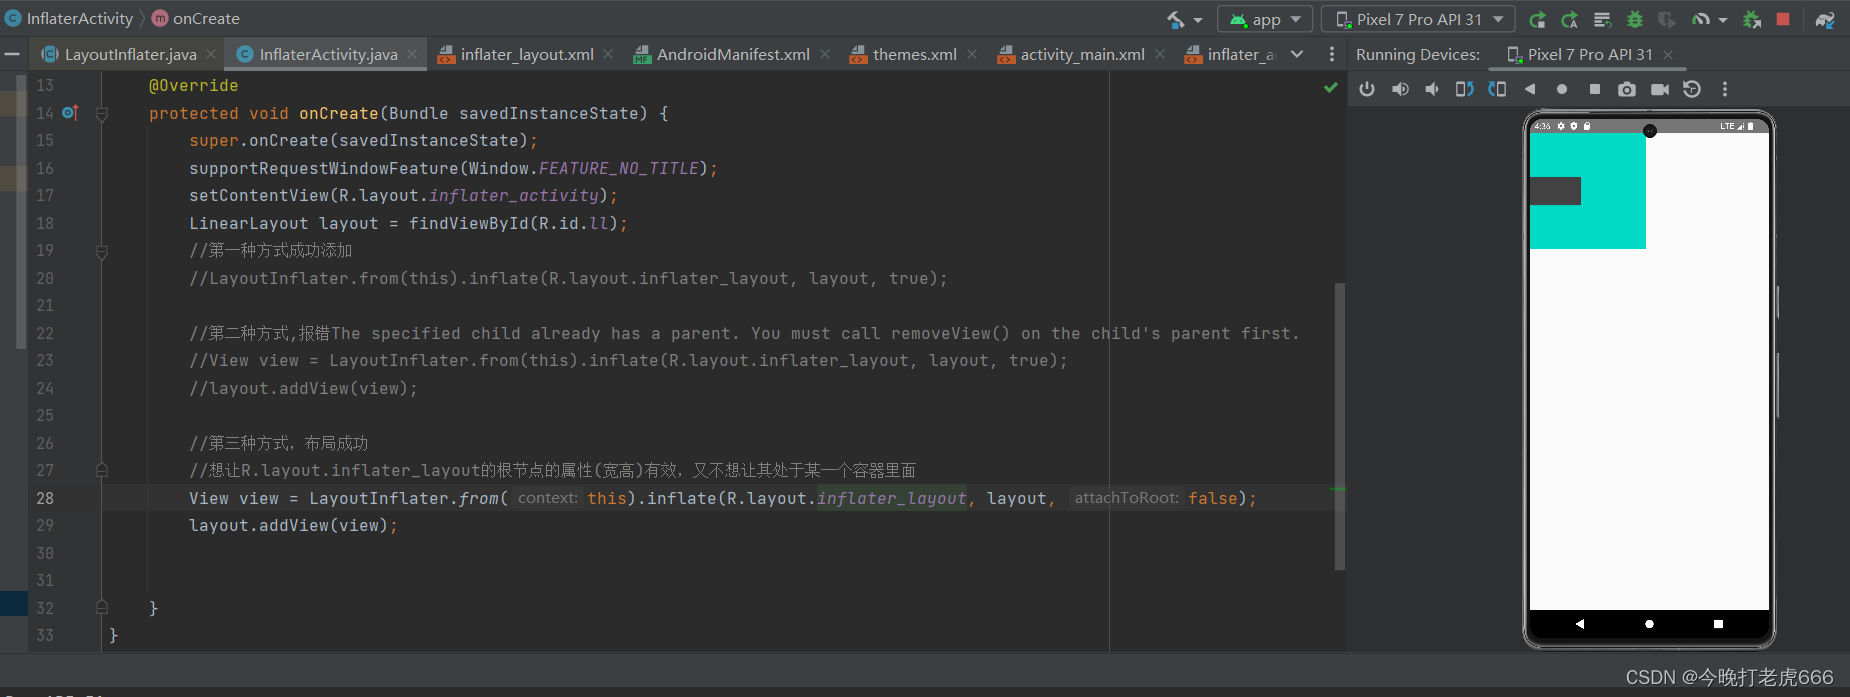
第三种方式布局有效,会执行:
if (root != null) {// Create layout params that match root, if suppliedparams = root.generateLayoutParams(attrs);if (!attachToRoot) {// Set the layout params for temp if we are not// attaching. (If we are, we use addView, below)temp.setLayoutParams(params);}}第四种方式:
public class InflaterActivity extends AppCompatActivity {@Overrideprotected void onCreate(Bundle savedInstanceState) {super.onCreate(savedInstanceState);supportRequestWindowFeature(Window.FEATURE_NO_TITLE);setContentView(R.layout.inflater_activity);LinearLayout layout = findViewById(R.id.ll);//第一种方式成功添加//LayoutInflater.from(this).inflate(R.layout.inflater_layout, layout, true);//第二种方式,报错The specified child already has a parent. You must call removeView() on the child's parent first.//View view = LayoutInflater.from(this).inflate(R.layout.inflater_layout, layout, true);//layout.addView(view);//第三种方式,布局成功//想让R.layout.inflater_layout的根节点的属性(宽高)有效,又不想让其处于某一个容器里面//View view = LayoutInflater.from(this).inflate(R.layout.inflater_layout, layout, false);//layout.addView(view);//第四种方式,布局成功//root为空的时候,不管第三个参数是什么,效果都是一样的//R.layout.inflater_layout根布局的宽高失效,只是包裹子View//但是子View(button)有效,因为Button是在容器下的View view = LayoutInflater.from(this).inflate(R.layout.inflater_layout, null, false);layout.addView(view);}
}
总结:
当xml的根布局是merge的话,添加到root里面。三个参数必须都填且最后一个参数是true。
当xml的根布局不是merge的话:
当root为空时,不管第三个参数是true还是false,xml的根布局的宽高都无效,且需要手动addView到root里面;
当root不为空时,第三个参数为true的话,xml根布局宽高有效,且自动帮我们添加到root里面;第三个参数为false的话,xml根布局宽高有效,需要我们手动addView到root里面。
三.标签特性
merge
1.优化布局,使用merge减少一次循环解析
2.必须用作更布局
include
1.如果include的标签设置了id,findViewById去查找通过include标签映入的xml的根布局的id是找不到的,会被include的标签的id给覆盖
2.不能用作根布局
ViewStub
1.与include差不多
2.viewStub构造函数里面会隐藏viewStub,具有懒加载作用
(在调用inflate()或者setVisibility()时,ViewStub才会加载真正的布局资源并在控件层级结构中替换为真正的控件,同时ViewStub从控件层级结构中移除,这是“懒加载”的核心思想)
这篇关于inflate流程分析的文章就介绍到这儿,希望我们推荐的文章对编程师们有所帮助!


