本文主要是介绍【VTKExamples::Visualization】第二期 TestAssignCellColorsFromLUT,希望对大家解决编程问题提供一定的参考价值,需要的开发者们随着小编来一起学习吧!
很高兴在雪易的CSDN遇见你
VTK技术爱好者 QQ:870202403
前言
本文分享vtkPolyData渲染时如何为每个Cell指定一个颜色,希望对各位小伙伴有所帮助!
感谢各位小伙伴的点赞+关注,小易会继续努力分享,一起进步!
你的点赞就是我的动力(^U^)ノ~YO
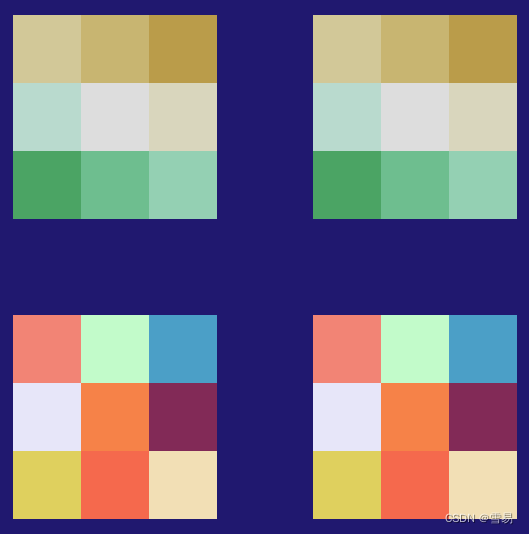
1. 指定Cell颜色

void ztInteractionApplication::MakeLUT(size_t const& tableSize, vtkLookupTable* lut)
{vtkSmartPointer<vtkNamedColors> nc = vtkSmartPointer<vtkNamedColors>::New();lut->SetNumberOfTableValues(static_cast<vtkIdType>(tableSize));lut->Build();// Fill in a few known colors, the rest will be generated if neededlut->SetTableValue(0, nc->GetColor4d("Black").GetData());lut->SetTableValue(1, nc->GetColor4d("Banana").GetData());lut->SetTableValue(2, nc->GetColor4d("Tomato").GetData());lut->SetTableValue(3, nc->GetColor4d("Wheat").GetData());lut->SetTableValue(4, nc->GetColor4d("Lavender").GetData());lut->SetTableValue(5, nc->GetColor4d("Flesh").GetData());lut->SetTableValue(6, nc->GetColor4d("Raspberry").GetData());lut->SetTableValue(7, nc->GetColor4d("Salmon").GetData());lut->SetTableValue(8, nc->GetColor4d("Mint").GetData());lut->SetTableValue(9, nc->GetColor4d("Peacock").GetData());
}//! Use a color transfer Function to generate the colors in the lookup table.
void ztInteractionApplication::MakeLUTFromCTF(size_t const& tableSize, vtkLookupTable* lut)
{vtkSmartPointer<vtkColorTransferFunction> ctf =vtkSmartPointer<vtkColorTransferFunction>::New();ctf->SetColorSpaceToDiverging();// Green to tan.ctf->AddRGBPoint(0.0, 0.085, 0.532, 0.201);ctf->AddRGBPoint(0.5, 0.865, 0.865, 0.865);ctf->AddRGBPoint(1.0, 0.677, 0.492, 0.093);lut->SetNumberOfTableValues(static_cast<vtkIdType>(tableSize));lut->Build();for (size_t i = 0; i < tableSize; ++i){double* rgb;rgb = ctf->GetColor(static_cast<double>(i) / tableSize);lut->SetTableValue(static_cast<vtkIdType>(i), rgb);}
}//! Create the cell data using the colors from the lookup table.
void ztInteractionApplication::MakeCellData(size_t const& tableSize, vtkLookupTable* lut, vtkUnsignedCharArray* colors)
{for (size_t i = 1; i < tableSize; i++){double rgb[3];unsigned char ucrgb[3];// Get the interpolated color.// Of course you can use any function whose range is [0...1]// to get the required color and assign it to a cell Id.// In this case we are just using the cell (Id + 1)/(tableSize - 1)// to get the interpolated color.lut->GetColor(static_cast<double>(i) / (tableSize - 1), rgb);for (size_t j = 0; j < 3; ++j){ucrgb[j] = static_cast<unsigned char>(rgb[j] * 255);}colors->InsertNextTuple3(ucrgb[0], ucrgb[1], ucrgb[2]);// Print out what we have.std::cout << "(";PrintColour<double[3]>(rgb);std::cout << ") (";PrintColour<unsigned char[3]>(ucrgb);std::cout << ")" << std::endl;}
}template <typename T>
void ztInteractionApplication::PrintColour(T& rgb)
{// Don't do this in real code! Range checking etc. is needed.for (size_t i = 0; i < 3; ++i){if (i < 2){std::cout << static_cast<double>(rgb[i]) << " ";}else{std::cout << static_cast<double>(rgb[i]);}}
}void ztInteractionApplication::on_assignCellColorsFromLUTAct_triggered()
{vtkSmartPointer<vtkNamedColors> nc = vtkSmartPointer<vtkNamedColors>::New();// Provide some geometryint resolution = 3;vtkSmartPointer<vtkPlaneSource> plane11 =vtkSmartPointer<vtkPlaneSource>::New();plane11->SetXResolution(resolution);plane11->SetYResolution(resolution);vtkSmartPointer<vtkPlaneSource> plane12 =vtkSmartPointer<vtkPlaneSource>::New();plane12->SetXResolution(resolution);plane12->SetYResolution(resolution);// Create a lookup table to map cell data to colorsvtkSmartPointer<vtkLookupTable> lut1 = vtkSmartPointer<vtkLookupTable>::New();vtkSmartPointer<vtkLookupTable> lut2 = vtkSmartPointer<vtkLookupTable>::New();int tableSize = std::max(resolution * resolution + 1, 10);// Force an update so we can set cell dataplane11->Update();plane12->Update();MakeLUT(tableSize, lut1);MakeLUTFromCTF(tableSize, lut2);vtkSmartPointer<vtkUnsignedCharArray> colorData1 =vtkSmartPointer<vtkUnsignedCharArray>::New();colorData1->SetName("colors"); // Any name will work here.colorData1->SetNumberOfComponents(3);std::cout << "Using a lookup table from a set of named colors." << std::endl;MakeCellData(tableSize, lut1, colorData1);// Then use SetScalars() to add it to the vtkPolyData structure,// this will then be interpreted as a color table.plane11->GetOutput()->GetCellData()->SetScalars(colorData1);vtkSmartPointer<vtkUnsignedCharArray> colorData2 =vtkSmartPointer<vtkUnsignedCharArray>::New();colorData2->SetName("colors");colorData2->SetNumberOfComponents(3);std::cout << "Using a lookup table created from a color transfer function."<< std::endl;MakeCellData(tableSize, lut2, colorData2);plane12->GetOutput()->GetCellData()->SetScalars(colorData2);// Setup actor and mappervtkSmartPointer<vtkPolyDataMapper> mapper11 =vtkSmartPointer<vtkPolyDataMapper>::New();mapper11->SetInputConnection(plane11->GetOutputPort());// Now, instead of doing this:// mapper11->SetScalarRange(0, tableSize - 1);// mapper11->SetLookupTable(lut1);// We can just use the color data that we created from the lookup table and// assigned to the cells:mapper11->SetScalarModeToUseCellData();mapper11->Update();vtkSmartPointer<vtkPolyDataMapper> mapper12 =vtkSmartPointer<vtkPolyDataMapper>::New();mapper12->SetInputConnection(plane12->GetOutputPort());mapper12->SetScalarModeToUseCellData();mapper12->Update();vtkSmartPointer<vtkXMLPolyDataWriter> writer =vtkSmartPointer<vtkXMLPolyDataWriter>::New();writer->SetFileName("pdlut.vtp");writer->SetInputData(mapper11->GetInput());// This is set so we can see the data in a text editor.writer->SetDataModeToAscii();writer->Write();writer->SetFileName("pdctf.vtp");writer->SetInputData(mapper12->GetInput());writer->Write();vtkSmartPointer<vtkActor> actor11 = vtkSmartPointer<vtkActor>::New();actor11->SetMapper(mapper11);vtkSmartPointer<vtkActor> actor12 = vtkSmartPointer<vtkActor>::New();actor12->SetMapper(mapper12);// Let's read in the data we wrote out.vtkSmartPointer<vtkXMLPolyDataReader> reader1 =vtkSmartPointer<vtkXMLPolyDataReader>::New();reader1->SetFileName("pdlut.vtp");vtkSmartPointer<vtkXMLPolyDataReader> reader2 =vtkSmartPointer<vtkXMLPolyDataReader>::New();reader2->SetFileName("pdctf.vtp");vtkSmartPointer<vtkPolyDataMapper> mapper21 =vtkSmartPointer<vtkPolyDataMapper>::New();mapper21->SetInputConnection(reader1->GetOutputPort());mapper21->SetScalarModeToUseCellData();mapper21->Update();vtkSmartPointer<vtkActor> actor21 = vtkSmartPointer<vtkActor>::New();actor21->SetMapper(mapper11);vtkSmartPointer<vtkPolyDataMapper> mapper22 =vtkSmartPointer<vtkPolyDataMapper>::New();mapper22->SetInputConnection(reader2->GetOutputPort());mapper22->SetScalarModeToUseCellData();mapper22->Update();vtkSmartPointer<vtkActor> actor22 = vtkSmartPointer<vtkActor>::New();actor22->SetMapper(mapper22);// Define viewport ranges.// (xmin, ymin, xmax, ymax)double viewport11[4] = { 0.0, 0.0, 0.5, 0.5 };double viewport12[4] = { 0.0, 0.5, 0.5, 1.0 };double viewport21[4] = { 0.5, 0.0, 1.0, 0.5 };double viewport22[4] = { 0.5, 0.5, 1.0, 1.0 };// Set up the renderers.vtkSmartPointer<vtkRenderer> ren11 = vtkSmartPointer<vtkRenderer>::New();vtkSmartPointer<vtkRenderer> ren12 = vtkSmartPointer<vtkRenderer>::New();vtkSmartPointer<vtkRenderer> ren21 = vtkSmartPointer<vtkRenderer>::New();vtkSmartPointer<vtkRenderer> ren22 = vtkSmartPointer<vtkRenderer>::New();// Setup the render windowsvtkSmartPointer<vtkRenderWindow> renWin =vtkSmartPointer<vtkRenderWindow>::New();renWin->SetSize(600, 600);renWin->AddRenderer(ren11);renWin->AddRenderer(ren12);renWin->AddRenderer(ren21);renWin->AddRenderer(ren22);ren11->SetViewport(viewport11);ren12->SetViewport(viewport12);ren21->SetViewport(viewport21);ren22->SetViewport(viewport22);ren11->SetBackground(nc->GetColor3d("MidnightBlue").GetData());ren12->SetBackground(nc->GetColor3d("MidnightBlue").GetData());ren21->SetBackground(nc->GetColor3d("MidnightBlue").GetData());ren22->SetBackground(nc->GetColor3d("MidnightBlue").GetData());ren11->AddActor(actor11);ren12->AddActor(actor12);ren21->AddActor(actor21);ren22->AddActor(actor22);vtkSmartPointer<vtkRenderWindowInteractor> iren =vtkSmartPointer<vtkRenderWindowInteractor>::New();iren->SetRenderWindow(renWin);renWin->Render();iren->Start();
}
结论:
感谢各位小伙伴的点赞+关注,小易会继续努力分享,一起进步!
你的赞赏是我的最最最最大的动力(^U^)ノ~YO

这篇关于【VTKExamples::Visualization】第二期 TestAssignCellColorsFromLUT的文章就介绍到这儿,希望我们推荐的文章对编程师们有所帮助!