本文主要是介绍2023年 beagle bone black教程3-点灯的三种方式,希望对大家解决编程问题提供一定的参考价值,需要的开发者们随着小编来一起学习吧!
beagle bone black点灯的三种方式
- 1 基于上下拉的点灯
- 1.1 终端控制
- 1.2 代码控制
- 2 基于电平控制的点灯
- 2.1 认识引脚
- 2.2 编程控制
- 3 基于PWM的控制
- 3.1 PWM引脚定义
- 3.2 终端控制
- 3.3 编程控制
1 基于上下拉的点灯
1.1 终端控制
在linxu中,为了控制引脚输出,我们需要各种初始化,比较麻烦。侯然想了一种方法:引脚是可以配置为上拉或下拉的,这样在默认的时候,它便输出高低电平。这样一句话就搞定。
引脚配置语句:
config-pin <pin> <filename> #配置引脚为对应filename的功能
config-pin -l <pin># 查询引脚支持的模式
config-pin -q <pin> #查看引脚目前配置模式
我们随便取一个引脚为:p9.14,先查询引脚当前模式和可以设置的模式
config-pin -q p9.14
config-pin  -l  p9.14

当前模式:默认 可以配置的模式:gpio_pu(上拉) / gpio_pu(下拉)
因此,我们将其配置为上拉,它就默认是高电平了。
sudo config-pin p9.14 gpio_pu
同理,我们将其配置为下拉,它就默认是低电平了。
sudo config-pin p9.14 gpio_pd
拿万用变测试一下确实ok。
1.2 代码控制
代码如下:
#include <stdio.h>
#include <stdlib.h>
#include <stdbool.h>
#include <unistd.h>void led_on(void)
{system("config-pin p9.14 gpio_pd");
}void led_off(void)
{system("config-pin p9.14 gpio_pu");
}void main(void)
{while(1){sleep(1);led_on();sleep(1);led_off();}
}
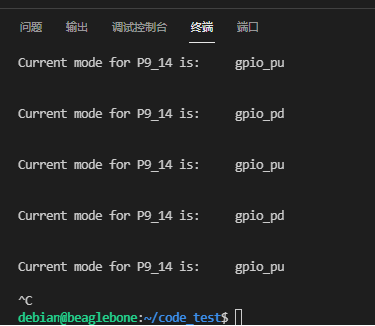
实际观察确实ok,就是终端一直输出如下数据,比较烦人

2 基于电平控制的点灯
2.1 认识引脚
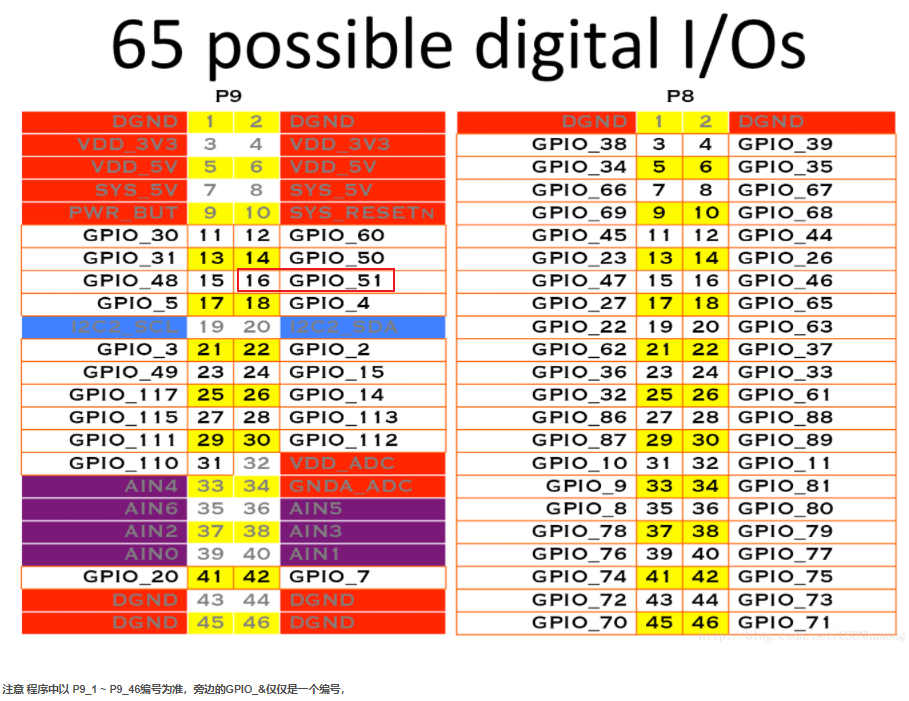
老实讲,网上的beaglebone black的引脚图很多,但是!!!你得知道哪个是对的。
 我们使用P9.16 作为led进行控制。它是GPIO_51。
首先我们先将引脚模式配置为gpio( gpio_pu 或者gpio_pd都行,就是默认上拉还是下拉)
config-pin p9.16 gpio_pu
其次,到gpio类中进行实现。
cd /sys/class/gpio/
echo 51 > export #变成用户可用的状态
cd gpio51
echo out > direction
echo 1 > value //高电平echo 0 > value //低电平
观察没有问题。
2.2 编程控制
我这里用了三个引脚进行操作,其中两个LED,一个蜂鸣器。
| 引脚 | 编号 | 用途 |
|---|---|---|
| P9.14 | gpio50 | LED0 |
| P9.16 | gpio51 | LED1 |
| P8.19 | gpio22 | BEEP |
你要问我这LED和蜂鸣器哪里来的? 我在板子上外接的。你们没有就用万用表去测也行,就是不那么直观…
控制LED和蜂鸣器每过一段时间亮/响一下,代码如下:
#include <stdio.h>
#include <stdlib.h>
#include <sys/types.h>
#include <sys/stat.h>
#include <fcntl.h>
#include <unistd.h>
#include <string.h>char export_path[]="/sys/class/gpio";
char led0_path[]="/sys/class/gpio/gpio50";
char led1_path[]="/sys/class/gpio/gpio51";
char beep_path[]="/sys/class/gpio/gpio22";#define led0_on()  file_config(led0_path,"value","0")
#define led0_off() file_config(led0_path,"value","1")
#define led1_on()  file_config(led1_path,"value","0")
#define led1_off() file_config(led1_path,"value","1")
#define beep_on()  file_config(beep_path,"value","0")
#define beep_off() file_config(beep_path,"value","1")static void  file_config(char* path,char* file,const char* val)
{char file_path[100];//文件路径 = 文件夹路径 + 文件名sprintf(file_path,"%s/%s",path,file);int fd = open(file_path, O_WRONLY);int len=strlen(val);if (len != write(fd, val,len)) {perror("write error");printf("%s\r\n",file_path);}close(fd); //关闭文件}int main(void)
{printf("hello\r\n");int ret;system("config-pin p9.14 gpio_pu");//led0 默认不亮system("config-pin p9.16 gpio_pu");//led1 默认不亮system("config-pin p8.19 gpio_pd");//beep 默认不响if(access(led0_path,F_OK)==-1)判断不存在file_config(export_path,"export","50");if(access(led1_path,F_OK)==-1)file_config(export_path,"export","51");if(access(beep_path,F_OK)==-1)file_config(beep_path,"export","22");file_config(led0_path,"direction","out");file_config(led1_path,"direction","out");file_config(beep_path,"direction","out");led1_off();while(1){led0_off();sleep(1); led0_on();sleep(1);     }return 0;}
3 基于PWM的控制
3.1 PWM引脚定义
上边的控制方式是比较通用的,但是偶尔也会出现bug,比如没有操作权限。但是使用PWM就不会有该问题,因为只需要往里面输入数据就行。
本人所使用的镜像为2020年的debian 10.3,且为flash版本。
引脚定义为:
| 9.14 | pwm4 :0 |
|---|---|
| 9.16 | pwm4:1 |
查看pwm引脚定义:bb.org-overlays/cape-unversal-pwm.txt at master · beagleboard/bb.org-overlays (github.com)
不管版本如何,我们都可以使用以下指令查看引脚属于哪个pwm
使用以下指令查看引脚属于哪个pwm
#P9.21/P9.22
#ls -lh /sys/devices/platform/ocp/48300000.epwmss/48300200.pwm/pwm/#P9.14/P9.16
#ls -lh /sys/devices/platform/ocp/48302000.epwmss/48302200.pwm/pwm/
我们查看p9.14

如图,说明p9.14 和p9.16是属于pwmchip4 。至于具体哪个是4.0 和4.1 需要测试一下。
3.2 终端控制
首先,查询引脚现在模式以及可以配置的模式
config-pin -l p9.14config-pin -l p9.16config-pin -q p9.14config-pin -q p9.16

可以看到,现在模式为gpio_pu(这是是啥都不重要) 以及可以配置的模式(包括pwm)。
将引脚配置为pwm模式
config-pin   p9.14 pwm
config-pin   p9.16 pwm

PWM接口已经配置好了!
进入pwm对应的类文件夹中。
cd /sys/class/pwm/
ls

可以看到pwm4:0和pwm4:1 已经被系统导出,就不需要我们导出了。可以直接操作对应功能了。
cd pwm-4:0
ls

这里只需要关注几个参数
| 参数 | 说明 |
|---|---|
| period | 一个周期的总时间大小 |
| duty_cycle | 周期里有效输出的时间 |
| enable | 使能 |
| polarity | 输出极性 0:有效输出为高电平(默认) 1:有效输出为高电平 |
假如说,我们要输出50%的占空比。可以将period设置为100,duty_cycle设置为50,enable=1
echo 100 > peroid
echo 50 > duty_cycle
echo 1 > enable
然后外部可以使用万用表去测电压(将是50%)。
3.3 编程控制
#include <stdio.h>
#include <stdlib.h>
#include <sys/types.h>
#include <sys/stat.h>
#include <fcntl.h>
#include <unistd.h>
#include <string.h>char export_path[]="/sys/class/pwm/pwmchip4";
char led0_path[]="/sys/class/pwm/pwm-4:0";
char led1_path[]="/sys/class/pwm/pwm-4:1";#define led0_on()  file_config(led0_path,"duty_cycle","100")
#define led0_off() file_config(led0_path,"duty_cycle","0")static void  file_config(char* path,char* file,const char* val)
{char file_path[100];//文件路径 = 文件夹路径 + 文件名sprintf(file_path,"%s/%s",path,file);int fd = open(file_path, O_WRONLY);int len=strlen(val);if (len != write(fd, val,len)) {perror("write error");printf("%s\r\n",file_path);}close(fd); //关闭文件
}void led0_set(int val)
{char temp[10];sprintf(temp,"%d",val);file_config(led0_path,"duty_cycle",temp);
}
void led1_set(int val)
{char temp[10];sprintf(temp,"%d",val);file_config(led1_path,"duty_cycle",temp);
}int main(void)
{printf("hello\r\n");int ret;system("config-pin p9.14 pwm");//led0 system("config-pin p9.16 pwm");//led1 if(access(led0_path,F_OK)==-1)判断不存在file_config(export_path,"export","0");if(access(led1_path,F_OK)==-1)file_config(export_path,"export","1");file_config(led0_path,"period","100");file_config(led1_path,"period","100");file_config(led0_path,"duty_cycle","100");//默认100%高电平file_config(led1_path,"duty_cycle","100");file_config(led0_path,"enable","1");//使能file_config(led1_path,"enable","1");while(1){static int a=0;a=a+5;led0_set(a);led1_set(a);sleep(1); if(a==50) a=0;}return 0;
}
个人在外部连接了两个led,这两个引脚的电平,从0%增加到50%。不停往复。
gcc -o pwm pwm.c
./pwm
用pwm的好处是,执行不需要sudo权限。上边的gpio操作不给容易出问题。
另外,添加了一个蜂鸣器P8.19:pwm7.9
#include <stdio.h>
#include <stdlib.h>
#include <sys/types.h>
#include <sys/stat.h>
#include <fcntl.h>
#include <unistd.h>
#include <string.h>
#include <stdbool.h>
char export_path[]="/sys/class/pwm/pwmchip4";
char led0_path[]="/sys/class/pwm/pwm-4:0";
char led1_path[]="/sys/class/pwm/pwm-4:1";
char beep_path[]="/sys/class/pwm/pwm-7:0";#define led0_on()  file_config(led0_path,"duty_cycle","100")
#define led0_off() file_config(led0_path,"duty_cycle","0")#define beep_on()  file_config(beep_path,"duty_cycle","100")
#define beep_off() file_config(beep_path,"duty_cycle","0")static void  file_config(char* path,char* file,const char* val)
{char file_path[100];//文件路径 = 文件夹路径 + 文件名sprintf(file_path,"%s/%s",path,file);int fd = open(file_path, O_WRONLY);int len=strlen(val);if (len != write(fd, val,len)) {perror("write error");printf("%s\r\n",file_path);}close(fd); //关闭文件
}void led0_set(int val)
{char temp[10];sprintf(temp,"%d",val);file_config(led0_path,"duty_cycle",temp);
}
void led1_set(int val)
{char temp[10];sprintf(temp,"%d",val);file_config(led1_path,"duty_cycle",temp);
}int main(void)
{printf("hello\r\n");int ret;system("config-pin p9.14 pwm");//led0 system("config-pin p9.16 pwm");//led1 system("config-pin p8.19 pwm");//beepif(access(led0_path,F_OK)==-1)判断不存在file_config(export_path,"export","0");if(access(led1_path,F_OK)==-1)file_config(export_path,"export","1");file_config(led0_path,"period","100");file_config(led1_path,"period","100");file_config(beep_path,"period","100");file_config(led0_path,"duty_cycle","100");//默认100%高电平file_config(led1_path,"duty_cycle","100");file_config(beep_path,"duty_cycle","0");  file_config(led0_path,"enable","1");//使能file_config(led1_path,"enable","1");file_config(beep_path,"enable","1");while(1){static int a=0;static bool b=true;a=a+5;led0_set(a);led1_set(a);if(b)beep_on();else beep_off(); b=!b;sleep(1); if(a==50) a=0;}return 0;
}
蜂鸣器将隔1s响一次。
这篇关于2023年 beagle bone black教程3-点灯的三种方式的文章就介绍到这儿,希望我们推荐的文章对编程师们有所帮助!


